Orange Drink

INGREDIENTS

  • Two oranges
  • Potato Peeler
  • 1 TBL Karo Syrup
  • Blender
  • Strainer

STEP BY STEP

  1. Peel the orange off an orange, but leave the white pith.
  2. Cut up and remove as many seeds as possible, but not necessary to get them all, since we will be straining it.
  3. Add 1 Tablespoon of Karo syrup
  4. Put into a blender, and then run through a food mill or strainer
  5. Serve over ice

Croissants

Here is a link to a recipe from AllRecipes.com

It is a bit quicker than the following recipe, so I am linking to their page as well.

http://www.allrecipes.com/recipe/6916/croissants/

#############

Here is another recipe

  1. Combine the following ingredients
    • 3 3/4 AP flour
    • 2 tsp salt
    • 1/3 C sugar
    • 2 TBL yeast
  2. Blend dry ingredients, and drizzle in 1 cup cold milk
  3. 1 C milk – more if required for flour to start pulling into a ball
  4. Wrap dough ball in plastic wrap
    Let rest at room temperature for 60 minutes,
    Then refrigerate overnight (at least 8 hours)
  5. Flatten out to about 1/2 inch thickness
  6. Five sticks of butter – Wrap butter in plastic and beat with rolling pin till flattened and one large sheet
  7. Refrigerate the butter, along with the dough, overnight
  8. Next morning, roll the flour into a square
  9. Flatten the cold butter to cover half of the square
  10. Fold sides of dough in
    – stretch if necessary to cover butter (1 butter layer)
  11. Flatten the “dough sandwich” till it is about twice its current size
  12. Fold in thirds, and pound to flatten again (3 layers)
  13. Use pastry brush to remove excess flour
  14. Fold in thirds the other way, and pound to flatten (9 layers)
  15. Use pastry brush to remove excess flour
  16. Fold in thirds, the other way, but don’t pound yet (27 layers)
  17. Wrap in plastic, and refrigerate  for one hour
  18. Remove from fridge, and pound to flatten
  19. Fold in thirds again, and pound to flatten  (82 layers)
  20. Fold in thirds again, but do not pound yet (243 layers)
  21. Wrap in plastic, and refrigerate for another hour
  22. Remove from fridge, and pound to flatten
  23. Fold in thirds again, and pound to flatten  (729 layers)
  24. Roll out flat into a square approx 20 x 15 inches
  25. Using a pizza cutter, cut the square in half to make two 10 x 15 pieces
  26. Cut the 10 x 15 pieces into 5 x 5 squares
  27. Cut at an angle across the points of each square, to make a crosshatch with the outside edge being about 5 inches wide and the point being 5 inches high
  28. Stretch gently to make a triangle about 5 x 20 inches
  29. Roll the triangle up, starting with the wide end, and ending at the point
  30. Put on a baking sheet leaving space between each piece
  31. Brush with egg wash (1 egg plus 1 tsp water plus 1/2 tsp salt)
  32. Let rise about three hours
  33. Preheat oven to 40 and bake 12-15 minutes, rotating at the 10 minute mark


Huevos Salsa Martajada

  1. Roast tomato, onion and poblano pepper at 450º for 20-30 minutes
  2. Peel tomato and pepper
  3. Pulse half the roasted vegetables in a food processor very briefly with a bit of salt
  4. Put pulsed veggies into a skillet and add the other half of the roasted veggies
  5. Simmer 10 minutes
  6. Meanwhile, scramble 6-12 eggs so that they are still glistening (very soft scrambled)
  7. Put the eggs into the salsa and mix just slightly
  8. Serve with some sort of soft bread

Tips: Tires – What you need to know

OK, so this is not a recipe, but like I said… this site is mainly for my use.

You should replace your tires at least every six years whether they are worn or not.  They degrade. Even if there’s plenty of tread left, tires should be replaced if they’re too old.  Over time, the rubber will dry and crack, possibly leading to a blowout or flat tire.

You can tell the manufacture date of your tire by looking on the side.  There will be DOT followed by four numbers  (eg) DOT and then eventually 1418.  This means they were manufactured during the 14th week of 2018  which is about mid April 2018.


Cheese Bread

Robert’s Cheese Bread

This uses a sour dough sponge for an extra twang

  • 3/4 C sourdough sponge
  • 1 C bread flour
  • 2 TBL potato flakes
  • 1/2 tsp salt
  • 1 TBL yeast
  • 1/2 C buttermilk
  • 1 TBL sugar
  • 1 egg yolk
  • 2 TBL softened butter
  1. Mix all ingredients in a Kitchen Aid
  2. Scrape down sides trying to get the contents to ball together
  3. Add bits of water and flour as necessary to promote formation of a ball
  4. After ball forms, mix 5-7 more minutes
  5. Put in covered glass bowl to rise 60 minutes
  6. Turn out onto floured surface
  7. Press flat, then fold together 4-5-6-7-8 times, adding grated cheddar at each fold.  Repeat until it starts to be springy
  8. You can substitute on Step 7 with onion, black olive, etc.
  9. Form into two loaves and put into a greased bread pan
  10. Spray top with oil, then cover and let rise 120 minutes
  11. Put into preheated oven to 425º
  12. Close door and immediately turn down to 350º
  13. Bake 20 minutes – If you have an internal temperature probe, cook until internal temp should be at least 190º but not over 205º
  14. Let cool 30 minutes before slicing or wrapping

Here is another good recipe

  1. In a mixing bowl, combine
    • 3 C potato starch
    • 2 tsp salt
    • 1/2 tsp baking powder
  2. In a sauce pan, combine and heat
    • 2/3 C milk
    • 1/2 C canola oil
    • 2 TBL butter
  3. Pour hot liquid into the mixing bowl and mix 2-3 minutes
  4. Add 1 large egg, and stir to incorporate
  5. Add another egg, and stir to completely incorporate
  6. While still mixing, add 1 C Parmesan cheese
  7. Continue mixing and add 1 C Romano cheese
  8. Once mixture is completely mixed, wrap in plastic and refrigerate for 2 hours
  9. After mixture has cooled, remove from fridge and cut into 8 pieces
  10. Preheat oven to 450º
  11. Place a baking dish of water in the bottom of your oven
  12. Dampen hands and roll the pieces into balls
  13. Flatten just slightly and brush top with egg wash
    (1 egg, 1 tsp water, 1/4 tsp salt)
  14. Place rolls on silicone mat
  15. Place in preheated oven and immediately lower temperature to 350º
  16. Cook 20 minutes, the rotate pan
  17. Cook another 20-25 minutes

Tamagoyaki – Rolled Egg

Search YouTube for several recipes and techniques.

  1. Beat 1 egg
  2. Put into hot pan with 1 tsp olive oil
  3. OPTION:  Sprinkle as little as possible spinach, chives, etc
  4. As soon as glisten is gone, roll it as small as possible
  5. Push to the side of the pan and add another beaten egg, allowing the liquid egg to run under and adhere to the first
  6. Add your optional ingredients – VERY sparsely
  7. Roll the first egg roll around the second flat and cooked egg, creating a larger roll
  8. Push to the side, and add a third beaten egg, allowing it to flow under the roll
  9. Do not add any extra ingredients this time.
  10. When the bottom is cooked, but the top still has a bit of glisten, roll your log over the third egg – creating one large rolled egg.
  11. Turn out of the pan onto a sheet of waxed paper
  12. Form into a square shape – and let rest about 3 minutes
  13. Unwrap (discard the paper) and cut the ends off.  This will create a nice section in which you can see the layers of rolled egg.
  14. Cut the log in half – creating two pieces
  15. Cut each of the two pieces into thirds – creating a total of six pieces
  16. Plate and garnish with basil, cilantro or chives

Japanese Cooking Ratios

These ratios were presented by Chef Tatsuo Saito from NHK World Dining with the Chef.  Other information has been researched and is presented here.

Base Ingredients

  • Soy provides saltiness with a touch of umami
  • Salt – Both soy and salt work to complete the electrical impulses needed for taste.
  • Mirin (sweet rice wine) provides a complex sweetness
  • Sugar provides a simple sweetness
  • Sake provides depth
    – Sake also removes fishy odors
  • Vinegar is a fermented and distilled liquid that adds layers of flavor.
  • Miso is a paste made from fermented soybeans and barley or rice malt, used in Japanese cooking.  Frequently used for soup.

Taste each individual ingredient so that you can better understand what each ingredient is bringing to the dish.

Teriyaki Sauce

  • 2 parts soy
  • 2 parts sake
  • 3 parts mirin

You can use sugar in place of mirin, but it makes a heavier tasting teriyaki.

Sukiyaki

  • 1 part dashi
  • 2 parts soy
  • 1 part sugar
  • 1 part mirin

Tempura

  • 4 parts dashi
  • 1 part soy
  • 1 part mirin

Ohitashi (spinach)

  • 8 parts dashi
  • 1 part soy
  • 1 part mirin

White Fish

Liquid to simmer fish

  • 3 parts water
  • 1 part soy
  • 3 parts sake
  • 1 part mirin

Hot Soba Soup

  • 10 parts dashi
  • 1 part soy
  • 1 part mirin

The same as Tempura liquid, but with more dashi

Simple Recipe of Rice

  1. Bring 2 parts water (2 C) to a boil.
  2. Add 1 part rice (1 C) and bring back to a boil.
  3. Reduce heat to lowest setting, cover and simmer 10 minutes.
  4. Remove from heat, keeping covered, and let rest another 10 minutes.
  5. Fluff with a fork and serve in very loose clumps.

Dashi

This is an incredibly simple, clear and unassuming broth It forms one of the culinary cornerstones of Japanese cooking.

  • Kombu Dashi is made in about 20 minutes with just three ingredients: water, kombu (dried kelp), and bonito fish flakes. The resulting clear broth tastes like the essence of the sea.
  • Niboshi Dashi uses baby dried sardines in place of the kombu.
  • Shitake Dashi uses Shitake mushrooms in the place of kombu.  It is also not heated to boiling, as that destroys the delicate taste of Shitake.
  • Awase Dashi is essentially Kombu Dashi that after simmering is allowed to sit for awhile to let the flavors leech from the contents.  It has a stronger flavor than Kombu Dashi.

Dashi is used in any Japanese dish that requires liquid for cooking. It’s also found at the heart of the soup broth in various broth-based dishes like nabe (hot pot), shabu shabu, sukiyaki, and oden. Mixed with soybean paste and a few cubes of tofu, dashi makes a flavorful miso soup.

Dashi mixed with a bit of soy sauce, sugar, and mirin (sweet rice wine) can be used to make dipping sauces for fried tempura or chilled noodle dishes like soba buckwheat noodles and udon flour noodles. A greater amount of hot dashi broth can also be added to dipping sauce or broth or a hot noodle soup. In addition to noodles, dashi can be cooked with rice and mushrooms, vegetables, and fish or meat to make takikomi-gohan.

Ohitashi literally means ‘steeped in dashi’ and is a common way of cooking vegetables. Some popular dishes include okra ohitashi, spinach ohitashi and eggplant ohitashi. Nimono, or simmered dishes, using dashi broth are another large part of Japanese home cooking. This includes staples like nikujaga (boiled meat and potatoes), kabocha no nimono (simmered Japanese pumpkin), buri-daikon (braised yellowtail with daikon radish), and buta no kakuni (stewed pork belly). Dashi can also be mixed in with eggs to make dashimaki tamago, a Japanese rolled omelet.

Dried kombu sheets, shiitake mushroom, and bonito flakes can all be purchased separately to make dashi. In addition, commercial dashi concentrate—available in instant powdered granules, liquid concentrate, or pre-made broth pouches—has become incredibly popular in Japan. Look for it in the Asian or international food section of your local supermarket, at Asian grocers, in health food stores, or from specialty vendors online.

Commercial dashi is so convenient and popular in Japan that making dashi from scratch is becoming a bit of a dying art. However, nothing beats the well-rounded flavor of homemade dashi broth, and a simple dashi can be made easily overnight or with a quick 30 minutes of preparation, so it’s worth it to try making dashi from scratch.

Pork Belly Sandwich

Ingredients

  • 3 LB Pork Belly with skin removed
  • 1 C granulated sugar
  • ½ C coarse salt
  • 1 TBL chopped rosemary
  • Juice and zest from one orange – separated
  • Juice and zest from one lemon – separated
  • Juice and zest from two limes – separated

Step by Step

  1. In a large mixing bowl, combine zest with other dry ingredients.
  2. Let rest on counter for 30 minutes.
  3. Pat pork belly dry and cross hatch fat cap.
  4. Rub liberally with dry mixture.
  5. Refrigerate uncovered for 24-48 hours.
    ON ANOTHER DAY…
  6. Preheat oven to 450º
  7. Rinse pork belly under water and remove most of the cure.
  8. Place on a rimmed baking sheet, pat dry, and let air dry 30 minutes.
  9. Put baking sheet into the oven and cook for 20 minutes.
  10. Reduce oven temperature to 250º WITHOUT OPENING DOOR
  11. Cook for another 90 minutes.
  12. Remove and let juices reabsorb for 20 minutes before cutting.

To make your Sandwich, use a high quality sub roll.

  • Toast sub roll slightly – browned edges, but not crispy overall
  • 3 leaves Butter lettuce
  • 2-3 fairly thick slices of the pork belly
  • 1 large Heirloom tomato – sliced thick – about 1/4 inch
  • 2 TBL Deli mustard
  • 1 TBL mayo or Miracle Whip

Philly Cheese Steak

Ingredients

  • Ideally: Shaved Ribeye
    OPTIONAL:  Leftover meat – chopped or shredded
  • 2 TBL butter
  • 2 TBL half and half
  • Dash Tabasco and a bit of Dijon mustard
  • Chives
  • 1/4 C Provolone cheese – shredded
  • 1/4 C Fontina cheese – shreded
  • 1/4 C Gorgonzola – shredded
  • 1 tsp corn starch mixed with shredded cheeses
  • Red Bell Pepper – sauteed
  • Dried French onion rings
  • Garlic salt

Step by Step

  1. Melt butter with Half and Half
  2. Mix in the Tabasco, Dijon and cheeses
  3. Saute bell pepper strips and chives, then set aside
  4. Sear your meat in a hot pan with a little EVOO
  5. Flip and chop
  6. Top with some cheese sauce and  cook to caramelize
  7. Oil or butter a really good sub roll
  8. Toast on your grill or in a hot pan
  9. Drizzle with extra cheese sauce
  10. Top with some of your cooked red bells and french fried onion rings

Real Breakfast Sandwich

This recipe uses a four-inch tefflon skillet or a large muffin ring sprayed with Pam.  You can make these in a six-inch skillet, and then cut the end patty in half, but I have a four-inch tefflon pan, so I use it.

Ingredients per person

  • one egg
  • 2 TBL AP flour (or something like almond flour)
  • 2 TBL yogurt or buttermilk
  • 1 TBL whey powder (optional)

One slice of ham and cheddar cheese per person too.

Step by Step:

  1. Mix together first three ingredients.
  2. Pour half into your small mold, or the entire thing into your larger skillet.
  3. Cook over low heat until fairly set.
  4. Flip the patty and cook the other side.
  5. Top with ham and cheese and any other desired toppings.
  6. Serve like a sandwich.


Green Leaf Wrap

You can use collard greens, iceberg lettuce, bib lettuce or butter lettuce.  It’s simple… prepare your wrap or burrito, but use greens rather than a tortilla.

Blanche the leaves in boiling water, and then ice water – or heat them on a skillet.  Here are a few recipes that would lend themselves to this preparation.

Reuben

Reuben:  Corned beef, horseradish, parsley and bean sprouts.  Fry in butter briefly after wrapping.

Breakfast Sandwich

Breakfast Sandwich:  Scrambled egg and cheddar cheese – with or without sausage/bacon.

Cucumber Sandwich

Cucumber Sandwiches

Grilled Bologna

Grilled Bologna Sandwich

Lobster Roll Sandwich

Lobster Roll Sandwich

Pulled Pork Sandwich

Pineapple Pulled Pork Sandwich

California Sandwich

California Sandwich

Egg Salad Sandwich

Egg Salad Sandwich

Tasajo

Tasajo

Tuna Salad Sandwich

Tuna Salad


Parnassienne au Chocolate

Christopher Gross’ Parnassienne au Chocolate Chocolate Tower

From Phoenix New Times:  October 21, 2010

Chocolate Tower

What’s better than chocolate? Three kinds of chocolate, of course.

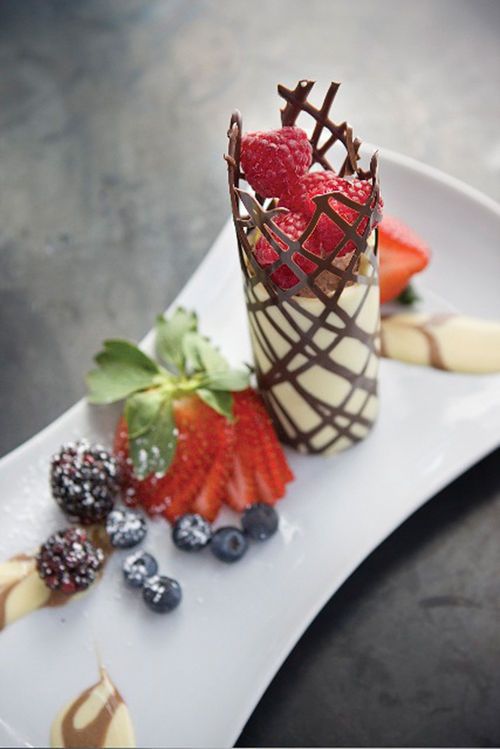
Chef Christopher Gross of Christopher’s Restaurant and Crush Lounge created his often-imitated  Parnassienne au Chocolate Chocolate Tower: Nearly half a foot of a dark chocolate lattice over a white chocolate tube that envelops a chocolate mousse center.

Today he shares the recipe for his signature tower — the same one he shared with Julia Child on her PBS master chef series — so you can try your hand at chocolatiering at home.

Click through for the three-part recipe: Mousse, lattice, and espresso sauce.

Chocolate Mousse

(Serves 8)
What you’ll need:
5-½ oz. semi-sweet chocolate, broken into pieces
3 Tbsp unsalted butter, sliced
¼ cup heavy cream
1-¼ cups egg whites (10 large)
4 Tbsp superfine sugar

What you’ll do:
1. Pour two inches of water into a saucepan and bring to a slow simmer. Set a stainless steel bowl on top of the pan, and add the chocolate and the butter. Stir occasionally as the chocolate melts; when smooth and lump-free, in about five minutes, remove and let the chocolate cool to room temperature.
2. Pour the cream into the stainless steel bowl set over ice and water. Beat by hand or with a portable beater, whipping in as much air as possible, until stiff peaks form.
3. Beat the egg whites to the soft peak stage; whip in two tablespoons of sugar; continue beating to stiff peaks form gradually adding the reminder of the sugar.
4. Whisk a quarter of the egg whites into the cool, melted chocolate, and then gradually add the rest. Fold in the cream quickly, deflating as little as possible.
5. Cut a piece of parchment paper into a rectangle 3-½ inches wide by 5 inches long. Form into a cylinder approximately 5 inches tall and 1-½ inches in diameter. Close the side with a piece of sticky tape and make sure that it stands up straight. Repeat to form 8 cylinders.
6. Fill a pastry bag with the mousse and pipe into the tubes, leaving a -½-inch space at the top. Drape the tops of the cylinders with a sheet of plastic and place in the freezer until frozen solid (approximately 1 hour).

Lattice

What you’ll need:
3 oz. semi-sweet chocolate, cut into pieces
6 oz. white chocolate, cut into pieces

What you’ll do:
1. For decorating the towers, cut eight 5-inch squares out of parchment paper.
2. Melt the semi-sweet chocolate over low heat.
3. Fill a decorating cone with some of the dark chocolate, and drizzle free form diagonal lines no more than 1/4 inch apart in a lattice pattern across each of the parchment squares. As each square is done, lay flat on one of the baking sheets.
4. When all squares are finished put the sheets in the freezer until the chocolate is set, or about 5 minutes. Reserve the remaining melted chocolate.
5. Melt the white chocolate over low heat.
6. Remove one dark chocolate lattice square from the freezer. And with the offset spatula, spread 2 to 3 tablespoons of the white chocolate in a very thin layer on top of the lattice, leaving a 1-inch strip uncoated at one side. Scrape off any excess chocolate.
7. Unwrap one frozen mousse tower and lay it on top of the white chocolate, parallel to and opposite the uncoated strip. Quickly wrap the parchment around the mousse, handling as little as possible and being careful to leave the uncoated flap overlapping.
8. Return each finished tower to the freezer, immediately after wrapping in parchment. Repeating steps 6 to 8 until you’ve latticed all the mousse towers.
9. The papers may be peeled off after five minutes in the freezer, and the chocolate lattice will remain in place around the mousse.
10. Then let the mousse defrost in the refrigerator for about an hour.

Espresso Sauce

What you’ll need:
1-½ cups half and half (light cream)
½ fragrant vanilla bean (or 1 tsp vanilla extract)
6 egg yolks
⅔ cup sugar
1 cup ILLY espresso coffee beans (2 oz.)

What you’ll do:
1. Heat the half and half with the vanilla bean, when almost at a simmer remove from the heat and cover the pan.
2. Meanwhile, start beating the egg yolks with the hand held mixer in the pan until thick and lemon-colored.
3. Gradually beat in the sugar, and then slowly blend in the ¼ cup of hot cream to warm the yolks. Blend slowly to minimize air bubbles.
4. Remove the vanilla bean from the remaining cream and blend the cream into the yolk mixture.
5. Pour in the espresso beans and set over low heat, stirring slowly and constantly until the mixture is thick enough to coat the back of the spoon.
6. Strain through the fine meshed sieve into a bowl and let cool. Serve warm, tepid or chilled.

Plate the chocolate tower plain or with fruit of your choosing. Then drizzle the espresso sauce over the components as desired.

This is one to bust out for dinner with the in-laws, your boss, a significant other, or anyone else you might be trying to impress. Can’t quite nail the presentation? Head over to Christopher’s instead.

(This is part three of our Chef Chat with Gross. Check out parts one and two for more about how he made the transition from picky eater to worldly chef and his foie gras battles.)

Fresh Beans

This is good for wax beans, green beans, string beans, etc.  It is NOT intended for things like peas, lentils and Lima beans.

  1. Bring pot of water up to a boil.
  2. Add 3 TBL salt.
  3. Add beans and boil for 15 minutes.
  4. Remove to a skillet.
  5. Add 3 TBL butter.
  6. Saute on low heat for another 15 minutes.
  7. Beans should be soft, and not al-dente at all.

Braised Leeks

  1. Cut off the green parts of the leeks.  Separate and rinse them well, then keep them for stock made at a later date.
  2. Cut off just the “strings” of the roots, keeping the body intact.
  3. Cut them in half lengthwise.
  4. Brown them in butter for 3 minutes per side.
  5. Add 1/2 cup chicken broth and 1/2 C white wine to the pan and bring up to a simmer.
  6. Cover loosely with a piece of foil and simmer  15-20 minutes
  7. Plate and garnish with parsley, chives, coarse salt and/or grated black pepper.OR

    Alternate:  Vinaigrette

    • Dijon mustard
    • French’s mustard
    • Red wine vinegar
    • Extra virgin olive oil
    • Salt and pepper
    • garlic
    • shallots
    • Whisk, taste and season
  8. Put some vinaigrette on the bottom of a baking dish
  9. Put into your halved leeks
  10. Pour remaining dressing over top
  11. Put into fridge for 3-12 hours
  12. Plate and top with remaining sauce
  13. Add hazelnuts, croutons, hard boiled egg pieces, chives
  14. Serve cold

Garlic Head Toast

  1. Cut off the top of an entire head of garlic.
  2. Place on crumpled foil so it stays upright.
  3. Add salt and pepper, then drizzle with olive oil.
  4. Carefully close the foil and bake at 425º for 60 minutes.
  5. Squeeze out garlic meat and spread on toast.
  6. Garnish with oregano or chives.

Corn Bisque

  1. Bring 2 QT of water up to boiling.
  2. Shuck two ears of corn into a bowl.
  3. Chop 1/2 Vidalia onion into corn-kernel sized pieces, and put in with the corn.
  4. Cut the cob into pieces and put it into your boiling water with 1 bay leaf, thyme, corriander, alspice and star anise – the spices in a bundle for easy removal later.  Boil 30 minutes.
  5. Bring 2 TBL butter, 2 TBL safflower oil, 5 cloves whole garlic and 1 TBL chopped ginger to high heat and simmer just until pungent.
  6. Remove the garlic and ginger and add your corn and onion, and cook it until it starts to brown.
  7. Add  2 C of your broth into the pan, and add salt and lime juice (to taste)
  8. Simmer 30 minutes.
  9. Mix 1 TBL corn starch or potato starch in with 1 C Half and Half, and add to the pan, whisking continually.
  10. Cook just until it starts to thicken slightly.  Add 1/2 more broth if needed for texture, color on consistency.

Trifle

SEE A SIMPLE RECIPE AT THE BOTTOM OF THIS PAGE

From AmandasCookin.com

This is a very simple and elegant dessert.  You can make a large trifle that will serve everyone, or individual dessert cup trifles.

From BBCGoodFood.com

A TRIFLE is a general category of recipe, kind of like “a casserole” – “a burrito” – or “a beverage.”

From RealFood.Tesco.com

It simply describes a layered desert, usually with a cake layer, a pudding layer, a fruit layer and a few other layers thrown in for good measure.

From taste.co.au

I’ve included photos from other websites so that you can get an idea of what a trifle is, and create your own.  You will see that the key is to maintain distinct layers.  If you browse all of these GOOGLE IMAGES you will see that some trifles are not clearly labeled at all, which makes it not really a trifle.

CLICK ON AN IMAGE FOR AN ENLARGEMENT

Food Network Canada

A simple recipe that you can follow, if you want a no-fail first attempt.

SIMPLE TRIFLE

  1. First, decide if you want one large dramatic trifle to share, or individual trifles.  You definitely want it to be clear glass though.  Be very careful to not fill any layer too deeply, or you will run out of space.
  2. SPONGE LAYER:  Traditionally you use Lady Fingers in a trifle, but you can buy angel food cake or use the recipe below and it will be just as tasty.  You can also simply use Vanilla Wafers.  Use a knife and cut prepared angel food cake into 1/2 to 1 inch slices.
  3. If you want to try to make your own sponge layer, here is a recipe for LADY FINGERS.
  4. If you don’t have a biscuit cutter, a single biscuit cutter is a good addition to your arsenal.  Cut circles from the angel food cake.  If they are too big for your container, cut them into geometric shapes and put them against the wall of your glass.
  5. PUDDING LAYER:  Spoon pudding into the bottom of your glass to hold your sponge in place.  Pudding can be from scratch or even a box instant pudding.  Both will work well.
  6. COOKIE LAYER:  You can use crushed Oreo’s or Graham Crackers.  You can even use granola.  The thing is that you want something with crumbly pieces to create a completely different texture.
  7. FRUIT LAYER:  For this, you want a soft fruit like peaches, strawberries, kiwi, and so forth.  The fruit should be in bite-sized pieces.
  8. WHIPPED CREAM LAYER:  You really don’t want to use spray canned whipped cream, as it breaks down too quickly.  Cool Whip is not a bad choice, but making your own whipped cream is actually pretty easy.  CLICK HERE for a simple three-ingredient whipped cream.
  9. OPTIONAL:  CREAM CHEESE LAYER:  Alternately, you can use Cream Cheese, Yogurt, cooked (cooled) Vanilla Pudding, and powdered sugar.
  10. FRESH FRUIT:  Top the whipped cream with something like blueberries, strawberries, cherries, etc.  Something small and colorful.
  11. GARNISH:  You can garnish with more crushed cookies, or even chopped nuts if you want.  You can also place a single mint leaf on the very top for an elegant presentation.

STEP BY STEP – OVERVIEW

  1. For a large trifle, put a layer of angel food cake in the bottom
  2. Add a layer of your white mixture cream cheese or whipped cream.
  3. Stack strawberries against the side so they can be seen
  4. Add strawberry pieces and blueberries
  5. Repeat with layers of cake, cream mixture, more fruit
  6. Finish with a layer of cake, cream mixture, and decoratively place fruits

Chef’s Notes

DO NOT USE ANYTHING BELOW THIS LINE IN MY COOKBOOK.


These notes are gleaned from PBS The Great British Baking Show

  • A Trifle should have well-defined layers
  • Trifles are a West Wales staple – placed on tables several times each week
  • Trifles traditionally use lady fingers for the cake layers
  • Another option is Vanilla Wafers
  • Use a shallow disk to serve many and to all all flavors in a single serving
  • Biscuits need to absorb the liquid without disintegrating
  • Many of the chefs used lemon meringue or lemon curd – The custard should be thick
  • Recipe 1: layers of biscuit/cake, strawberry, whipped cream and blueberry
  • Recipe 2: Recipe featured a praline circle on the top
  • Recipe 3: bananas, strawberries, mangos with Lemon Macaroons on top
  • Recipe 4: Ginger cake with fruit and creme anglaise
  • Recipe 5: Spray the layers with cointreau
  • Recipe 6: Peach, almond and ginger – with browned butter
  • Recipe 7: Cake layer was a lemon Swiss roll
  • Recipe 8: Amaretti Bisquits on top
  • Recipe 9: Chef used a jelly layer

If you are interested, you can MAKE YOUR OWN LADY FINGERS rather than using pound cake


Recipe from Wall Street Journal

Dec 20, 2016 – CLICK ON IMAGES TO ENLARGE
Trifle 1 Trifle 2 Trifle 3
What they are calling their Christmas Pudding was defined in a previous publication. You can use slices of Angel Food Cake, Vanilla Wafers, or more traditionally Lady Fingers. This goes over GREAT at parties. Make sure you assemble it into a clear glass bowl or the WOW factor is lost.


HTML Snippets Powered By : XYZScripts.com