Apple Crisp

Can also use peaches, pears, etc

    1. Slice apples thinly
      • Use: Granny Smith, Fuji, or Gala
      • Not: Red and Delicious, they tend to become grainy
      • A good tip is to use a melon baller – slices work just fine too
    2. Soak apple pieces in lemon juice water – Alt:  Sprite – If you are not preparing right away
    3. Strain, but don’t pat dry
    4. Sprinkle with 1/4 C CinnaSugar PLUS 1 TBL sugar

TOPPING

    • 1/2 C Flour
    • 1/2 C Browm Sugar
    • 1/2 C Quick cook oats (Instant)
    • 1 tsp baking soda
    • 1/2 tsp salt
    • 1/4 tsp nutmeg
    • 1/4 C COLD butter
      • Cut together
    1. Dump topping onto apples
    2. Bake at 350 for 25 minutes
    3. Serve with ice cream or whipped cream


Instant Pot Cheesecake

Here are the Step-by-Step instructions on how to make an Instant Pot New York Cheesecake.   From  Pressure Cooker Recipes

Whole Process Consists of 4 Parts:

A. Make Crust
B. Make Cheesecake Batter
C. Pressure Cook Cheesecake
D. Cool, Chill, Serve Cheesecake

*Note: there are various optional steps in our recipe to satisfy your inner perfectionist. Feel free to skip those steps to save time. 🙂


Ingredients for Instant Pot New York Cheesecake #17

Crust

  • 10 (120g) graham crackers, finely ground
  • 3 – 4 tablespoons (42g – 56g) unsalted butter, melted
  • A pinch sea salt
  • 2 teaspoons – 1 1/2 tablespoon (8.3g – 19g) brown sugar (depending on your desired sweetness)
  • Optional: ¼ cup (32g) all-purpose flour (For blind-bake crust)

Cheesecake Batter (7 inches x 3 inches)

  • 16 ounces (454g) Philadelphia cream cheese, room temperature
  • 2 large eggs, room temperature
  • 2/3 cup (133g) white sugar
  • 1/2 cup (120g) sour cream, room temperature
  • 2 tablespoons (16g) cornstarch
  • 2 teaspoons (10ml) vanilla extract
  • 2 pinches sea salt

PREPARATION


16 ounces (454g) Philadelphia cream cheese
2 large eggs
½ cup (120g) sour cream
3 – 4 tablespoons (42g – 56g) unsalted butter


Place cream cheese, eggs, sour cream on counter-top to reach room temperature.

Then, melt the unsalted butter.

*Critical Tip: this is critical for your cheesecake’s success, so please please make sure all the above ingredients are at room temperature before you start. If not, you may end up with lumpy fluff top cheesecake. So don’t skip this step! 🙂


PART A
MAKE THE CRUST


1


Ground Graham Crackers


10 (120g) graham crackers
Food processor or Ziploc bag + Rolling pin


Finely ground the graham crackers in a food processor.

Or place the graham crackers in a Ziploc bag and roll them with a rolling pin.

Mix Crust Mixture


Finely ground graham crackers
A pinch sea salt
2 tsp – 1½ tbsp (8.3g – 19g) brown sugar

Small mixing bowl
Fork


In a small mixing bowl, mix finely ground graham crackers, sea salt, brown sugar together with a fork.

*Pro Tip: Why add sea salt? A small pinch of sea salt heightens the flavor of other ingredients. A secret ingredient in many restaurant-quality desserts. shh… 😉


3


Optional – Add Flour


¼ cup (32g) all-purpose flour


If you want a firmer & crisper crust, we recommend blind-baking the crust. We’ll discuss this in Step 7 below.

If you’re blind-baking your crust, mix in the flour at this step.


4


Mix in Melted Unsalted Butter


3 – 4 tbsp (42g – 56g) unsalted butter, melted


Mix in unsalted butter until the mixture sticks together.


5


Line Pan


Parchment paper

7 inches x 3 inches Fat Daddio’s Cheesecake Pan (with removable bottom)


Line the side & bottom of the cheesecake pan with parchment paper for smoother sides & easier release.

*Note: We did not use any butter to line the parchment paper.

Form Crust


Graham cracker crumbs mixture, from above
Measuring cup/Spoon


Pour in the graham cracker crumbs mixture.

Gently press down the crumbs with a flat measuring cup, ramekin or Mason jar to form an even layer. You can also use a spoon for the edges.

In our blind taste test, the Method #2: Blind-Baked Crust was noticeably firmer and crisper compared to Method #1’s freezer version.

Method #1 – Freeze the Crust: Place the cheesecake pan in the freezer while you make the cheesecake batter.

Method #2 – Blind-Bake the Crust (for firmer & crisper crust): Place the crust in a 325°F oven for 15 minutes.


PART B
MAKE CHEESECAKE BATTER

*Critical Tip: We highly recommend using a Hand Mixer instead of a Stand Mixer. Stand Mixer is usually more powerful, thus you can easily overmix and introduce too much air into the cheesecake batter. This may result in a puffy souffle-style cheesecake.

*Note: Click on the Tabs to choose Method #1: Dense or Method #2: Creamy.


Method #1: Dense Cheesecake Batter


8


Mix Sugar Mixture


2 tbsp (16g) cornstarch 2 pinches of sea salt ⅔ cup (133g) white sugar Small mixing bowl


Mix cornstarch, sea salt, and white sugar together in a small mixing bowl.  


9


Briefly Beat Cream Cheese


16 ounces (454g) Philadelphia cream cheese Medium mixing bowl Hand mixer


In a medium mixing bowl, briefly break up the cream cheese by beating it for 10 seconds with a hand mixer using low speed.  


10


Mix in Sugar Mixture


Sugar mixture, from above Hand mixer Silicone spatula


Add in half the sugar mixture and beat until just incorporated using low speed (roughly 20-30 seconds). Scrape down the sides and the hand mixer with a silicone spatula every time a new ingredient is added. Add remaining sugar mixture and beat until just incorporated using low speed (roughly 20-30 seconds).  


11


Add Sour Cream & Vanilla Extract


½ cup (120g) sour cream 2 tsp (10 ml) vanilla extract Hand mixer


Add sour cream and vanilla extract to the cream cheese mixture. Beat until just incorporated using low speed (20-30 seconds).

Blend in Eggs


2 large eggs
Hand Mixer
Silicone spatula


Blend in the two eggs using low speed, one at a time. Mix until just incorporated (about 15 – 20 seconds with a hand mixer). Try not to overmix on this step.

Scrape down the sides and the hand mixer with a silicone spatula and fold a few times to make sure everything is fully incorporated.


13


Pour Batter in Pan


Cream cheese batter
Cheesecake pan


Pour cream cheese batter into the cheesecake pan.

14


Remove Air Bubbles for Smooth Surface

Tap cheesecake pan against the counter to let the air bubbles rise to the surface.

Burst the air bubbles with a toothpick or fork.

The longer you tap, the more air bubbles you’ll be able to burst.

Removing air bubbles is an art that requires patience!

Tap until you are satisfied. Ensure the surface is clear of air bubbles or fork marks.

Side note: what we learned from our 16 17 experiments, it’s almost impossible to remove all air bubbles.


PART C
PRESSURE COOK CHEESECAKE

To make it easier to take out the cheesecake pan from Instant Pot: make a foil sling by folding a piece of aluminum foil (as shown below).

*Note: Be sure to tuck in the foil sling down the sides (don’t let it fold over the cake when you close the lid).

Click on the Tabs to choose between: Regular Method #1 or Perfectionist Method #2.

Perfectionist Method #2

This Perfectionist Method takes an extra step to further prevent surface dents on the cheesecake. Cause of Surface Dents: Dents on cheesecake’s surface is mostly caused by the condensation build-up during the “going up to pressure” stage. Why Use This Method? By starting with boiling water, we can shorten the “going up to pressure” time in order to minimize condensation.


15


Pressure Cook Cheesecake


1 cup (250 ml) of water Steamer rack Foil sling Instant Pot Pressure Cooker


Place a steamer rack and pour water in pressure cooker. Bring water to a boil (Instant Pot users: Press manual/pressure cook and set the time to 28 minutes).

When the water begins to boil, place cheesecake pan on the steamer rack with a foil sling right away.

*Caution: Don’t wait too long to place the cheesecake in pressure cooker, as it’ll affect the cooking time. Place it immediately once the water begins to boil. This prevents too much water from evaporating.

Immediately close the lid with the Venting Knob at Venting Position.

Turn Venting Knob to Sealing Position and let it pressure cook. It should go up to pressure in ~1 minute.

  • Pressure Cooking Time: High Pressure for 28 minutes, then Full Natural Release (takes roughly 7 – 9 minutes)

Open the lid gradually.

*Pro Tip 1 – For 6 x 3 inches Cheesecake Pan: add 5 mins High Pressure Pressure Cooking Time. *Pro Tip 2: As you open the lid, try your best to avoid dripping the condensation from the lid onto the cheesecake.

Absorb any condensation on the surface by lightly tapping it with a soft paper towel.


PART D
COOL, CHILL, SERVE CHEESECAKE


16


Cool Cheesecake


Allow cheesecake to cool to room temperature with the lid open in the Instant Pot Pressure Cooker.

Or place it on a wire rack to cool to room temperature.

cooling the instant pot cheesecake in pressure cooker


17


Release Cheesecake From Sidewall


After cooling for 10 – 15 minutes, carefully run a thin paring knife between the sidewall and the cheesecake (or parchment paper) to release the cheesecake from the pan.

how to best release the instant pot cheesecake from the pan

The parchment paper will wrinkle after pressure cooking. Pull it lightly to straighten it out for a smooth side.


18


Chill Cheesecake in Fridge


Once the cheesecake has completely cooled, place it in the refrigerator for at least 4 – 8 hours (preferably overnight).


19


Serve Instant Pot Cheesecake #17


Remove the cheesecake from the refrigerator!

The best way to release the cheesecake from the bottom pan is warm bottom of the pan to melt the butter. You can use a torch or heating pad for this step.

How to release Cheesecake from cheesecake pan

Carefully peel off the parchment paper.

You’ve done it!! Your very own Instant Pot Cheesecake #17.

Give yourself a pat on the back & EAT!! 😀


Cooking Tips for Instant Pot Cheesecake

1. Ensure Cream Cheese, Eggs, Sour Cream at Room Temperature

Placing the above ingredients on the counter ahead of time until it reaches room temperature is critical to your cheesecake’s success! Please ensure they’re not cold before you begin making your stunning New York Cheesecake #17!

2. Smooth & Creamy Cheesecake Option:

Adjust the beating time to 1 minute for Part B – Step 9 (cream cheese), Step 10 (sugar mixture), and Step 11 (sour cream & vanilla extract).

3. Add Lemon Juice to Cheesecake Batter?

We tried using fresh Sour Cream and old Sour Cream. Old sour cream has lost some of the tangy flavors, so adding 1 tablespoon of lemon juice will help balance the flavors. Add it in Part B – Step 11 with the sour cream.

But if your sour cream is fresh, no lemon juice is needed unless you like extra tangy flavor. 🙂

4. Modifications For Other Sizes of Cheesecake Pan?

You can use the same recipe with adjusted pressure cooking time.

  • 6 x 3 inches Cheesecake Pan (Uncovered): Due to the increase in thickness, add 5 – 8 mins High Pressure Pressure Cooking Time
  • 4.5 – 5 x 2 inches Cheesecake Pan (Uncovered): High Pressure 18 minutes + Natural Release
  • Standard silicone cup (2.7″ x 1.25″) cheesecake bites (uncovered): High Pressure 7 minutes + Natural Release

5. Can I Wrap My Cheesecake with Aluminum Foil?

Some users like to wrap their cheesecake with aluminum foil for pressure cooking, but it’s not necessary. If you do decide to wrap the pan with aluminum foil, add additional 5 – 7 mins to our stated pressure cooking time in this recipe.

6. Use Hand Mixer Rather than Stand Mixer

We highly recommend using a Hand Mixer over a Stand Mixer to mix the cheesecake batter. Since Stand Mixers are usually more powerful, you can easily overmix and introduce too much air into the cheesecake batter. This may result in a puffy souffle-style cheesecake.

7. More Instant Pot Cheesecake Cooking Tips:

Pressure Cooker Cheesecake Guide: 11 tested tips for a stunning Cheesecake in Instant Pot. Developed based on 16 experiments.

Time for cooking Cheesecake #17 in Instant Pot!

 
Easy New York Instant Pot Cheesecake Recipe: make this smooth & creamy or rich & dense pressure cooker cheesecake with crisp crust. Impress guests & pamper yourself!
 
 
4.99 from 634 votes

Instant Pot New York Cheesecake #17

Author: Amy + Jacky
Easy New York Style Instant Pot Cheesecake Recipe: Pamper yourself & impress guests with your choice of smooth/creamy or rich/dense pressure cooker cheesecake with crisp crust.
 

Subscribe for Free Recipes & Tips

 
Servings 7 inches
 
Total Time 40 mins

Ingredients

Crust

  • 10 (120g) graham crackers , finely ground
  • 3 – 4 tablespoons (42g – 56g) unsalted butter , melted
  • Pinch sea salt
  • 2 teaspoons – 1½ tablespoon (8.3g – 19g) brown sugar (depends on desired sweetness)
  • ¼ cup (32g) all-purpose flour (Optional for blind-baking crust)

Cheesecake Batter (7 inches x 3 inches)

  • 16 ounces (454g) Philadelphia cream cheese , room temperature
  • 2 large eggs , room temperature
  • cup (133g) white sugar
  • ½ cup (120g) sour cream , room temperature
  • 2 tablespoons (16g) cornstarch
  • 2 teaspoons (10ml) vanilla extract
  • 2 pinches sea salt

Share this Recipe so We can create more yummy recipes for you.  Thank you 🙂

Instructions 

Amy + Jacky’s Tips Before You Start

    • We highly recommend using a Hand Mixer to mix the cheesecake batter instead of a Stand Mixer. Stand Mixers are often more powerful, thus you can easily overmix and introduce too much air into the cheesecake batter. This may result in a puffy souffle-style cheesecake.

PREPARATION

  • Place 16 ounces (454g) cream cheese, 2 large eggs, ½ cup (120g) sour cream on counter-top to reach room temperature. Then, melt the 3 – 4 tablespoons (42g – 56g) unsalted butter.*Pro Tip: this is critical for your cheesecake’s success, so please make sure all the above ingredients are at room temperature before you start. If not, you may end up with lumpy fluff top cheesecake. So don’t skip this step! 🙂

PART A. MAKE THE CRUST

  • Ground Graham Crackers: Finely ground 120g graham crackers in a food processor. Or place the graham crackers in a Ziploc bag and roll them with a rolling pin.
  • Mix Crust Mixture: In a small mixing bowl, mix finely ground graham crackers, a pinch of sea salt, 2 tsp – 1 1/2 tbsp (8.3g – 19g) brown sugar together with a fork.
  • Perfectionist’s Step – Add Flour (if blind-baking for firmer & crisper crust): mix in ¼ cup (32g) all-purpose flour.
  • Add Melted Unsalted Butter: Mix in roughly 3 – 4 tbsp (42g – 56g) unsalted butter until the mixture sticks together.
  • Line Pan: Line the side & bottom of cheesecake pan with parchment paper.


    *Note: We did not use any butter to line the parchment paper.

  • Form Crust: Pour in the graham cracker crumbs mixture. Gently press down the crumbs with a ramekin or Mason jar to form an even layer. You can also use a spoon for the edges.
  • Firm Crust


    Method #1 – Freeze: Place cheesecake pan in freezer while you make the cheesecake batter.


    Method #2 – Blind-Bake (for firmer & crisper crust): Place crust in a 325°F oven for 15 minutes.

PART B. MAKE DENSE CHEESECAKE BATTER

  • Mix Sugar Mixture: Mix 2 tbsp (16g) cornstarch, 2 pinches of sea salt, and 2/3 cup (133g) white sugar together in a small mixing bowl.
  • Briefly Beat Cream Cheese: In a medium mixing bowl, briefly break up the 454g cream cheese by beating it for 10 seconds with a hand mixer using low speed.
  • Mix in Sugar Mixture: Add in half the sugar mixture and beat until just incorporated using low speed (roughly 20 – 30 seconds). Scrape down the sides and hand mixer with a silicone spatula every time a new ingredient is added. Add remaining sugar mixture and beat until just incorporated using low speed (roughly 20 – 30 seconds).
  • Add Sour Cream & Vanilla Extract: Add 1/2 cup (120g) sour cream and 2 tsp (10 ml) vanilla extract to the cream cheese mixture. Beat until just incorporated using low speed (20 – 30 seconds).
  • Blend in Eggs: Blend in the two eggs using low speed, one at a time.


    Mix until just incorporated (about 15 – 20 seconds with a hand mixer & less time if you are using a powerful stand mixer). Try not to overmix on this step.


    Scrape down the sides and hand mixer with a silicone spatula and fold a few times to make sure everything is fully incorporated.

  • Pour Batter in Pan: Pour cream cheese batter in cheesecake pan.
  • Remove Air Bubbles for Smooth Surface: Tap cheesecake pan against the counter to let air bubbles rise to the surface. Burst the air bubbles with a toothpick or fork. Tap until you are satisfied. Ensure the surface is clear of air bubbles or fork marks.


    See above photos for demo.

PART C. PRESSURE COOK CHEESECAKE

  • Method #1: Pour 1 cup (250 ml) of cold water in pressure cooker. Place cheesecake pan on top of a steamer rack (so, it’s not touching the water). Close lid and pressure cook at High Pressure for 26 minutes and Full Natural Release. Natural release will take roughly 7 minutes. Open lid gradually. Absorb any condensation on surface by lightly tapping it with a soft paper towel.


    Perfectionist’s Method #2 – Prevent Surface Dents: Place a steamer rack and pour 1 cup (250ml) of water in pressure cooker. Bring water to a boil (Instant Pot users: Press manual/Pressure Cook and set the time to 28 minutes). When the water begins to boil, place cheesecake pan on the steamer rack with a foil sling right away.


    *Caution: Don’t wait too long to place the cheesecake in pressure cooker, as it’ll affect the cooking time. Place it immediately once the water begins to boil. This prevents too much water from evaporating. Immediately close the lid with Venting Knob at Venting Position. Turn Venting Knob to Sealing Position and let it pressure cook at High Pressure for 28 minutes and Full Natural Release. It should go up to pressure in roughly 1 minute. Natural release will take roughly 7 – 9 minutes. Open the lid gradually. Absorb any condensation on the surface by lightly tapping it with a soft paper towel.

PART D. COOL, CHILL, SERVE CHEESECAKE

  • Cool Cheesecake: Allow cheesecake to cool to room temperature with the lid open in the pressure cooker. Or place it on a wire rack to cool to room temperature.
  • Release Cheesecake from Sidewall to Avoid Cracking: After cooling for 10 – 15 minutes, carefully run a thin paring knife between the sidewall and parchment paper to release the cheesecake from the pan. Pull the slightly wrinkled parchment paper lightly to straighten it out for a smooth side.
  • Chill Cheesecake in Fridge: Once the cheesecake has completely cooled, place it in the refrigerator for at least 4 – 8 hours (preferably overnight).
  • Serve: Remove cheesecake from the refrigerator. The best way to release the cheesecake from the bottom pan is warm the bottom of the pan to melt the butter. You can use a torch or heating pad for this step. Carefully peel off the parchment paper. Enjoy~
 

Video

Notes

Smooth & Creamy Cheesecake Option: Remember to adjust the beating time to 1 minute for Part B – Step 2 (cream cheese), Step 3 (sugar mixture), and Step 4 (sour cream & vanilla extract).


For 6 x 3 inches Cheesecake Pan: add 5 mins High Pressure Pressure Cooking Time.


*Rate Amy + Jacky’s Recipe: If you’ve tried our recipe, don’t forget to Rate the Recipe in the Comments Section. Thank you!

 
Calories: 288kcal
 
Course: Brunch, Dessert, Party Food
 
Cuisine: American
 
Keyword: instant pot cheesecake

Nutrition

Calories: 288kcal | Carbohydrates: 25g | Protein: 4g | Fat: 19g | Saturated Fat: 11g | Cholesterol: 81mg | Sodium: 271mg | Potassium: 93mg | Fiber: 1g | Sugar: 16g | Vitamin A: 694IU | Vitamin C: 1mg | Calcium: 60mg | Iron: 1mg


Rate the Recipe


Please read before leaving a comment 🙂

1) If you have a question, it’ll be great if you can try to search for the answer first by checking the comments below. Thank you so much. 🙂

2) We’re super thankful for all the reviews. We may not be able to reply to all of you, but we read and enjoy every single one of them.


1.8K Comments
 
newest

#17 recipe Instant Pot cheesecake I made last night5 stars

Pressure Cooker
Instant Pot DUO 60

333962895_729299562086236_8888004058767842839_n.jpg

 
0


I have made this several times, and it is wonderful.5 stars

Pressure Cooker
Instant Pot DUO EVO PLUS 60
0


After weeks of planning and preparation, I finally managed to make the famous cheesecake #17!

Pressure Cooker
Instant Pot DUO 60

332495296_59081815.jpg

 
0


I have been playing with and making LOTS of Cheesecake #17 my latest creation is an Espresso Cheesecake with a Chocolate Glaze. I have been giving at LEAST half of every cake away. This time I gave the whole cake away in trade for two beautiful lobsters!5 stars

Pressure Cooker
Instant Pot DUO 60

332495296_59081815.jpg

 
0


What is the serving size used to determine the nutritional value? Serving size with the recipe says 7 inches.5 stars

Pressure Cooker
Instant Pot DUO 60
0
 
 
0


I used cinnamon-oat-cookies bought at a Swedish Furniture Company. On top of the prebaked bottom I added dulce du leches and fresh apples coated with brown sugar and cinnamon. Then the cheesecake batter. On top I added another thin layer of dulce du leches and some caramelized Walnuts (The nuts were tossed in a pan with sugar and maple syrup to caramelize them) right before serving. I will use more caramel and apples inside next time, but the consistency and taste was perfect. The nutty crunch on top was a great addition.5 stars

Pressure Cooker
Instant Pot DUO 60

331291055_1224848031748165_3183999120986863722_n.jpg

 
1


a sliced one

330012375_8711222102284296_4014948483816311449_n.jpg

 
1


Cheesecake #17 for my Sweet Valentine5 stars

Pressure Cooker
Instant Pot DUO 60

325592275_1330972944412078_1897244022811581583_n.jpg

 
0


I made an oreo cookies n creme cheesecake in my IP today for my boyfriends birthday tomorrow! It has an oreo crust, oreos mixed into the cheesecake, hersheys cookies n creme topping, oreos mixed into the homemade whipped cream, and mini oreos on top!!! I follow the cheesecake #17 recipe by Amy & Jacky. Here are the things I do different on my cheesecakes: I use a 7″ springform pan I tap bubbles out while the cheesecake batter is still in the mixing bowl I cover the cheesecake with papertowel and tin foil while pressure cooking. Here are my twists… Read more »

Pressure Cooker
Instant Pot DUO 60

329569484_1058590985096688_4411119043400741056_n.jpg

 
2


It was a total hit! Super amazing! Here’s a picture of it cut. 😊 even beautiful from the inside.

330239401_508625868060285_5532089145908912239_n.jpg

 
1


I decided to try another cheesecake in the instant pot. This time I did a strawberry cheesecake and I even hand dipped the strawberries and chocolate. Let me tell you I do not do dessert so those strawberries were challenging but they look okay. And if there wasn’t enough chocolate, I had to get Ghirardelli chocolate hearts 😂I used this recipe and followed it to the t and it came out even better this time. I hope this is a huge hit at the super bowl party. I am going to tomorrow with my chocolate chip cookie that I made… Read more »

Pressure Cooker
Instant Pot DUO 60

329941572_860219491704519_3079810865850348902_n.jpg

 
1


Cheesecake #17 did not disappoint! I’ve made a lot of IP cheesecakes, but this was definitely the best by far! I followed all of the pro tips. It made a perfect birthday cheesecake for my husband! Thanks Amy + Jack.

P.S.: I can’t believe how much better it sliced being denser than the previous ones I’ve made!5 stars

Pressure Cooker
Instant Pot DUO 60

326722622_3154934618132469_8594682301700117968_n.jpg

 
0


Chocolate Dip Berries

Strawberries, Large blueberries, Blackberries

  • White chocolate
    • Put into a glass bowl – put over double boiler
    • Fresh vanilla bean
  • Milk chocolate
    • Put into a glass bowl – put over double boiler
    • Espresso powder
  • NOTE:  Not too hot
  • Hazelnuts into dry skillet – toast lightly
    • Chop nuts
  • Starberries into dark chocolate
  • Blackberries in white, then hazelnuts
  • Put into refrigerator for at least an hour

Buttermilk Donuts

WET INGREDIENTS

  • 1 stick of butter  (8 TBL) melted and browned (see below)
  • 1 lemon – zest and juice
  • 2 eggs + 3 egg yolks
  • 1 TBL vanilla extract
  • 1 tsp almond extract
  • 3/4 C buttermilk

DRY INGREDIENTS

  • 1 C almond flour
  • 5 tsp baking powder
  • 1/2 C granulated sugar
  • 1/2 C packed brown sugar
  • 4 C cake flour (AP flour, if you must)
  • 1/2 tsp baking soda
  • 1 tsp salt
  • 1 tsp ground CinnaSugar

BROWN YOUR BUTTER

  1. Over medium heat melt your butter
  2. Let it simmer until the “sizzling” stops and the edges start to brown
  3. Don’t overcook it, or it will become bitter

COMBINE WITH WITH DRY

  • Add 1/2 C dry (a bit at a time) into the wet until all in
  • The dough should be about the consistency of Play Dough
  • Wrap in Plastic and Refrigerate 2 hours (or overnight)
  • Roll to 1/2 – 3/4 inch thickness
  • Form either bars or donuts
    • 1/2 inch bars
    • 3″ donuts with 1″ hole in center
  • Place on baking sheet
  • Combine and re-roll scraps
  • Put back onto sheet pan and refrigerate for another 30 minutes
  • Using spider strainer or fish spatula, lower into fry at 350º (min 345º – max 360º)  till browned and cracked.  Flip occasionally.
  • Wire rack to drain
  • Dip into Glaze – both sides
  • Drain on wire rack

GLAZE

  • 2 C powdered sugar
  • zest and juice from one lemon
  • 2 tsp vanilla extract
  • 2 TBL Melted butter
  • 2 TBL boiling water (ONLY IF NECESSARY)

 – Glaze should be like thick syrup or cold honey


Apple Pie for Diabetics

Ingredients

  • Pastry for double-crust 9-inch pie
  • 13 cup + 112 Tbsp of zero-calorie Truvia Original Calorie-Free Sweetener Spoonable Jar***
  • 3 Tbsp cornstarch
  • 14 tsp salt
  • 1 tsp ground cinnamon
  • 14 tsp ground nutmeg
  • 8 cups Granny Smith apples, peeled, cored, and sliced
  • 1 Tbsp lemon zest
  • 1 Tbsp butter
 

Directions

  • 1.   Roll out half of the pastry on a floured surface to 1 inch larger than inverted 9-inch pie pan. Ease pastry into pan.
  • 2.   Blend Truvía® Original Sweetener, cornstarch, salt, cinnamon and nutmeg in small bowl. Sprinkle on apples and toss until coated. Add lemon zest and mix thoroughly. Arrange apple mix into crust. Cut butter into slices, place on top of apples.
  • 3.   Roll remaining pastry into circle large enough to cover inverted 9-inch pie pan. Place over apples, seal edges, trim and flute. Cut slits in top to allow steam to escape.
  • 4.   Bake at 400°F for 40 to 50 minutes or until crust is golden and apples are tender. Cool on wire rack.

Apple Turnover

Ingredients
8
Original recipe yields 8 servings
Ingredient Checklist

2 tablespoons lemon juice
4 cups water
4 Granny Smith apples – peeled, cored and sliced
2 tablespoons butter
1 cup brown sugar
1 teaspoon ground cinnamon
1 tablespoon cornstarch
1 tablespoon water
1 (17.25 ounce) package frozen puff pastry sheets, thawed
1 cup confectioners’ sugar
1 tablespoon milk
1 teaspoon vanilla extract


Directions
Instructions Checklist

Step 1

Combine the lemon and 4 cups water in a large bowl. Place the sliced apples in the water to keep them from browning.
Step 2

Melt butter in a large skillet over medium heat. Drain water from apples, and place them into the hot skillet. Cook and stir for about 2 minutes. Add brown sugar, and cinnamon, and cook, stirring, for 2 more minutes. Stir together cornstarch and 1 tablespoon water. Pour into the skillet, and mix well. Cook for another minute, or until sauce has thickened. Remove from heat to cool slightly.
Step 3

Preheat the oven to 400 degrees F (200 degrees C).
Step 4

Unfold puff pastry sheets, and repair any cracks by pressing them back together. Trim each sheet into a square. Then cut each larger square into 4 smaller squares. Spoon apples onto the center of each squares. Fold over from corner to corner into a triangle shape, and press edges together to seal. Place turnovers on a baking sheet, leaving about 1 inch between them.
Step 5

Bake for 25 minutes in the preheated oven, until turnovers are puffed and lightly browned. Cool completely before glazing.
Step 6

To make the glaze, mix together the confectioners’ sugar, milk and vanilla in a small bowl. Adjust the thickness by adding more sugar or milk if necessary. Drizzle glaze over the cooled turnovers.

Color Swirl White Chocolate Bark

  • Melt 1 C white chocolate chips in the microwave
  • Use four different colors of candy melts – Melt in microwave
  • Pour white chocolate on a tray lined with parchment paper
  • Drizzle the multi colors onto the white chocolate canvas
  • Use toothpick, fork or knife to draw designs over the white
  • Put into fridge to cool

Bananas Foster Upside Down Cake

  1. Mix the following dry ingredients
    • 1 1/2 C AP flour
    • 1 1/2 tsp baking powder
    • 1/2 tsp kosher salt
    • 1/4 tsp baking soda
    • 1/4 tsp nutmeg
  2. Put 8 TBL softened butter into mixer, then add
    • 1/2 C granulated cane sugar (not beet sugar)
    • 1/2 C brown sugar
  3. then add
    • 2 very ripe bananas
    • 2 eggs plus 1 yolk
    • 2 tsp vanilla
  4. Mix to combine
  5. Mix in 1/2 of your flour mixture and mix until you have a batter
  6. Add 1/4 C buttermilk powder and the rest of the flour
  7. Fold together until it is mixed,but be careful to not overmix
  8. In a sauce pan combine
    • 2 TBL butter
    • 2 TBL rum
    • 1/2 tsp salt
    • 1 C brown sugar
    • 1 TBL Grandpa’s CinnaSugar
  9. Heat until sugar melts
  10. Pour some into the bottom of a cast iron pan
  11. Slice 2 aged bananas into long slices and put in bottom of pan
  12. Mix 1 tsp vanilla with 2 TBL more dark rum
  13. Top bananas with dark rum and more sugar
  14. Put onto heat until the rum starts to sizzle
  15. Pour in the batter, then bake at 350º  for 45-50 minutes
  16. Carefully remove the pan
  17. Loosen sides and invert onto a plate
  18.  Serve hot

Cookies from Box Mix

Cake and Pancake mixes are simply flour, baking soda, salt and sometimes dried milk.  Making cookies from a box mix is easy, if you can measure ingredients, you can bake cookies from box mix. You can use any kind of pancake mix or cake mix you have on hand and one of your favorite cookie recipes.

  • 3/4 C box mix – Bistro sells Aunt Jemima Pancake Mix
  • 3 TBL butter, slightly softened
  • 1/4 C brown sugar – packed (or ¼ C granulated white sugar and 2 tsp molasses)
  • 1 medium egg
  • 1/2 teaspoon vanilla extract
  • scant salt
  • OPTIONAL INGREDIENTS
    • ¼ C chunky peanut butter
    • ¼ C raisins or Craisins
    • ¼ C semi-sweet chocolate chips, chilled
    • ¼ C walnuts, chopped
  1. Mix together sugar, salt, butter, vanilla and egg
  2. Add optional ingredients (chocolate, nuts, etc)
  3. Stir in dry pancake mix with a spoon just until combined
    NOTE: Batter should be thick
  4. Cover and put into the refrigerator for 20 minutes
  5. Preheat oven to 350 degrees Fahrenheit.
  6. Cut dough into 4, 6 or 8 pieces, depending on how big you want your cookies.
  7. Form into balls with your hands
  8. Put 3 TBL CinnaSugar in a bowl
    (1/2 C each granulated sugar and cinnamon – scant nutmeg)
  9. Roll dough balls in CinnaSugar to cover.
  10. Place cinnamon covered balls 4 inches apart on an ungreased baking sheet
  11. Optional:  Sprinkle with Maldon salt
  12. Press down only slightly
  13. Bake 10-12 minutes or until set.
  14. Remove hot cookies immediately from cookie sheet to cooling rack with spatula.
  15. Cool for at least 2 minutes before removing from baking tray, then enjoy.

Here is a combination as suggested by Arizona Your Life A-Z

  • 1 box 16 oz cake mix
    (or 15 oz mix plus 1/4 C flour or Bisquick for each ounce under 16)
  • 1/2 C Vegetable Oil
  • 2 Eggs
  • Plus sprinkles, chocolate chips, nuts, etc
  • 350º for 8-10 minutes

Biscuit Sticky Buns

    • Cook Caramel
  • 1 TBL butter
  • 1 TBL water
  • 1 1/4 C brown sugar
    • Mix together till smooth
  • 1/2 C heavy cream drizzled in while whisking
    • Cook until starts to brown
    • Meanwhile line a buttered glass baking dish with parchment paper
    • Pour the caramel onto the parchment paper
    • Sprinkle caramel with chopped pecans and set aside 
  • Mix 4 C Bisquick
  • 1/3 C buttermilk powder
  • 1 tsp baking powder
  • Cut in 1 stick cold butter
  • and enough cold skim milk to make a stiff dough
    • Combine all quickly and flatten with a rolling pin
    • Try to shape into a rectanble
  • Top with softened butter, sugar, chopped pecans, CinnaSugar
  • Roll up starting on the short side so you end up with larger rolls, do not start on the long side
  • Trim off ends
  • Cut into twelve one inch medallions and place on top of caramel
  • Bake 375º for 30-35 minutes
  • Turn pan over and carefully remove pan, then peel off parchment paper

Pumpkin Fluff

  • 2 C pumpkin puree
  • 1/3 C real maple syrup
  • 1 tsp vanilla
  • 1 TBL pumpkin pie spice
  • 2 C whipped cream
    • mix to combine
  • put into parfait cups (uncooked) and top with whipped topping, pecans and crushed ginger snaps

Carole Stubbs’ Cheesecake

This is hands down, the best cheesecake I’ve ever had.  She brought three to a party, and I ended up eating half of one of them.  I was soooo sick.

  • 8 ounce package Philadelphia Cream Cheese (room temp)
  • 1/3 C sugar
  • 1 TBL light Karo
  • 3 TBL sour cream
  • 1 large egg
  • zest and juice from two lemons
  • 1 tsp vanilla extract

Use my recipe for a graham cracker crust.

  1. Butter the sides and bottom of a baking pan.  Ideally, use a springform pan
  2. Cut strips of parchment paper about 2 inches wide and place around sides of pan.
  3. Prepare graham crackers – press into BOTTOM ONLY of the baking pan (not the sides)
  4. Beat cream cheese, sugar and Karo
  5. Add egg and sour cream and beat
  6. Add lemon and vanilla and beat to incorporate
  7. Pour into prepared graham cracker crust
  8. Place the baking pan in the bottom of a large casserole dish, and fill the dish with about one inch of boiling hot water
    NOTE:  If using a springform pan (or any pan that may leak) wrap the baking pan with foil to isolate it from the water.
  9. Lay foil lightly over top of the pan/dish
  10. Bake at 350º for 30 minutes
  11. Cool at least 2 hours before serving
  12. Top with fresh blueberries or lingonberry preserves

TOPPING OPTIONS

For the sour cream topping:

  • 2 cups sour cream (475 ml)
  • 1/3 cup powdered sugar (35g)
  • 1 teaspoon vanilla extract

For the raspberry sauce:

  • 12 ounces (340g) fresh raspberries
  • 1/2 cup granulated sugar (100g)
  • 1/2 cup water (120 ml)

Caramel Ganache

  • 28 individually wrapped Kraft Caramel candies -Approximately 8 oz
  • 3 TBL butter
  • 1/2 tsp salt
  • 1/4 cup heavy whipping cream
  1. Prepare an ice water bath for when the caramel is melted
  2. Bring whipping cream and butter up to 195º and add the caramel pieces and salt
  3. Stir until smooth
  4. Place the pan with the caramel mixture into the ice water bath and beat with an electric mixer, stopping to scrap down the sides
  5. This will take about 5 minutes but eventually the mixture will get creamy and thicken.

Pearl Tapioca

Ingredients

  • 3 1/2 oz pearl tapioca
  • 1 PT cold water
    Soak overnight on the counter – not in the fridge
  • Put drained tapioca into sauce pan
  • Add 2 1/2 C whole milk (not low fat)
  • Add 1/2 C heavy cream and a pinch of salt
  1. Turn the heat on the absolutely lowest temperature you can possibly attain
  2. Let cook for 2 hours – it should get hot, but not even simmer
  3. Mix 1 egg yolk with 1/3 C sugar
  4. Temper hot liquid into your eggs, then back into the pot
  5. Mix in the zest and juice from one lemon
  6. Cook uncovered for 15 more minutes
  7. Cool on counter for 1 hour and serve warm
  8. If planning to cool, cover surface with plastic and refrigerate

Caramel Pie

Use a prepared graham cracker pie shell for this recipe

  • 8 oz butter
  • 1 C brown sugar
  • 1/4 C heavy cream

Heat and melt first three ingredients

  • Drizzle in 3 C whole milk and bring back up to heat
  • In separate bowl combine 2 egg yolks, 3 TBL corn starch, 1/2 tsp vanilla and 1 C whole milk
  • Temper 1 C of the hot mixture into the egg mixture
  • Drizzle tempered mixture back into the pot, whisking continually
  • Whisk until it thickens, then pour into your pie shell
  • Refrigerate for at least an hour
  • Meanwhile, beat 2 egg whites till they start to firm, then add 1/2 C confectioner sugar, scant salt, and 1 tsp vanilla
  • Continue to beat until stiff peaks form
  • Spread onto pie, making a bunch of little waves or peaks
  • Broil for a few minutes, or torch to brown

Parnassienne au Chocolate

Christopher Gross’ Parnassienne au Chocolate Chocolate Tower

From Phoenix New Times:  October 21, 2010

Chocolate Tower

What’s better than chocolate? Three kinds of chocolate, of course.

Chef Christopher Gross of Christopher’s Restaurant and Crush Lounge created his often-imitated  Parnassienne au Chocolate Chocolate Tower: Nearly half a foot of a dark chocolate lattice over a white chocolate tube that envelops a chocolate mousse center.

Today he shares the recipe for his signature tower — the same one he shared with Julia Child on her PBS master chef series — so you can try your hand at chocolatiering at home.

Click through for the three-part recipe: Mousse, lattice, and espresso sauce.

Chocolate Mousse

(Serves 8)
What you’ll need:
5-½ oz. semi-sweet chocolate, broken into pieces
3 Tbsp unsalted butter, sliced
¼ cup heavy cream
1-¼ cups egg whites (10 large)
4 Tbsp superfine sugar

What you’ll do:
1. Pour two inches of water into a saucepan and bring to a slow simmer. Set a stainless steel bowl on top of the pan, and add the chocolate and the butter. Stir occasionally as the chocolate melts; when smooth and lump-free, in about five minutes, remove and let the chocolate cool to room temperature.
2. Pour the cream into the stainless steel bowl set over ice and water. Beat by hand or with a portable beater, whipping in as much air as possible, until stiff peaks form.
3. Beat the egg whites to the soft peak stage; whip in two tablespoons of sugar; continue beating to stiff peaks form gradually adding the reminder of the sugar.
4. Whisk a quarter of the egg whites into the cool, melted chocolate, and then gradually add the rest. Fold in the cream quickly, deflating as little as possible.
5. Cut a piece of parchment paper into a rectangle 3-½ inches wide by 5 inches long. Form into a cylinder approximately 5 inches tall and 1-½ inches in diameter. Close the side with a piece of sticky tape and make sure that it stands up straight. Repeat to form 8 cylinders.
6. Fill a pastry bag with the mousse and pipe into the tubes, leaving a -½-inch space at the top. Drape the tops of the cylinders with a sheet of plastic and place in the freezer until frozen solid (approximately 1 hour).

Lattice

What you’ll need:
3 oz. semi-sweet chocolate, cut into pieces
6 oz. white chocolate, cut into pieces

What you’ll do:
1. For decorating the towers, cut eight 5-inch squares out of parchment paper.
2. Melt the semi-sweet chocolate over low heat.
3. Fill a decorating cone with some of the dark chocolate, and drizzle free form diagonal lines no more than 1/4 inch apart in a lattice pattern across each of the parchment squares. As each square is done, lay flat on one of the baking sheets.
4. When all squares are finished put the sheets in the freezer until the chocolate is set, or about 5 minutes. Reserve the remaining melted chocolate.
5. Melt the white chocolate over low heat.
6. Remove one dark chocolate lattice square from the freezer. And with the offset spatula, spread 2 to 3 tablespoons of the white chocolate in a very thin layer on top of the lattice, leaving a 1-inch strip uncoated at one side. Scrape off any excess chocolate.
7. Unwrap one frozen mousse tower and lay it on top of the white chocolate, parallel to and opposite the uncoated strip. Quickly wrap the parchment around the mousse, handling as little as possible and being careful to leave the uncoated flap overlapping.
8. Return each finished tower to the freezer, immediately after wrapping in parchment. Repeating steps 6 to 8 until you’ve latticed all the mousse towers.
9. The papers may be peeled off after five minutes in the freezer, and the chocolate lattice will remain in place around the mousse.
10. Then let the mousse defrost in the refrigerator for about an hour.

Espresso Sauce

What you’ll need:
1-½ cups half and half (light cream)
½ fragrant vanilla bean (or 1 tsp vanilla extract)
6 egg yolks
⅔ cup sugar
1 cup ILLY espresso coffee beans (2 oz.)

What you’ll do:
1. Heat the half and half with the vanilla bean, when almost at a simmer remove from the heat and cover the pan.
2. Meanwhile, start beating the egg yolks with the hand held mixer in the pan until thick and lemon-colored.
3. Gradually beat in the sugar, and then slowly blend in the ¼ cup of hot cream to warm the yolks. Blend slowly to minimize air bubbles.
4. Remove the vanilla bean from the remaining cream and blend the cream into the yolk mixture.
5. Pour in the espresso beans and set over low heat, stirring slowly and constantly until the mixture is thick enough to coat the back of the spoon.
6. Strain through the fine meshed sieve into a bowl and let cool. Serve warm, tepid or chilled.

Plate the chocolate tower plain or with fruit of your choosing. Then drizzle the espresso sauce over the components as desired.

This is one to bust out for dinner with the in-laws, your boss, a significant other, or anyone else you might be trying to impress. Can’t quite nail the presentation? Head over to Christopher’s instead.

(This is part three of our Chef Chat with Gross. Check out parts one and two for more about how he made the transition from picky eater to worldly chef and his foie gras battles.)

Trifle

SEE A SIMPLE RECIPE AT THE BOTTOM OF THIS PAGE
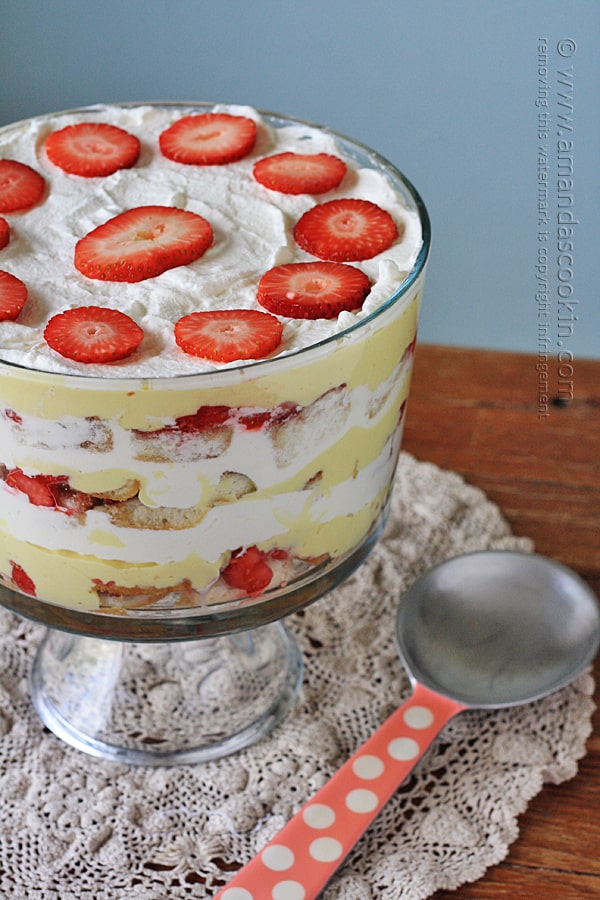
From AmandasCookin.com

This is a very simple and elegant dessert.  You can make a large trifle that will serve everyone, or individual dessert cup trifles.
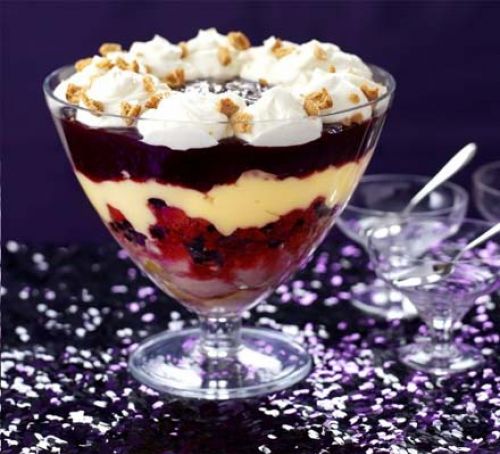
From BBCGoodFood.com

A TRIFLE is a general category of recipe, kind of like “a casserole” – “a burrito” – or “a beverage.”
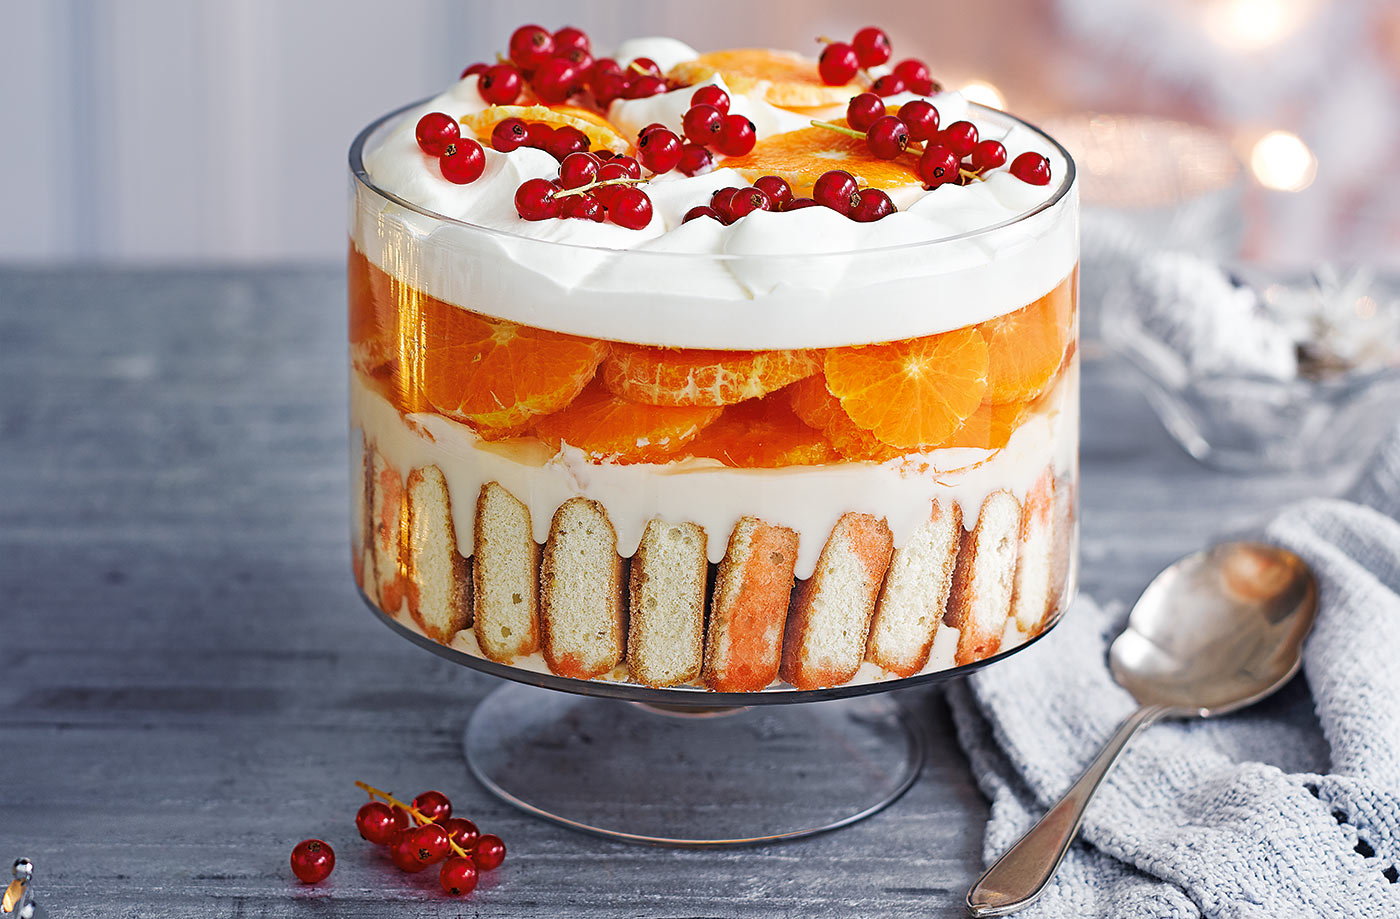
From RealFood.Tesco.com

It simply describes a layered desert, usually with a cake layer, a pudding layer, a fruit layer and a few other layers thrown in for good measure.
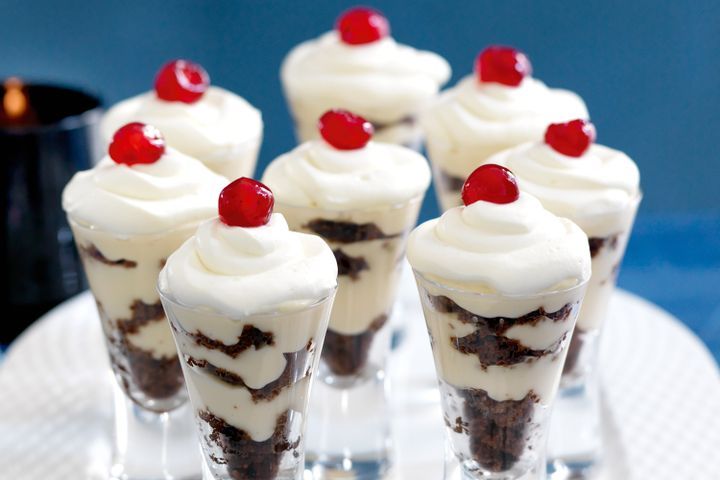
From taste.co.au

I’ve included photos from other websites so that you can get an idea of what a trifle is, and create your own.  You will see that the key is to maintain distinct layers.  If you browse all of these GOOGLE IMAGES you will see that some trifles are not clearly labeled at all, which makes it not really a trifle.

CLICK ON AN IMAGE FOR AN ENLARGEMENT
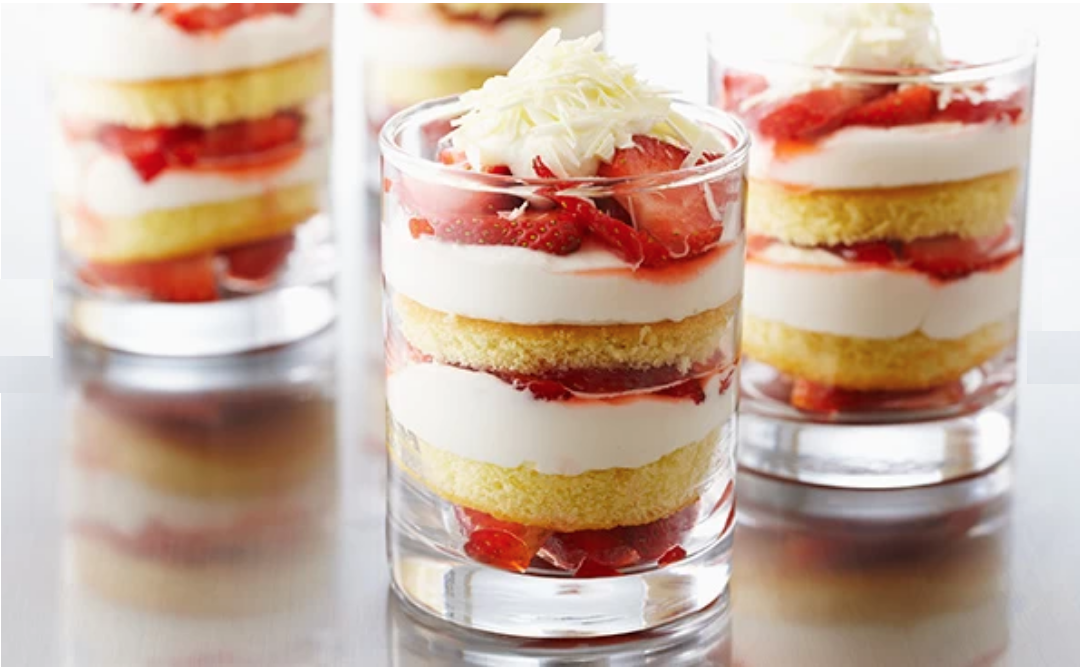
Food Network Canada

A simple recipe that you can follow, if you want a no-fail first attempt.

SIMPLE TRIFLE

  1. First, decide if you want one large dramatic trifle to share, or individual trifles.  You definitely want it to be clear glass though.  Be very careful to not fill any layer too deeply, or you will run out of space.
  2. SPONGE LAYER:  Traditionally you use Lady Fingers in a trifle, but you can buy angel food cake or use the recipe below and it will be just as tasty.  You can also simply use Vanilla Wafers.  Use a knife and cut prepared angel food cake into 1/2 to 1 inch slices.
  3. If you want to try to make your own sponge layer, here is a recipe for LADY FINGERS.
  4. If you don’t have a biscuit cutter, a single biscuit cutter is a good addition to your arsenal.  Cut circles from the angel food cake.  If they are too big for your container, cut them into geometric shapes and put them against the wall of your glass.
  5. PUDDING LAYER:  Spoon pudding into the bottom of your glass to hold your sponge in place.  Pudding can be from scratch or even a box instant pudding.  Both will work well.
  6. COOKIE LAYER:  You can use crushed Oreo’s or Graham Crackers.  You can even use granola.  The thing is that you want something with crumbly pieces to create a completely different texture.
  7. FRUIT LAYER:  For this, you want a soft fruit like peaches, strawberries, kiwi, and so forth.  The fruit should be in bite-sized pieces.
  8. WHIPPED CREAM LAYER:  You really don’t want to use spray canned whipped cream, as it breaks down too quickly.  Cool Whip is not a bad choice, but making your own whipped cream is actually pretty easy.  CLICK HERE for a simple three-ingredient whipped cream.
  9. OPTIONAL:  CREAM CHEESE LAYER:  Alternately, you can use Cream Cheese, Yogurt, cooked (cooled) Vanilla Pudding, and powdered sugar.
  10. FRESH FRUIT:  Top the whipped cream with something like blueberries, strawberries, cherries, etc.  Something small and colorful.
  11. GARNISH:  You can garnish with more crushed cookies, or even chopped nuts if you want.  You can also place a single mint leaf on the very top for an elegant presentation.

STEP BY STEP – OVERVIEW

  1. For a large trifle, put a layer of angel food cake in the bottom
  2. Add a layer of your white mixture cream cheese or whipped cream.
  3. Stack strawberries against the side so they can be seen
  4. Add strawberry pieces and blueberries
  5. Repeat with layers of cake, cream mixture, more fruit
  6. Finish with a layer of cake, cream mixture, and decoratively place fruits

Chef’s Notes

DO NOT USE ANYTHING BELOW THIS LINE IN MY COOKBOOK.


These notes are gleaned from PBS The Great British Baking Show

  • A Trifle should have well-defined layers
  • Trifles are a West Wales staple – placed on tables several times each week
  • Trifles traditionally use lady fingers for the cake layers
  • Another option is Vanilla Wafers
  • Use a shallow disk to serve many and to all all flavors in a single serving
  • Biscuits need to absorb the liquid without disintegrating
  • Many of the chefs used lemon meringue or lemon curd – The custard should be thick
  • Recipe 1: layers of biscuit/cake, strawberry, whipped cream and blueberry
  • Recipe 2: Recipe featured a praline circle on the top
  • Recipe 3: bananas, strawberries, mangos with Lemon Macaroons on top
  • Recipe 4: Ginger cake with fruit and creme anglaise
  • Recipe 5: Spray the layers with cointreau
  • Recipe 6: Peach, almond and ginger – with browned butter
  • Recipe 7: Cake layer was a lemon Swiss roll
  • Recipe 8: Amaretti Bisquits on top
  • Recipe 9: Chef used a jelly layer

If you are interested, you can MAKE YOUR OWN LADY FINGERS rather than using pound cake


Recipe from Wall Street Journal

Dec 20, 2016 – CLICK ON IMAGES TO ENLARGE
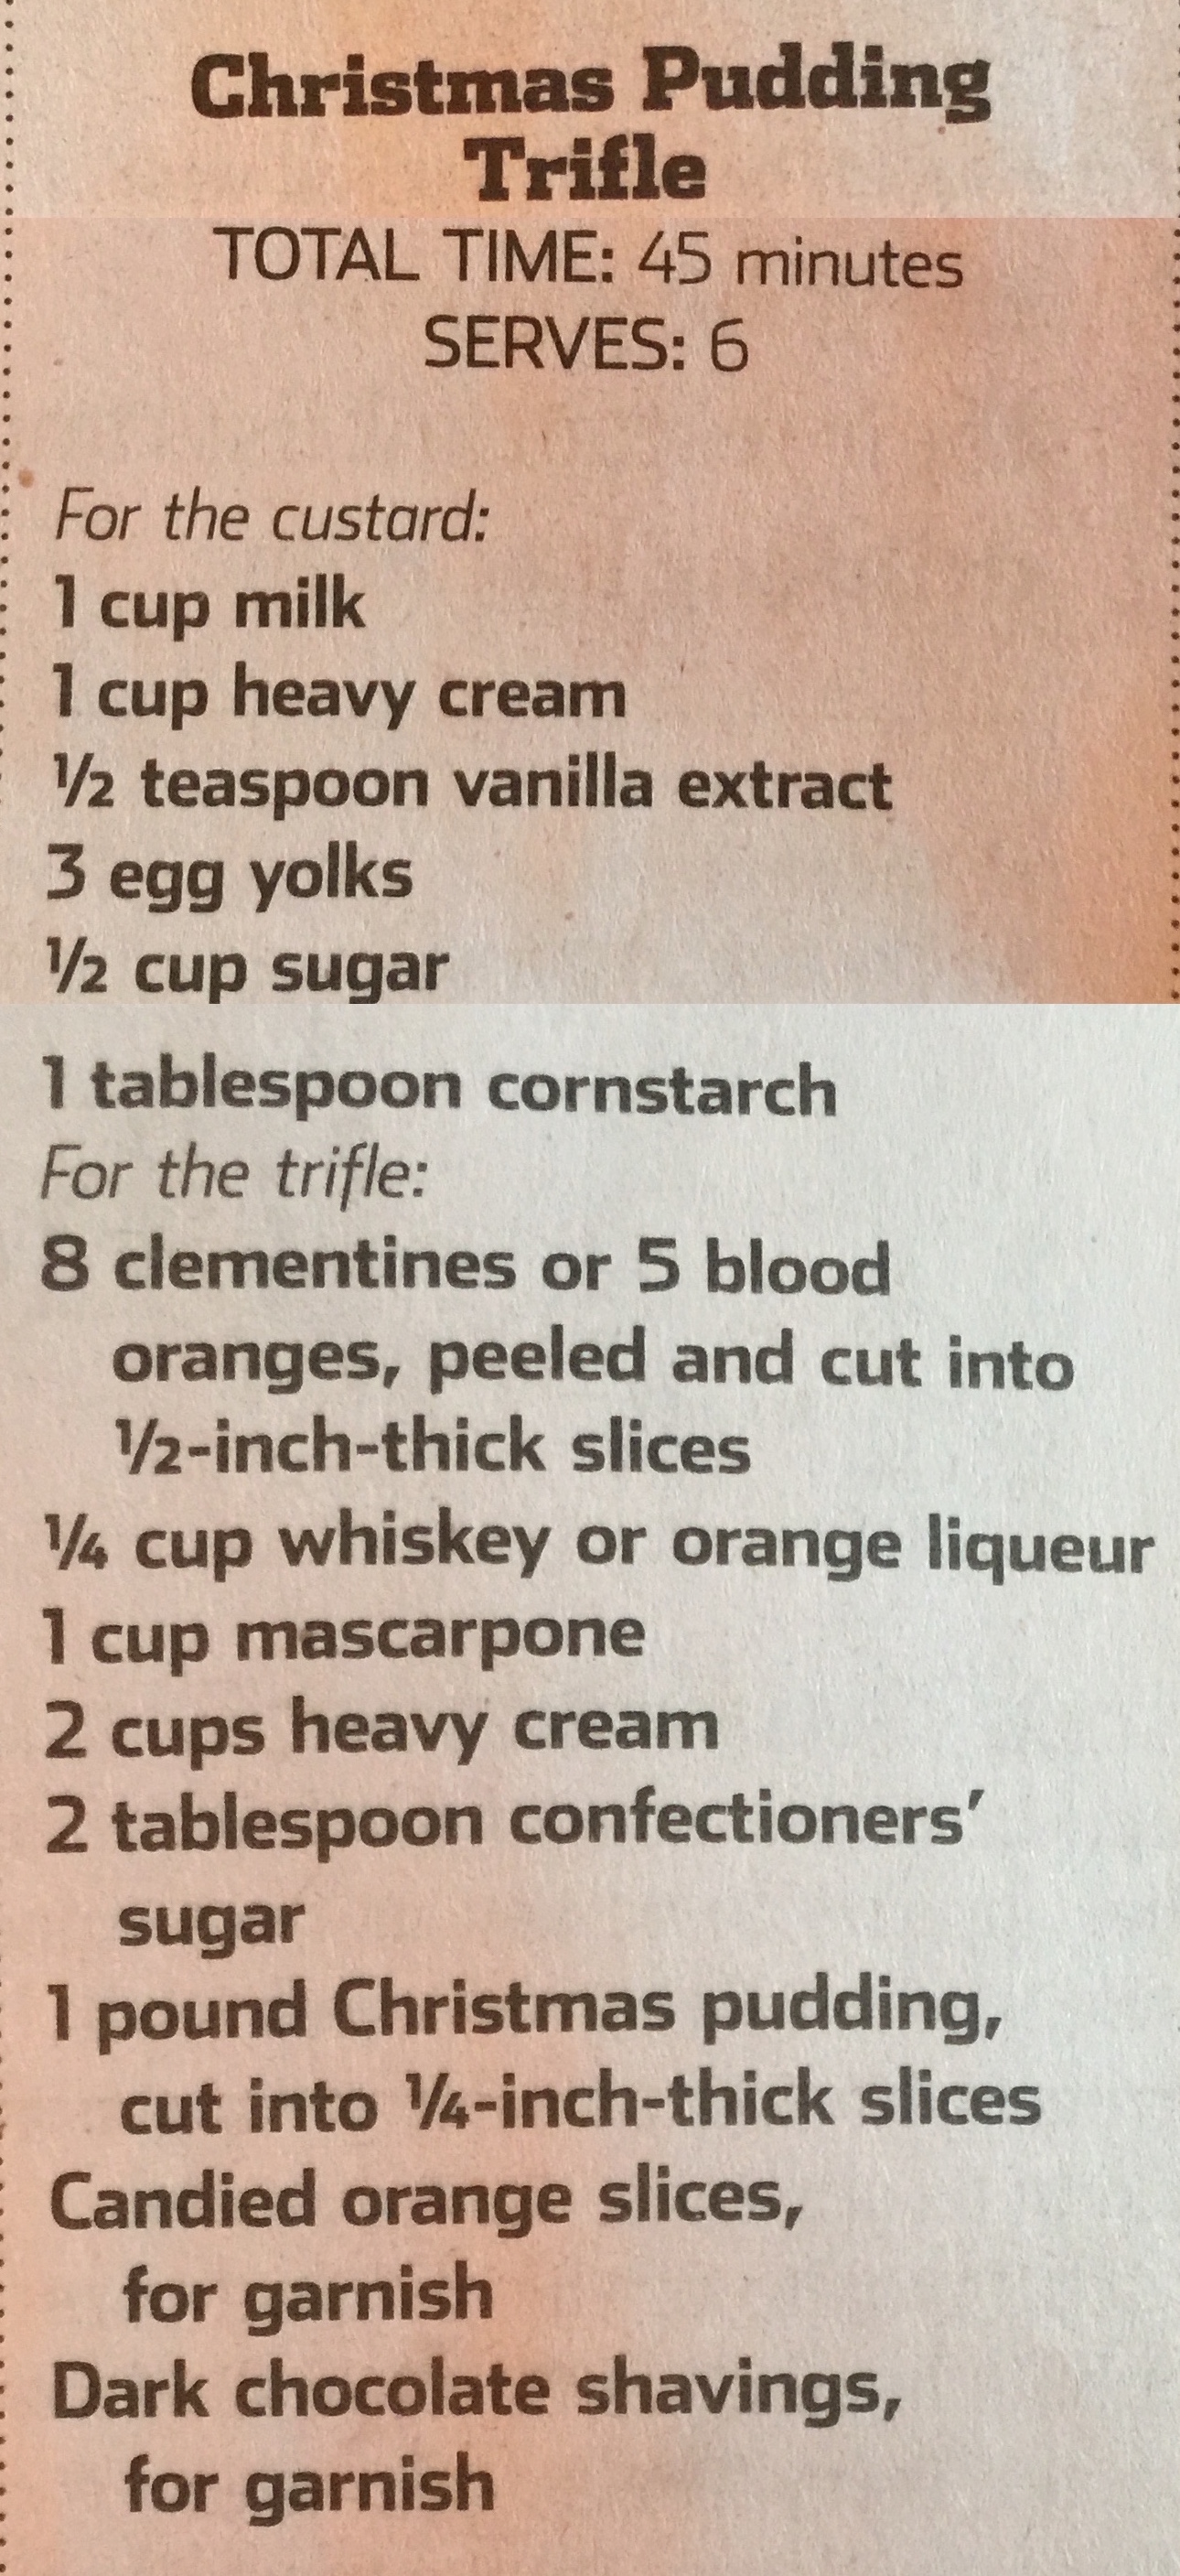
Trifle 1 Trifle 2 Trifle 3
What they are calling their Christmas Pudding was defined in a previous publication. You can use slices of Angel Food Cake, Vanilla Wafers, or more traditionally Lady Fingers. This goes over GREAT at parties. Make sure you assemble it into a clear glass bowl or the WOW factor is lost.


Lemon Bar

Barb Fenzel of Les Gourmettes Cooking School (here in Phoenix) prepared this recipe.  This is my best attempt at recreating it from what I observed.

  1. Grease a 9×12 glass baking dish with butter.
  2. Pulse in your food processor: 3/4 C flour, 1/2 C confectioner sugar, 1/2 tsp salt, and 1 stick (cut into 8 pieces) cold butter.
  3. Press into pan using an offset spatula.
    Don’t bother cleaning the food processor basket yet.
  4. Bake at 350º for 30 minutes.
  5. Meanwhile prepare your lemon filling.
  6. Combine in a large mixing bowl: zest and juice from two lemons, 1/2 C sugar, 1 egg plus 1 egg yolk, 1/2 tsp salt and 1 TBL corn starch.
  7. Dump onto your baked base and spread with a spatula.
  8. In your food processor, combine:  1 brick softened cream cheese, 1/2 C sugar, and 1 egg.
  9. Drop it onto your lemon filling by spoonfuls.
  10. Bake at 350º for another 30 minutes.
  11. Rest 1 hour before putting into refrigerator, and then chill 2 hours before serving.
  12. Cut into squares and serve.
HTML Snippets Powered By : XYZScripts.com