Bam Bam has years of experience in competition as well as BBQ restaurants, so he knows a lot about when chicken is done. For that reason, he relies solely on his Thermapen. Most home cooks and beginning BBQ-ers should monitor the internal temperature of the chicken throughout the cook. In this recipe, we’ve included instructions to use a leave-in probe thermometer to keep track of the chicken temps as they rise.
Ingredients
8 Chicken thighs, bone-in, skin on
~6 Tbsp of your favorite chicken BBQ rub
1–2 C your favorite BBQ sauce for chicken
1 lb butter, plus a tablespoon for the sauce
Instructions
Preheat smoker to 300°F (149°C)
If you want competition-style thighs, trim them by removing the skin, cutting off any high-spots of fat from the inside of the skin, squaring up the meat and trimming off excess fat, and removing the ball joint of the bone.
Sprinkle the meat lightly but evenly with the rub.
Re-wrap the meat in the skin and sprinkle with more rub.
Even if you don’t do all the trimming, it’s a good idea to peel the skin back and sprinkle some rub underneath it. Skin is designed to keep things out. Put some rub under it to flavor the meat better.
Cut the butter up into small cubes and put it all in the bottom of an aluminum pan that is large enough to fit all the chicken in one layer.
Layer the chicken, seam-side up, on the butter. Cover it with foil and put it in the smoker for 45 minutes.
After 45 minutes has elapsed, remove the chicken pan from the smoker and let it sit for 15 minutes.
Remove the chicken from the pan and place it back in the smoker, inserting a Pro-Series® Probe attached to a leave-in thermometer such as BlueDOT®, ChefAlarm® or Smoke™. Set the high alarm for 175°F (79°C) and smoke the chicken.
Warm your barbecue sauce on the stove or in the smoker for a few minutes. Stir in the tablespoon of butter and remove the sauce from heat.
When the alarm sounds, verify the temperature with your Thermapen, then baste the chicken with the BBQ sauce. Alternatively, you can lift each piece and dunk it in the sauce before returning it to the smoker.
Cook the chicken for a final 10 minutes to set the sauce.
Remove the chicken from heat, allow to rest for 10 minutes and serve.
For food safety, it’s very important that you add citric acid to this Green Tomato Ketchup recipe to give it enough acidity to avoid any issues with Colostrum botulinum bacteria, which is a deadly neurotoxin.
Canned, this will last until next season.
Ingredients
3 LB green tomatoes(200 mg)
2 LB onions
1 tsp ground black pepper
1/2 tsp ground dry mustard
1 tsp Worcestershire sauce
1 C apple cider vinegar
1 C granulated sugar
12-16 oz tomato paste CHEESECLOTH BAG
6 cloves
4 bay leaves
1 sprig rosemary AT THE VERY END
1 tablespoons bottled lemon juice (do not used fresh juice as it’s not acidic enough) or 1/2 tsp pure powdered citric acid
Step by Step
Slice or chop green tomatoes and onions.
Place in a large crockpot with pepper, mustard, and Worcestershire sauce.
Put the removable flavoring spices in a small cheesecloth bag and add to the pot.
Pour cider over mixture.
Cook for 6 to 8 hours over very low heat, stirring occasionally.
Remove cheesecloth bag and discard.
Puree mixture with a wand blender or in a food processor or blender.
Strain tomato mixture through a mesh strainer, or if you have it a food mill using the smallest disk available
Return to pot and bring to boil.
Add 12-16 oz tomato paste and whisk until smooth.
If necessary, let simmer on low until thickened. I usually go about 3-4 hours.
Add citric acid and stir until dissolved. Using a clean spoon, take a taste. If you feel the ketchup is sweet enough, stop. If not, add another 1/4 cup of sugar. CANNING
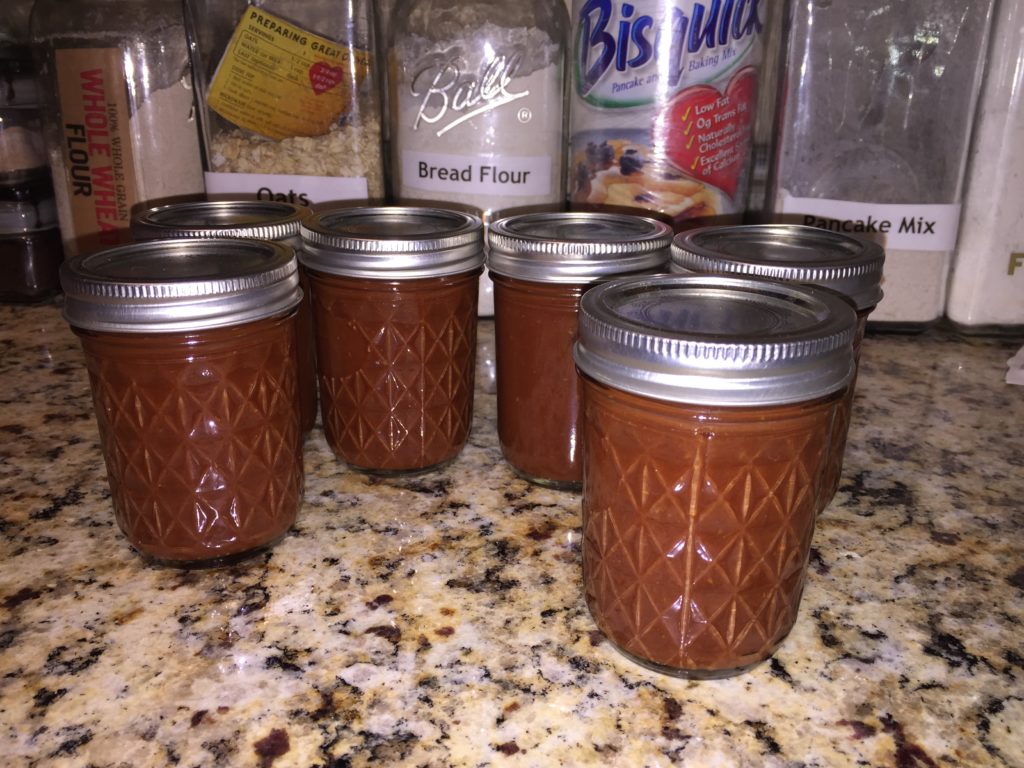
Immediately fill six sterilized half pint jelly jars with green tomato ketchup, leaving 1/4-inch head space.
Wipe the jar tops and threads clean with a clean paper towel. Place hot sealing lids on the jars, as you fill each one, and apply the screw on rings loosely.
Process in boiling water bath in a deep canning pot for 10 minutes.
Remove the jars and cool completely. Tighten the jar screw rings to complete the sealing process.
After the jars of green tomato ketchup cool (don’t do this while they are still hot) check seals by pressing middle of lid with finger. If lid springs back, your green tomato ketchup didn’t seal and must be refrigerated and used within the month.
Let jars of green tomato ketchup stand at room temperature 24 hours.
Store unopened product in a cool dry place up to one year. Refrigerate green tomato ketchup after opening and keep for up to a month.
The Whitehouse Recipe is a fun part of history, and makes pretty good ketchup (or should I say catsup) but this variation has a few twists added by Grandpa.
1 8 oz can tomato paste
3-5 tomatoes – cut into pieces
1 small onion (minced)
½ tsp EACH dry hot mustard, nutmeg, coriander, black pepper, cayenne pepper, cinnamon, ground clove, salt, garlic powder, paprika
2 bay leaves
1 TBL lime juice
1 TBL soft brown sugar (packed) HOLD FOR LATER
2 TBL apple cider vinegar – HOLD FOR LATER
Step by Step
Combine all ingredients (except sugar and vinegar) in a large heavy pan
Rinse can/jar of tomato paste into pan with 2 TBL water, TWICE
Bring the mixture to the boil, then reduce to a slow simmer.
Cook over a medium heat for 20 minutes stirring often and carefully.
Add brown sugar and vinegar and cook until it starts to thicken (10-40 minutes) stirring frequently
Leave to cool a full half hour
Run through a food mill’s finest settings for the ketchup
Run through the next larger food mill screen for a nice spread for crostini
Pour the ketchup mixture through a funnel into suitable bottles
Use it as you would any commercial tomato ketchup
Stored in the fridge this ketchup will keep for a month.
Note: Before Step 6 if you put it (while hot) into sterilized canning jars (and sterilized canning lids) you can store it for up to a year.
This recipe was adapted from “The Whitehouse Cookbook” published in 1887 by Fanny Lemira Gillette & Hugo Ziemann. Grover Cleveland was President of the United States at the time.
16 oz tomato pieces (drained)
1/4 onion (minced) and collected juices
2 tsp TBL salt
2 TBL brown sugar
2 tsp mustard
1 tsp alspice
1 tsp black pepper
1 tsp cinnamon
1/4 tsp ground clove
1/4 tsp cayenne pepper
1/4 tsp grated nutmeg
1/2 C white balsamic vinegar
Step by Step
Blend tomato pieces, then run through a food mill or sieve to remove seeds.
Mince onion, salt and brown sugar.
Boil until quite thick
Mix together mustard, allspice, black pepper, cinnamon, ground cloves, cayenne pepper, and grated nutmeg
Blend with balsamic vinegar
Mix vinegar mixture with tomato mixture.
Bring to a boil, then simmer for five minutes, stirring continually.
Pour into sterilized canning jars with sterilized lids.
Unless you’re a professional cook, you may be confused as to why most pots and pans have a hole at the end of the handle You may not have even noticed that the hole is there. There are actually two good reasons why pots and pans have this hole. First, it makes it easy to hang them up on hooks when they’re drying or not in use. This is often seen in professional kitchens or house that have a lot of space.
Another trick that experienced chefs like to use is using that hole to hold a utensil. For example, if you have a stirring spoon, you don’t just want to leave it in the pot or set it on the counter. But with the hole at the end of the handle, you can slide the utensil in there so it just sits up and drips back into the pot. Try it out next time you want to impress people with your cooking skills.
Salt is one of the most commonly found minerals on earth. And while most people associate it with cooking, it actually has tons of uses all around the house. One of the more helpful alternatives uses for salt is to help fix clogged drains.
Here’s what you need to do. First, clear as much of the blockage as you can by hand. Then take 1/2 a cup of salt and 1/2 a cup of baking soda and pour it into the drain. Then take vinegar and pour it down the hole. It will bubble up fast, then by the time the bubbles stop, the clog should be gone.
Salt can also be used for things like putting out a dangerous grease fire. You can also use it as an abrasive to help clean a very dirty pot or pan. There are literally ended uses for salt around the house, that’s why it pays to always keep extra in your pantry.
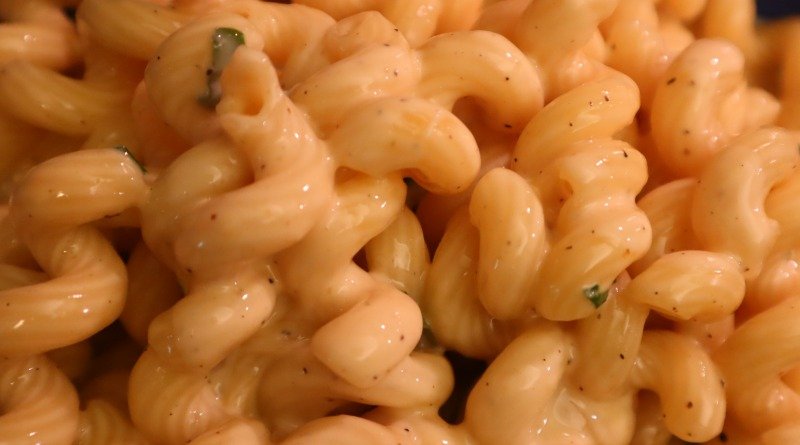
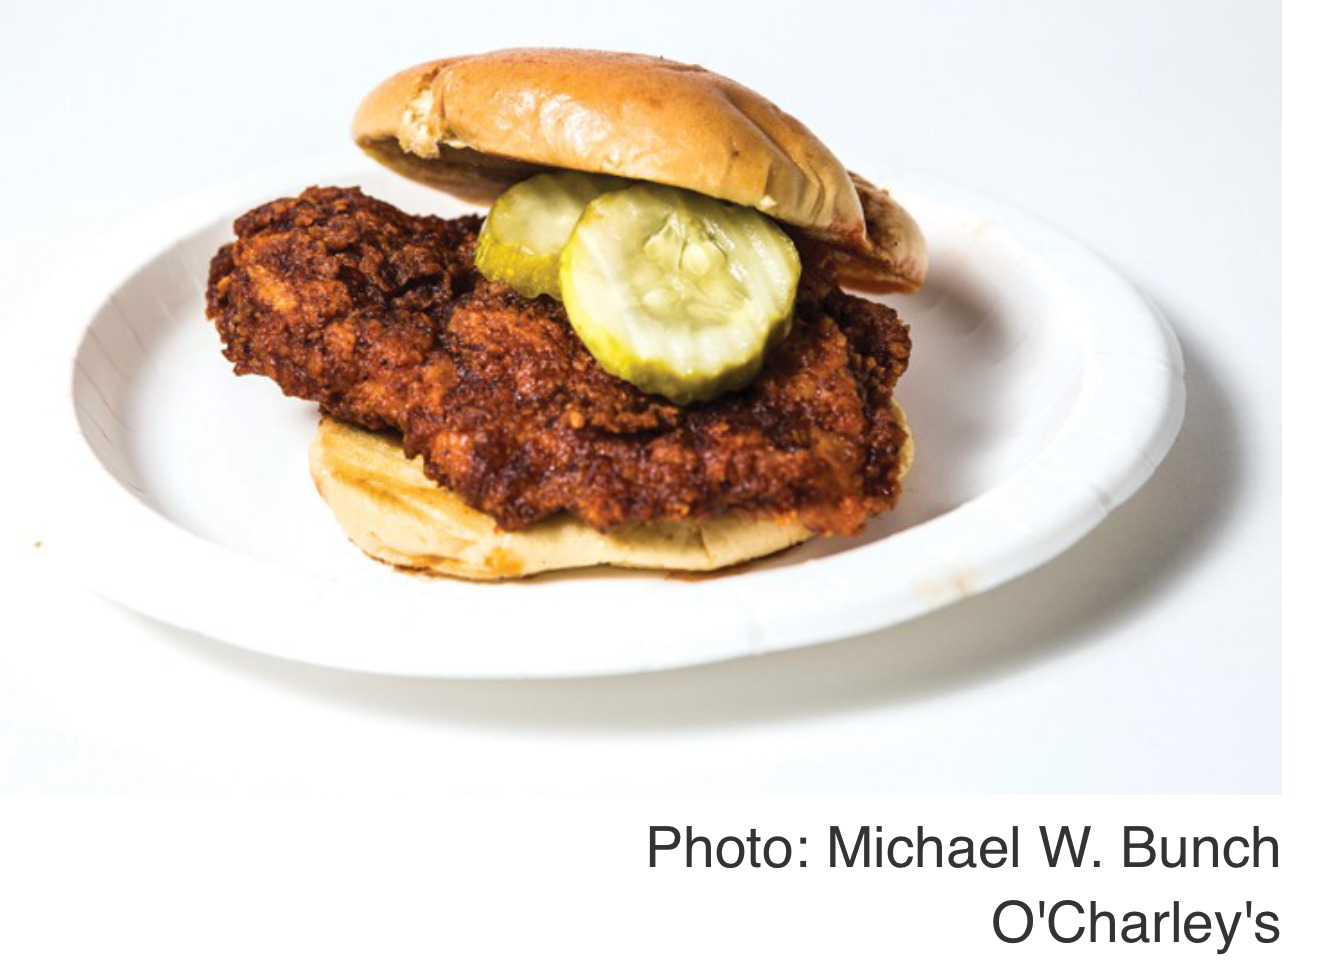
This is a nice sandwich if you are looking for a bit of heat and a crispy mouth feel. Here is my recipe, adapted from a recipe shown on YourLife A – Z.
Prepare wet marinade: 1/2 C buttermilk, 1 egg yolk, 2 TBL Frank’s Red Hot Cayenne, 2 tsp Grandpa’s Thunder Powder. For less heat, use a bit of cumin and a bit of garlic powder.
Pound 2 chicken thighs between two sheets of plastic, lightly sprayed with Pam. Make evenly flat, but not too thin.
Put into plastic bag, and let rest in refrigerator overnight.
– – NEXT DAY
Next day (for lunch or dinner) remove liquid from plastic bag, and put into a large bowl for later use.
Pat dry (DON’T WIPE) and dredge in dry ingredients:
2 TBL brown sugar, 1 tsp salt, 1 tsp garlic powder, 1 TBL Thunder Powder, 1/4 C AP flour, 1 tsp corn starch
Set on wire rack and let rest an hour
– – AN HOUR LATER
Dredge again in the dredge flour and place in hot oil – Canola or Peanut
Fry about 10-12 minutes each piece at 320 – 330º
Drain on a wire rack.
Put thighs in an oven at 350º for about 30 minutes
Serve on a brioche bun with desired sandwich toppings
16 ounces (454g) Philadelphia cream cheese 2 large eggs ½ cup (120g) sour cream 3 – 4 tablespoons (42g – 56g) unsalted butter
Place cream cheese, eggs, sour cream on counter-top to reach room temperature.
Then, melt the unsalted butter.
*Critical Tip: this is critical for your cheesecake’s success, so please please make sure all the above ingredients are at room temperature before you start. If not, you may end up with lumpy fluff top cheesecake. So don’t skip this step! 🙂
PART A
MAKE THE CRUST
1
Ground Graham Crackers
10 (120g) graham crackers Food processor or Ziploc bag + Rolling pin
Finely ground the graham crackers in a food processor.
Or place the graham crackers in a Ziploc bag and roll them with a rolling pin.
Mix Crust Mixture
Finely ground graham crackers A pinch sea salt 2 tsp – 1½ tbsp (8.3g – 19g) brown sugar
Small mixing bowl Fork
In a small mixing bowl, mix finely ground graham crackers, sea salt, brown sugar together with a fork.
*Pro Tip: Why add sea salt?A small pinch of sea salt heightens the flavor of other ingredients. A secret ingredient in many restaurant-quality desserts. shh… 😉
3
Optional – Add Flour
¼ cup (32g) all-purpose flour
If you want a firmer & crisper crust, we recommend blind-baking the crust. We’ll discuss this in Step 7 below.
If you’re blind-baking your crust, mix in the flour at this step.
4
Mix in Melted Unsalted Butter
3 – 4 tbsp (42g – 56g) unsalted butter, melted
Mix in unsalted butter until the mixture sticks together.
Line the side & bottom of the cheesecake pan with parchment paper for smoother sides & easier release.
*Note: We did not use any butter to line the parchment paper.
Form Crust
Graham cracker crumbs mixture, from above
Measuring cup/Spoon
Pour in the graham cracker crumbs mixture.
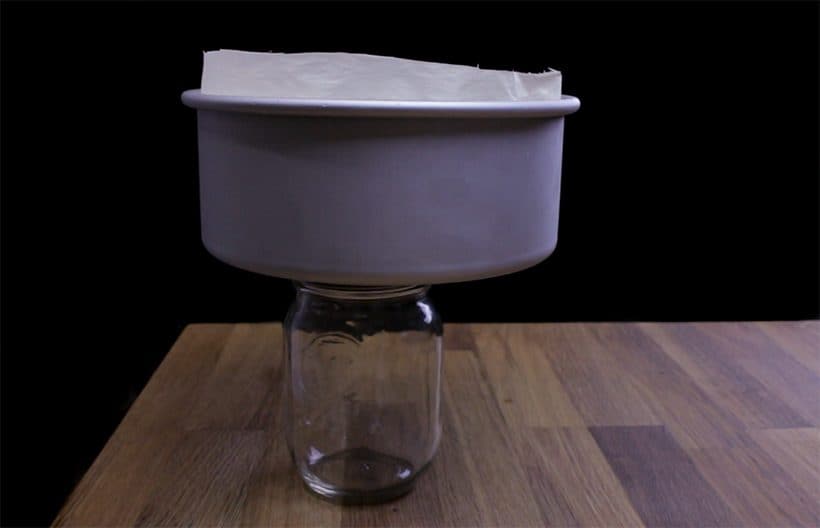
Gently press down the crumbs with a flat measuring cup, ramekin or Mason jar to form an even layer. You can also use a spoon for the edges.
In our blind taste test, the Method #2: Blind-Baked Crust was noticeably firmer and crisper compared to Method #1’s freezer version.
Method #1 – Freeze the Crust: Place the cheesecake pan in the freezer while you make the cheesecake batter.
Method #2 – Blind-Bake the Crust (for firmer & crisper crust): Place the crust in a 325°F oven for 15 minutes.
PART B
MAKE CHEESECAKE BATTER
*Critical Tip: We highly recommend using a Hand Mixer instead of a Stand Mixer. Stand Mixer is usually more powerful, thus you can easily overmix and introduce too much air into the cheesecake batter. This may result in a puffy souffle-style cheesecake.
*Note: Click on the Tabs to choose Method #1: Dense or Method #2: Creamy.
2 tbsp (16g) cornstarch2 pinches of sea salt⅔ cup (133g) white sugar Small mixing bowl
Mix cornstarch, sea salt, and white sugar together in a small mixing bowl.
9
Briefly Beat Cream Cheese
16 ounces (454g) Philadelphia cream cheese Medium mixing bowl Hand mixer
In a medium mixing bowl, briefly break up the cream cheese by beating it for 10 seconds with a hand mixer using low speed.
10
Mix in Sugar Mixture
Sugar mixture, from aboveHand mixerSilicone spatula
Add in half the sugar mixture and beat until just incorporated using low speed (roughly 20-30 seconds). Scrape down the sides and the hand mixer with a silicone spatula every time a new ingredient is added. Add remaining sugar mixture and beat until just incorporated using low speed (roughly 20-30 seconds).
11
Add Sour Cream & Vanilla Extract
½ cup (120g) sour cream2 tsp (10 ml) vanilla extract Hand mixer
Add sour cream and vanilla extract to the cream cheese mixture. Beat until just incorporated using low speed (20-30 seconds).
Blend in Eggs
2 large eggs Hand Mixer Silicone spatula
Blend in the two eggs using low speed, one at a time. Mix until just incorporated (about 15 – 20 seconds with a hand mixer). Try not to overmix on this step.
Scrape down the sides and the hand mixer with a silicone spatula and fold a few times to make sure everything is fully incorporated.
13
Pour Batter in Pan
Cream cheese batter Cheesecake pan
Pour cream cheese batter into the cheesecake pan.
14
Remove Air Bubbles for Smooth Surface
Tap cheesecake pan against the counter to let the air bubbles rise to the surface.
Burst the air bubbles with a toothpick or fork.
The longer you tap, the more air bubbles you’ll be able to burst.
Removing air bubbles is an art that requires patience!
Tap until you are satisfied. Ensure the surface is clear of air bubbles or fork marks.
Side note: what we learned from our 16 17 experiments, it’s almost impossible to remove all air bubbles.
PART C
PRESSURE COOK CHEESECAKE
To make it easier to take out the cheesecake pan from Instant Pot: make a foil sling by folding a piece of aluminum foil (as shown below).
*Note: Be sure to tuck in the foil sling down the sides (don’t let it fold over the cake when you close the lid).
Click on the Tabs to choose between: Regular Method #1 or Perfectionist Method #2.
This Perfectionist Method takes an extra step to further prevent surface dents on the cheesecake. Cause of Surface Dents: Dents on cheesecake’s surface is mostly caused by the condensation build-up during the “going up to pressure” stage. Why Use This Method? By starting with boiling water, we can shorten the “going up to pressure” time in order to minimize condensation.
15
Pressure Cook Cheesecake
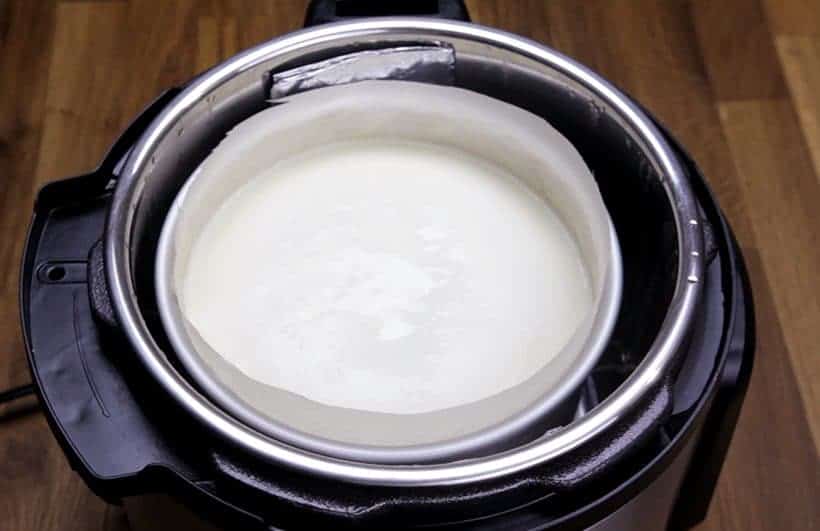
1 cup (250 ml) of waterSteamer rackFoil slingInstant Pot Pressure Cooker
Place a steamer rack and pour water in pressure cooker. Bring water to a boil (Instant Pot users: Press manual/pressure cook and set the time to 28 minutes).
When the water begins to boil, place cheesecake pan on the steamer rack with a foil sling right away.
*Caution: Don’t wait too long to place the cheesecake in pressure cooker, as it’ll affect the cooking time. Place it immediately once the water begins to boil. This prevents too much water from evaporating.
Immediately close the lid with the Venting Knob at Venting Position.
Turn Venting Knob to Sealing Position and let it pressure cook. It should go up to pressure in ~1 minute.
Pressure Cooking Time: High Pressure for 28 minutes, then Full Natural Release (takes roughly 7 – 9 minutes)
Open the lid gradually.
*Pro Tip 1 – For 6 x 3 inches Cheesecake Pan: add 5 mins High Pressure Pressure Cooking Time. *Pro Tip 2: As you open the lid, try your best to avoid dripping the condensation from the lid onto the cheesecake.
Absorb any condensation on the surface by lightly tapping it with a soft paper towel.
Allow cheesecake to cool to room temperature with the lid open in the Instant Pot Pressure Cooker.
Or place it on a wire rack to cool to room temperature.
17
Release Cheesecake From Sidewall
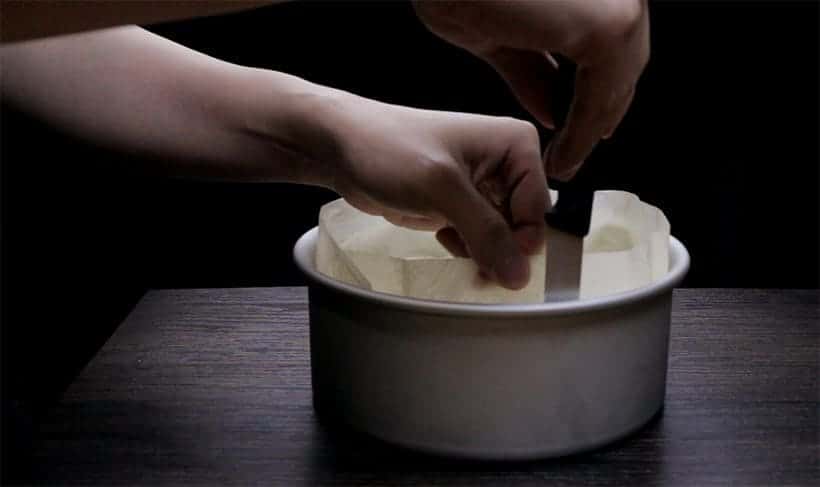
After cooling for 10 – 15 minutes, carefully run a thin paring knife between the sidewall and the cheesecake (or parchment paper) to release the cheesecake from the pan.
The parchment paper will wrinkle after pressure cooking. Pull it lightly to straighten it out for a smooth side.
18
Chill Cheesecake in Fridge
Once the cheesecake has completely cooled, place it in the refrigerator for at least 4 – 8 hours (preferably overnight).
19
Serve Instant Pot Cheesecake #17
Remove the cheesecake from the refrigerator!
The best way to release the cheesecake from the bottom pan is warm bottom of the pan to melt the butter. You can use a torch or heating pad for this step.
Carefully peel off the parchment paper.
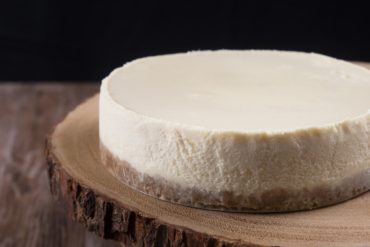
You’ve done it!! Your very own Instant Pot Cheesecake #17.
Give yourself a pat on the back & EAT!! 😀
Cooking Tips for Instant Pot Cheesecake
1. Ensure Cream Cheese, Eggs, Sour Cream at Room Temperature
Placing the above ingredients on the counter ahead of time until it reaches room temperature is critical to your cheesecake’s success! Please ensure they’re not cold before you begin making your stunning New York Cheesecake #17!
2. Smooth & Creamy Cheesecake Option:
Adjust the beating time to 1 minute for Part B – Step 9 (cream cheese), Step 10 (sugar mixture), and Step 11 (sour cream & vanilla extract).
3. Add Lemon Juice to Cheesecake Batter?
We tried using fresh Sour Cream and old Sour Cream. Old sour cream has lost some of the tangy flavors, so adding 1 tablespoon of lemon juice will help balance the flavors. Add it in Part B – Step 11 with the sour cream.
But if your sour cream is fresh, no lemon juice is needed unless you like extra tangy flavor. 🙂
4. Modifications For Other Sizes of Cheesecake Pan?
You can use the same recipe with adjusted pressure cooking time.
6 x 3 inches Cheesecake Pan (Uncovered): Due to the increase in thickness, add 5 – 8 mins High Pressure Pressure Cooking Time
4.5 – 5 x 2 inches Cheesecake Pan (Uncovered): High Pressure 18 minutes + Natural Release
Standard silicone cup (2.7″ x 1.25″) cheesecake bites (uncovered): High Pressure 7 minutes + Natural Release
5. Can I Wrap My Cheesecake with Aluminum Foil?
Some users like to wrap their cheesecake with aluminum foil for pressure cooking, but it’s not necessary. If you do decide to wrap the pan with aluminum foil, add additional 5 – 7 mins to our stated pressure cooking time in this recipe.
6. Use Hand Mixer Rather than Stand Mixer
We highly recommend using a Hand Mixer over a Stand Mixer to mix the cheesecake batter. Since Stand Mixers are usually more powerful, you can easily overmix and introduce too much air into the cheesecake batter. This may result in a puffy souffle-style cheesecake.
Easy New York Style Instant Pot Cheesecake Recipe: Pamper yourself & impress guests with your choice of smooth/creamy or rich/dense pressure cooker cheesecake with crisp crust.
We highly recommend using a Hand Mixer to mix the cheesecake batter instead of a Stand Mixer. Stand Mixers are often more powerful, thus you can easily overmix and introduce too much air into the cheesecake batter. This may result in a puffy souffle-style cheesecake.
Place 16 ounces (454g) cream cheese, 2 large eggs, ½ cup (120g) sour cream on counter-top to reach room temperature. Then, melt the 3 – 4 tablespoons (42g – 56g) unsalted butter.*Pro Tip: this is critical for your cheesecake’s success, so please make sure all the above ingredients are at room temperature before you start. If not, you may end up with lumpy fluff top cheesecake. So don’t skip this step! 🙂
PART A. MAKE THE CRUST
Ground Graham Crackers: Finely ground 120g graham crackers in a food processor. Or place the graham crackers in a Ziploc bag and roll them with a rolling pin.
Mix Crust Mixture: In a small mixing bowl, mix finely ground graham crackers, a pinch of sea salt, 2 tsp – 1 1/2 tbsp (8.3g – 19g) brown sugar together with a fork.
Perfectionist’s Step – Add Flour (if blind-baking for firmer & crisper crust): mix in ¼ cup (32g) all-purpose flour.
Add Melted Unsalted Butter: Mix in roughly 3 – 4 tbsp (42g – 56g) unsalted butter until the mixture sticks together.
Line Pan: Line the side & bottom of cheesecake pan with parchment paper.
*Note: We did not use any butter to line the parchment paper.
Form Crust: Pour in the graham cracker crumbs mixture. Gently press down the crumbs with a ramekin or Mason jar to form an even layer. You can also use a spoon for the edges.
Firm Crust
Method #1 – Freeze: Place cheesecake pan in freezer while you make the cheesecake batter.
Method #2 – Blind-Bake (for firmer & crisper crust): Place crust in a 325°F oven for 15 minutes.
PART B. MAKE DENSE CHEESECAKE BATTER
Mix Sugar Mixture: Mix 2 tbsp (16g) cornstarch, 2 pinches of sea salt, and 2/3 cup (133g) white sugar together in a small mixing bowl.
Briefly Beat Cream Cheese: In a medium mixing bowl, briefly break up the 454g cream cheese by beating it for 10 seconds with a hand mixer using low speed.
Mix in Sugar Mixture: Add in half the sugar mixture and beat until just incorporated using low speed (roughly 20 – 30 seconds). Scrape down the sides and hand mixer with a silicone spatula every time a new ingredient is added. Add remaining sugar mixture and beat until just incorporated using low speed (roughly 20 – 30 seconds).
Add Sour Cream & Vanilla Extract: Add 1/2 cup (120g) sour cream and 2 tsp (10 ml) vanilla extract to the cream cheese mixture. Beat until just incorporated using low speed (20 – 30 seconds).
Blend in Eggs: Blend in the two eggs using low speed, one at a time.
Mix until just incorporated (about 15 – 20 seconds with a hand mixer & less time if you are using a powerful stand mixer). Try not to overmix on this step.
Scrape down the sides and hand mixer with a silicone spatula and fold a few times to make sure everything is fully incorporated.
Pour Batter in Pan: Pour cream cheese batter in cheesecake pan.
Remove Air Bubbles for Smooth Surface: Tap cheesecake pan against the counter to let air bubbles rise to the surface. Burst the air bubbles with a toothpick or fork. Tap until you are satisfied. Ensure the surface is clear of air bubbles or fork marks.
Method #1: Pour 1 cup (250 ml) of cold water in pressure cooker. Place cheesecake pan on top of a steamer rack (so, it’s not touching the water). Close lid and pressure cook at High Pressure for 26 minutes and Full Natural Release. Natural release will take roughly 7 minutes. Open lid gradually. Absorb any condensation on surface by lightly tapping it with a soft paper towel.
Perfectionist’s Method #2 – Prevent Surface Dents: Place a steamer rack and pour 1 cup (250ml) of water in pressure cooker. Bring water to a boil (Instant Pot users: Press manual/Pressure Cook and set the time to 28 minutes). When the water begins to boil, place cheesecake pan on the steamer rack with a foil sling right away.
*Caution: Don’t wait too long to place the cheesecake in pressure cooker, as it’ll affect the cooking time. Place it immediately once the water begins to boil. This prevents too much water from evaporating. Immediately close the lid with Venting Knob at Venting Position. Turn Venting Knob to Sealing Position and let it pressure cook at High Pressure for 28 minutes and Full Natural Release. It should go up to pressure in roughly 1 minute. Natural release will take roughly 7 – 9 minutes. Open the lid gradually. Absorb any condensation on the surface by lightly tapping it with a soft paper towel.
PART D. COOL, CHILL, SERVE CHEESECAKE
Cool Cheesecake: Allow cheesecake to cool to room temperature with the lid open in the pressure cooker. Or place it on a wire rack to cool to room temperature.
Release Cheesecake from Sidewall to Avoid Cracking: After cooling for 10 – 15 minutes, carefully run a thin paring knife between the sidewall and parchment paper to release the cheesecake from the pan. Pull the slightly wrinkled parchment paper lightly to straighten it out for a smooth side.
Chill Cheesecake in Fridge: Once the cheesecake has completely cooled, place it in the refrigerator for at least 4 – 8 hours (preferably overnight).
Serve: Remove cheesecake from the refrigerator. The best way to release the cheesecake from the bottom pan is warm the bottom of the pan to melt the butter. You can use a torch or heating pad for this step. Carefully peel off the parchment paper. Enjoy~
Video
Notes
Smooth & Creamy Cheesecake Option: Remember to adjust the beating time to 1 minute for Part B – Step 2 (cream cheese), Step 3 (sugar mixture), and Step 4 (sour cream & vanilla extract).
For 6 x 3 inches Cheesecake Pan: add 5 mins High Pressure Pressure Cooking Time.
*Rate Amy + Jacky’s Recipe: If you’ve tried our recipe, don’t forget to Rate the Recipe in the Comments Section. Thank you!
*Disclosure: We are an Amazon Influencer/Amazon Associate. This means that if you decide to purchase items or services on Amazon through our links on Pressure Cook Recipes to Amazon, Amazon will send a small commission to us at no additional costs to you. Thank you!
Please read before leaving a comment 🙂
1) If you have a question, it’ll be great if you can try to search for the answer first by checking the comments below. Thank you so much. 🙂
2) We’re super thankful for all the reviews. We may not be able to reply to all of you, but we read and enjoy every single one of them.
1.8K Comments
newest
Chris @ FB
5 hours ago
#17 recipe Instant Pot cheesecake I made last night
Pressure Cooker
Instant Pot DUO 60
0
Diane
16 days ago
I have made this several times, and it is wonderful.
Pressure Cooker
Instant Pot DUO EVO PLUS 60
0
Matthew @ FB
17 days ago
After weeks of planning and preparation, I finally managed to make the famous cheesecake #17!
Pressure Cooker
Instant Pot DUO 60
0
Nancy @ FB
18 days ago
I have been playing with and making LOTS of Cheesecake #17 my latest creation is an Espresso Cheesecake with a Chocolate Glaze. I have been giving at LEAST half of every cake away. This time I gave the whole cake away in trade for two beautiful lobsters!
Pressure Cooker
Instant Pot DUO 60
0
Sarah
20 days ago
What is the serving size used to determine the nutritional value? Serving size with the recipe says 7 inches.
I used cinnamon-oat-cookies bought at a Swedish Furniture Company. On top of the prebaked bottom I added dulce du leches and fresh apples coated with brown sugar and cinnamon. Then the cheesecake batter. On top I added another thin layer of dulce du leches and some caramelized Walnuts (The nuts were tossed in a pan with sugar and maple syrup to caramelize them) right before serving. I will use more caramel and apples inside next time, but the consistency and taste was perfect. The nutty crunch on top was a great addition.
I made an oreo cookies n creme cheesecake in my IP today for my boyfriends birthday tomorrow! It has an oreo crust, oreos mixed into the cheesecake, hersheys cookies n creme topping, oreos mixed into the homemade whipped cream, and mini oreos on top!!! I follow the cheesecake #17 recipe by Amy & Jacky. Here are the things I do different on my cheesecakes: I use a 7″ springform pan I tap bubbles out while the cheesecake batter is still in the mixing bowl I cover the cheesecake with papertowel and tin foil while pressure cooking. Here are my twists… Read more »
It was a total hit! Super amazing! Here’s a picture of it cut. 😊 even beautiful from the inside.
1
Melissa @ FB
1 month ago
I decided to try another cheesecake in the instant pot. This time I did a strawberry cheesecake and I even hand dipped the strawberries and chocolate. Let me tell you I do not do dessert so those strawberries were challenging but they look okay. And if there wasn’t enough chocolate, I had to get Ghirardelli chocolate hearts 😂I used this recipe and followed it to the t and it came out even better this time. I hope this is a huge hit at the super bowl party. I am going to tomorrow with my chocolate chip cookie that I made… Read more »
Pressure Cooker
Instant Pot DUO 60
1
Susan @ FB
1 month ago
Cheesecake #17 did not disappoint! I’ve made a lot of IP cheesecakes, but this was definitely the best by far! I followed all of the pro tips. It made a perfect birthday cheesecake for my husband! Thanks Amy + Jack.
P.S.: I can’t believe how much better it sliced being denser than the previous ones I’ve made!
 Step by Step