Lox and Bagels

Homemade Lox

  • Sushi grade salmon
  • Mustard seeds, cumin seeds, corriander seeds
    • Toast briefly and grind together – set aside
  • Chop cilantro – set aside
  • Combine
    • 1 C kosher salt
    • 1 C brown sugar
    • Add 1/4 C tequila
  • Cover sheet tray with plastic sheet
  • Put salmon on the large sheet of plastic – skin side down
  • Brush salmon with chipotle puree
  • Sprinkle with dried spices
  • Put citrus zest on top
  • Put salt slurry on top
  • Wrap in plastic
  • Top with another pan and put a weight on top
  • Refrigerate 48-60 hours
  • Wipe seasoning off salmon
  • Slice as thinly as possible against the grain

Pickled Red Onions

  • Slice red onion in half, then slice thinly
  • Pickling Liquid
    • 1 C Red wine vinegar, lime juice or citric acid
    • 2 TBL sugar, whole mustard seeds, corriander
    • Black pepper corns and kosher salt
    • Bring to a boil, then turn off heat and let rest ( on burner 15 minutes )
  • Pour over onion and let rest 30 minutes
  • Transfer to mason jar and refrigerate
    • Pour liquid to cover onions

Goat Cheese Spread

    • Goat Cheese
    • Green Onion
    • Fresh dill
    • Salt and pepper
    • Splash of milk
    • Mix in food processor

Jalapeno Cream Cheese

    • Cream cheese
    • Fresh cilantro
    • Roasted jalapeno
    • Splash of milk
    • Mix with a fork


Oysters Rockefeller

  • Put a skillet on a pan over medium-low
  • Melt 6 TBL butter
  • Add 3/4 C onion – chopped
  • 3/4 C celery finely – chopped
  • 1/2 tsp salt
    • Sweat vegetables for about 5 minutes
  • Add 1 TBL garlic (4 cloves) and let cook another 3 minutes
  • Add 1 can artichoke hearts – drained and chopped
  • Add 1 C panko bread crumbs
  • 2 tsp lemon zest
  • 1/2 tsp black pepper – freshly ground
  • 1 tsp dried oregano
  • Pinch of salt
    • Stir until bread crumbs absorb moisture
    • Spread salt on a sheet pan to stabilize oysters
    • Put 2 dozen oysters on the salt so that nothing spills
    • Put some of your mixture on top of the oysters
    • Bake for 425º for 10 minutes


Pickled Herring

RESTAURANT RECIPE

  1. Fresh herring:  Clear eyes, no smell, firm flesh – 8-10 inches in length

    CLICK HERE FOR TIPS ON BUYING FRESH FISH

  2. Salt the herring – or start with salted herring
  3. Add red onion and carrots
  4. Bring to boil:
    • 1/2 C Boiling water
    • 1 C White vinegar
    • 2 TBL Sugar
    • 1 Star anise
    • 8 Clove
    • 1 Clove garlic
    • 8 Black peppercorns
    • 3 bay leaves
    • 1 TBL Mustard seeds
    • 12 White peppercorns
  5. Let meld 5 days – Keeps in fridge for 2-3 months

NewScanCook.com

OLD RECIPE

  1. Salted herring pieces
  2. Onion slivers
  3. Apple slices
  4. Pack into a jar
  5. Hot brine
    1. Apple cider vinegar
    2. Honey
    3. Whole coriander seeds
    4. Horseradish
  6. Marinate 3-4 days – agitate daily

SWEDISH BREAKFAST HERRING

  1. Mix the following
    • 1/2  C sour cream
    • 1/4 C chopped dill
    • 3 Stalks of young fennel
    • 1 lemon – juice and zest
  2. Chop herring into 1 inch pieces
  3. Toss gently with sour cream mixture
  4. Let meld 1-2 hours in the refrigerator

Shrimp – Tips and Tricks

Here are some things that you want to know before buying shrimp.

Quick Guide to Cooking Shrimp

  • Leave Shell On.
  • BROIL:  Move rack to the second from the top.  Toss in EVOO and Old Bay Seasoning, Broil with shell on for two minutes first side, and one minute second side.  Put in freezer for five minutes
  • SKILLET:  Preheat skillet to medium high, then cook exactly like broil
  • BOIL: 

Shrimp off South Eastern US Coast

  • Brown – June to August – Texas
  • Pink – Florida
  • White – August to December (more abundant)

In Europe large shrimp are called Prawns.  In the US a prawn is a fresh water shrimp.

Shrimp Size Guide

  • Extra Colossal: 5 to 8 per pound (Remove vein)
  • Colossal: 8 to 14 per pound (Remove vein)
  • Extra Jumbo: 14 to 18 per pound – Grill (Remove vein)
  • Jumbo: 18 to 24 per pound – Grill (Remove vein)
  • Extra Large: 24 to 30 per pound – Cocktails (Remove vein)
  • Large: 30 to 36 per pound – Cocktails (Remove vein)
    (devein this, and anything larger than this – scissors are good for this)
  • Medium Large: 36 to 42 per pound – Spring rolls
  • Medium: 42 to 50 per pound
  • Small: 50 to 60 per pound – Bisque
  • Extra Small: 60 to 80 per pound – Bisque

Another way to size shrimp is Tails per Pound

  • 60-70 – EXTRA SMALL SHRIMP
  • 26-30
  • 21-25
  • 16-20
  • U-12 – VERY LARGE SHRIMP

I personally don’t like this scale, because what happens if you have 50 or 18 tails per pound?  You will see this in some places though.

  • If fresh is not available to you, buy “Shell-on Frozen Shrimp” 
  • Thaw frozen shrimp in 1 C hot water, 1/4 C sugar, 1/4 C salt.  Put shrimp in, stir once, then dump in 2 C ice cubes.  Rinse and drain on a towel.
  • Most “fresh” shrimp in the grocery stores is thawed-out frozen shrimp.
  • Thawed shrimp has a shelf-life of only a couple of days versus frozen shrimp which retains their quality for several weeks.
  • Avoid frozen shrimp that has already been peeled and deveined which can cause a loss of flavor and texture.  Also, do not buy precooked shrimp.
  • Cook shrimp in the shell for more flavor
  • Defrost shrimp in a brine (1/4 C each salt + sugar) with ice cubes in the water. 20-30 minutes.  Shrimp cooks very quickly so defrosting in the sink or microwave is a big no-no.
  • Broiling shrimp (or putting in an oven at 450º) develops the flavor better than boiling water.  A grill or hot plate also does well.  Dry the shell-in shrimp, toss in a bit of EVOO and paprika before broiling.  Cook two minutes, flip and cook 1 more minute.  Toss in a metal bowl that has been in the freezer.

Things to Look for When Buying

  • No black spots
  • No fishy smell
  • No ammonia or chlorine smell
  • Firm bodies
  • Not soft or sticky
  • No detached body from shell

Supposedly shrimp with the heads and tail still on is the best way to eat
shrimp.

It needs to be cooked at a very high heat and then tossed in something
spicy afterward just before serving.

Tips: Fresh Fish

How to buy a whole fish

Sea bass is the best for whole-fish cooking.  Also called a bronzini (bronch zino)

How to tell that it is fresh

  • Fish should be whole and fresh.
  • If you know your butcher, you can just ask for sushi-quality fish, but otherwise buy a whole fish.
  • Eyes should be clear.  Cloudy eyes indicate an older fish.
  • Gills should be bright red.
  • Fish should never smell fishy or like bleach.
  • Flesh should be firm, not be mushy.
  • If you are using meat from a large fish, you can tell it is fresh by the firmness and visual texture of the flesh.
  • It should glisten.
  • Go shopping with a cooler because it will degrade really quickly.
  • Should have bulging, but clear eyes
  • Scales should be close to the body – tight, not relaxed
  • Fish body should have no bruises or soft spots
  • Buy your fish at a market that does a big volume, otherwise you may get older fish
  • Trust your fish vendor.  Ask
    – What is in season
    – What do you have that is local
    – Is this wild or farmed  (Wild is better)
    – What do you have that is line-caught
  • If you are buying squid, it should be shiny, have clear eyes, and the ink should not be dried

How to handle fish

  • Cut off all fins (except the tail) early so you don’t stick yourself. A fish wound gets easily infected.
  • Scale and clean fish immediately.  Store fish on ice in a baggie, but allow it to drain. You DO NOT want your fish to set in water for any time at all.  If it is properly handled, a fresh fish could last for six months
  • Scale fish outside, or somewhere that the zillions of scales will not cause a problem.  Just hold it by the tail and go back and forth with a knife held perpendicular to the body.

Fish that are high in oil

  • Smelt, mackerel, herring and orange roughy
  • Rinse, dredge, fry in film of peanut oil 3-4 minutes per side, then drain
  • Serve with slices of lemon
  • To dredge: dip in lemon then roll in crumbs with salt and pepper (or toss)

Fish that are good for the grill

  • Whitefish or trout is the best choice for PLANK COOKING
  • Soak wooden plank overnight, using brick to keep submerged.
  • Grill with INDIRECT HEAT at 375-400 degrees and cook until wood begins to char (about 20 minutes)
  • Internal temp will be about 125 degrees
  • Serve right on the plank

Good summer fish

  • Flounder and fluke are good fish to eat in the summer

Good round fish

  • Snapper, porgy, tile fish, sardines, mackeral

What types of wood should I use

  • DO NOT USE plain wood, as it may have chemicals.
  • Make sure your wood is natural, untreated and kiln or air dried.
  • Good woods are: Cedar, alder, maple, hickory, cherry, pecan, apple, white oak, mesquite

Fish Characteristics

  • Slow moving fish (such as grouper) have a light meat and subtle mild flavor. They also overcook very easily.
  • Fast fish (such as tuna) have an oily steak-like texture.  Sharks and Tuna are examples of fast fish
  • Striped bass is the most versatile, and is firm but stil flakey
  • Shark and Tuna are long-lived fish, and will have a higher concentration of mercury in the meat.

Processing

  • To scale, run your knife against the scales
  • Gut the fish and run under cold water
  • Pat the fish dry
  • Remobe the gills

Kona Kampachi Tiradito

Get a very fresh fish such as Jack.  Bright red gills, clear eyes, no fishy smell.

  1. Make slurry with lemon zest, ricotta, yuzo, A-1 sauce, chive and parsley.
  2. Prepare garnish:  flower, mint, pineapple, papaya, watermelon radish
  3. Spread slurry on a plate
  4. Place garnish to the side
  5. Slice VERY thin slices of raw fish and shingle on top of the slurry
  6. Sprinkle with a bit of cayenne

Grandpa’s Salmon Cakes

Grandpa’s Spinach Salmon Cakes


Grandpa’s Special Crab Cakes

  • 2 eggs
  • 1 tsp grain mustard
  • 1 TBL mayonnaise or Miracle Whip
  • 1/2 tsp Old Bay Seasoning
  • 1/2 tsp salt
  • 1 tsp Worchestershire
  • 1 tsp fresh parsley – chopped
  • scant black pepper
    • Mix above together well
  • Add and gently mix
    • 3/4 C Panko bread crumbs
    • 1/2 C long leg crab
    • 1/2 C lump crab
    • 1/2 C jumbo crab
  • Form into patties and refrigerate for one hour (This will help them hold together)
  • Cook using real butter on a cast iron skillet

Tuna Tar Tar

Adapted from Jeff Smedstad – Elote Cafe in Sedona, Arizona.

Jeff’s Special Elote Mayo Mixture

  • 1/2 C Best Foods mayonnaise
  • 1 tsp granulated sugar
  • 1/2 tsp granulated garlic
  • Salt and pepper to taste
  • Choloula to taste
  • 1 TBL fresh lime juice

Ingredints

  • 1 LB Grade #1 Tuna
  • 2 TBL grated carrot
  • 1 TBL finely diced radish
  • 2 TBL diced onion
  • generous portion of cilantro
  • 2 TBL bottled lime juice
  • 1/2 sliced avocado
  • dash of soy sauce
  • dash of cream of tartar
  • 1/2 C Elote Mayo Mixture

Step by Step

  1. Cut your tuna into small pieces
    Remove the black vein from the fish if present
  2. Mix all ingredients except tuna
  3. Toss mixture with tuna
  4. Serve on rustic crackers

Do not keep for more than 6 hours


Adapted from Lincoln Steakhouse and Bar – Chef John Frasier

  • Sashimi Grade Aji Tuna – cubed
  • Avocado, lime, salt pepper
  • Pineapple Juice
  • Soy Sauce – low sodium
  • Thai Chili Paste
  • Lemon Zest
  • Fresh Ginger
  • Fresh Garlic
  • Chopped Jalapenos
  • Charred Pineapple
  • Red Bell

Combine

  • 1 TBL soy sauce
  • 1 TBL pineapple juice
  • Dab of chili paste
  • Lemon Zest, Grate Ginger
    • Let marinate 3 minutes
  • In food ring add
    • 1/4 ringAvocado
    • 3/4 ring tuna
    • Fresh peppers and Garlic on the side
    • pineapple on the top


Fried Salmon

  1. Fresh salmon
  2. In the fat part of the filet, cut cross hatches across skin – about 3/4 inch slices – halfway through
  3. Oil and Salt both sides lightly
  4. Cook in 400º hot canola oil (skin side down) just till it cooks about halfway (2 minutes per side)

NOTE:  When you put it in, LEAVE IT ALONE for the first 2 minutes.

Ahi Tuna Poke

  • Sushi Grade Ahi Tuna cut into 1/2 inch small cubes
  • Ask for sushi grade – Whole Foods or AJ’s
  • Green onions
  • Cilantro
  • Jalapeño – deseeded
  • 1/2 Avocado
  • Pour in sauce (bottom)
  • Toss gently
  • Plate with Won Tons and Shrimps
  • Fry Won Tons – 145º – Fry up to a golden brown

Shrimp Side Dish

  • 6 C boiling water plus
  • 1 T lemon
  • 1 T lemon
  • 1 T Old Bay seasoning

Put shrimp in the boiling water mixture for two minutes
Put into ice bath after it loses ALL transluscency

Agave Ponzu Sauce

  • Lemon juice
  • Soy sauce
  • Agave syrup
  • Honey
  • Tobers Angry Sauce or Siracha

Mix sauce together

Octo Pasta

Ingredients

  • 1 whole octopus
    MARINATE
  • 8 C water
  • 2 C red wine
  • 1/2 C white vinegar
    VINAIGRETTE
  • 3 TBL white wine
  • 2 TBL EVOO
  • 2 tsp garlic powder
  • oregano, salt and pepper
  • one lemon – zest and juice
    PASTA
  • 1/2 onion – slivered
  • 4 cloves shaved garlic
  • 1 C cherry tomatoes (halved)
  • 1/4 C Kalamata olives
  • 1/2 C tomato sauce
  • salt, pepper, micro greens and cooked orichetta pasta

Step by Step

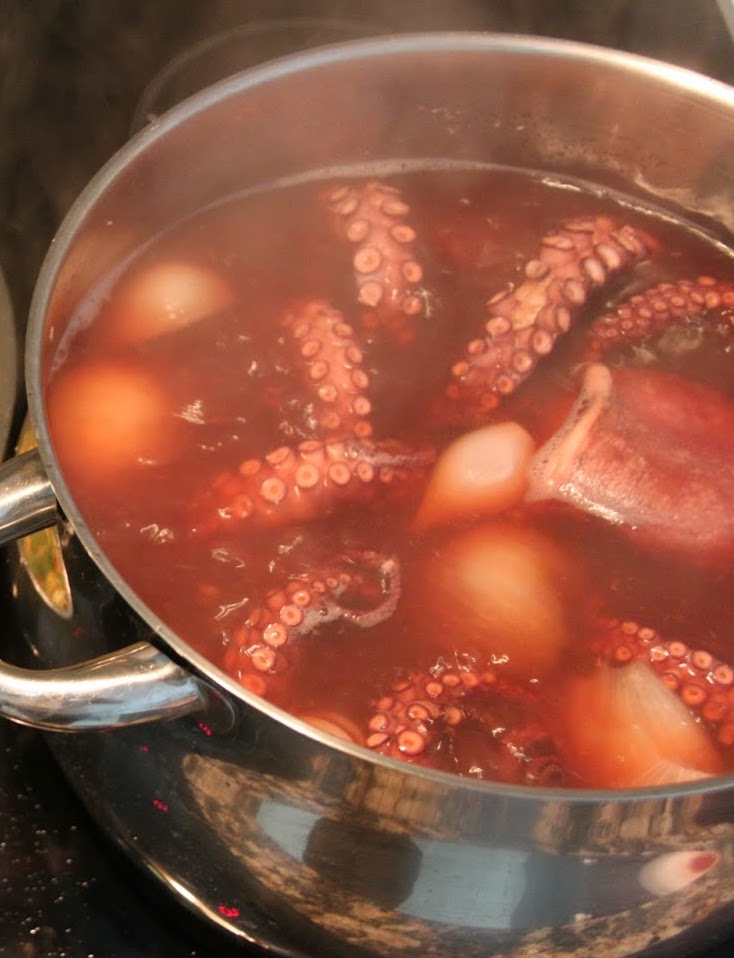
  1. Put all (or part) of octopus into the marinate
  2. Wives tale?  Don’t know, but they all do it…
    Put two wine bottle corks in the liquid
  3. Turn heat onto medium low
  4. As soon as the marinate starts to simmer, reduce to low
  5. Allow to cook for another 90 minutes
  6. Rub off sucker cups with a spoon
  7. Remove the beak (cartilage)
  8. Cut arms at a bias into 3/4 inch pieces
  9. TASTE TEST:  Should be soft, not chewy
  10. Brush with oil and sprinkle with salt and pepper
  11. Sear on hot grill pan (350º) for 1 minute per side
  12. Whisk together Vinaigrette and toss with octopus pieces and set aside
  13. Now, finish your pasta
  14. Sear shallots or onion in EVOO
  15. Add in shaved garlic
  16. Sweat for 3 more minutes
  17. Add olives
  18. Add cherry tomatoes
  19. Add salt and pepper
  20. Add tomato sauce
  21. Toss above with orichetta pasta
  22. Plate pasta
  23. Top with octopus
  24. Garnish with microgreens and lemon


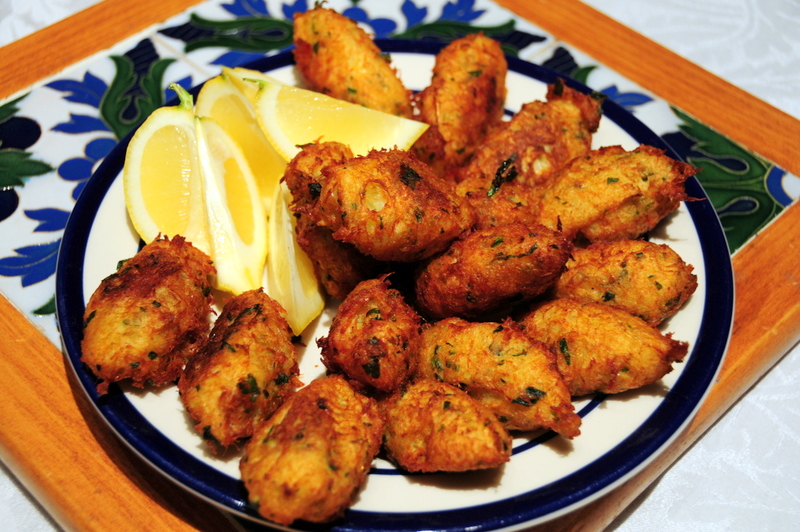
Cod Fritters – Bacalhau

This is best with cod, but you can also use talapia or catfish.

Ingredients

  • Fish (see note at bottom)
    DRY INGREDIENTS
  • 1 C flour
  • 1/2 tsp garlic
  • 1/2 tsp onion powder
  • 1/2 tsp chili powder
  • 1/2 tsp black pepper
  • 1/2 tsp cumin
  • 1 tsp salt
  • 1 TBL baking soda
  • 2 tsp corn starch
  • 1 tsp sugar
    WET INGREDIENTS
  • 1 egg plus 1 egg yolk
  • 1 lemon – juice and zest
  • 1 C beer
    FOR DREDGING
  • 1 egg white

Step by Step

  1. Sift together all dry ingredients
  2. Mix together wet ingredients
  3. Fold dry ingredients and 1/2 wet ingredients together
    Mixture should be the consistency of a thin pancake batter
  4. Cut fish into two-bite pieces
  5. Dip in egg white – let drip so it is not too wet
  6. Dredge in flour – shake off excess so it is not too gummy
  7. Dip in batter – let drip so it is not too wet
  8. Fry until browned – about three minutes
  9. Put onto rack to drain – salt while still hot
  10. Dress with lemon or spicy tomato sauce or cocktail sauce

If using salted cod

  1. Soak salted cod for 48 hours in refrigerator
  2. Change water every 8 hours
  3. Blanche for 10 minutes in unsalted boiling water
  4. Dry 60 minutes on a rack, then proceed to recipe

Poached Halibut or Cod

INGREDIENT

  • A nice fresh piece of cod or halibut
    – Alternately, you can use sole, tuna, talapia
  • 1/3 C cream
  • Chopped chives
  • 1 TBL red wine vinegar
  • 1/4 C mayonnaise
  • Salt and pepper

STEP BY STEP

  1. Heat sauce in a big skillet (water, broth, etc)
  2. Add 2 TBL capers
  3. Sprinkle of red pepper flakes or powder
  4. Nestle halibut into the liquid
  5. Based as it cooks
  6. Cover and simmer 4-5 minutes each side – barely a simmer though
  7. Plate and top with parsley and lemon zest
  8. Drizzle with EVOO

Alternate:  At Step 7, top with the following topping – THEN top with parsley and lemon zest, but no EVOO.

  • 1/3 C cream (whisk about 5 minutes)
  • 5 minced chives
  • 1/4 C mayonnaise
  • salt and pepper
  • 1 TBL red wine vinegar

Salmon Rillettes

INGREDIENTS

  • Fatty part of the salmon – Belly – about 6-8 ounces
  • Smoked salmon – also about 6-8 ounces
  • 1 stick of salted butter
  • 1/2 onion – finely minced
  • 1 TBL prepared horseradish

STEP BY STEP

  1. Melt butter in a large skillet
  2. Let butter rest for 30 seconds, then pour off about half (clarified butter) into a separate container (to be used later)
  3. In remaining butter sautee minced onion
  4. Sprinkle in some salt and pepper
  5. Cook salmon for about 1 minutes – DO NOT overcook
  6. Add horseradish and stir until combined
  7. Crush all ingredients together with a fork until roughly combined
  8. Put loosely into a mold (a glass bowl to be turned upside down later)
  9. Top with clarified butter
  10. Put into refrigerator for 2-3 hours (or overnight)
  11. Turn out on chilled plate and serve with toast points, pita or crostini


Tips: Tuna

  • A sashimi knife called a yanagi-bocho or yanagi knife is sharpened only on one side.  This allows you to slice the sashimi with minimal bruising or mashing.
  • Tosha Soy is generall used for sashimi dipping.  You can make an acceptable substitute using soy + sake + mirin + bonito flakes.  Boil the mixture, then cool, then strain.
  • Create a carrot wave, but slicing a carrot very thin, then wrapping it around a chop stick.  Immerse it in ice water for 5 seconds, and the form will stay in place.
  • NOTE:  White tuna – Kanpachi or Amberjack – is a heartier fish and will hold up better for many recipes, but it does not offer the presentation that RED tuna offers.
  • A typical recipe for Amberjack is to carve very thin slices on the bias, and then skewer them with a thin lemon medallion.
  • When cutting tuna, let the knife do the work and be patient.  DO NOT push the knife through the meat, but rather let the moving knife gently slice through the meat.
  • Put your finger on top of your carving knife to stabilize it and keep it from moving from side to side.
  • Start your slicing movement before you even touch the surface of the fish.
  •  

Big Bay Sea Scallops

How to Buy Scallops

  • Scallops are sold either “wet” or “dry.”
  • Look for “Dry,” natural scallops that have not been treated with any chemicals.  They should smell fresh… like the ocean.
  • “Wet” scallops are treated with phosphates, which causes them to absorb water. This extra water makes them heavier and thus more expensive.  The water also dilutes their flavor and makes it nearly impossible to sear or brown properly.
  • How can you tell the difference between wet and dry scallops? You should just be able to ask the fishmonger, but there is a visual clue that usually gives the game away:
    • “wet” scallops tend to be snow-white in color
    • “dry” scallops are a natural pale vanilla color.
  • A good size to buy is 8-12 scallops per pound

Types of Scallops

  1. Sea Scallops aka Weathervane Scallops
    • Served seared or thinly sliced
  2. Bay Scallops
    • Smaller, but just as sweet
  3. Rock Scallops
    • Found only in the Pacific ocean
    • Do not move around
  4. FARMED:  Very good.  Especially those from British Columbia
  5. DIVER:  Excellent.  Hand picked by divers
  6. DREDGED:  Bad for the environment.  Do not buy

How to Cook Scallops

  • Remove small abductor muscle.  It is edible, but tough.
  • Do not overcook.  They become chewy.
  • Poach, saute, sear, or bake
  • Best to pat dry and sear for 60 seconds each side in very lightly oiled pan; or serve raw.

STEP BY STEP

  1. Preheat oven to 350º
  2. Remove the abductor muscle before cooking
  3. Sprinkle both sides with salt and pepper
  4. Preheat very hot cast iron skillet
  5. EVOO, wipe oil, sear scallops – 1 minute first side
  6. Put 1 TBL butter into the pan, and let it melt
  7. Flip and cook the other side for 1 minute
  8. Plate with garlic pesto schmear or in melted butter with lemon zest over top
  9. A tiny spritz of rum is also good

Your goal is to only sear these scallops, not cook them.  If you cook them, they will become rubbery and lose that silky texture.

Ahi Poke

SEE TUNA TIPS BY CLICKING HERE

INGREDIENTS

  • 1 LB fresh sashimi grade RED tuna
  • Scallions
  • Macadamia nuts
  • Marinate ingredients (see below)

STEP BY STEP

  1. Cut ahi tuna into 1/2 inch chunks
  2. Toss gently in marinate
  3. Refrigerate 30 – 60 minutes
  4. Top with minced scallion greens
  5. Finish with chopped macadamia nuts

MARINATE

  • 1/2 Maui onion
  • Garlic
  • Ginger
  • Soy
  • Lemon
  • White scallion
  • Sambal olek
  • Sesame oil
HTML Snippets Powered By : XYZScripts.com