Tips: Pig Parts – Dissection

CLICK HERE for cuts from other animals


pork-chart


From America’s Test Kitchen and Sugar Mountain Farm.

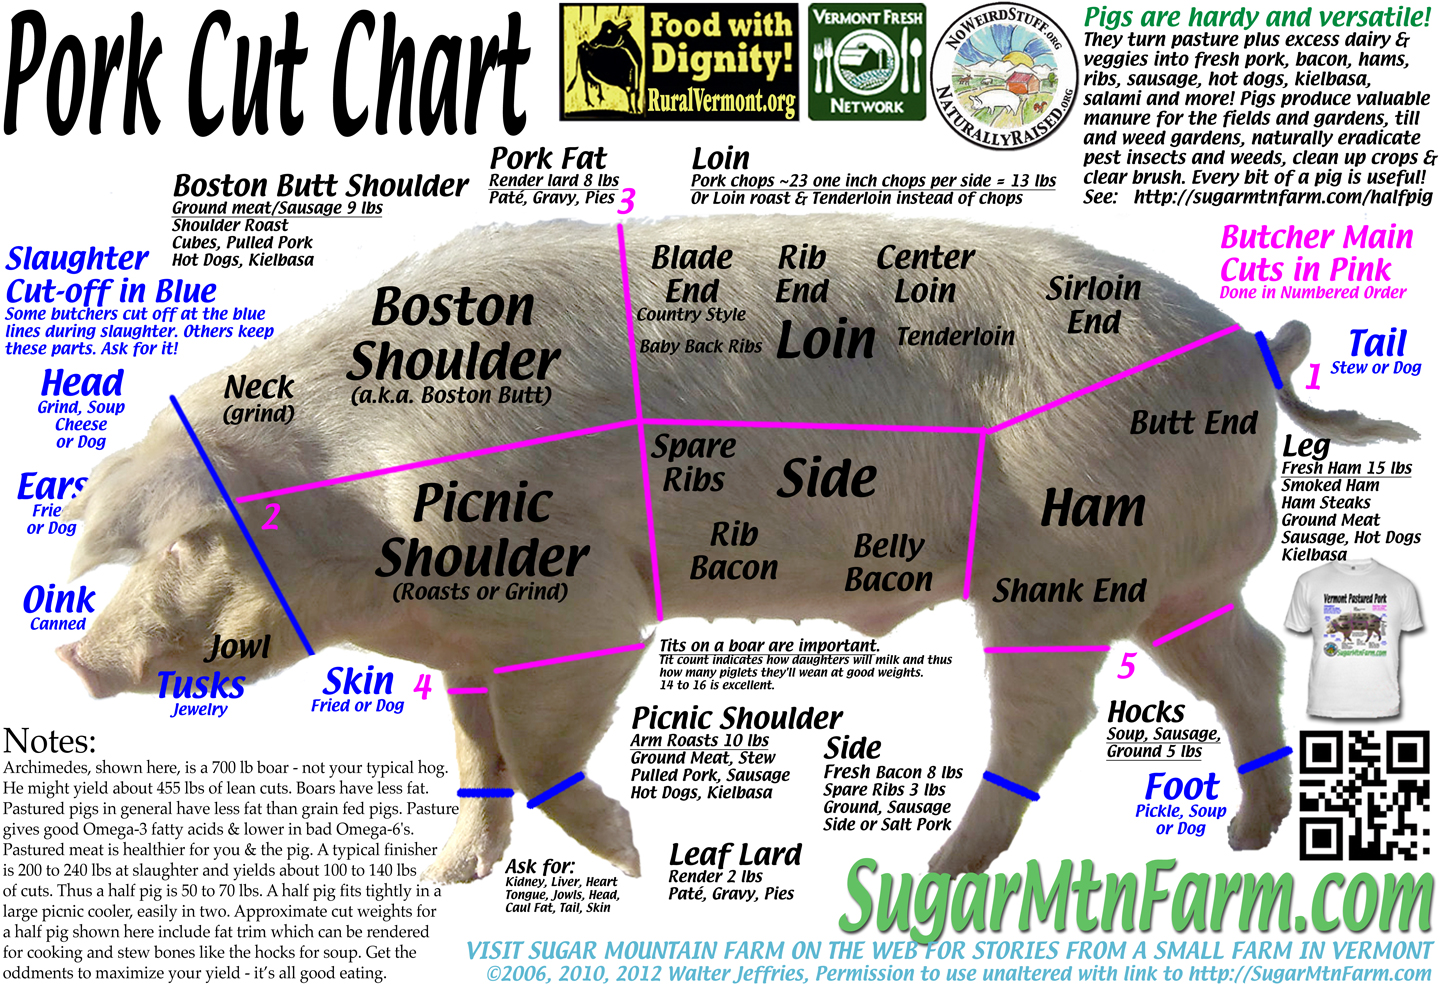
Ever wonder where Ham Hocks come from? What’s the difference between the ribs and the spare ribs? What’s the difference between the loin and the center loin?

Here is a picture and an explanation of the Pig Parts and how to use them.

  • The buttocks are salted and pressed in order to eventually produce ham.
  • The ribcage meat is salted and smoked in order to get bacon.[6] Salt is rubbed thoroughly into each piece of meat and all surfaces are covered. Some formulas also include lots of black pepper. The bulk of the meat is cut and ground to produce various sausages, which are traditionally wrapped into the intestines of various sizes.[6]

Schematic representation of the main pork cuts.

The bulk of the fat is cut into small pieces. Some of it is fried to produce cracklings. Lard is made by rendering – heating fragments of fat in a large iron pot over a fire until it is reduced to simmering grease which congeals when cooled.[6] Lard is then stored in lard tins with tin covers. The typical tins in the US are five gallons.

The intestines are stripped by drawing them through a clenched fist. They are then washed, cut into short pieces, and fried to make chitlins.

The various “leftovers” are put into various forms of headcheese jelly, etc. Most parts of the pig are used in this traditional process, even parts of the skin that would normally be thrown away are preserved to be cooked with beans.

The smoke house is essential for the preservation and long term storage of hams, shoulders, bacon sides, and pork bellies. The meat is hung on racks and hooks in the smokehouse; and later smoked. Fragrant hardwood, such as hickory, beech, or cherry is allowed to smolder slowly in a pit below the hanging meat. This gives added flavor and color to the meat as well as serving to dry cure the pork.

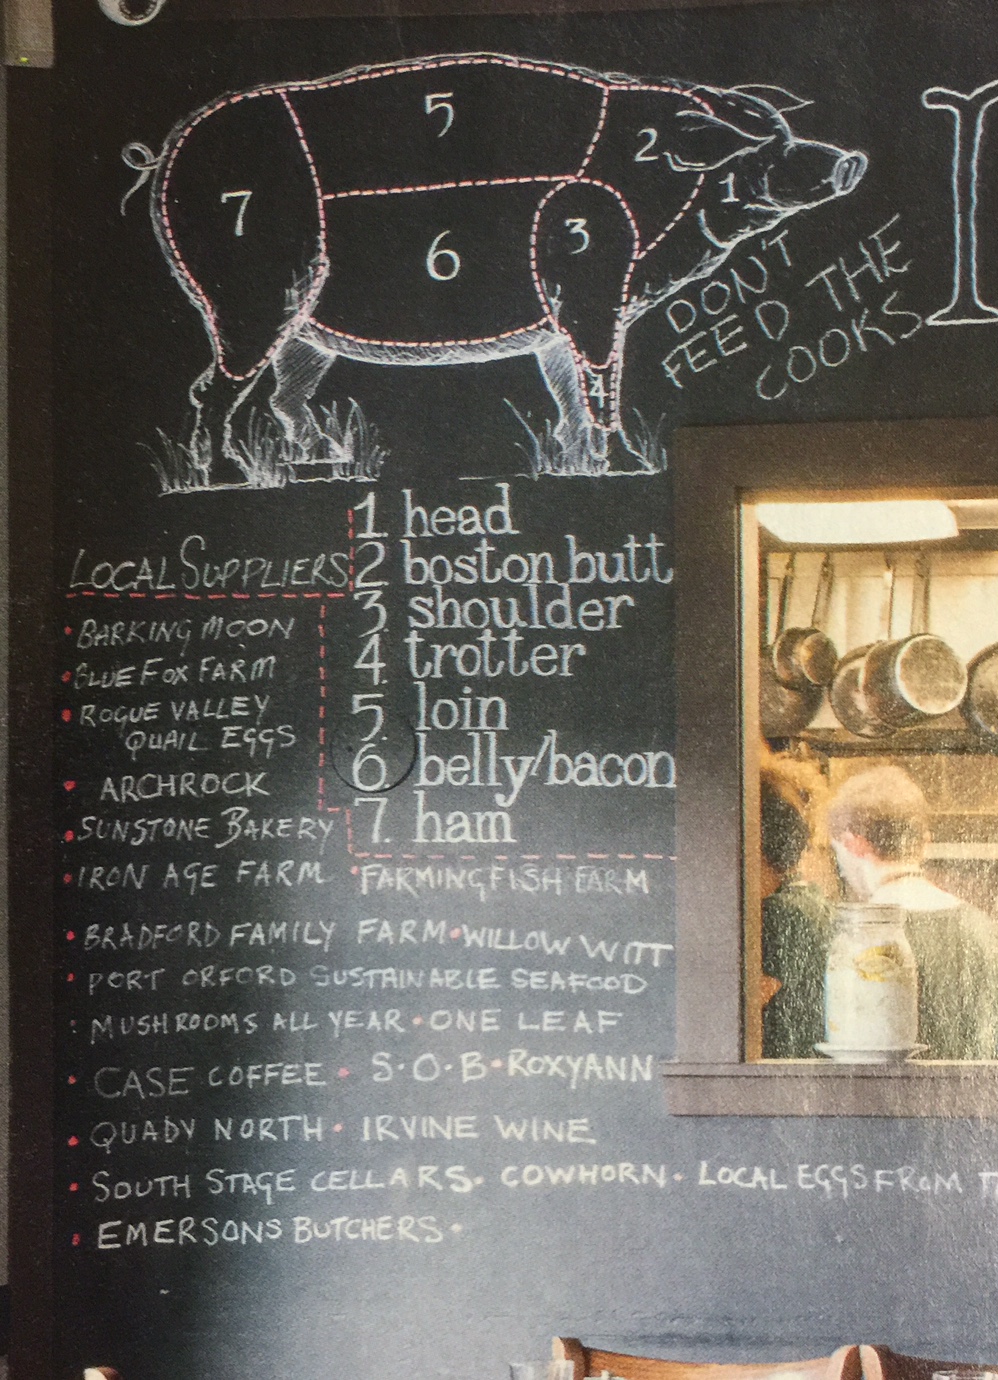
Here is another bit of information:

Pork Cuts – Where do they come from?

Where does the meat come from?
Ham – front and back legs up to the haunches
Butt – from the shoulder
Pork loin – the top of the back near the rear of the pig
Loin ribs – Same as baby back, but closer to the rear
Baby back ribs – ribs nearest the spine
Spare ribs – ribs just outside the baby back ribs
St Louis ribs – the tips… past the spare ribs

Instructions

Spare ribs are a bit tougher so take longer to cook, but contain more meat.
Baby backs are faster cooking, more tender and take flavors well
Vaccuum packed ribs will keep in the fridge for 2-3 weeks

Info from Alton Brown


Pasole / Posole / Pozole / Pazole

Pasole is a Mexican tradition. Making Pasole is kind of like saying you are making a Casserole.  The recipe contains hominy, and all other ingredients are based on family tradition.  Here is one recipe out of thousands.  A video from Your Life A to Z follows.

INGREDIENTS

  • 2 C white hominy ( nixtamal )
  • 1/4 C each – Shredded chicken and pork
  • 6 tomatillos
  • 3 jalapeño peppers
  • 2 poblano peppers
  • SPICES:  Oregano, cumin, diced onion
  • GARNISH OPTIONS:  Sour cream, fresh cilantro, halved tostada shells, shredded lettuce, julienne radish, onion slivers, arbol chilies, oregano, green onion

STEP BY STEP

  1. Start hominy boiling in salted water
  2. Simmer for 2-3 hours
  3. Meanwhile, wash tomatillos, and peppers
  4. Cut off stem and put into a blender (deseed peppers to decrease spice level)
  5. When hominy has finished cooking strain – reserving liquid
  6. Put hominy into soup pan
  7. Add just enough of the hominy water to allow the blender to fully process the peppers and tomatillo
  8. Combine hominy and pepper mixture in soup pan, and simmer 45-60 minutes
  9. Top with sour cream and cilantro leaves
  10. Serve with corn chips


Curing your own Olives

Here is a collection of information that you may find helpful.

  • VIDEO – Part 1 – – Collect olives
    The video does not give too much information.  What we saw in Spain was people setting tarps below the trees, then shaking them or blowing them with a leaf blower.  Once on a tarp, the olives can be easily gathered.
    .
  • VIDEO – Part 2 – – Score and brine 1 CU salt per gallon of water
    This video shows each olive being scored individually.  Very labor intensive.  A quicker way is to just rap them lightly with a hammer or mallet, then toss them into the brine.
    .
  • VIDEO – Part 3 – – Change brine weekly
    This is a surprisingly important step.  If you don’t change the brine, your olives become stagnant and will take on a kind of musty and dirty taste.
    .
  • VIDEO – Part 4 – – Try one in 15 weeks – If too bitter, brine three more weeks
    Our friend in Velez brined his olives for only two weeks.  We tried them, and they were pretty awful, but he likes them that way.  “It’s an acquired taste.”

Another site that I found said to soak them in clear water for the first few weeks, changing the water every couple of days.  What I did was change the water every 2-3 days for the first three weeks, then change to a weekly brine after that.  I don’t know why, it just seems right, so that’s what I’m going to do.

I also found one recipe that put chopped up lemon pieces, a bit of oregano, garlic and cumin, and some vinegar into the brine.  Add these if the mood strikes you.  Also, adding some whole dried peppers would  give your olives a bit of a bite.  I personally like the lemon peel idea.

Here is one more video that offers an alternate method, and some good insights:

All things considered, here is what I plan to do:

  1. Go through your olives and remove any that are shriveled or blemished
  2. Clean the good olives using LOTS of water
  3. Smack the olives to break the skin to allow the brining solution access to the meat of the olive.
  4. Heat 1 gallon of water to near boiling, and add 2 CU ice cream maker salt
    NOTE: This is NOT edible, but then again, neither is lye.  It will be rinsed off by the time we are done.
    Melt the salt in hot water, then pour through a coffee filter to remove the gravel, grit, etc.
  5. Pour to cover the olives, using a plate to completely submerge them. See Video Parts 2 and 3 above.
  6. One time per week (same time) drain the water and repeat step 4 – Do this for four weeks… mark your calendar
  7. Step 5 is intended to remove much of the bitterness
  8. After the first four weeks move to a phase that is intended more to preserve and clean the olives
    NOTE: To be sure grit is gone, rinse them in a bowl of standing water. Remove by hand, not by dumping, into a colander.  Discard grit in the bottom of the bowl, and put olives back into their brining container
  9. Heat 1 gallon of water to near boiling, and add 1 CU food-quality course sea salt
  10. Recover olives, completely submerging them
  11. Do this for ten more weeks.
  12. Rinse and taste an olive. If the olive still tastes bitter, repeat steps 9, 10 and 12 for two more weeks.
  13. Once the olives are to your liking either can them or refrigerate them.
  14. To refrigerate them, heat 1 gallon of water, and add 1/2 CU course sea salt (Proportionally adjust amounts if necessary)
  15. Put olives in a canning jar and refrigerate.
  16. They should keep refrigerated for up to two months.

NOTES FROM SPAIN

Start with 2 C oil dried black olives con hueso
Add eight cloves crushed garlic
Orange zest . Not the pith
Crushed red pepper flakes
Fennel seed powder
Liberal amount of EVOO
Toss together and marinate 48-72 hours
Remove garlic
Put into a jar
Store in fridge for up to 4 weeks\

Basic Ceviche

This is a very easy ceviche recipe that you can do as a side dish, an appetizer, or even an entire meal. We made this with our friend Cinthia while living in Velez-Malaga, Spain.  Ceviche is very flexible as long as your ingredients are extremely fresh.  Below is a good video from AllRecipes about ceviche.

INGREDIENTS

  • This recipe must be made at least 2 hours ahead of time – 4 hours is better
    PROTEINS
  • 1-2 LB FRESH  Mahi (Tuna) or other delicate white fish
    – cut into 1/4 – 1/2 inch pieces
    – You can also use Rock Fish, Sea Bream, Grouper, Seabass, Halibut, Talapia, Cod or Red Snapper – cut thinly and blanched 30 seconds
    – DO NOT use swordfish or tuna, as these are long-lived fish and are more likely to have parasites
  • Scallops – blanched*  20-30 seconds
  • Shrimp – blanched*  20-30 seconds
  • Crab – blanched* 20-30 seconds
  • Squid or Octopus – blanched* 20-30 seconds
    * Blanched means that you plunge it into boiling water for about 30 seconds, and then remove it to an ice bath to stop the cooking.
    REQUIRED VEGETABLES and LIQUIDS
  • One Lemon and one lime – zest and juice
  • 1 C FRESH real lime juice (this is because the acidity is well-controlled)
  • 1 TBL tomato juice or green tomato
  • Cucumber – Small cubes
  • Roma Tomato – Deseeded and chopped fairly small
  • 1/2 red onion – Chopped fairly large – blanched 30 seconds
  • Cilantro – Rough chopped
  • Jalapeño or Serrano – minced (hotter: habañero)
  • Chives – Cut into 1/4 inch strips
  • 1 tsp salt
  • EVOO
  • Additions:  Red onion slivers, Passion Fruit, Papaya, Pineapple, Mango, Kumquat, Plums,
    OPTIONAL INGREDIENTS
  • Spice it up with a squirt of Siracha
  • Radish
  • An easy option is to buy a good pico de gallo and use in place of the vegetables listed above.

SELECTING THE RIGHT FISH

CLICK HERE FOR TIPS ON BUYING A FRESH FISH

STEP BY STEP

  1. Cut fish into 3/4 – 1 inch pieces
  2. Place fish pieces in a glass bowl
  3. Blanche all raw seafood for no more than 30 seconds, then plunge into ice water to stop the cooking process
  4. 1/2 fresh squeezed lime juice – enough to cover
  5. Sprinkle with a bit of salt and set aside for 10-20 minutes
  6. Dry Pack Scallops are another good thing to use in your ceviche.
     – – – To find out why Dry Pack are better than Wet Pack,  CLICK HERE.
  7. Optional: Plunge shrimp (deveined) and other seafood into boiling water for 30 seconds, then into ice water.  I actually prefer this step.
  8. In a second large mixing bowl, combine the following:
  9. Cut 1 red onion into very thin julienne strips
  10. 2-3 large tomatoes – thinly slice tomato flesh, discarding seeds and juice
  11. Finely chop 2-4 TBL  EACH – Depending on taste
    – Optionally: strips of pepper – mild or hot
    – green olives – quartered
    – parsley – chopped
    – cilantro – some chopped, some fairly whole
    – celery pieces (1 stalk, ribs removed before cutting)
    2 TBL EACH
    – ketchup
    – EVOO (emulsified with whisk)
    – Worcestershire sauce
    – oregano and salt to taste
    – minced garlic
  12. Combine all of the above in the glass bowl and refrigerate for AT LEAST 2 hours, but for as long as five.  Not longer though, they will become chewy.
  13. Serve topped with slices of avocado, cubed papaya or mango, salt, pepper, and chopped cilantro

If you want to see a ceviche recipe in action, use the below video.

Lots about Sushi: with VIDEO

Sushi Toolbox

  • Dark soy sauce
  • Rice wine vinegar
  • Short grain rice
  • Nori – small sealed packages
  • Rice Spatula
  • Rolling Mats
  • Wasabi paste or powder
  • Pickled Ginger (Gari) – white (homemade) or pink

Sushi Rice

      • 2 C short grain rice (meshi)
        • AKA Sushi Rice, Glutinous Rice or Pearl Rice
          Very starchy and sticky OR if you can’t find any, add 1 TBL cornstarch to your rice
        • Rinse three times
      • 2 C water
        MIX BELOW – Use this after the rice has finished cooking
      • 3 T rice vinegar or Sushi seasoning vinegar (heated in microwave)
      • 1 TBL mirin
      • 2 TBL sugar
      • 2 tsp salt

STEP BY STEP

      1. Measure your amount of rice while it is dry
      2. Wash rice in a bowl of cold water
      3. Strain
      4. Repeat Steps 2 and 3 until water runs clear (total three times is usually OK)
      5. Mix pre-measured amounts of rice and water and let set for 30 minutes
      6. Cook rice according to directions
        OR Put rice into boiling water, simmer 15 minutes
      7. Remove from heat, cover and let rest 10 minutes
      8. Meanwhile, mix vinegar, mirin, sugar and salt
      9. Poke holes/wells into your rice with a spoon
      10. Pour over a wooden paddle onto rice … drizzle
      11. GENTLY fold cooked rice into vinegar mixture
        Stir around, don’t beat (fan with paper plate to help it cool more quickly)
      12. Keep your hands wetted
      13. Cover with plastic and let cool about 30 minutes on the counter.  Do not refrigerate

Rolling Tips and Tricks

      • Nori (海苔) is the Japanese name for edible seaweed and is frequently used for sushi across the world.  It is usually just referred to as seaweed.
      • Seaweed . Smooth and shiny goes toward the outside.  Rough side goes to the inside against the rice.
      • Use plastic wrap as a covering for your sushi mat
      • Press rice flat onto plastic
      • Dress with slices of cucumber, avocado, shredded imitation krab meat
      • Do not overfill
      • Tuck and roll
      • Dip knife and hands in water
      • Cut in half three times for 8 pieces or half, then thirds for six pieces.

Sushi Filling Options

  • Salmon
  • Shrimp
  • Tuna (mahi mahi)
  • Red snapper
  • Spanish mackerel
  • Scallop
  • Mushrooms
  • Avocado
  • Scallion
  • Sesame Seed
  • Caviar
  • Un
  • Fennel Leaves
  • … and actually whatever you want to wrap into it

Types of Sushi

      • Chirashizushi: “scattered sushi” – Sushi plus other things over rice
      • Oshizushi: “pressed sushi”. Also known as hako-sushi which means “box sushi”
      • Nigirizushi: “hand-pressed sushi” – Frequently like a salmon roll (See Nigiri below)
      • Makizushi – meaning “rolled sushi” – What most Americans visualize when they hear sushi
        Generally wrapped in Nori (seaweed), but can occasionally be wrapped in a thin omelette, soy paper, cucumber, or shsiso (perilla) leaves.

        • Hosomaki: “thin roll” – rice on inside, nori on the outside
        • Chumaki: “medium roll” – rice on inside, nori on the outside
        • Futomaki: “thick roll” – rice on inside, nori on the outside
        • Uramaki: “inside-out roll” – rice on outside, nori on the inside
        • Temaki: “hand roll” – cone-shaped roll
        • Tekkamaki:  Cut tuna into sticks, put nori on mat rough side up, put down rice then tuna

Nigiri

  1. Shape sushi rice into a bite-sized football, but don’t compress
  2. Schmear wasabi on fish, krab or shrimp
  3. Put wasabi against rice and squeeze only to merge all ingredients.  Do not over-compress

Westernized Sushi

        • Dragon Roll:  Eel, crab, cucumber with avocado on the outside
        • Tiger Roll:  Avocado, shrimp tempura, cucumber
        • California Roll:  Rice down on plastic covered mat, then nori, avocado, crab, cucumber. Roll wrap in rice sprinkled with sesame seeds
        • Rainbow Roll: An assortment of fish and avocado on top of a California Roll
        • Spider Roll: Soft-shell crab, cucumber, sprouts (or lettuce, roe, or avocado) and sometimes spicy mayo
        • Spicy Tuna Roll: Rice, tuna, mayo, and chili sauce wrapped in nori
        • Philadelphia Roll: Salmon, avocado, asparagus, and cream cheese wrapped in rice
        • Dynamite Roll: Yellowtail and/or prawn tempura, bean sprouts, carrots, avocado, cucumber, chili, and spicy mayonnaise
        • Teriyaki Roll: Nori, chicken, teriyaki sauce wrapped in rice
        • Boston Roll: Crab, salmon, and scallion wrapped in rice
        • Alaska Roll: Asparagus, and avocado wrapped in rice, topped with Smoked salmon
        • Scallop Volcano Roll: California roll topped with a baked scallop and mushrooms
        • Summer Roll: Sashimi and veggies inside wrapped in rice paper
        • Spicy Tataki Roll: Spicy tuna inside. Sashimi tuna and avocado outside.
        • Eel Avocado Roll: Rice, avocado, and eel wrapped in nori.  Topped with avocado
        • Seattle Roll: Cucumber, avocado, raw salmon, and smoked salmon wrapped in rice
        • Firecracker Roll:  Spicy scallop inside. Tuna and avocado outside
        • Yellowtail Roll: Yellowtail and scallion California roll.
        • Hawaiian Roll: Garlic and albacore inside. Wrapped in rice with avocado and albacore on top.
        • Mango Roll: Avocado, crab meat, tempura shrimp wrapped in rice, topped with mango slices, and creamy mango paste.
        • Classic Roll: Tuna, avocado, and cucumber wrapped in rice and nori
        • Futomaki Roll: Crab, egg, and vegetables wrapped in rice and nori

See www.Ranker.com for a list three times longer than the one above.

Extra Tips and Information

      • If you are going out for sushi, use these tips:
        • Smell should not be overly “fishy”
        • Weekends are when the fresh fish come in
        • Ask about source of their sushi
      • Japanese style sushi has the rice on inside
      • American style sushi has the rice in outside
      • Sashimi is considered by many to be a type of sushi made with raw high-quality fish or raw meat.  It is actually a completely different dish.
      • Sushi should be freshly but quickly killed, usually with a knife point to sever the brain stem
      • Bleeding fish in ice water immediately after killing keeps the meat clear
      • Wait several hours for rigor to start for a firmer flesh
      • Visit All About Sushi Guide for more information

Jacques Pepin Sushi Tray

      • Jacques Pepin made a sushi platter by putting down a layer of rice, and then cubes of salmon, cubes of tuna, small bay scallops, chopped black mushrooms, pieces of avocado (tossed in lemon juice to prevent browning), diced scallion, sesame seeds, caviar, uni, and fennel leaves.  He served wasabi and soy in a cup.  It was WAY easier than formal pieces of sushi and looked just beautiful.

Common Types of Sashimi

      • Salmon (Sake)
      • Squid (Ika)
      • Shrimp (Ebi)
      • Tuna (Maguro)
      • Mackeral (Saba)
      • Horse Mackeral (Aji)
      • Octopus (Tako) – Usually blanched or cooked
      • Whale Meat (Gei-niku)
      • Sea Urchin (Uni)
      • Scallop (Hotate-gai)
      • Puffer Fish (Fugu)
      • Yellowtail (Hamachi)
      • Fatty Tuna (Otoro)

      • You may also view my page for Dungeness Crab Cakes which was filmed at a class aboard the MS Rotterdam.
      • The below video was taken at the Phoenix Eats Trade Show, so has very little verbal description, but offers some very good video for rolling sushi.

Video from Kikoman

Bananas Foster: VIDEO

Thai Crab Salad Rolls

Sake Poached Scallops with Ginger

Bananas Foster

Food and Wine built a cooking class kitchen aboard the MS Rotterdam. With a class of nine, we cooked Thai Crab Salad Rolls, Sake Poached Scallops with Ginger and Bananas Foster. The results were incredible. Here is a summary of the 90 minute class.

This page has been repeated three times, for each of the above recipes.

This is a 45 minute video of a cooking class given aboard the Holland America MS Rotterdam on our way back from Spain.

Sake Poached Scallops with Ginger: VIDEO

Holland America Cooking Class

Thai Crab Salad Rolls

Sake Poached Scallops with Ginger

Bananas Foster

Food and Wine built a cooking class kitchen aboard the MS Rotterdam. With a class of nine, we cooked Thai Crab Salad Rolls, Sake Poached Scallops with Ginger and Bananas Foster. The results were incredible. Here is a summary of the 90 minute class.

This page has been repeated three times, for each of the above recipes.

This is a 45 minute video of a cooking class given aboard the Holland America MS Rotterdam on our way back from Spain.

Thai Sweet Chili Sauce: VIDEO

Holland America Cooking Class

Dungeness Crab Cakes with Thai Sweet Chili Sauce

Marinated Cucumbers

This page has been repeated three times, for each of the above recipes.

This is a 45 minute video of a cooking class given aboard the Holland America MS Rotterdam on our way back from Spain.

  • 1/2 ounce fresh minced ginger
  • 1/4 ounce garlic minced
  • 1/2 ounce white wine vinegar
  • 2 ounce fresh lime juice
  • 12 ounce Sake
  • 4 ounce heavy cream
  • 12 ounce butter
  • 2 ounce Thai sweet chili sauce
  • salt and white pepper to taste
  • Add everything except the cream and reduce to a light syrup
  • add cream and simmer

Spaetzle

This is classically served with veal. See my recipe for Braised Veal Shank at least a day before starting this recipe.  Alternately, this is good when served as a side for schnitzel.

INGREDIENTS

STEP BY STEP

  1. Grate nutmeg, salt and pepper into flour
  2. Create well in center of flour and put in two eggs and a splash of milk
  3. Mix and incorporate slowly adding more milk if necessary.
    Final batter should be almost like a pancake batter.
  4. Put large-holed colander over a pot of barely boiling water – slightly more than simmering though
  5. Pour the batter into the colander allowing batter to drop into the boiling water below.
  6. Push through all batter using a spatula as a pusher.
  7. The squiggles will cook through in 2-3 minutes.  When they rise to the top they are done.
  8. Strain and plunge them into an ice bath to stop the cooking.
  9. Strain WELL and pour out on a platter or onto a towel
  10. Here they will rest about 5 minutes or more and absorb any water on the surface of the spaetzle.
  • Serve with seasonal veggies.
  • Bake the harder veggies
  • Blanch softer veggies
  • When your meat is about done, fry your spaetzel in HOT EVOO or clarified butter in a stainless steel pan
  • Sautee mushrooms if you have them.  Better over-done than under-done.
  • Top with grated Parmesan cheese

Tips: Grilling Burgers (Beef)

Grades for Marbling
Grades for Marbling – click to enlarge

See also Tips: Steaks and Cow Parts

Buying your Hamburger

  • 80/20 lean has the best fat to meat ratio for grilling
  • What does 80/20 or 85/15 mean?  If ground beef has 20 percent fat and 80 percent lean beef, it is good for grilling, but not necessarily good for you. To be called “lean,” ground beef, it must have a lean point of 92% lean (or higher) and only 8% fat . “Extra lean” ground beef must have a lean point of 96% lean or higher. 
  • Another good meat option is 1/2 LB ground chuck mixed with 1/2 LB ground brisket
  • MARBLING EQUALS FLAVOR
    – SELECT is right around BMS Grade 3
    – CHOICE is right around Grade 4
    – PRIME is right around Grade 5
  • Select a piece of chuck with lots of marbling and have your butcher grind it (yes, there are people behind those doors — just ring the bell).
  • Ask for a “coarse” grind.
  • You can also grind the meat yourself with a meat grinder or chop in the food processor (cut into 1- to 1½-inch cubes first).
    An advantage to this is that there are fewer worries about contamination and you can safely cook your burgers medium-rare, if that’s how you like them.  A chef’s favorite that I see on TV a lot is 1/3 chuck, 1/3 shoulder and 1/3 short ribs.
  • Try different combinations of meat.  Almost any kind of ground meat can be used to make burgers, or mix together different ones. I’ve heard of mixing pork with beef, chicken with lamb, or even buffalo with beef. For flavor, try mixing some fresh sausage in with another type of meat.
  • A good combination is half short ribs, half brisket with an extra handful of fat thrown in.

Prepping your Meat for Cooking

  • When making your patties, don’t handle the meat too much.  It will become mealy.  The heat from your hands begins to melt the fat and makes the patty too dense. Move it lightly from hand to hand and loosely make a patty no thicker than one inch, or you will have to cook it too long).
  • When adding other ingredients to ground meat, use a spoon or spatula to avoid heating the meat with your hands
  • Make an indentation in the center of the meat.  Have you noticed that your burgers tend to form rounded tops when cooking, causing the condiments to slide off? If you push down slightly in the center, creating a round area about ¼ inch lower than the surrounding meat, your finished burger will come out flat.
  • Many people just want great beef, straight up with salt and pepper. But it’s also fun to add flavors, and if you are using leaner meats, or leaner cuts of beef, you can add moisture at the same time. Finely minced vegetables such as onion, mushrooms, or mild chilies are especially good for this.
  • Worcestershire sauce and soy sauce are common liquids to add to burgers.About 2 tsp per pound of meat is good.
  • You can also take a lean cut of meat and add some olive oil for good fat, or butter for flavorful bad fat; although this will cook faster than meats that are naturally fattier like 80/20 hamburger
  • If using lean meat, add moisture or fat to your meat.

Cooking your Meat

  • Start charcoal in center in a pyramid, then move to one side
    • Direct Heat:  Things that cook quickly or to get a sear (steak, chicken skin)
    • Indirect Heat: Finish cooking.  Also use for flare ups
    • Spread out coals for thin hamburgers, zucchini, asparagus, hot dogs, skewered seasoned shallots
  • Press down gently, but firmly, at the very beginning to get a good sear on the meat.  After that, don’t press down on the burgers when cooking.  This compresses the meat, making it denser, and also squeezes the juices out of the meat.
  • Salt and pepper are a must, but consider garlic powder or onion powder.  I personally recommend Grandpa’s Thunder Powder.
  • Once your burger is on the heat, don’t move it until it naturally releases.  Once it does, flip it.  Flip it twice more so that both sides get two cookings each.
  • A thermometer is a must-have.  I have a page of Kitchen Gadgets with a link to Thermoworks.  I recommend both an infrared (or IR) thermometer and an instant read ThermaPen.  Cook your meats at least to 145º internal temperature, unless you have ground the meat yourself.
HTML Snippets Powered By : XYZScripts.com