Buying Good Meat – About Butcher Shops – Cuts of Meat
Cuts of Meat
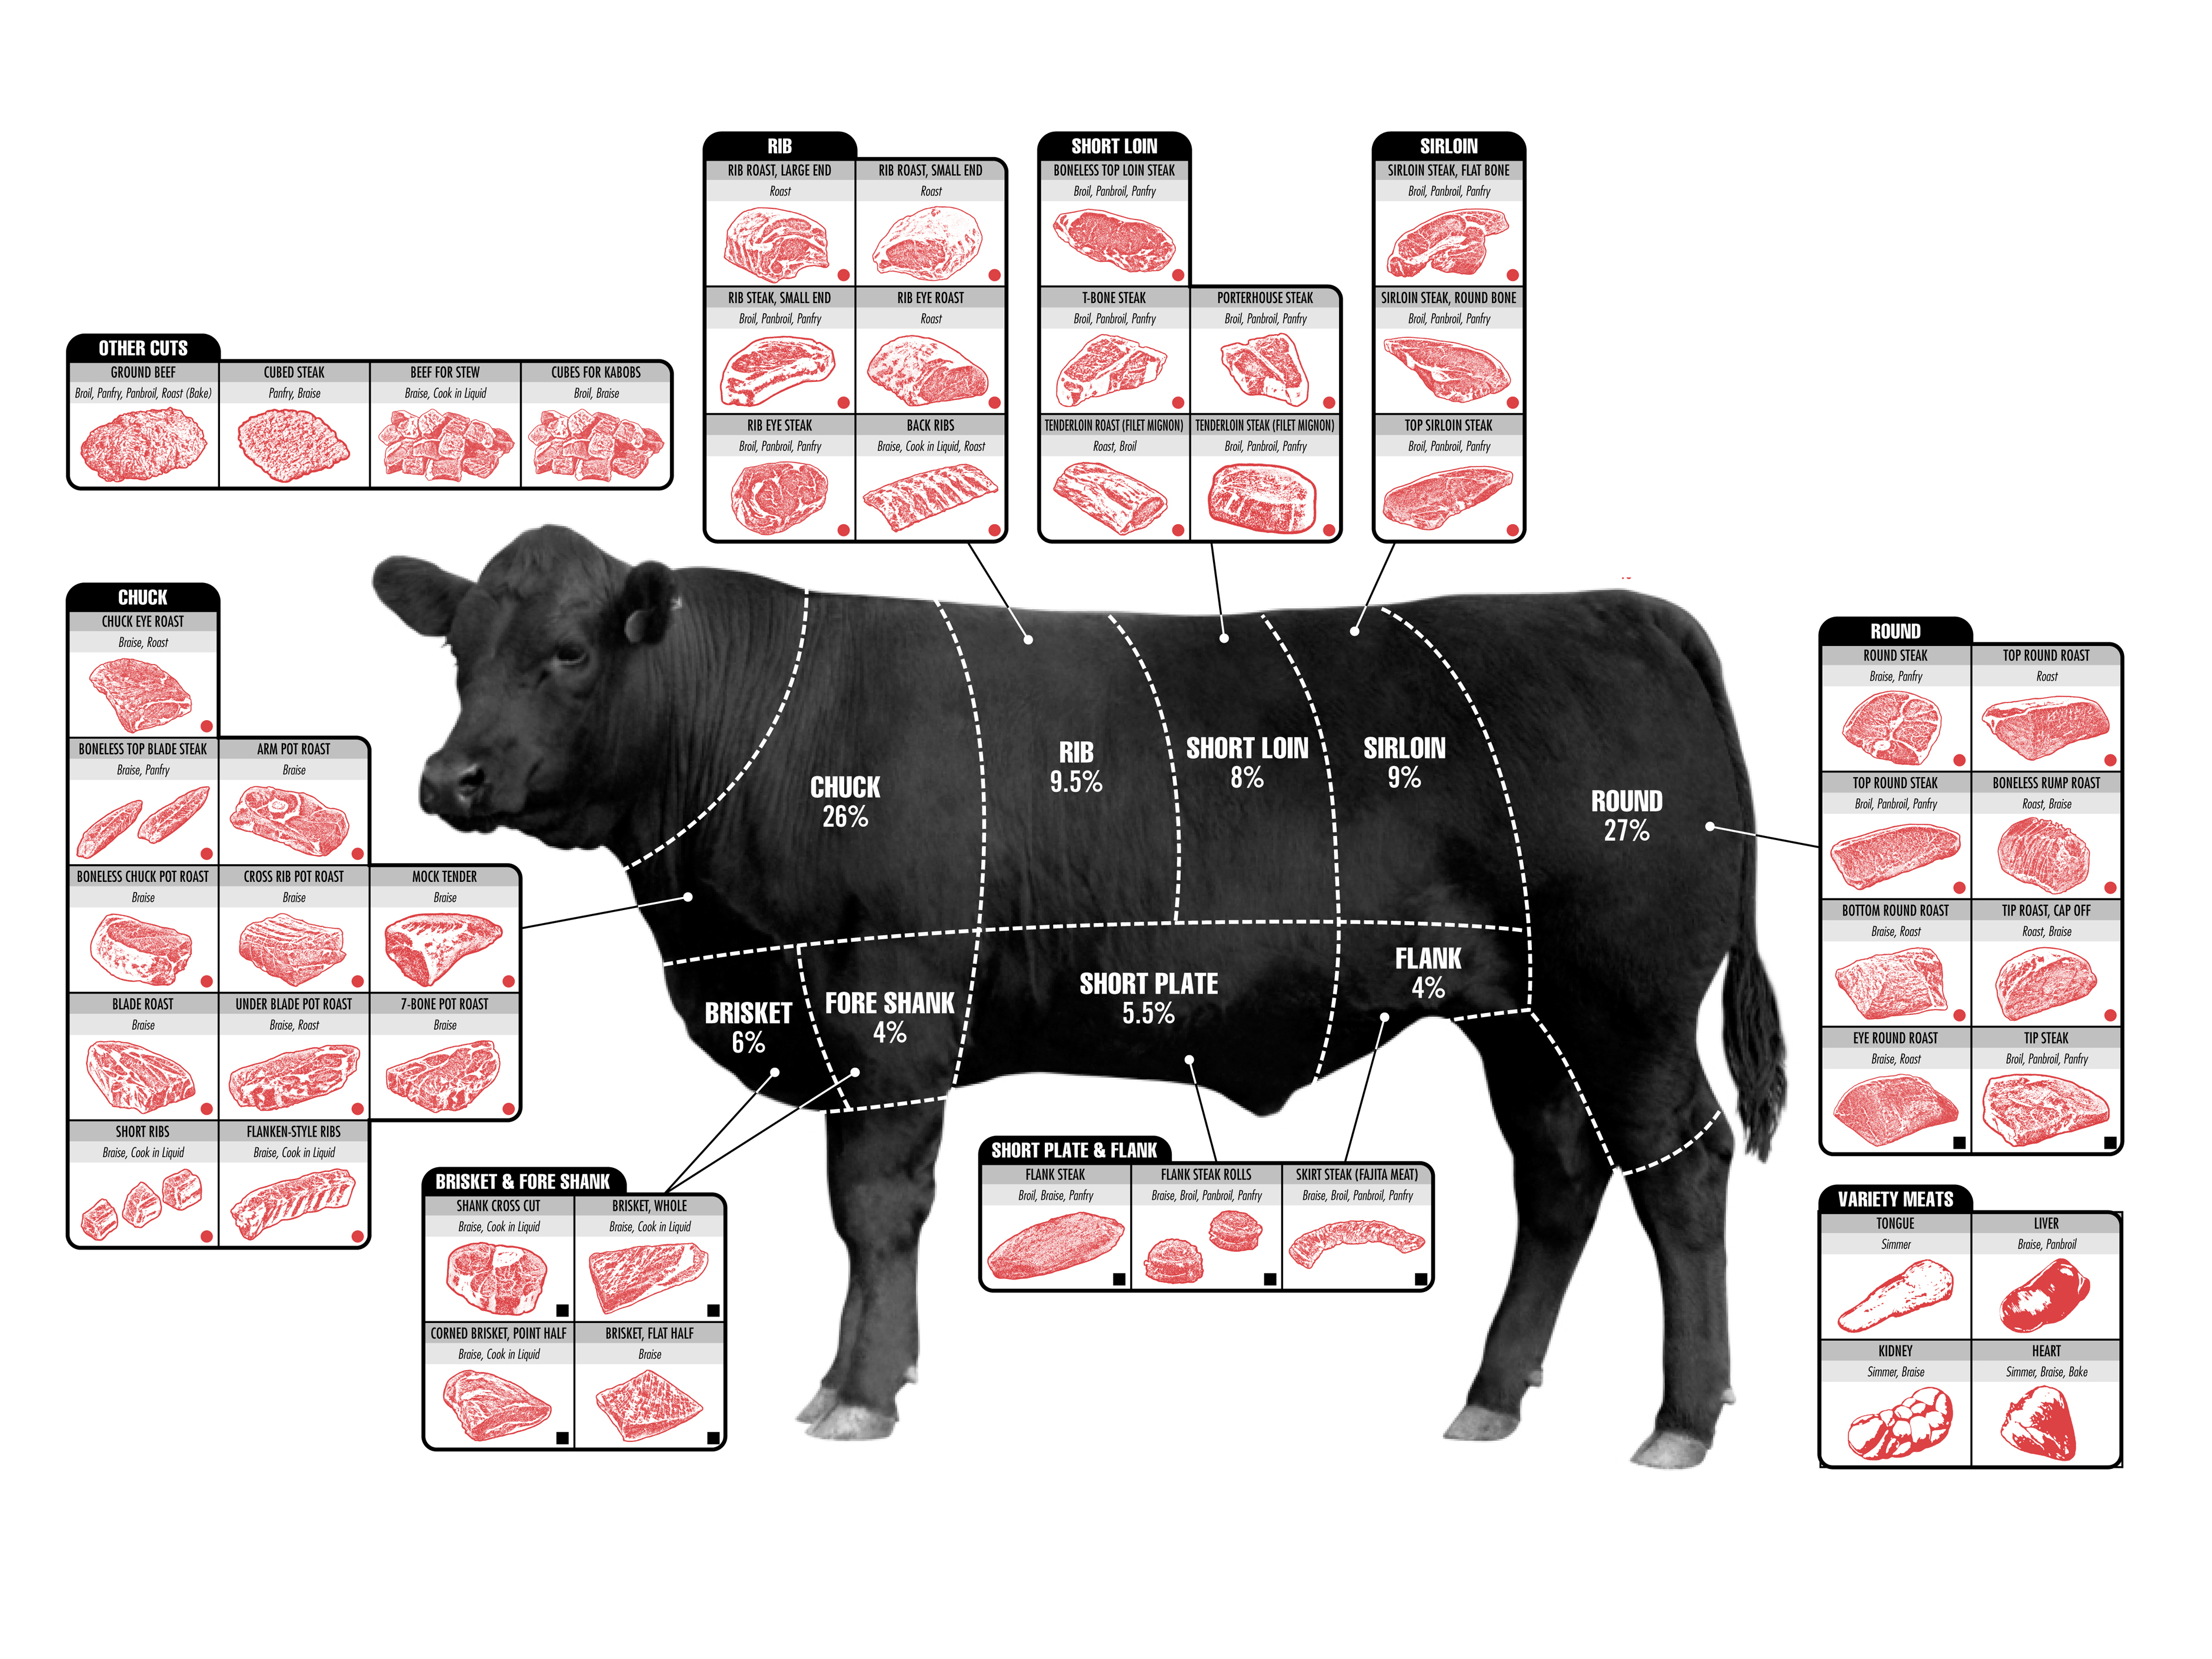
Here is a chart of where cuts of meat are from. Click on the cow to get an enlargement of the graphic. Click again to browse up close and personal. Thanks to www.BusinessInsider.com for providing this chart.
Buying Ground Meats
You can usually ask your butcher to grind your meat for you. That way, you know you are getting 100% meat without fillers. The exception to this could be chicken. Because of the potential for contamination, small butcher shops may grind chicken only one or two days per week. Larger shops will have a dedicated grinder. Call before you go.
Ground beef is NOT hamburger. Beef fat may be added to hamburger, but cannot be added to ground beef. Ground beef is usually made from the less tender cuts of meat, but the marbling and grade is the same as the higher grade steaks.
Chuck steak s a good choice for grinding. A good hamburger is made using 80/20 ground beef that has been ground on a fairly coarse plate. It is usually about 78-84% lean.
Round steak is OK, and is about 85-89% lean.
Sirloin steak is about 90-95% lean and would be better as a steak. It would not produce a very juicy hamburger.
Buying Quality Meats
I think it is safe to say that you have all had a $4 steak from the grocery store, and wondered why it doesn’t taste as great as those that you pay $15 for in a restaurant.
The reason is not only atmosphere, it’s quality of product. Here in Arizona, you can go to The Meat Shop to preorder restaurant-quality cuts of meat. Another good source is Hobe Meats at 16th Street and Bethany Home Road.
A much more convenient option is to buy from Omaha Steaks. You will pay a bit more than a quality local grocery store, but your meat will arrive at your front door step the day after you order it.
YES, they cost you more than what you would pay at the grocery store, but you are worth it. The old adage You get what you pay forreally comes true in this scenario.
Sterling Beef is one of the top quality meats available to consumers. One of the chief factors is the inter-muscular marbling. Good quality meats will be under 2 years of age.
Grading of meat is very important based on how you will be cooking the meat.
Steer are young male cows that usually never see three years old. Older cows and steers are kept for milking or breeding.
The grades for steer meat are:
Utility Grade – Steers that are about 3 years old. This is good for raw dishes such as carpacio or steak tar tar, because eating raw fat is not something we do often in America. Usually entirely grass fed.
Select – This is good meat, but it is fairly lean, so will not be as fall-apart tender as meat with marbling. 30 months old or less. (about $5/lb) Sear and keep center about medium. Cut against grain for something like fajitas.
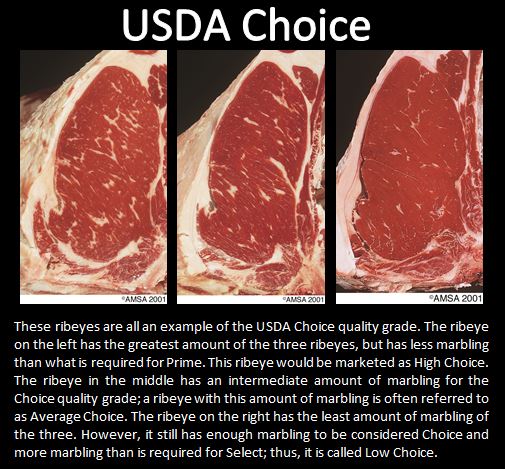
Choice – Bit more marbling. A very good choice for home grilling. (about $8/lb) A top quality home steak. Fed its final days on ground corn, so it can be easily digested. This is the best cut for home-cooking.
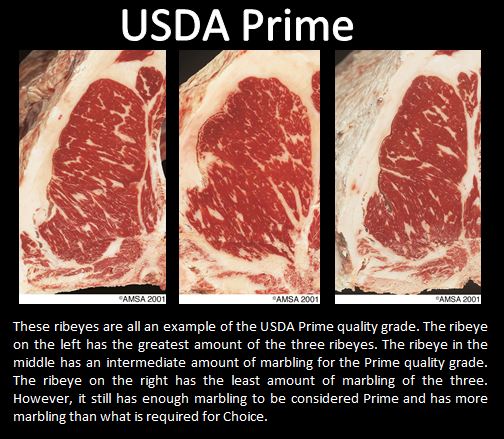
Prime – Lots of marbling, lots of fat. Represents only about 3% of the meat available for purchase. (about $12/lb) Seared over very high heat, leaving the center rare to medium rare. Must be young (between 18 and 24 months) Many restaurants get this grade.
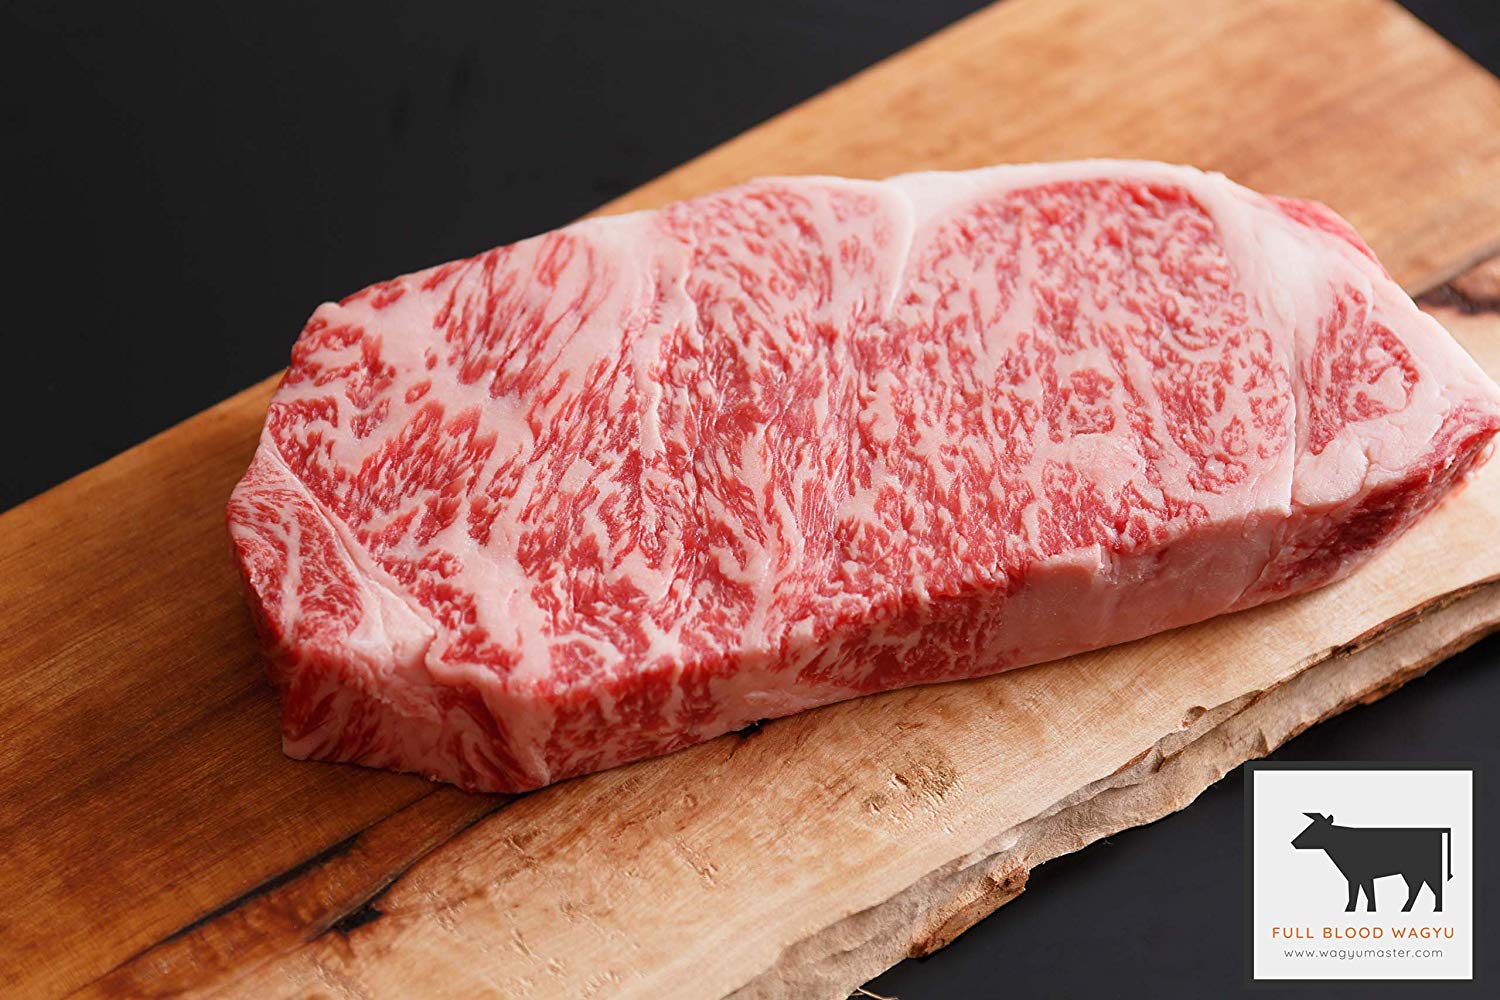
Wagyu or Kobe Beef – Even more marbling… almost too much for some people. (can be as high as $25/lb or more) Usually slice VERY thin and then seared briefly, not cooked as a steak. Usually about 30 months of age. Matsusaka is another high quality beef.
What do you call a cow on a hill? Answer: lean beef
What do you call a cow lying down? Answer: ground beef
What do you call a cow with with twitch? Answer: beef jerky
Why can’t a bankrupt rancher complain? Answer: he has no beef
What is a cow’s favorite musical note? Answer: beef flat
Why don’t cows have any money? Answer: the farmer has milked them dry,
and they are udderly broke.
What happened to the lost beef shipment? Answer: nobody’s heard
Why did the boy give the cow a pogo stick? Answer: he wanted a milk shake
Where do cows go for lunch? Answer: the calf a teria
Why did the boy buy a brown cow? Answer: he wanted chocolate milk
Why do milking stools only have three legs? Answer: the cow has the udder
Where do steers take their cows on dates? Answer: the moo-vies
Why do cows wear bells? Answer: because their horns don’t work
What does the invisible man drink? Answer: evaporated milk
And then there was the lady riding the train through Vermont when she noticed some cows.
“What a cute bunch of cows!” she remarked.
“Not a bunch, herd”, her friend replied.
“Heard of what?”
“Herd of cows.”
“Of course I’ve heard of cows.”
“No, a cow herd.”
“What do I care what a cow heard. I have no secrets to keep from a cow!”
Cooking Meat – Tips and Tricks
During pan roasting process, baste with marinate
Rest on a rack for about 10 minutes after cooking to avoid loss of juice
Cut against grain – ALWAYS
Porterhouse is the tenderloin on one side, and a sirloin on the other side
Nieman Ranch Meats
Neiman Ranch has a reputation for quality meats. They are based out of Colorado.
Within Phoenix, the Corporate offices are at Sterling Food Service at 920 Grand Avenue, Phoenix, AZ, 85007 – Ph: (602) 252-7345
Studded with zucchini, corn, and tomatoes, this hearty soup is comforting, especially on chilly evenings. Oregano flavors both the liquid and the meatballs.
This is perfect when you want about a quart of salsa.
Just buy the ingredients, process, and you are done!
The video above is Grandpa showing you just how easy this recipe is.
INGREDIENTS: Shopping List:
2 Tomatoes
1 Green chili pepper
1 Jalapano pepper(optional)
1 Serano chili pepper (optional)
1 Sweet onion
1 Orange bellpPepper
1 Bunch cilantro
2 Green onions
3 Garlic cloves
1 tsp salt
STEP BY STEP
Remove skin from tomatoes (Optional) See below
Pulse onion and garlic until chopped – about 5 x
Add bell pepper pulse 3 x
Add jalapeno and serrano peppers pulse 3 x
Cut tomato into large pieces and ** process until blended but chunky
Cut all other ingredients into pieces and *** pulse until chunky (not too small though)
Add salt to taste
Pour into mixing bowl, mix and store in refrigerator
NOTES
To remove skin from tomatoes, bring pot of water to boiling. Put a small X on the top of the tomato. Put tomatoes in boiling water for about 60 seconds. Remove and put into cold water for another 60 seconds. The skin should easily peel off.
Process – means blender or food processor. If you have neither chop the heck out of it with a knife. Goodwill though, has blenders for just a couple of dollars.
Pulse – means run your processor in short bursts until the ingredients are “chopped” into small pieces.
This recipe has been provided by Rowena Stallings – on the condition that it NEVER be brought to one of the First Church Potlucks by anyone other than her.
Pasole is a Mexican tradition. Making Pasole is kind of like saying you are making a Casserole. The recipe contains hominy, and all other ingredients are based on family tradition. Here is one recipe out of thousands. A video from Your Life A to Z follows.
I don’t like the thicker tortillas that you find in the grocery store. Here is a fairly simple way to make thin ones. These also work well for Mu Shu pancakes.
INGREDIENTS
1 cup sifted flour
1/2 cup very hot water
Scant salt
STEP BY STEP
Mix flour and salt, then add extremely hot water
What I do is put flour and salt in a food processor, and then drizzle in hot water until it starts to come together.
The hot water breaks down the gluten so that they roll easier and flatter
After adding the boiled water, drizzle in cold water until dough comes together.
Mix adjusting water until dough is like playdough
Wrap in plastic and let set for 30 minutes
Prepare a medium-hot skillet – Cast iron is my preference – NO OIL
Roll a log, and then cut in half, then in half again, then in thirds – You will have 12 pieces
Roll into balls, and then flatten into thick disks – hockey pucks
Brush sesame oil onto the top of HALF of them
Stack two disks (oil in between) and roll out until about 7 or 8 inches in diameter
Put a pair into a non-greased skillet on 350-400º for 30 seconds
When the edges start to become translucent (about 30 seconds) flip the pancakes as a pair
Cook the second side for about 30 more seconds
Flip the two together and cook the first side again for only 10-20 seconds more
Remove the pancakes to cool just a little bit, then separate
See tips below on keeping them from drying out
To keep Mu Shu Pancakes from Drying Out
Place finished pancakes in shallow covered bowl – like a glass pie pan
Put microwave-heated wet cloth at the bottom of the bowl
Put a plate on top of the cloth so the pancakes do not become soggy
Cooked side always goes up.
Put a pan lid on top of the bowl to keep the moisture in.
Mu Shu Pancakes – Video
Here is a video that shows how to roll the pancakes together. It is kind of hard to visualize above. They fold the pancakes into quarters. Although that is very common, I don’t like that because they tend to stick together that way.
Mu Shu Crepe Pancakes
INGREDIENTS
3 TBL melted butter
1 C whole milk
1/2 C flour
1/2 tsp salt
2 eggs
STEP BY STEP
Pulse together flour, salt, eggs and butter
Add milk, and pulse just to mix
Strain using a fairly coarse strainer
Let batter rest for 30 minutes to let the glutens relax
Cook in buttered crepe pan until cooked, but not browned
Stack on plate to store and serve
Finish on a floured surface. If you have a scale, 120 – 130 mg ball of dough is perfect for pancakes. Roll balls, then cover and set them aside for 30 minutes
Grandpa created and submitted this recipe to The International Rescue Committee for inclusion in its Gila Farm Cooperative CSA Newsletter. This is a program that we subscribed to, and prepaid for, which gives the farmers money for seeds. Throughout the coming year, we get all sorts of greens and other produce fresh from the farm.
This is also great if you are traveling and get a chance to sample the street side farmer stands or a local farmers’ market.
INGREDIENTS
2 portions Spinach
1 portion Kale
1 portion Collard Greens
3 Radishes
1/4 C Golden Raisins (Grocery)
1/4 C Dried Cherries (Costco)
1 Tomato (Grocery)
We shop at a small immigrant grocery next to Fatoush Restaurant ( 4426 N 19th Ave, Phoenix, AZ 85015 ) near 19th Avenue and Camelback. Most Eastern restaurants will have yellow raisins.
STEP BY STEP
Wash each ingredient with full immersion, then dry the veggies and leaves, discarding the water.
Prepare the large bowl with iced water for cooling the heated greens
Cut the tomatoes into bite sized pieces.
Use a crinkle cutter to cut your radishes into medallions.
Tear stems off spinach and tear leaves into bite sized pieces.
Cut Collard Green and Kale stems off, and discard stems
Heat a large pan with a little water in it.
When water begins to show “hot water bubbles” put in Kale and Collard Greens and cover for 30-60 seconds.
Dump Greens into ice bath to stop cooking and wilting process.
Dry or spin cooled greens, then discard water in bowl, rinse and dry to use in the next step.
Combine all ingredients in clean bowl and toss gently.
Grandpa created and submitted this recipe to The International Rescue Committee for inclusion in its Gila Farm Cooperative CSA Newsletter. This is a program that we subscribed to, and prepaid for, which gives the farmers money for seeds. Throughout the coming year, we get all sorts of greens and other produce fresh from the farm.
This is also great if you are traveling and get a chance to sample the street side farmer stands or a local farmers’ market.
INGREDIENTS
2 TBL brown rice
2 TBL barley
2 TBL basmati rice or other white rice
8 leaves Spinach
4 leaves Kale
4 leaves Collard Greens
1 Radish
8 Golden Raisins (Grocery)
8 Dried Cherries (Costco)
1/4 CUP leftover chicken, beef or pork – shredded
STEP BY STEP
Wash each ingredient with full immersion, then dry the veggies and leaves, discarding the water.
Prepare the large bowl with iced water for cooling the heated greens
Rinse rice until water runs clear.
Mince radish
Tear stems off spinach and tear leaves into bite sized pieces.
Cut Collard Green and Kale stems off, and discard stems
Heat a large pan with a little water in it.
When water begins to show “hot water bubbles” put in Kale and Collard Greens and cover for 30-60 seconds.
Dump Greens into ice bath to stop cooking and wilting process.
Dry or spin cooled greens, then discard water in bowl, rinse and dry to use in the next step.
Cut uncooked spinach into julienne strips
Chop cooked greens into medium sized pieces
Combine all ingredients in clean bowl and toss gently.
COOK RICE
Measure rice (eg 1/2 Cup) and place in pan on stove to begin heating and browning
Heat 2x the amount of rice (eg 1 Cup) of water in the microwave until it begins to boil
Pour in with browning rice and add salt to taste
Turn heat as low as possible, cover and wait… you cannot hurry rice.
Stir to keep from sticking every 10 minutes
In 40 minutes, dump rice into a colander, discarding whatever water has not been absorbed.
Toss gently with all other ingredients and serve hot
COMPOSTING MADE EASY
If you wish to begin your own composting, the stems and bits from this recipe will be a good first ingredient. The City of Phoenix Waste Management cuts off the bottom, and drills holes in the sides of their trash barrels with broken wheels; and sells them for $5 each. These make excellent compost bins. Visit the recycle center at 37th Avenue and Buckeye Road to buy one.
Published in Grandpa’s Corner – IRC Volume 1, Issue 4
Grandpa created and submitted this recipe to The International Rescue Committee for inclusion in its Gila Farm Cooperative CSA Newsletter. This is a program that we subscribed to, and prepaid for, which gives the farmers money for seeds. Throughout the coming year, we get all sorts of greens and other produce fresh from the farm.
This is also great if you are traveling and get a chance to sample the street side farmer stands or a local farmers’ market.
Use 16 oz of canned stock, or make your own. It’s much healthier and really easy. Here is a link to Grandpa Cooks HOMEMADE MEAT AND VEGGIE STOCK.
Fill with DISTILLED water to cover two inches over top of ingredients
INGREDIENTS
16 oz stock
Handful of mustard greens (chopped)
Handful of Collar Greens (chopped)
2 green onions (diced)
1 stalk celery (diced)
1 carrot (julienne strips or peeler strips, then chopped)
This creates a nice soft bollito that is great for making a po’ boy.
INGREDIENTS
1 TBL dry yeast
1 TBL Nonfat Dry Milk
1/2 TBL Sugar
1 tsp Salt
2 C AP flour (I plan to try swapping 1 Cup of cake flour next time)
1 C Hot Water (120-130 F)
1/2 TBL Butter
1/2 TBL cold water
STEP BY STEP
Mix together 1 Cups flour, yeast, dry milk, sugar and salt
Pour in the hot water and butter, mix well
Add remaining flour 1/2 cup at a time. Switch to hook near the end of flour
Add additional flour 1 TBL at a time to get to an elastic ball that is not TOO sticky, but better sticky than too dry.
Knead on medium speed 2 for 10 minutes
Turn dough out onto floured surface and knead with your hands, folding over and over until it is NOT sticky, and dough springs back when you push a finger into it.
Shape into a ball, oil lightly, and place in large glass bowl at least 3x the size of the ball.
Let rise until doubled in size – about 1 hour
Turn out onto a lightly floured surface. Knead briefly to allow large bubbles to escape.
Place pan of water in the oven
Start oven preheating to 350º
Divide into 2 pieces, shape into two torpedoes, and cover loosely with saran and let rise for another 60 minutes on top of the stove
The dough should double easily in 45 min
Brush dough with cold water, slash across the top and bake for 40 Minutes
Rotate half way through for even color – do not over-bake
Grandma LOVES spinach pasta. This recipe was designed to make quick, but good, spinach pasta using a Kitchen Aid, and will make a total of about eight servings. We’ve also substituted Collard Greens and Kale with excellent results. Since I created this recipe though, I found a great source of spinach pasta at Amazon.com. CLICK HERE to see what I buy these days. Even Grandpa takes a quality shortcut now and then.
INGREDIENTS
4 C AP Flour
1 block froezen spinach (drained, chopped and squeezed)
3 eggs
1 tsp salt
1/2 C Flax
1/2 C Whole Wheat Flour
1/2 C water
1/4 C EVOO
STEP BY STEP
Mix until like Playdough
Add a spoonful of water or a spoonful of flour to adjust if necessary
Cut into four pieces
Roll into skinny long rope – about 12 inches long
Roll to about 1/4 inch with rolling pin
Put into pasta roller at 1 for one pass
Fond and repeat on 1 about four more times
Return into pasta roller at 3 for three more passes
NOTE: The continued rolls will improve the consistency of the resulting pasta
Put through pasta cutter, controlling the strands as they come out
Hang over board or broom handle for 20-30 minutes in four separate groups
Take each group and divide again into 4-8 groups and wind VERY LOOSELY into nests
Set aside to dry for 24 hours before bagging and storing
Make sure they dry out before storing or they will mold
Will keep about two weeks. Four in the refrigerator.
2 large russet potatoes – peeled and chopped ( see note below )
2 cups water
1/2 teaspoon salt
3 ounces cheddar, grated – about 1 cup)
2 TBL chopped chives or scallion tops
STEP BY STEP
In a large saucepan, cook the bacon until crisp
Remove the bacon and set aside on a paper towel
Pour off all but 1 tablespoons of the bacon fat
If you don’t have 1 tablespoons, add a bit of canola oil
Reduce the heat to low
Add the onion and cook until softened – about 5 minutes
Stir in the potato pieces until they start to brown
Add water and salt and bring to a boil
Simmer, stirring occasionally, until the potatoes are tender, 15 to 20 minutes
If you want a creamy soup, pour the soup into a blender and puree
For a more rustic soup, use a potato masher to do most of the work.
Return the potatoes to the pan
Still over low heat, add the cheese bits and stir until melted
Remove the pan from the heat
Taste the soup and season with salt, pepper or cumin to the desired taste
Serve the soup topped with the bacon and chives, and a dollop of sour cream
MORE STUFF YOU NEED TO KNOW
Boiling potatoes have less starch than baking potatoes and consequentially hold together better when boiled. This is why they are used in dishes such as potato salads. Not in this soup, though. Since we want most of the potato to break down into smaller pieces and thicken the soup, baking potatoes are preferred.
For Vichyssoise, prepare soup as above, then add 1/2 cucumber – peeled and seeded and 1 TBL light cream. Let soup chill, then add Vichy ingredients and blend in a blender until smooth. Refrigerate several hours. Garnish with chopped chives.
SAFETY TIP: If you blend your hot soup, DO NOT put the lid tightly on the blender. The explosion of hot air will spread hot potato soup all over your kitchen, ceiling and face. Leave the lid off, and cover the top with a heavy towel or wash cloth.
1/2 cup chopped lean corned beef brisket (3 ounces, see Tip)
1/4 cup reduced-sodium chicken broth
1 TBL chopped fresh parsley
Salt & freshly ground black pepper to taste
4 medium eggs
TIP: Corned beef can be purchased at your supermarket deli. Be sure to specify lean: LEAN has ONLY 1 gram fat per ounce. REGULAR Corned Beef has 5 grams fat.
STEP BY STEP
In a large cast-iron skillet, heat oil over medium-high heat.
Add onion and sauté until it starts to brown, 5 to 8 minutes.
Add potatoes and cook, stirring, until they brown in spots and become crusty, about 8 minutes more.
Stir in corned beef and broth and cook, scraping up any browned bits, until liquid is absorbed, 5 to 8 minutes.
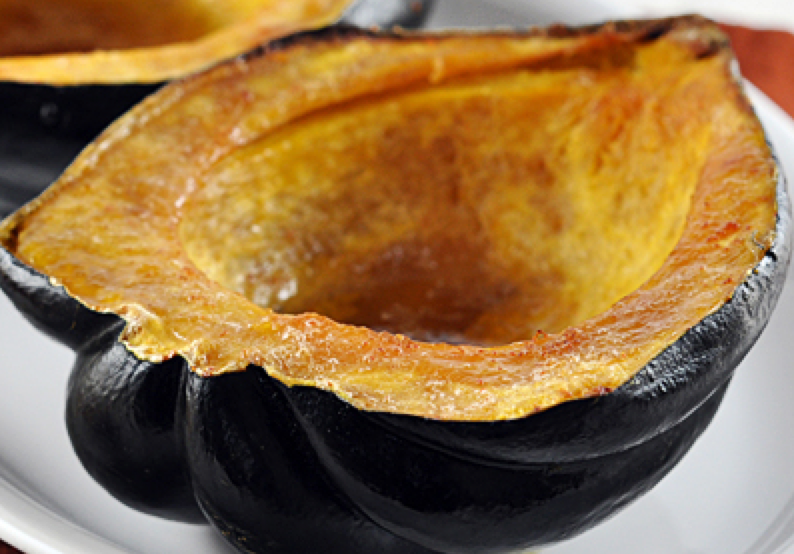
Wash briefly under running water, then dry with a towel.
Cut in half from stem to tip using a heavy knife.
Spray both cut faces with PAM or brush with EVOO.
Bake in Convection Oven or Toaster Oven face down for 25 minutes at 350 degrees.
If you like your squash a little on the firmer side, make this only 20 minutes.
Remove half-baked squash, and spray or oil again.
If you have it, EVOO or melted butter, this adds a great flavor
Return face up to cook 20 more minutes.
Meanwhile, cream together 1 TBL sugar into 4 TBL butter
Remove and cover each with 1/2 of the butter mixture
Return to cook (cut side up) for five more minutes.
Note: A piece of crumpled aluminum foil makes a good base if your squash does not sit flat.
##################
Here is a recipe from Martha Stewart, where she cooks (and eats) the skin and all.
Halve the squash and remove the seeds – just as done above – but this is where the similarity ends…
Cut the halves in half again and again, creating about 32 thin wedges
Toss with EVOO, corriander, salt, cumin, cayenne and black pepper (to taste)
Bake on greased baking sheet at 425º for 20 minutes
Flip wedges to bake the other side
Bake another 15 minutes
Serve with the skin
Hmmmmm….. I haven’t tried this yet, but Martha has not led me wrong before.


 INGREDIENTS