COLLECTION – Brisket – Corned Beef

BRISKET vs CORNED BEEF :: They are both from the front chest area of the cow near the bottom of the chest,  but they are not the same thing.

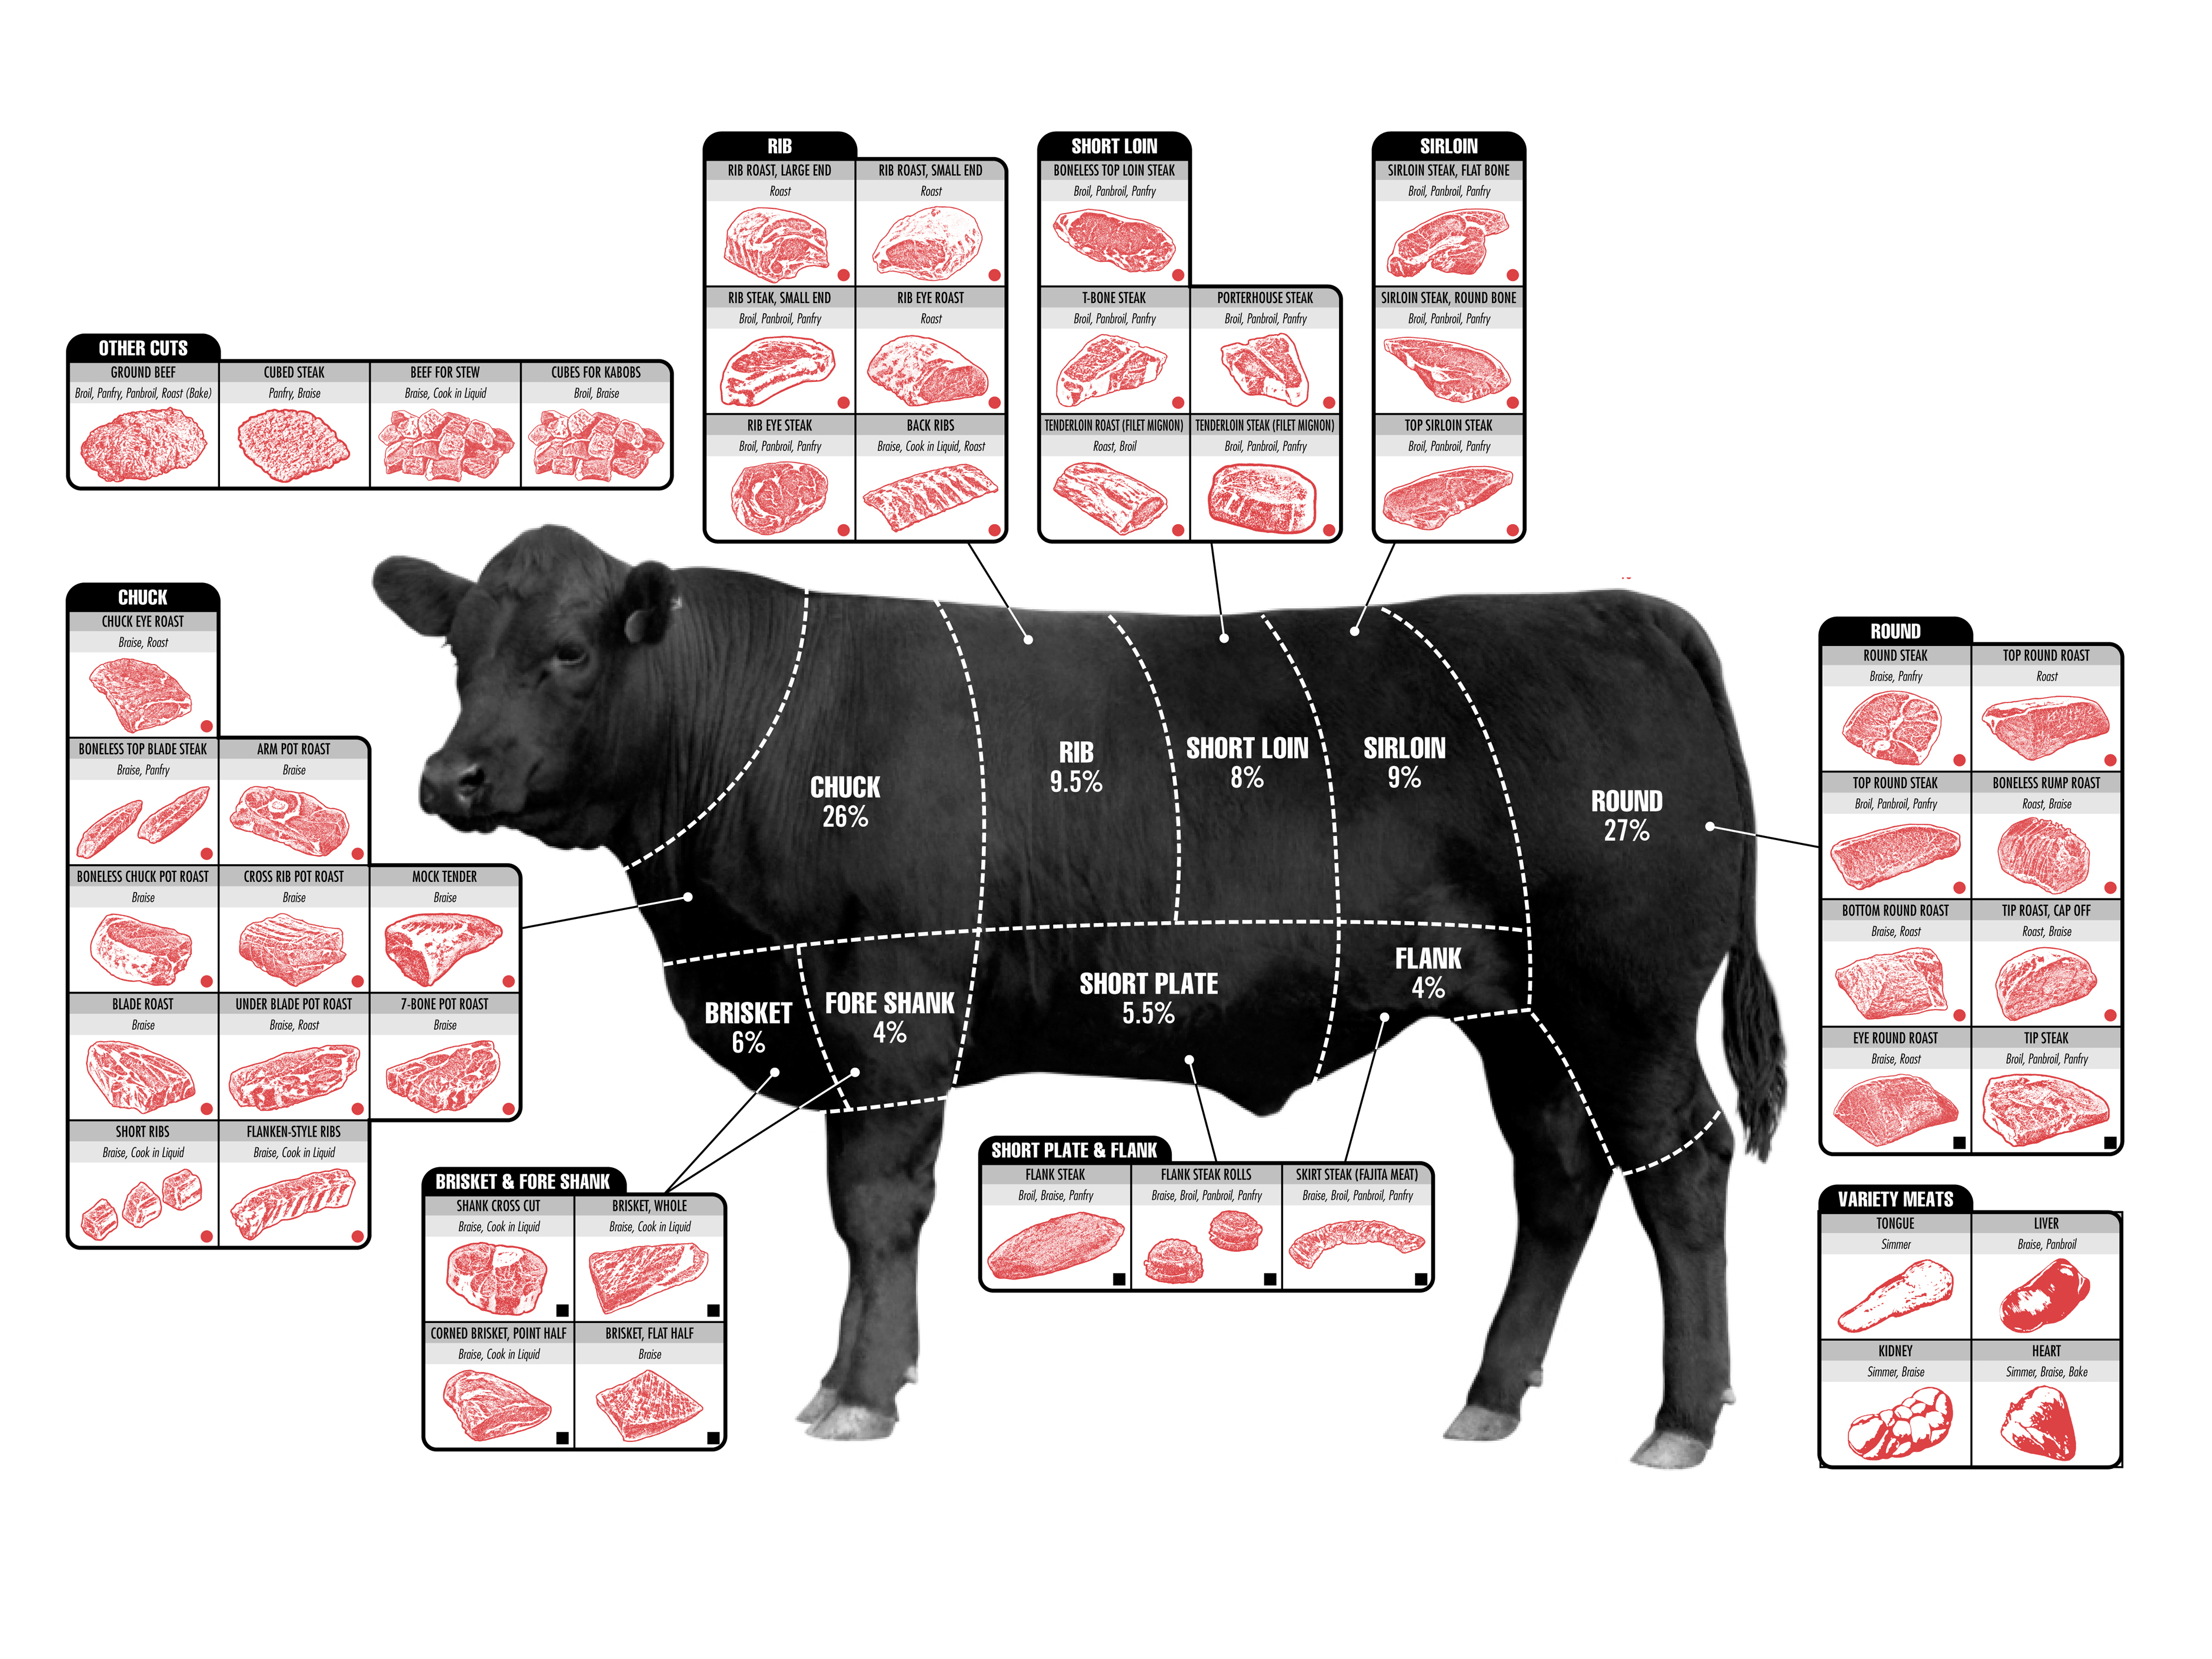
Fresh beef brisket is like a big roast.  It refers to a cut of meat. The FLAT CUT is larger and leaner, which calls for a quick preparation. The POINT CUT is fattier and has more flavor. You should braise the point cut to allow for the breakdown of connective tissue. Trim some fat from each before preparing.

Corned beef frequently starts out as beef brisket and is brine-cured first.  Corned beef refers to the curing/seasoning method, not the cut of meat.

Not all corned beef is brisket and certainly not all brisket is corned beef.  Corned beef is usually cooked in a crock pot or dutch oven and the result is rather pink

Brisket Recipes

Corned Beef


NOTES FROM ANOTHER WEB SITE:

What’s the difference between…

Pastrami vs. corned beef

The deli counter is full of pressing questions — because while you may have some vague understanding that pastrami and corned beef are two different things, and that one might be better than the other, you may be stuck on the how or why. Here are the major points of differentiation between the two, because no meat should ever be a mystery.

Pastrami and corned beef have different countries of origin: Pastrami has two possible ancestries: It’s either Romanian (where its predecessor, pastrama, was made with pork or mutton) or Turkish (where it’d be a descendent of pastirma, made with beef). Corned beef hails from Ireland, which is why it’s eaten on St. Patrick’s Day.

Pastrami and corned beef are different cuts of meat: Today’s corned beef and pastrami are both made from beef, albeit different parts of the animal. Corned beef is made from brisket, which comes from the lower chest of the cow; pastrami is either made from a cut called the deckle, a lean, wide, firm shoulder cut, or the navel, a smaller and juicier section right below the ribs. These days, you may also see pastrami made from brisket.

Pastrami and corned beef do have the same brine: Pastrami and corned beef are brined before they’re cooked; they’re either rubbed with or submerged in a solution of salt and spices to infuse the meat with more moisture and flavor. Both are brined in a mixture of salt, sugar, black pepper, cloves, coriander, bay leaves, juniper berries, and dill, as well as the preservatives sodium nitrate or sodium nitrite.

Pastrami and corned beef have different spice mixes: Here’s when things really start to differ. After brining, pastrami gets coated in a mixture of black pepper, coriander, mustard seeds, fennel seeds, and sometimes fresh garlic; that spice coating is what gives it its blackened appearance. Corned beef is… naked. No spice mix to speak of.

Pastrami and corned beef have different cooking methods: Pastrami is smoked over hardwood, oftentimes with a pan of water nearby, which helps create steam and keep the meat moist. It’s then cooled and then steamed before serving. Corned beef is… boiled. Sometimes with cabbage and other accoutrements in the mix, too.

Bonus round: If you’ve ever been to Montreal, you may be wondering: What does “smoked meat” have to do with all this? Smoked meat is a Canadian specialty that pulls from the same themes as corned beef and pastrami, but has a story arc of its own. It’s made with brisket and is brined in a mixture of black pepper, coriander, garlic, and mustard seeds — but with much less sugar than its pastrami and corned-beef cousins. It’s then smoked, like pastrami, and is best layered onto rye bread with mustard for serving — just like the rest of family.

Chinese 5 Spice Powder

  • 1 stick cinnamon
  • 2 tsp cennel seeds
  • 10 cloves clove
  • 4 stars atar anise
  • 2 tsp Sichuan peppercorns
  1. Use actual peppercorns, not a substitute.
  2. Using a spice grinder, grind everything to a powder
  3. If using a coffee grinder, grind 1 TBL rice before grinding spices.
  4. Sieve out larger remainders
  5. Keeps for about 6 months
  6. Use 1 tsp powder for 1-2 LB of meat

Sesame Noodles

Ingredients

  • Udon or Sesame Noodles
  • 3 scallions
  • 2 TBL lemon juice
  • 1/2 C Hoisin sauce
  • 3/4 C peanut butter
  • 2 tsp toasted sesame oil
  • 1 TBL soy sauce
  • 1 C filtered water
  • 1 tsp Sriracha
  1. Bring sauce to a simmer on the stovetop.
  2. Prepare Udon noodles in a pot of water.
  3. Add desired amount of sauce in with your Udon noodles


Gazpacho – COLLECTION INDEX

Garnishes

See below for a laundry list of great garnishes

A gazpacho is a (usually) smooth (usually) cold (usually) vegetable soup.  Basically you will blend your veggies, remove the foam, and then run through a food mill to make a very smooth soup.

Garnishes to be put on top at the discretion of the diner are almost a requirement.  Below are some options for bowls of garnish.

Great Garnishes

  • Basil chiffonade
  • Bell Pepper – Green, red or orange – Raw, peeled, and diced
  • Chives – Fresh and cut into small pieces – greens and whites separated
  • Cilantro – Chopped with the stems included
  • Croutons – Make your own – toss in EVOO and spices, then bake
  • Cucumber – Seeds removed and diced small
  • Dill – Chopped
  • Grandpa’s Thunder Powder
  • Lime or Lemon Zest
  • Onion – White – Vadallia – Cut very small, and then rinsed to remove the strong acid taste
  • Onion – Red – Cut very small, and then rinsed
  • Parsley – Chopped with the stems removed
  • Tomato – Blanched and skin removed, then diced
  • Sour cream
  • Spearmint
  • Strawberry
  • Tabasco, Choloula or salsa

Norwegian Cheesecake

  1. Mash 4 graham crackers and mix with 1 TBL melted butter.
  2. Press crust into two ramekins
  3. Mix together 1 C creme fraiche and 1 C cream cheese
  4. Melt 1/3 C sugar with 5 TBL hot water in a pan
  5. Add big wide strips of lemon zest (to be removed later)
  6. Put 1 sprig of rosemary into water mixture.
  7. Add 2 tsp gelatin and bring sugar water mixture to a boil.
  8. Strain solids out and cool for 15 minutes
  9. Mix gelatin mixture in with cream cheese
  10. Pour into pie crusts and chill overnight
  11. Top with lingonberries or other fresh fruit (or preserves)


Vegetable Salsa Bed

This is good for fish, scallops, rare meat… many different main courses.

Ingredients

  • 2 tsp each:  EVOO, garlic, ginger (saute together, then add yellow pepper
  • Fresh veggies:  To your personal taste:  yellow tomatoes, shallots, jalapeños, cucumber, carrot, Japanese sake

Plate the salsa, top with the protein and surround with cherry or compari tomatoes.

Creme Fraiche Custard

Ingredients

  1. Mix 1 egg and 1 C créme fraiche and put into greased pie pan
  2. Sprinkle lightly with Turbinado sugar (approx 1/2 C)
  3. If in a pie shell, wipe down the edge of the shell with egg white and sprinkle with more Turbinado
  4. Put a pan of hot water in the bottom of the oven
  5. Bake at 275º for 30-40 minutes or until it starts to brown
  6. Custard should jiggle slightly, but not appear to be too liquid
  7. Turn off oven and open door halfway to let cool

Lighthouse Potatoes

From TheDay.com

Lighthouse Inn Potatoes

Once you taste these seductive spuds, you’ll have a new favorite for family gatherings, holiday potlucks and yes, even weeknight meals.

Serves 8-10

  • 2 ounces Parmesan cheese, grated (about 1 cup)
  • 1 cup panko bread crumbs
  • 4 tablespoons unsalted butter, melted, plus 6 tablespoons cut into 6 pieces
  • Salt and pepper
  • 2½ pounds russet potatoes, peeled and cut into 1-inch chunks
  • 3 cups light cream, divided (may substitute heavy cream but not half-and-half, which tends to break)
  • 1/8 teaspoon baking soda (for stability and silkiness)
  1. Adjust an oven rack to the middle position and preheat the oven to 375 degrees. In a small bowl, combine Parmesan, panko, 4 tablespoons melted butter and ¼ teaspoon salt. Set aside.
  2. In a large saucepan, combine the potato chunks, 2½ cups light cream, 1/8 teaspoon baking soda, 2 teaspoons salt and 1 teaspoon pepper.
  3. (You’ll think that this is too much salt. You’ll be tempted to use less. Don’t do it. Follow the recipe. The sauce will be salty, but in the end the potatoes will be perfection.)
  4. Bring this mixture to a boil over medium-high heat. The potatoes will want to stick, so stir them frequently. Reduce the heat to low and cook at a bare simmer, still stirring often, until a paring knife slides easily into several potato chunks without the potatoes crumbling apart, 20 to 25 minutes.
  5. You don’t want the potatoes mushy. As soon as the biggest chunks yield easily to the knife, get them off the heat and stir in the remaining ½ cup of cream and the remaining 6 tablespoons of unsalted butter. Keep stirring until the butter has melted, about 1 minute.
  6. Pour the creamy potato mixture into a 9-by-13-inch baking dish. (You’ll want to butter the dish, but you don’t have to.)
  7. If you’re making the potatoes ahead, proceed below. If you are cooking them immediately, sprinkle the Parmesan-panko mixture evenly over the top. Bake, uncovered, until the potatoes are bubbling and the crumb topping is nicely browned, around 15-20 minutes. Let the potatoes cool for at least 15 minutes before serving.

To make ahead and bake later: After the potato mixture has been transferred to the baking dish, let it cool completely, then cover the dish with aluminum foil and refrigerate for up to 24 hours. When you’re ready, before applying the Parmesan-panko topping, bake the potatoes at 375 degrees, covered, until they’re heated through, about 35 minutes. Remove the dish from the oven and apply the topping evenly. Bake again, now uncovered, for another 15-20 minutes until the top is nicely browned.

Original recipe from Ashley Moore and Cook’s Country magazine, December/January 2017.

Improving Sausage

Start with traditional sausage patties or sausage with casings removed

  1. Mix with salt, pepper, parsley, chives, garlic, mushrooms, bread crumbs and egg yolk
  2. Fry in EVOO on high – covered 2-4 minutes
  3. Flip and lower heat
  4. Cook an additional 3-4 minutes
  5. Serve on cornmeal mush made by deglazing the pan


Shrimp – Tips and Tricks

Here are some things that you want to know before buying shrimp.

Quick Guide to Cooking Shrimp

  • Leave Shell On.
  • BROIL:  Move rack to the second from the top.  Toss in EVOO and Old Bay Seasoning, Broil with shell on for two minutes first side, and one minute second side.  Put in freezer for five minutes
  • SKILLET:  Preheat skillet to medium high, then cook exactly like broil
  • BOIL: 

Shrimp off South Eastern US Coast

  • Brown – June to August – Texas
  • Pink – Florida
  • White – August to December (more abundant)

In Europe large shrimp are called Prawns.  In the US a prawn is a fresh water shrimp.

Shrimp Size Guide

  • Extra Colossal: 5 to 8 per pound (Remove vein)
  • Colossal: 8 to 14 per pound (Remove vein)
  • Extra Jumbo: 14 to 18 per pound – Grill (Remove vein)
  • Jumbo: 18 to 24 per pound – Grill (Remove vein)
  • Extra Large: 24 to 30 per pound – Cocktails (Remove vein)
  • Large: 30 to 36 per pound – Cocktails (Remove vein)
    (devein this, and anything larger than this – scissors are good for this)
  • Medium Large: 36 to 42 per pound – Spring rolls
  • Medium: 42 to 50 per pound
  • Small: 50 to 60 per pound – Bisque
  • Extra Small: 60 to 80 per pound – Bisque

Another way to size shrimp is Tails per Pound

  • 60-70 – EXTRA SMALL SHRIMP
  • 26-30
  • 21-25
  • 16-20
  • U-12 – VERY LARGE SHRIMP

I personally don’t like this scale, because what happens if you have 50 or 18 tails per pound?  You will see this in some places though.

  • If fresh is not available to you, buy “Shell-on Frozen Shrimp” 
  • Thaw frozen shrimp in 1 C hot water, 1/4 C sugar, 1/4 C salt.  Put shrimp in, stir once, then dump in 2 C ice cubes.  Rinse and drain on a towel.
  • Most “fresh” shrimp in the grocery stores is thawed-out frozen shrimp.
  • Thawed shrimp has a shelf-life of only a couple of days versus frozen shrimp which retains their quality for several weeks.
  • Avoid frozen shrimp that has already been peeled and deveined which can cause a loss of flavor and texture.  Also, do not buy precooked shrimp.
  • Cook shrimp in the shell for more flavor
  • Defrost shrimp in a brine (1/4 C each salt + sugar) with ice cubes in the water. 20-30 minutes.  Shrimp cooks very quickly so defrosting in the sink or microwave is a big no-no.
  • Broiling shrimp (or putting in an oven at 450º) develops the flavor better than boiling water.  A grill or hot plate also does well.  Dry the shell-in shrimp, toss in a bit of EVOO and paprika before broiling.  Cook two minutes, flip and cook 1 more minute.  Toss in a metal bowl that has been in the freezer.

Things to Look for When Buying

  • No black spots
  • No fishy smell
  • No ammonia or chlorine smell
  • Firm bodies
  • Not soft or sticky
  • No detached body from shell

Supposedly shrimp with the heads and tail still on is the best way to eat
shrimp.

It needs to be cooked at a very high heat and then tossed in something
spicy afterward just before serving.

Pan de Yema (Yolk Bread)


The information below this section is from a third party. It is part of Grandpa's Personal Recipe box. Feel free to browse, but know that this information is from someone else.

Pan de yema is a rich, sugar-coated egg bread that is delicious enough to pull apart and eat like pastry. Traditionally prepared for Day of the Dead celebrations.

Ingredients for Two Loaves

  • 1 1/2 TBL aniseed
  • 3/4 C water
  • 2 packages dry yeast (2 TBL)
  • 2/3 C sugar
  • 7 eggs (5 yolks and 2 eggs)
  • 3/4 tsp salt
  • 1/2 tsp ground nutmeg
  • 1 stick butter
  • 4 1/2 C flour, plus flour for dusting work surface
  • Vegetable oil for coating bowl
  • 1/3 C sugar for sprinkling

Step by Step

  1. In a large bowl, soak the aniseed in 1/4 C hot water for 10 minutes.
  2. When the hot water has become only warm to the touch, add yeast and half of the 2/3 cup sugar.
  3. Let sit until foamy – about 10 minutes.
  4. Meanwhile, separate 3 eggs.  Set aside the whites.
  5. Add 3 whole eggs to the separated yolks and beat.
  6. Melt the stick of butter in the microwave for 30 seconds.
  7. Add the beaten eggs, salt, the remaining sugar, aniseed with water, nutmeg, and melted butter.
  8. Stir to combine.
  9. In a Kitchen Aid (or by hand) mix in flour.
  10. Transfer to a lightly floured board or counter.
  11. Knead the dough for 10 minutes, until the dough is smooth and slightly sticky.
  12. Place the dough in a large oil-coated bowl.
  13. Cover with a lightly moistened tea towel and let rise in a warm place until doubled, about 90 minutes.
  14. Punch the dough down
  15. Turn out onto a floured counter.
  16. Roll into three or four strands and braid
  17. Cut braids off at 2-3 inches creating mini loaves
  18. Place loaves on a greased baking sheet.
  19. Cover the assembled dough with a damp towel and set aside to rise until the loaves hold a fingerprint when pressed, about 50 minutes.
  20. Preheat the oven to 375 degrees.
  21. Beat the remaining egg in a small bowl with 1 tablespoon water.
  22. Brush the risen loaves with the egg wash and sprinkle with remaining 1/3 cup sugar.
  23. Bake at 350º until golden, 20-25 minutes.
  24. Cool on a rack.
  25. Serve with Mexican chocolate


Juevos Martajada (eggs with salsa)

We will start with Salsa Martajada, and then extend this into a great egg recipe.

  1. Cook 6 Roma tomatoes and 1/2 onion pieces and garlic cloves coated in oil under the broiler.  About 10 minutes or until blackened
  2. Either put 2 banana peppers and 2 poblano peppers under the broiler as well, or peel them using a flame (which I prefer) Instructions here.
  3. Once all above ingredients have been processed, pulse them in a food processor only until in chunky but small pieces, NOT pureed.
  4. Add 1 tsp salt, 1/2 tsp chile powder or cayenne
  5. This is good just like this for chips, etc.

Juevos Martajada

  1. Lightly (soft) scramble two eggs
  2. Add 1-2 TBL salsa martajada
  3. Serve with a flour tortilla

Tempura Veggie

Batter:

  • 1 C flour
  • 1/2 tsp salt
  • 2 eggs
  • 1/2 C lowfat buttermilk

1/2 inch safflower oil in fry pan at 365º

  1. Decide on veggie:  () thin asparagus spears () mushroom slices () zucchini slices () Brussel sprout leaves () broccoli

Dip in flour, then batter, then hot oil

Tip: Weight Loss

  1. Get more sleep
  2. Drink more water
  3. Eat slowly
  4. Put your fork/spoon down between bites
  5. Put food on a smaller plate
  6. Distribute smaller portions
  7. Exercise easy/repeatable 30 minutes per day
  8. Park away from the doors – walk more
  9. Drink a glass of milk before your meal
  10. Eat more fiber
  11. Eat more fruits and veggies
  12. Use hot sauce

Fruit Jerky

– aka – Fruit Leather

  • 1 pint (2 C) of any fresh fruit – peaches, bananas, blueberries, strawberries, raspberries, cherries, etc.
  • Zest and juice from one lemon
  • 1/2 C honey or pure maple syrup
  • 1 tsp dried mint

STEP BY STEP

  1. Puree all in a blender
  2. Spread out on oil-sprayed parchment paper
  3. Bake 5-6 hours @ 175º
  4. Cut apart into strips while still warm


Meringue Cups

The base for this dessert is from Martha Stewart.

INGREDIENTS

  • 6 egg whites
  • 2 T agave syrup or pure maple syrup
  • 1 tsp cream of tartar
  • 1 tsp cornstarch
  • 1 tsp vanilla
  • 1 egg yolk (topping)
  • 1/2 C heavy cream (topping)
  • 1 C creme fresh (topping)
  • zest from one lemon (topping)

STEP BY STEP

  1. Beat egg whites
  2. Halfway through, add your sugar, tartar, cornstarch and vanilla
  3. When you have stiff peaks, put the mixture into a pastry bag with a 3/4 inch tip
  4. Line a baking sheet with parchment paper with an outline of your serving tray (put paper upside down if it has pencil marks on it)
  5. Create two-inch decorative mounds around the edges leaving some space in the center for macerated fruit when this is all finished.
  6. Hollow out “dishes” in the center of each mound
  7. Bake at 250º for 60 minutes
  8. Leave oven door closed, turn off oven, and wait another 60 minutes
  9. Toss strawberry, raspberry, blueberry, blackberry, peaches, etc – – – whatever – – – – with 1/4 C granulated sugar
  10. Meanwhile, beat 1/2 C heavy whipping cream to soft peaks, and fold in 1 1/2 C creme fresh and zest and juice from one large lemon
  11. Spoon the cream into the hollow dishes
  12. Place multi-colors of fruit onto the cream topping
  13. Serve all the extra fruit in the vacancy in the middle of the batch.

Albondigas with Chepil Rice

Albondigas

INGREDIENTS

STEP BY STEP

  1. Mix above by hand, but don’t overmix
  2. Sear on hot skillet and set aside
  3. Prepare Guajillo Sauce (See below)
  4. Put meatballs into Guajillo sauce and simmer 35 minutes uncovered
  5. Add splashes of water or chicken stock if it gets too thick
  6. Serve over chepil rice

Guajillo Sauce

  • 2 dried and toasted Guajillo chiles – seeds removed
    should be dried, but still pliable.  If brittle, discard.
  • 3 tomatillos – peeled and rinsed
  • 2 cloves garlic – minced
  • Put above into a pot with just enough water or chicken broth to cover them
  • Bring to a boil and simmer 10-12 minutes
  • Remove from water and crush with a fork or potato masher and put into a blender.  SET THE WATER ASIDE
  • Puree the pieces – no need to strain – Add water by the tablespoon ONLY IF you need more liquid to puree.
  • Saute 1/2 onion in 1 T EVOO
  • Deglaze pan with 1/4 C of the cooking water
  • Put the blended sauce back onto heat with the minced and sauteed onion
  • Discard the remainder of the water
  • Add 1 C chicken broth and bring to a simmer
  • Add the meatballs and simmer 35 minutes uncovered – which is Step 4 above
  1. Add splashes of water or chicken stock if it gets too thick
  2. Serve over chepil rice

Chepil Rice

  • 1 cup long-grain rice
  • 3 tablespoons lard or vegetable oil
  • 2 garlic cloves, minced
  • 1 small onion, finely chopped
  • 2 cups chicken or pork stock
  • 3 tablespoons chepil leaves stripped from stems
  • 1/3 teaspoon salt, or to taste

Prepare as you would normally prepare rice.  Add chepil halfway through when the water starts to be absorbed.

Tarts – COLLECTION INDEX

Lemon Curd and Tart Collection

More tart recipes and stand-alone lemon curd


Sweet Tarts

  • Pear and Pumpkin Tart

    The information below this section is from a third party. It is part of Grandpa's Personal Recipe box. Feel free to browse, but know that this information is from someone else.

    • A third-party recipe baked on Puff Pastry
  • Tortilla Pear Tart
    • A sweet tart baked on a flour tortilla
  • Cran-Apple Tart
    • A third-party recipe using easy ingredients on Puff Pastry
  • Rustic Freeform Tart
    • A tart with Panko bread crumbs and whatever fruit you have on hand
  • Breakfast Tart
    • Food processor dough that uses fruit
  • Apple Tart
    • Granny Smith apples on Puff Pastry
  • Peach Tart
    • Peaches on a simple pie dough

Savory Tarts

  • Onion Tart
    • Lightly cooked onions on a pizza dough base
HTML Snippets Powered By : XYZScripts.com