Copied from TasteOfHome.com
Use the above link to see this recipe complete with photographs along the way. Photos not included here.
Curious to learn how to make corned beef brisket at home? Our Test Kitchen takes you through the process, step-by-step.
Every editorial product is independently selected, though we may be compensated or receive an affiliate commission if you buy something through our links.
Corned beef has been a staple of old-school diner menus and Irish-American diets for decades. (Just like many of these classic Irish recipes.) You might find it mingling with sauerkraut in a tasty Reuben sandwich or next to potatoes at a St. Patrick’s Day supper. Sure, you can buy it canned or already cured in a store, but nothing beats the flavor—and feeling of total accomplishment—of making your own. So how do you make corned beef from scratch?
The Taste of Home Test Kitchen has found the best way. Follow along with our expert tips and methods below.
A quick heads-up: This recipe requires multiple days. But don’t let the time scare you. The steps are simple and the flavor payoff is second to none. It’ll take about 10 days to brine the meat, so if it’s for a big event, schedule it into your calendar early.
| Grandpa’s note: This recipe requires multiple days, so I have (in bold red letters) put days in so that you can have Corned Beef for Sunday lunch. If you want it for a different time, make adjustments accordingly. |
How to Make Corned Beef
Ingredients
- 1 fresh beef brisket (4 to 5 pounds)
- 1 gallon water
- 1-1/2 cups kosher salt
- 1/2 cup packed brown sugar
- 1/4 cup mixed pickling spices, divided
- 4 teaspoons pink curing salt
- 4 garlic cloves, minced
- 2 large carrots, chopped
- 2 medium onions, chopped
- 2 celery ribs, chopped
Editor’s Tip: As a shortcut, you can buy pickling spices at your local market, but we recommend going the extra mile with our Homemade Pickling Spice recipe. It’s simple to make, and you might have the ingredients already in your pantry.
Supplies
- Large stockpot (Like this one from our new line of cookware and bakeware.)
- 2 oven roasting bags
- Dutch oven
- Enough room in your fridge to store the brisket for 10 days
Step 1: Get Prepping – Thursday: 10 days before meal
In a large stockpot, combine water, kosher salt, brown sugar, 2 tablespoons pickling spices, pink curing salt and garlic. Bring the brine to a simmer and stir until salt and sugar are dissolved. Remove from heat and cool to room temperature. Refrigerate until chilled.
Editor’s Tip: Pink Curing Salt? Not all pink-colored salts are created equal. Unlike Himalayan pink salt, or other rosy salts on the market, pink curing salt is made using sodium nitrate, which prevents food from spoiling while being stored for a lengthy time. Curing salt is often dyed red so it’s not mistaken for standard table salt.
Step 2: Let’s Wrap
It’s time to play Russian nesting doll with your oven-roasting bags. Open them both and place one inside the other. Tuck the brisket into the innermost bag and carefully add in the cooled brine. Be sure that it pools over and around the brisket. Then seal both bags. Try to press as much air out as possible before sealing. Before placing in the fridge, turn the meat a few times to evenly coat it.
Step 3: Keep it Cool
Clear a special place in the fridge for the brisket to live. Keep it refrigerated for 10 days so that the meat can properly soak in all the spiced flavor. Be sure to turn the brisket over occasionally so that it remains evenly coated.
– Thursday: 10 days before meal
Flip meat when you get up in the morning, and just before bedtime at night.
– Friday: 9 days before meal
Flip meat when you get up in the morning, and just before bedtime at night.
– Saturday: 8 days before meal
Flip meat when you get up in the morning, and just before bedtime at night.
– Sunday: 7 days before meal
Flip meat whe6n you get up in the morning, and just before bedtime at night.
– Monday: 6 days before meal
Flip meat when you get up in the morning, and just before bedtime at night.
– Tuesday: 5 days before meal
Flip meat when you get up in the morning, and just before bedtime at night.
– Wednesday: 4 days before meal
Flip meat when you get up in the morning, and just before bedtime at night.
– Thursday: 3 days before meal
Flip meat when you get up in the morning, and just before bedtime at night.
– Friday: 2 days before meal
Flip meat when you get up in the morning, and just before bedtime at night.
– Saturday: 1 days before meal
Flip meat when you get up in the morning, and just before bedtime at night.
– Sunday Morning: Get ready to eat
Step 4: Time to Cook
The corned beef is almost ready. Wake up the brisket from its chilled slumber by removing it from the brine. Give the cut a thorough rinse and place it in a Dutch oven with enough water to cover. Add in carrots, celery and the remaining pickling spices and bring to a boil over high heat. Reduce heat, cover and add water if necessary to keep brisket covered. Cook for about 3 hours or until meat is tender.
– Sunday Lunch
Step 5: Dig In!
At long last, your corned beef is ready to serve, hot or cold. Use a sharpened knife to cut the brisket into thin slices. Slap it onto a sandwich or serve with additional vegetables simmered until tender.
To eat the beef at a later date, refrigerate it in the cooking liquid. It’ll keep for several days. Reheat in that same liquid when you’re ready to serve.
Have leftovers? Use ’em up in these recipes.
#######################################
Recipe from ThermoWorks
History of Corned Beef and Cabbage:
Corned beef is Irish…kind of. It’s an iconic meal that was developed out of necessity by early Irish immigrants. Before immigrating to the United States, a typical meal for an Irish family would have been cured pork with potatoes. After traveling to the U.S. in the 1800s, cash-strapped Irish immigrants found that pork and potatoes were far too expensive.
The Irish immigrants shared neighborhoods and shops with Jewish immigrants who didn’t sell pork in their butcher shops, and who had learned to cure cheap cuts of beef. The Irish took the cured beef brisket and boiled it with cabbage rather than potatoes to create hearty meals. Corned beef and cabbage may not have originated in Ireland, but it’s authentically Irish-American. A great dish to celebrate Irish-immigrant heritage!
Where’s the corn?!?
People often ask about the corn in corned beef. And the truth is, there is none. The “corn” in corned beef comes from the coarse-grained salt that was originally used to cure the meat. These kernels of salt gave the name “corned” to the beef, with the word corn not referring to a specific grain, but to the old word for anything the size of a grain. So that’s why there’s no corn in the dish!
Corning is a common term for the method of curing meat with salt. And while preserving meat by way of salt-curing has been in practice for centuries (the chemical composition inhibits bacterial growth), we mainly cure meat now for the flavor and texture qualities inherent in the process.
To properly cure a brisket for corned beef, Prague powder #1 (pink curing salt) is an essential ingredient. The sodium nitrite slowly decomposes into nitric oxide, which reacts with myoglobin in the meat to create the pink color of the brisket. This reaction is also what gives cured meat its slightly tangy flavor.
Why pink?
Curing salt is pink to distinguish it from table salt. The chemical reaction during curing is what turns the meat pink, not added pink coloring.
A note on brisket
Beef brisket is one tough piece of meat. This cut is from the pectoral muscle and is heavily worked from bearing much of the animal’s weight. Protein fibers of weight-bearing muscles are very tough and are held together with a web of connective tissue that is primarily comprised of collagen.
The cut’s tough texture and connective tissue require it to be cooked slowly and held for a longer time at a higher temperature to adequately break down the collagen, transforming it into gelatin. Once gelatin is formed, it can absorb six to ten times its weight in water. Gelatin is essential in arriving at the desired moist and silky texture so commonly associated with tough cuts like brisket and pork shoulder.
Why time and temperature matter for cooking corned beef:
For food safety, the meat’s internal temperature only needs to reach 145°F (63°C), but collagen doesn’t begin to dissolve until 160-180°F (71-82°C). Heat applied to the protein needs to be low and slow to keep it tender, but the tender protein won’t matter unless the connective tissue has rendered down to perform its silky magic. For optimal collagen breakdown and gelatin development, we recommend cooking brisket to an internal temperature of 190-205°F (88-96°C).
Homemade Corned Beef Cure Recipe
We used a Corned Beef Brisket recipe from Kenji Lopez-Alt of Serious Eats.
A note on curing salt: curing salt is to be added by the weight of the meat. For every 5 lb meat, use 1 tsp curing salt. Weigh your brisket, then make the conversion for how much salt you need. Too much curing salt can be toxic, so don’t just assume that if some preserves it, more will do better.
Ingredients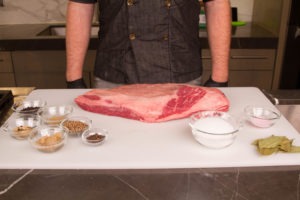

- 1 brisket flat
- 3/4 cup kosher salt
- 1 teaspoon pink curing salt (Prague powder #1, NOT Himalayan pink salt, which is entirely different)
- 2 tablespoons brown sugar
- 2 tablespoons whole black peppercorns
- 1 tablespoon yellow mustard seeds
- 2 tablespoons whole coriander seeds
- 1 tablespoon allspice berries
- 6 whole cloves
- 1 tablespoon ground ginger
- 6 bay leaves, roughly torn
Instructions
- Pat the brisket dry with paper towels.
- Combine the salt, pink (curing) salt, and sugar together in a bowl.
- Place the brisket in a rimmed baking sheet.
- Rub the brisket all over with the salt/sugar mixture. If there is any extra salt mixture, pile it on/under the brisket in the pan.
- Combine the spices in a bowl.
- Rub the spices all over the surfaces.
- Cover the brisket and pan tightly with plastic wrap.
- Place in the refrigerator.
- Unwrap it, flip it and rewrap it a few times over the next 7-10 days.
Now you just need to wait 7-10 days…
Cooking Corned Beef
Traditional method for cooking corned beef: boil it hard
Now that the corned beef is cured, it’s time to cook it. But how? The traditional means of preparing corned beef is to put it in a pot and boil it all day, adding cabbage, carrots, and potatoes in the last 40 minutes or so. Thus it has been for generations. Of course, previous generations were notorious for overcooking vegetables, and they also didn’t have the benefit of high-precision thermometry!
Why boiling hard all day works
Collagen breakdown
As we said above, brisket is tough meat, chock-full of connective tissue. All that collagen makes for chewy corned beef if it isn’t broken down into gelatin, and the long hard boil will get the meat up into the collagen-melting temperature range —above 160°F (71°C)—it needs to turn that hard, chewy collagen into soft and yummy gelatin.
No stall
If you’ve ever smoked a brisket, you are familiar with the dreaded ‘stall.’ This phenomenon occurs when the collagen in the brisket starts to break down, releasing water. As the water evaporates in the heat of the smoker, it acts as perspiration and cools the brisket so that the temperature doesn’t rise, sometimes for many hours, and won’t stop until enough water has exited the meat to allow the temperature to rise again. Bother.
Cooking the corned beef by boiling it avoids the stall altogether. If the beef is covered in water, there is no evaporation, and therefore no cooling. The only route for heat to escape the water directly is through the surface, and a flame under the pot keeps enough heat going in that the relatively small amount of heat venting out the top doesn’t hinder your cook.
Easy to do
Putting a slab of beef in a big pot and hitting ‘go’ is about as easy as cooking gets. Busy immigrant families probably thought of this as an ideal way of cooking (except for the cost of fuel for an all-day stove flame) if there were other things to be done.
Why an all-day hard boil doesn’t work
Too much breakdown
We all know you can overcook a steak and dry it out—let it hit 150°F (66°C), and you may as well give it to the kids, who don’t know any better. And while brisket can take a much higher temperature, it too can be overcooked. If all the collagen turns to gelatin, that’s good, but if all the gelatin cooks out of the corned beef, you’ll just have a crumbly, dried out piece of salted beef.
Flavor loss
Also, boiling meat hard all day is going to leach flavor out of it, leaving it a pale shadow of what it could have been.
What would the ideal method be?
In researching how to achieve corned beef perfection, we looked closely at what J. Kenji López-Alt had to say on the subject. After multiple cooks for multiple times and multiple temperatures, Kenji reported the best method for his taste preference was to cook the corned beef for ~10 hours at 180°F (82°C). This resulted in a texture that he liked best with a happy medium between structural breakdown and juiciness.
Mind you, that’s his preference. His experiments showed that you can get a flakier—though somewhat drier—texture by cooking the corned beef at a higher temperature for a shorter time.
What’s going on here?
Collagen breakdown is a function of time and temperature. Once you breach the threshold of gelatin creation—about 160°F (71°C)—the meat will begin to soften. But at that temp, it will take 36 hours to get tender! At 205°F (96°C), that time is reduced to a mere 3 hours. But because the total internal temp will have climbed so much higher, other protein reactions will have happened that make the meat flakier and drier.
How to cook corned beef perfectly
What we’re looking at here is a fine difference between tradition and modern science. The traditional method is a hard boil all day. This is a soft simmer for as little as 3 hours, but up to all day depending on your textural preference.
To achieve that level of textural accuracy, temperature control is key. So how do you get that control? You could sous vide it. Sous vide is all about careful temperature control, but this recipe for corned beef will be a little too salty, I believe, if you sous vide it. Simmering it in open water draws some of the salt out, vac-sealing it for sous vide will give that salt nowhere to go.
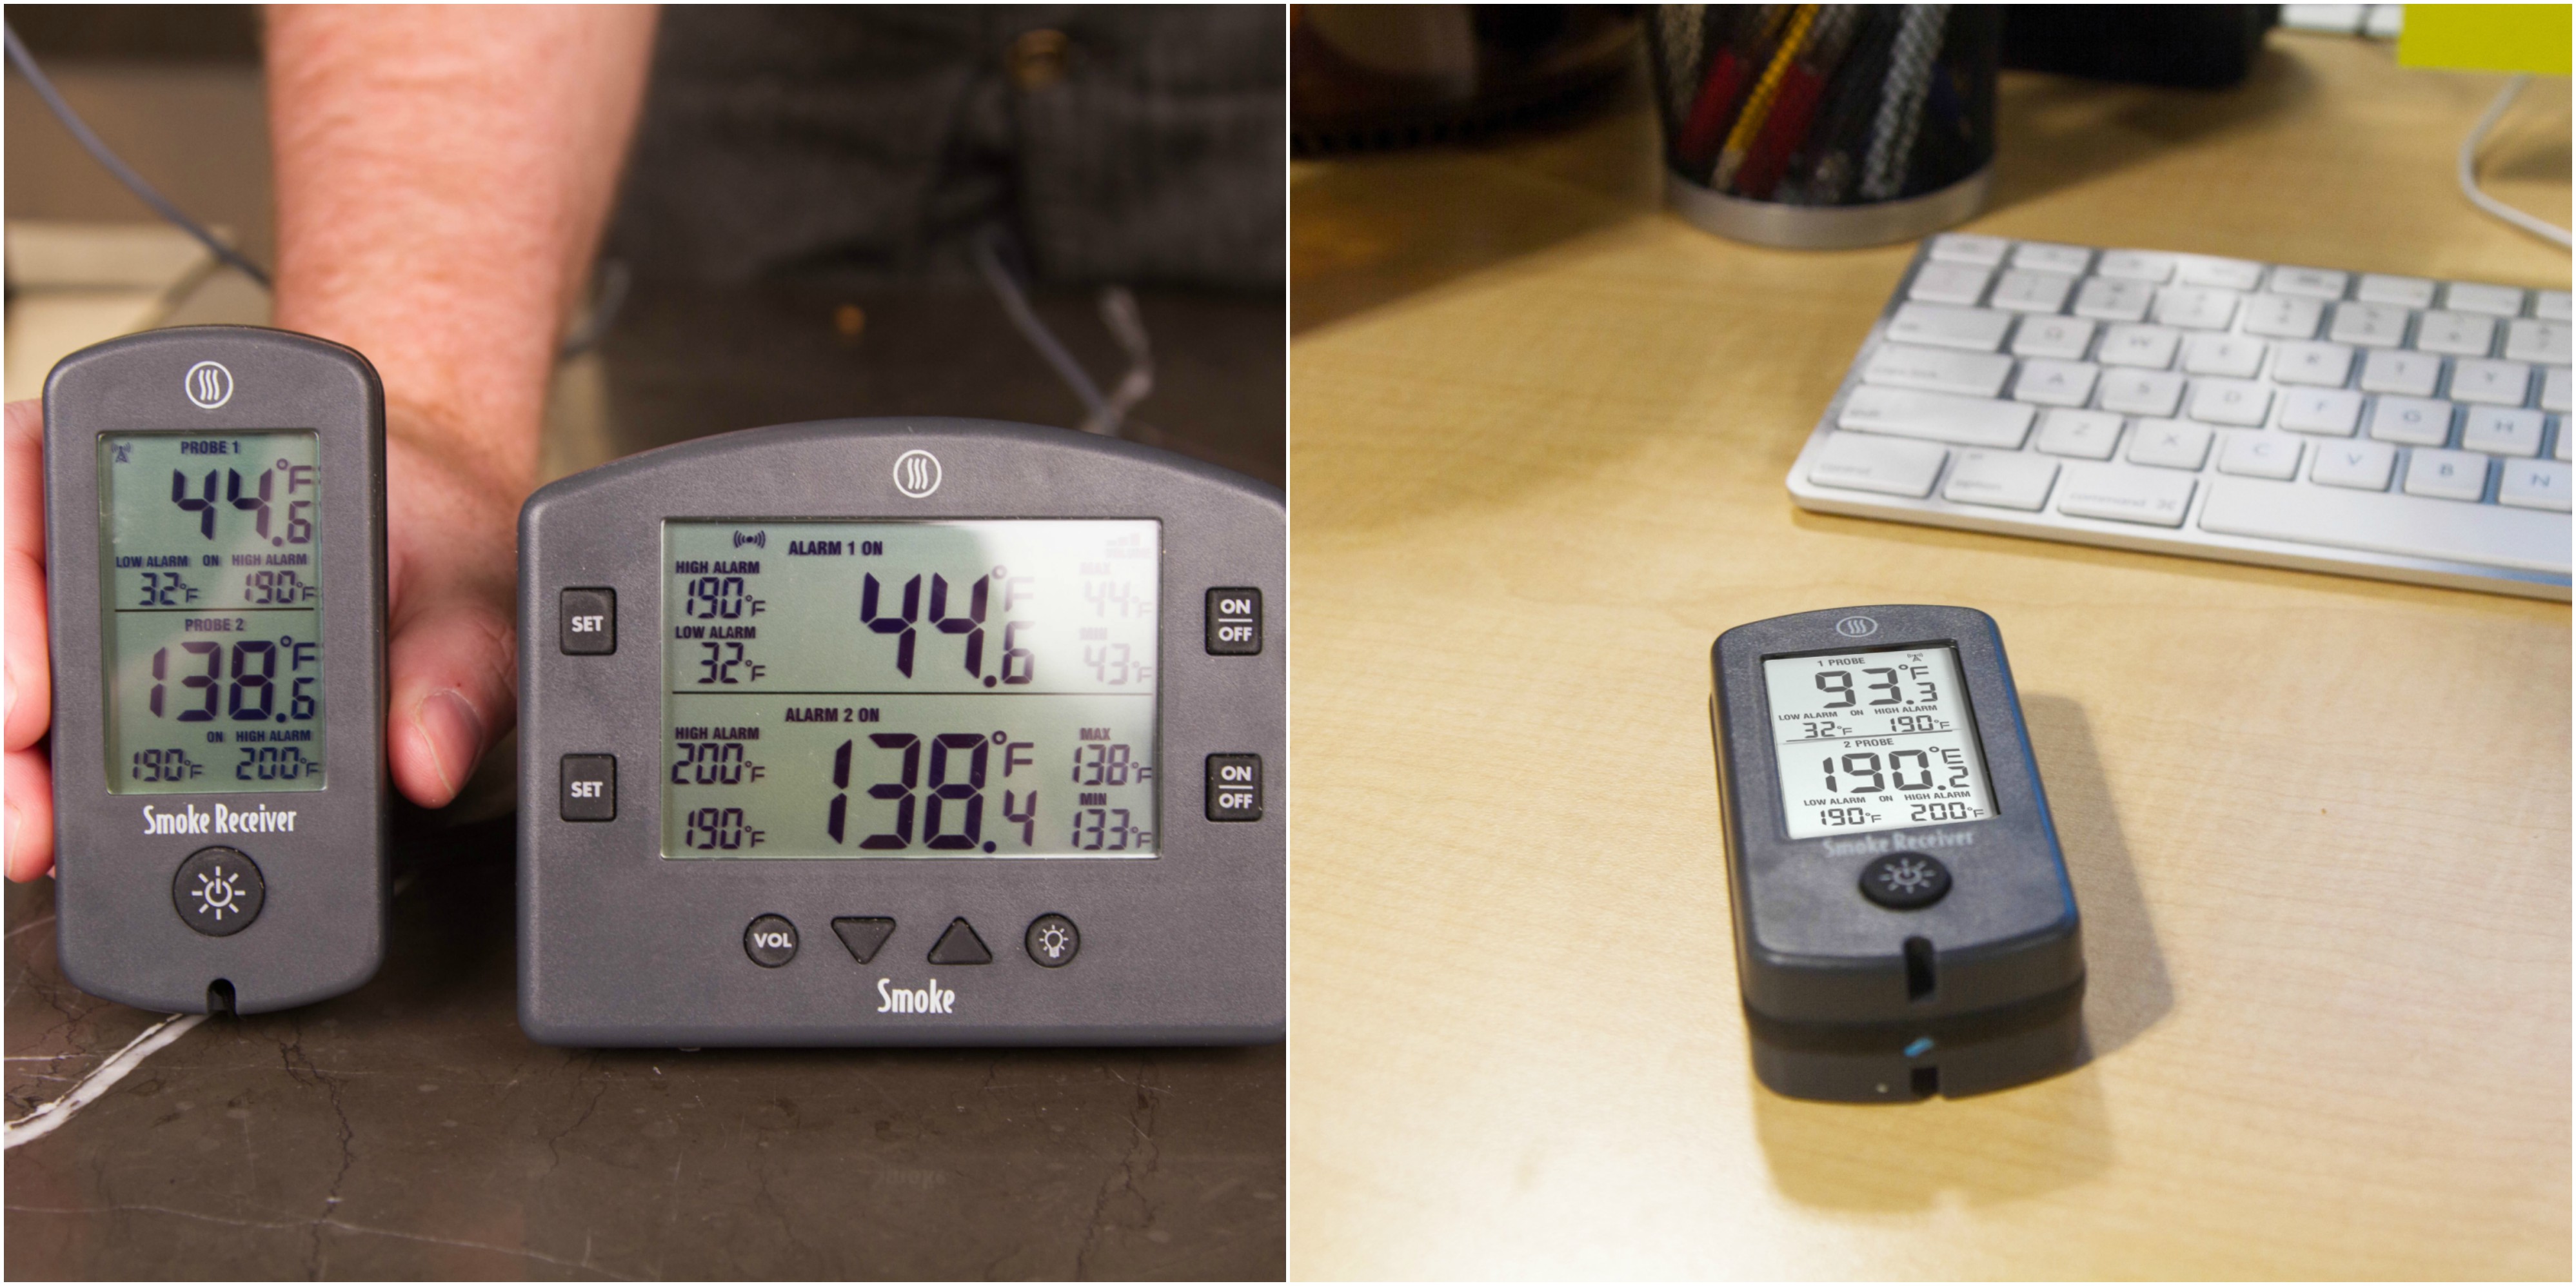
You could use a slow cooker. Every slow cooker is different, and they all try to maintain different temperatures. If yours keeps a temp that you like for the cook, go for it. But the ThermoWorks demo kitchen doesn’t have a slow cooker, so we broke out the thermometers and rigged up our own system!
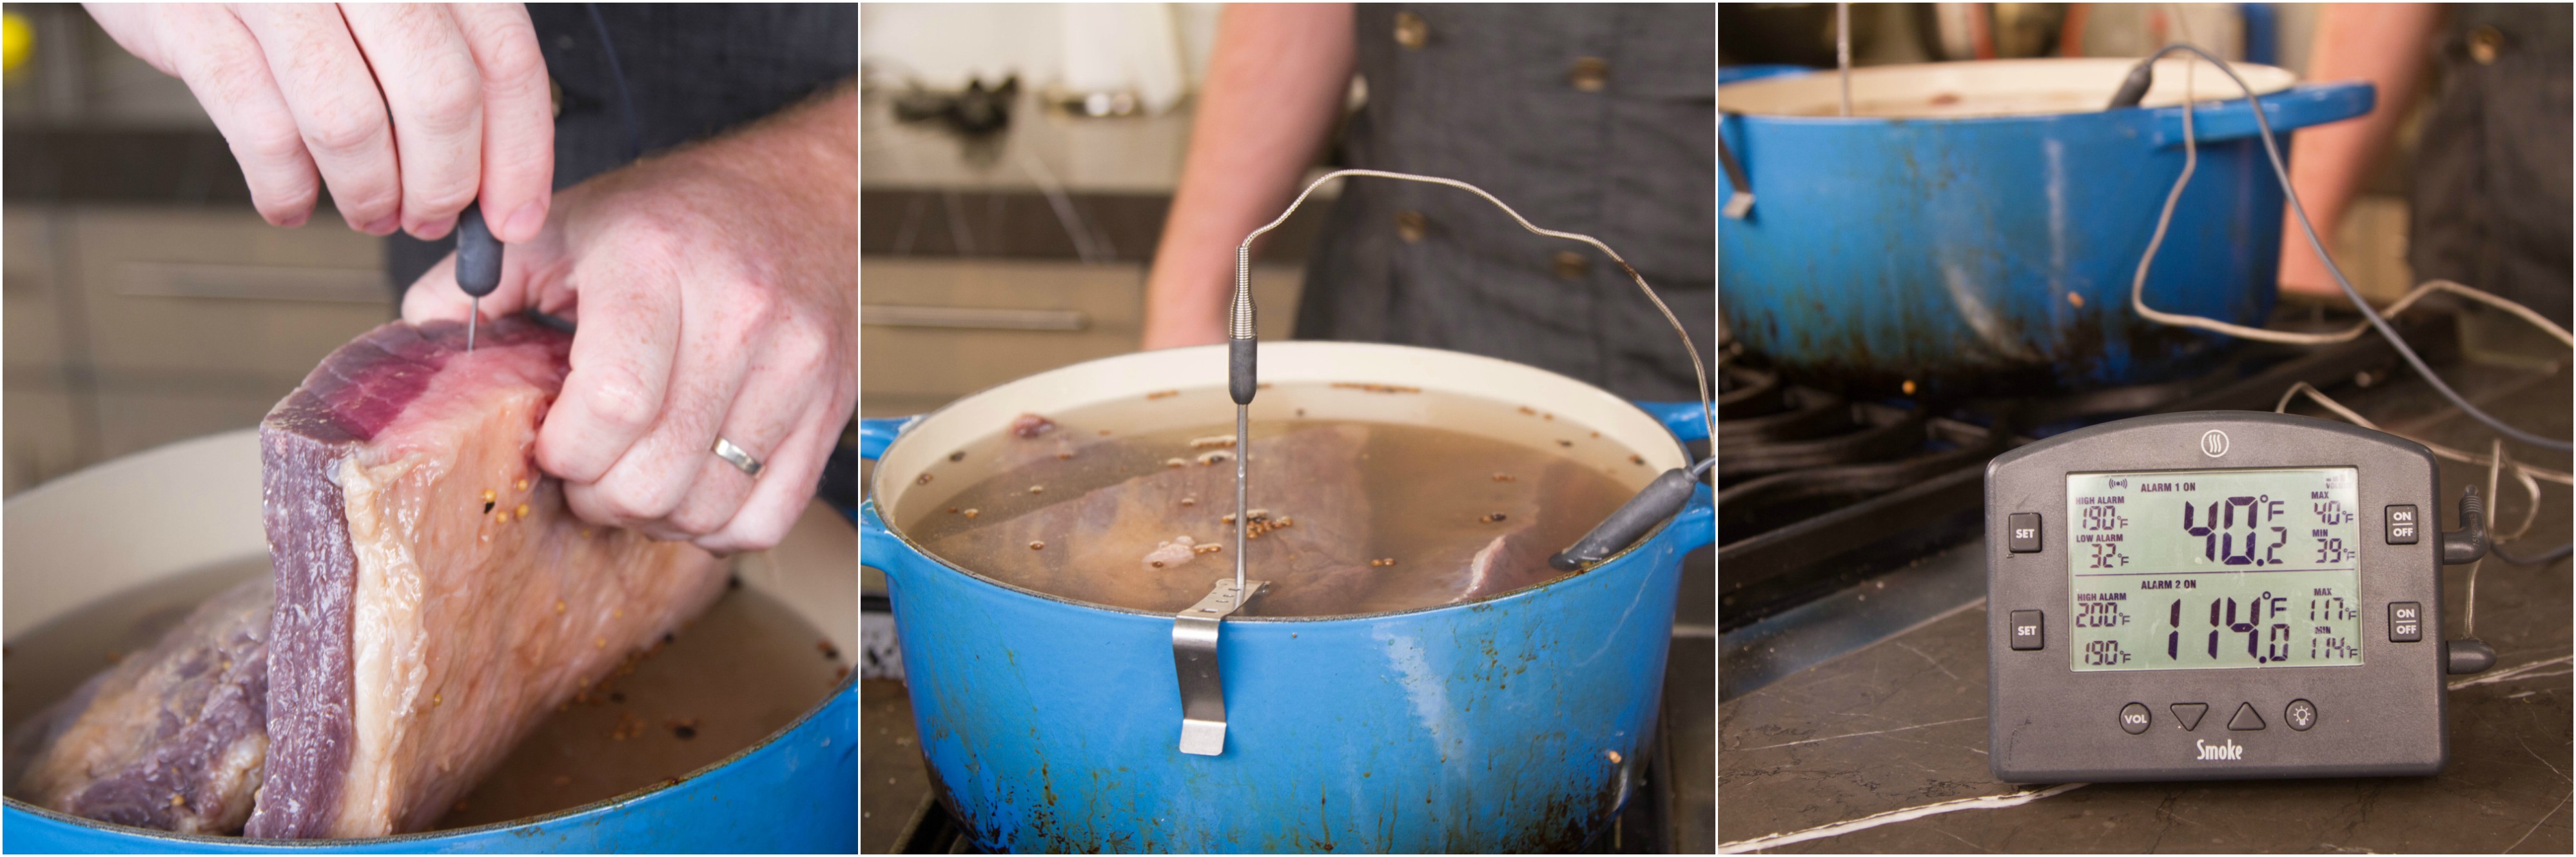
We put our beef in the pot and covered it with water. Then onto the stove it went, and we started to monitor the temp once it started to visibly simmer. We tried to maintain a water temp of ~195°F (91°C) to balance texture and speed. Because we were taking a more scientific approach to this cook, we used a SmokeTM dual-channel thermometer and a Pro-Series Waterproof Needle Probe to monitor both the temperature of the water and the internal temperature of the corned beef. We wanted to know exactly what was going on with the beef temperature, etc. But if you don’t have a Smoke or ChefAlarm when you cook yours, sporadic monitoring of your water temperatures with an instant-read like the Thermapen® will also work.
What temperature is corned beef done?
You’ll want to keep your water temperature at a high simmering temp—if you want very firm but tender corned beef that means 180°F (82°C), 190-195°F (88-91°C) for flakier but faster corned beef.
Using the Smoke’s receiver is nice for this, as you don’t have to be by the pot to know what’s going on. But until the internal temp of the beef and the temp of the water start to equalize a bit, there’s going to be a lot of back-and-forth on your stove heat to maintain the temperature you want.
Once your corned beef reaches the internal temperature you want, it will still need to have time for the collagen to break down. Our target temp was 190°F (88°C), and it took 2 hours after reaching that temp for the meat to reach the consistency we wanted. Yours may take more time depending on your temperature and texture preference.
How to Cook Corned Beef—simmering
- Rinse the excess salt mixture from the corned beef.
- Place the beef in a pot. If it’s too big to fit, cut it into smaller pieces and wedge them in together.
- Cover the beef with at least an inch of water.
- If you are using a Smoke to track your cook, use the Smokehouse probe and a pot clip for the water temp and a waterproof needle probe for the meat.
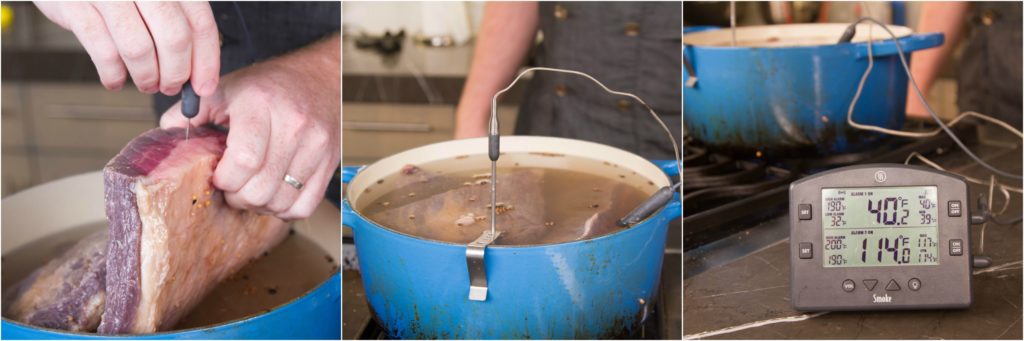
- Bring your water up to your target temperature, and maintain it there by adjusting the heat on your burner.
- Monitor the internal temp of your corned beef, either with the Smoke or with a Thermapen. Once you reach your target temperature, let the meat cook until it can be easily pierced by a knife—at least 2 hours after the temp is reached.
- You may need to add more water in the course of the cook, as some will be lost to steam.
- Once your beef is tender enough, add any veg to the pot that you want to boil with your beef: carrots, potatoes, turnips, cabbage, etc. Let them simmer with the beef until they reach the texture you like.
- Remove the beef from the pot and let it cool enough to handle.
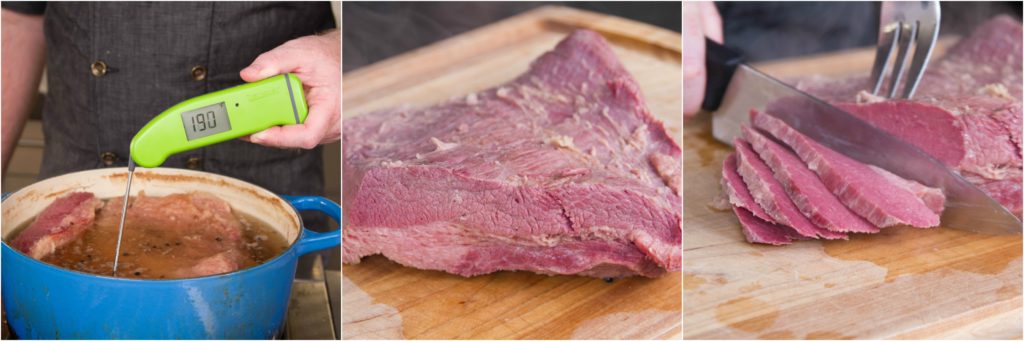
- Slice the beef to your liking and serve with the cooked veggies and some good mustard.

How to Smoke Corned Beef
Smoking is a non-traditional but delicious way to prepare corned beef. You still want to cook it in water at least part of the time to let some of the salt out of it, but smoking it before a steam/braise cycle will imbue it with a deep, smoky flavor. We followed the advice given at Taste of Home to get ours just right. This is a great way to jazz up a store-bought cured corned beef that won’t have as much depth of flavor as a home-cured version.
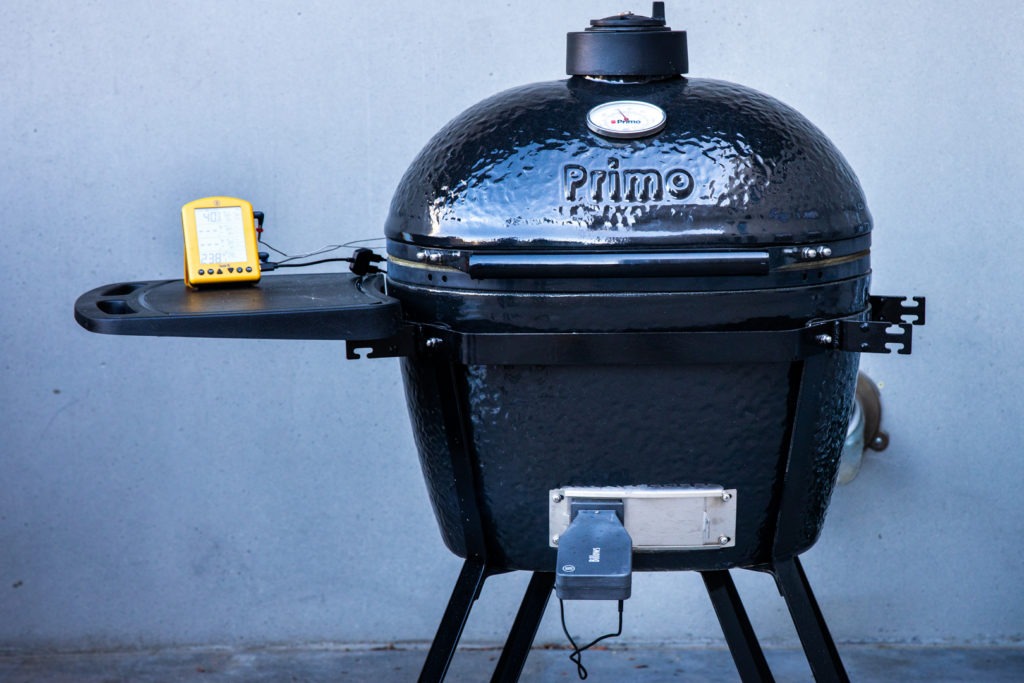
Using a leave-in probe thermometer like the Smoke X4™ to monitor the cook is a great way to make sure you hit your critical temperatures.
Ingredients
- 1 corned beef, raw, about 3 –5 pounds
- water
Instructions
- Preheat your smoker to 275°F (135°C). If you’re using the Billows™ BBQ control fan with your Smoke X4, set the fan temp for 275°F (135°C), otherwise, set your high-temp alarm for 300°F (149°C) your low-temp alarm for 250°F (121°C) and monitor your smoker with the receiver to make sure it stays in the proper range.
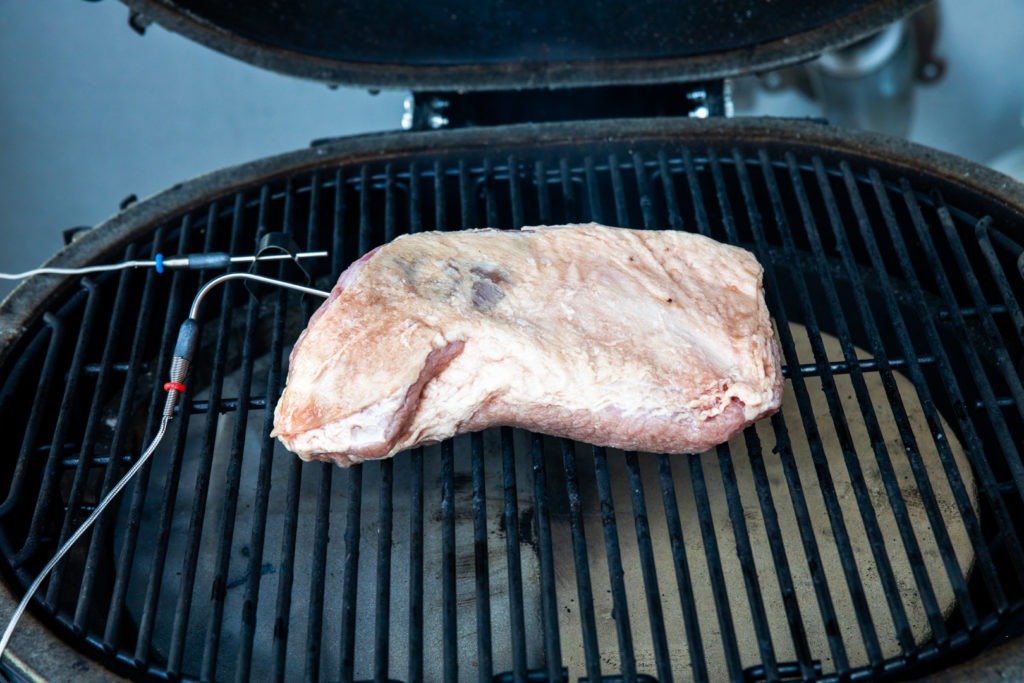
- Rinse your corned beef and pat it dry.
- Insert the penetration probe into the corned beef and place it in the smoker. Set the high-temp alarm on the meat channel for 160°F (71°C).
- When the alarm sounds, place your beef in a pan and add water to come 1/3 of the way up the side of the meat.
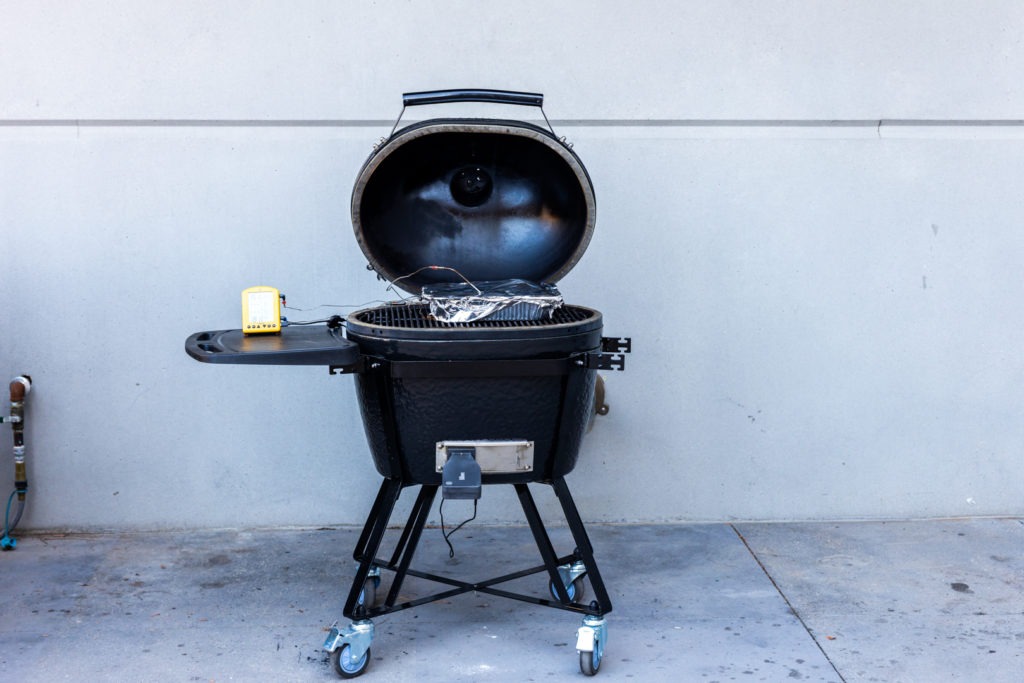
- Wrap the pan tightly in foil, insert the probe through the foil into the meat, and reset your high-temp alarm for the meat to 203°F (95°C).
- Cook the corned beef in the pan until the alarm sounds. Verify that the meat has reached 203°F (95°C) throughout by spot-checking with a Thermapen®.
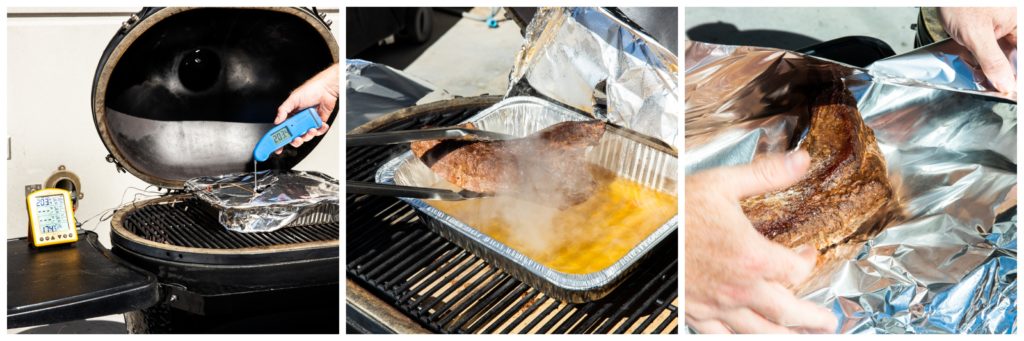
- Remove the corned beef from the water pan and wrap it tightly in two layers of foil, then wrap it in a few towels and stash it to rest in a cooler for at least an hour, preferably two.
- Slice thinly and serve!

And there you have it! Home cured, carefully cooked corned beef is far better than the commercial stuff you have tried before. And with our temperature hints and a Smoke or a Thermapen® you can get exactly the corned beef texture you like!
