Robert’s Prime Rib

This is not a quick recipe, but it is a good one that is very easy.  Short recipes for Horseradish Sauce and Au Jus are at the bottom of the page.

INGREDIENTS

  • *  1 large piece Bone in Prime Rib Roast – Large End (see list below)
  • 3/4 C red wine
  • 2 C beef stock
  • 3 TBL butter
  • Lots of whole garlic cloves
  • Several sheets of cheesecloth
    • DRY RUB
  • 4 TBL (1/4 C) orange zest
  • 3 TBL Grandpa's Thunder Powder or Arghhh Powder, brown sugar
  • 2 TBL each  Softened butter,  salt, garlic powder, onion powder, granulated sugar
  • 1 TBL each  Cayenne powder, cumin, corriander, rosemary, parsley, sage, thyme

* See shopping notes at bottom of this page

STEP BY STEP

  1. Buy Prime Rib – Approximately 1 1/2 pounds prime rib per person:   4 = 6 lbs :: 6 = 9 lbs :: 8 = 12 pounds :: etc
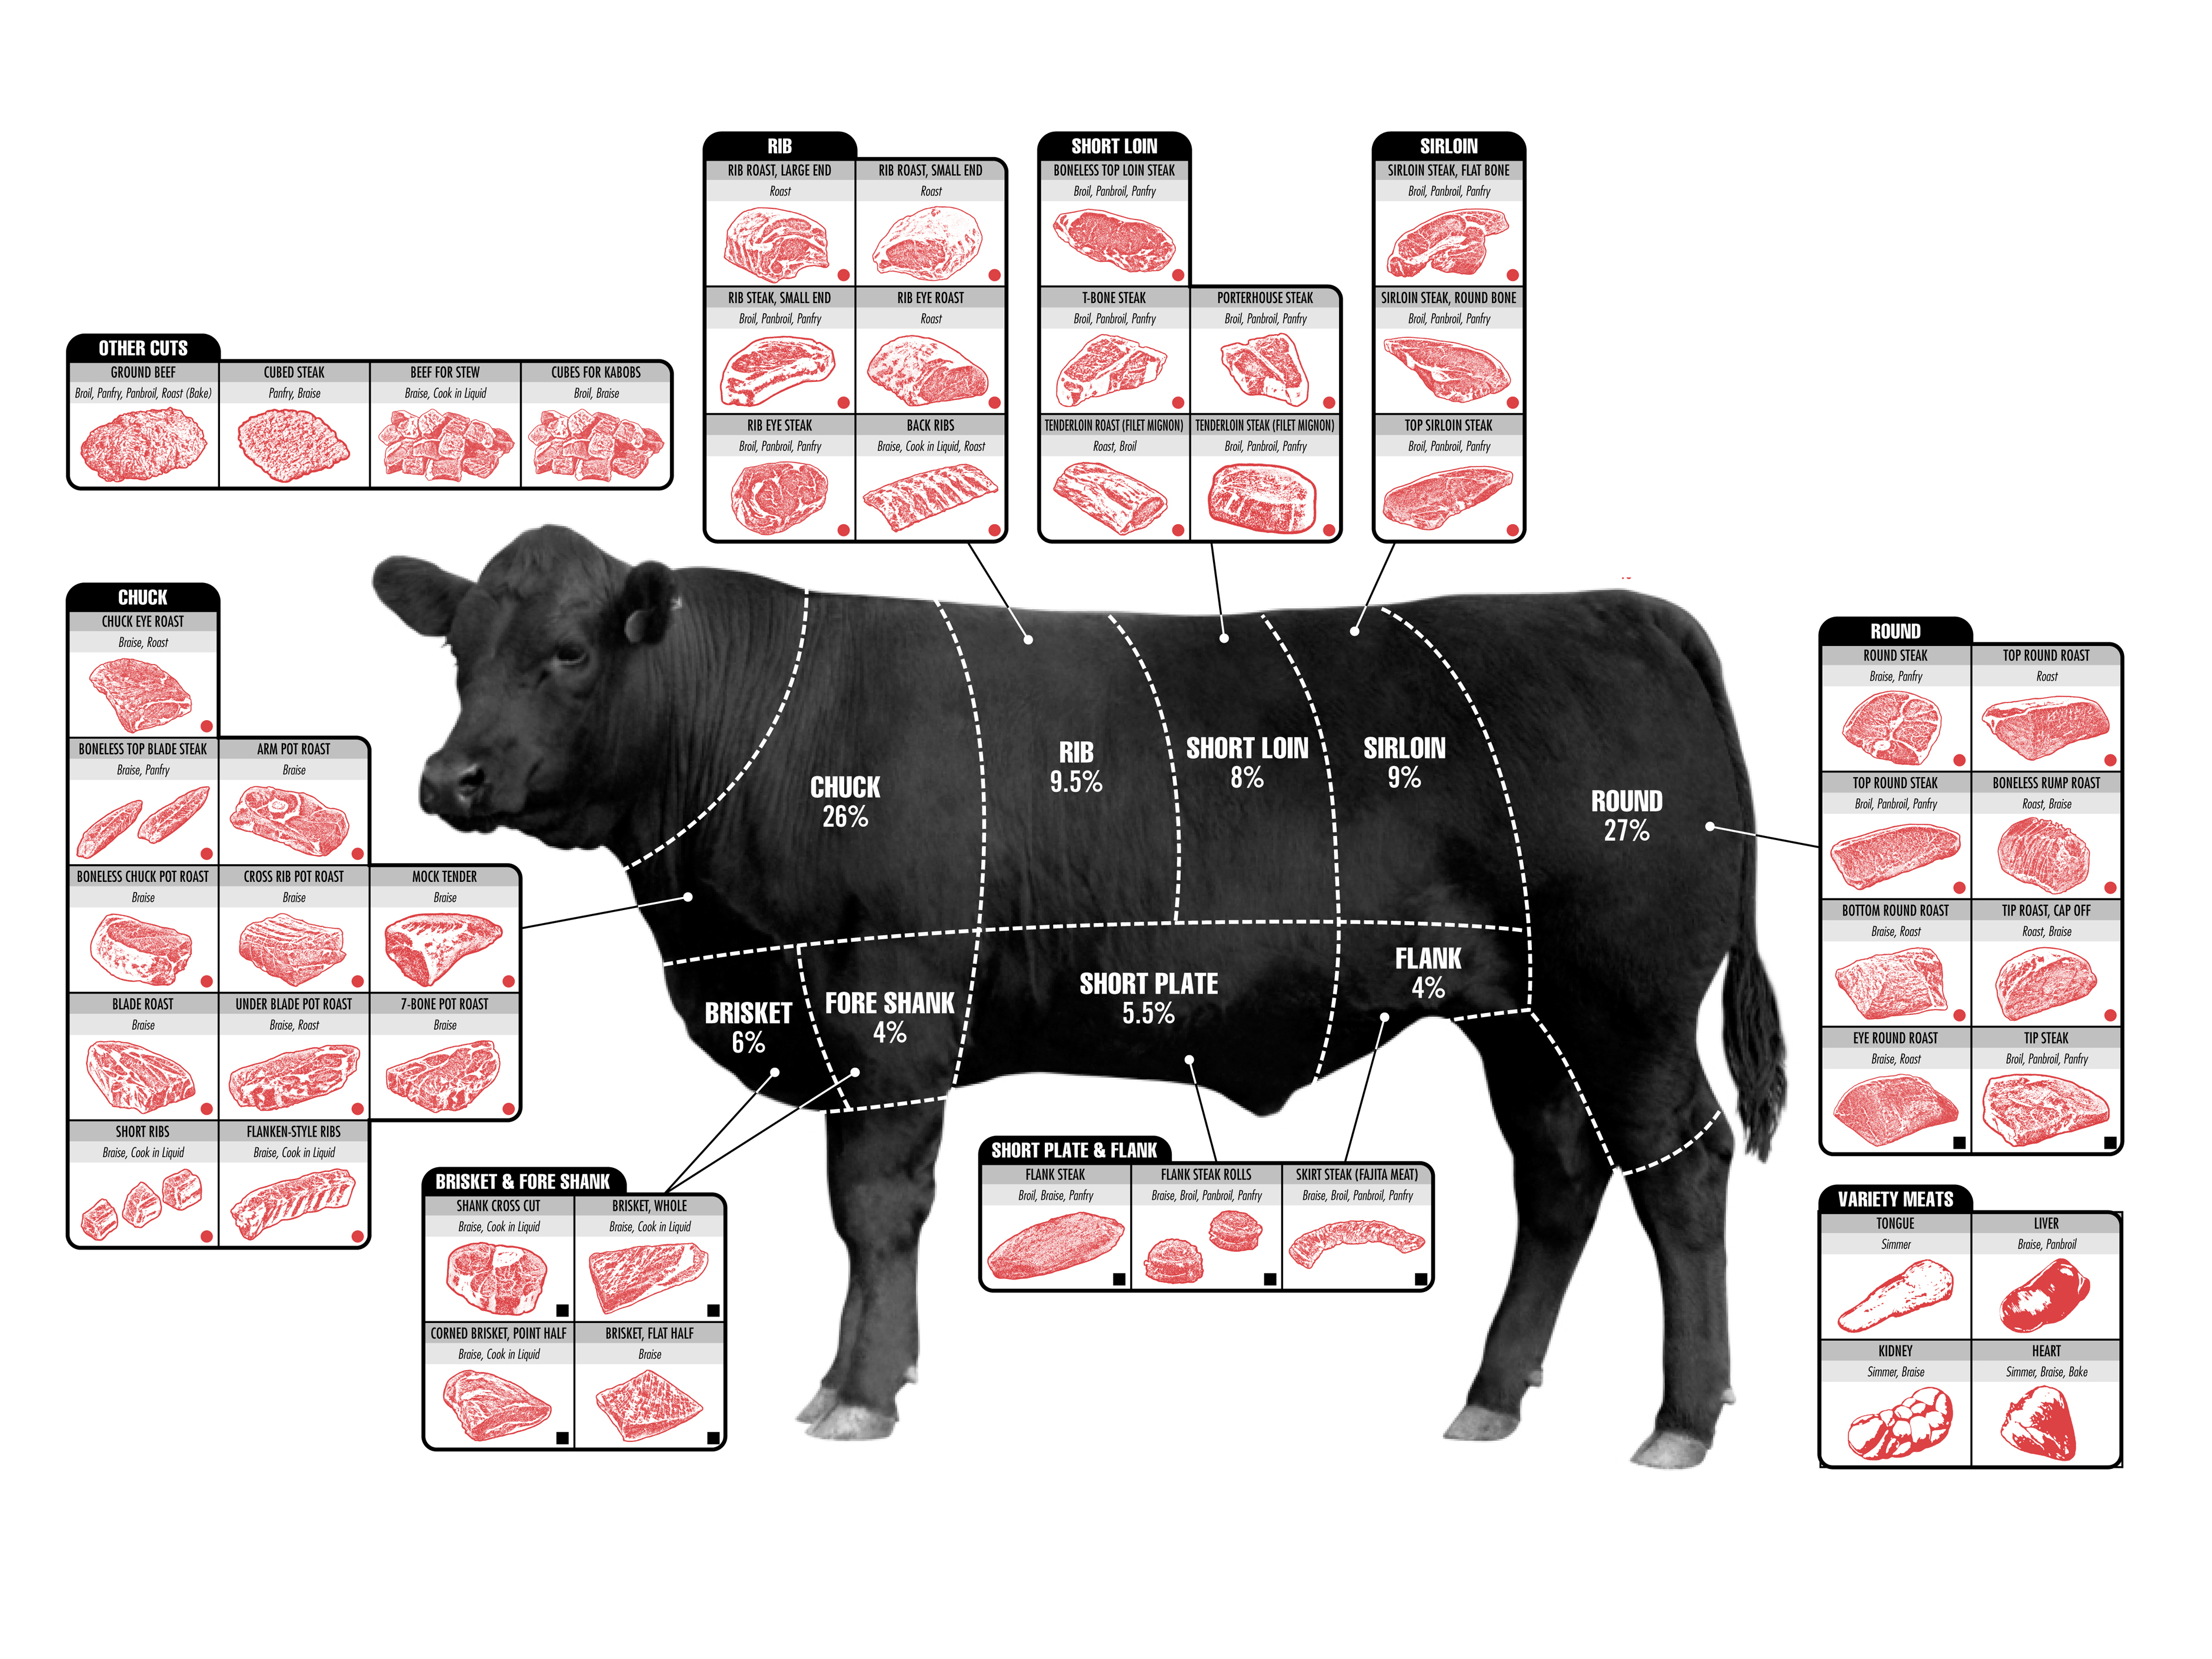
    • Prime Rib is a.k.a. Rib Eye Roast or Rib Roast.  Just behind the shoulders on the back –CLICK HERE for cuts of meator HERE.•  If budget is of primary concern, feel free to use the Chuck Eye or Eye of the Round for this recipe.
    +-+-+-+-+-+-+-+-+-+-+
    THREE DAYS BEFORE SERVING (APPROXIMATELY)
  2. Rinse meat well, then wrap in cheesecloth and refrigerate for 24 hours
  3. The next day, discard first cheesecloth and pat down with a towel, then replace cheesecloth and refrigerate another two days
    +-+-+-+-+-+-+-+-+-+-+
    TWO DAYS BEFORE SERVING
  4. The next day, discard cheesecloth
  5. Cut ribs off, wrap and refrigerate – they will be used as the rack later
  6.  Cut off any massive sections of fat, but leave some for self-basting, and trim any parts of the meat that have discolored over time.
  7. Prepare dry rub (see above)]
  8. Wipe down lightly with oil or butter.  Coat liberally with dry rub.  (SEE  ABOVE)  Feel free to use other seasoning mixes.
  9. Wrap in plastic and refrigerate for another 48 hours  (total 5 days in the fridge)
    READY TO COOK
  10. When ready to cook, let meat rest on counter for up to an hour.  Warm the meat a bit, or it will seize and you will loose juices.
  11. PREHEAT oven to 500º
  12. Sear all sides (except bone rack side) in an oiled hot cast iron skillet 3-5 minute per side
  13. Tie meat back onto ribs – HINT: Butcher Knot or Surgeon’s Knot – These are helpful knots that will “hold itself” when you use it with meat.  Here is a link to an ULTRA ULTRA Slowdown of a demo video by The Scott Rea Project.
  14. Put in baking pan (ribs down) with wine and beef stock
  15. Insert temperature probe that can be monitored from outside of a closed oven
  16. Bake at 500° for 6 minutes per pound – (eg) 5 pounds = 30 minutes, 7 pounds = 42 minutes, 8 lb = 48 minutes, etc

WARNING:  I prepared this two years ago and it worked out perfectly.  This time, I followed it exactly and my Prime Rib reached 221º by 10:15.  That was over an hour before expected.  Monitor at least every 20 minutes.  Better lukewarm at serving time, than cooked well-done.

  1. Prepare au jus vegetables and set aside
  2. Turn oven to 250°. Bake for approximately 20 minutes per pound – (eg) 5 pounds = 100 minutes, 7 pounds = 140 minutes  . When internal temp gets to 115 degrees, keep oven door closed and turn off heat
  3. Let rest 30-60 minutes in a closed (heat off, but still hot) oven
    Watch internal temperature.
    120° equals rare;
    125° equals medium rare;
    130° equals medium;
    135° equals medium well – approaching sacrilege;
    140° DON’T DO IT… JUST DON’T DO IT.
  4. Ideally, internal temp should reach 120 degrees, at which time you take it out of the oven and cover it with foil, and let it rest for 20-30 minutes on the stovetop.
  5. While it cools, make your au-jus
  6. Cut meat into 3/4 inch slices
  7. Top with au-jus and serve with a TBL of horseradish on the side
  8. Serve with Yorkshire Pudding or potatoes

HORSERADISH SAUCE
• 1 TBL each – Morehouse prep horseradish, dijon mustard, sour cream
• Add salt, chives, black pepper, lemon juice or zest to taste

AU JUS

  • Strain drippings from roasting pan into measuring cup and allow to cool.
  • In hot skillet, add one onion chopped fine and three cloves of garlic till softened.  Put onion into roasting pan.  Deglaze skillet with 1/4 C red wine and pour into roasting pan
  • Skim fat from drippings and pour back into roasting pan.
  • Heat on medium heat over two burners to deglaze.  If necessary, add 1/4 C red wine, but it should not be necessary.
  • Strain drippings/broth back into hot skillet – discard solids
  • Add 1 C beef broth mixed with 1 TBL corn starch
  • Add a sprig of thyme and bring to a boil and cook until it thickens (8-10 minutes)
  • Remove from heat and add 2 TBL butter.  Stir until melted
  • Add salt and pepper to taste
  • Strain into serving cup – discard solids

SHOPPING TIPS

These are some great cuts of meat, but they can be expensive.  Here are some options and the sale price that was available five days before Christmas:

  • $15 USDA Prime Beef Bone-in Ribeye Roast – Large End – Full Retail Price
  • $11 USDA Choice Beef Bone-in Ribeye Roast – Large End – Sale Price
  • $8 USDA Bone in Standing Rib Roast
  • $5 USDA Choice Beef Ribeye Roast
  • $5 * USDA Choice Beef Bone-in Ribeye Roast – Small End
  • $5 USDA Rump Roast
  • $4 USDA Choice Boneless Beef NY Roast
  • $3 USDA Choice Beef Boneless Eye of the Round
  • $3 USDA Choice Beef Boneless London Broil
  • $3 USDA Choice Beef Boneless Cross Rib (X)
  • $3 USDA Choice Beef Boneless Top Round
  • $3 USDA Choice Beef Boneless Bottom Round
  • $3 USDA Choice Beef Boneless Sirloin Tip (X)

(X) means it is only a marginal choice for this recipe.  Better braised.

CLICK HERE TO EXAMINE DIFFERENT CUTS

Basic Fried Egg – aka Over Easy: Two Ways

  1. Use small nonstick panfried egg
  2. Use a small glass ramekin, and get it very slightly wet inside. This will help the yolk not break.
  3. Break your egg into ramekin being careful not to get eggshell pieces into your Egg.
    NOTE:  If shells fall in, use the edge of the larger shell to scoop it out.
  4. Bring temperature of pan up to 280° – 340° . Small drop of water should splatter
  5. Put in 1 tablespoon cold butter and 1 tsp olive oil
    Olive oil will help the butter to not burn
  6. Move butter around to coat pan
  7. Add egg to medium hot pan
  8. Cover with lid to set the yolk and cook the white a bit.
    This will be sunny side up
  9. If you want it over easy, flip it and let it cook for 15 seconds
  10. If you want it over hard, flip it, poke the yolk, and cook for 30 seconds
  11. Plate up, garnish with a sprig of parsley, and serve with toast.

Alton Brown makes the case for Over Easy eggs cooked in the Oven

  1. Put a carbon steel pan into the oven at 450º
    10 inch for two eggs – 8 inch for one egg
    Use a pan for which you have a tight-fitting lid
  2. Once it comes up to heat, put the pan in and let the pan heat up for 30 more minutes
  3. Crack one or two eggs into a small bowl
  4. Put the hot pan on the top of the turned-off stove
  5. When ready, put in 1 TBL butter (softened) for two eggs
    2 tsp butter for one egg
  6. When the butter has nearly melted, add the egg(s)
  7. Sprinkle with salt
  8. Cover and cook for 4 minutes for two eggs
    (only 3 1/2 minutes for one egg)
  9. Serve on toast
  10. Clean up with salt and paper towel while the pan is still hot


Basic Omelette

  1. Use small nonstick pan
  2. Beat two eggs until white and yolk is incorporated, but not completely homogenous – about 20 strokes
  3. Use a whisk to incorporate lots of air for a lighter omelette.
  4. If you like a really really light omelette, separate the yolks first, then beat the egg whites for a while. Adding the yolks back in after the whites start to foam, but not form any type of peaks – then continue beating.
  5. Bring temperature of pan up to 280° – 320° . Small drop of water should splatter
  6. Put in 1 tablespoon cold butter and 1 tsp olive oil
  7. Move butter around to coat pan
    . Ideally, melt butter in a small pan to separate out solids. Use only the clarified butter. Clarified butter will not burn as easily as whole butter.
  8. Add egg to medium hot pan
  9. Move pan around to spread yolk into cooked areas
  10. Once your has been mostly cooked, add your toppings
  11. Toppings should be precooked
  12. Roll omelette over to make a small tube
    . French style omelettes are rolled
    . American style omelettes are folded
  13. Egg should be cooked, but not browned
  14. Top with garnish of your choice

BASIC CUSTARD

This base recipe can be used alone, or for Bread Pudding, Pumpkin Custard, Personal Custards, and much more. It is a recipe that you MUST know, because you will use it throughout your life so often.

INGREDIENTS

  • 4 Eggs
  • 2 additional egg yolks
  • 1 C Sugar
  • 1/2 Brown Sugar
  • 1/4 C whiskey or rum
  • Dash Vanilla
  • Grandpa’s CinnaSugar®
  • Merest dash of salt
  • Zest and juice from one orange
  • 1 C whole or lowfat milk – NOT skim, because you need the fats to gel properly
  • 1/2 C Cream (Traditionally you should use just cream * I substitute 1/3 milk instead of cream to keep it healthier)
  • Optional:  Mix in 1/2 C dried fruit

You can also use Half and Half rather than the milks listed on the previous two lines.

  • Optionally:  grated orange peel and/or ginger

STEP BY STEP

  1. Cream together eggs and sugar
  2. Mix in vanilla, cinnamon, nutmeg, salt and orange
  3. Mix with milk and cream
  4. If you are using this as part of another recipe that uses custard, you will probably add whatever those ingredients are right about here.
  5. Pour into greased ramekins
  6. Optional: top with dried cherries or raisins
  7. Bake at 350º for 35-45 minutes.  For a creamier custard, bake at 325º for 1.5 – 2 hours.  Internal temperature should be about 170º

Optional Topping . Crème Anglaise or Brandy Cream Sauce


Fingerling Potatoes

INGREDIENTS

STEP BY STEP

  1. Halve or quarter fingerlings
  2. Toss fingerlings with rosemary, sage, thyme and EVOO
  3. Add garlic powder, salt and pepper and toss again
  4. Add eight large cloves garlic with their skin still on and toss again
  5. Dumped onto preheated baking tray
  6. Cook at preheated 425° oven for 25-30 minutes


Breakfast Crepes

CrepeINGREDIENTS

  • 2 eggs or 1 carton Egg Beaters
  • 1 CU 2% milk
  • 1/4 CU Plain Yogurt
  • 2 TBL melted butter
  • 1 TBL canola oil
  • 1/2 CU All purpose flour (sifted*)
  • 1 TBL Whole wheat flour or Mesquite Meal
  • 1/2 tsp Vanilla Extract
  • 2 TBL sugar
  • Pinch of salt

Get optional ingredients ready as well – read below

STEP BY STEP

  1. Mix all ingredients
  2. Let batter set for 30 minutes – better 2 hours

Preheat pan to about 350º

  1. Drop 1/2 cup mixture onto lightly oiled skillet
  2. Immediately tip and rotate pan to spread batter across bottom of pan
  3. Start timer – Cover and cook for exactly 90 seconds
  4. Uncover and flip crepe – cook uncovered for about 30 seconds more
  5. Slip onto cloth to cool for a few minutes
  6. Serve with squeezed lemons and powdered sugar

Special Steps – FOLDING

  1. Fold in half, then in half again the same direction creating a long skinny burrito kind of pastry.
  2. Fold in half, then again in the opposite direction creating a triangle with a rounded side

Special Steps – SERVING OPTIONS

  • Serve sprinkled with powdered sugar
  • Top with REAL Maple Syrup
  • Fill with strawberry jam or preserves (or apricot, etc)
  • Fill with meat for a lunch crepe
  • Fill with lemon curd and blueberry dressing
  • Fill with banana, strawberry and chocolate
  • Fill with spinach, tomato, roasted garlic, goat cheese, onion
  • Fill with tarragon, mushrooms and gruyere cheese
  • Fill with Nutella and sprinkle with powdered sugar
  • Fill with something sweet, then top with lemon zest
  • Sprinkle with Turbinado Sugar, then put into over to caramelize a little bit

Special Steps – PREPARATION OPTIONS

  • Substitute 1/4 CU skim and 1/4 CU yogurt for 1/2 CU 2% milk
  • It’s not traditional, but if you add 1/4 tsp baking powder, you will get a fluffier crepe
  • Eliminate the sugar for lunch crepes.
  • If you don’t have a sifter (I don’t either) you can do what I do:  use a wire strainer basket and a wooden spoon

{CAPTION}

{CAPTION}

{CAPTION}


Deviled Eggs

Easy, Good, Better, Best

See also my page on How to Hard-Boil Eggs


Deviled Egg tips

  • For a smooth filling, push yolk through sieve. For a more rustic filling, crush with a fork.
  • Yolks tend to stick to your knife. Cut your egg in half with dental floss. This will give a clean cut.
  • Six eggs will produce 12 deviled eggs. I always prepare eight eggs to allow for some breaking.
  • If making deviled eggs, use a plastic bag as a pastry bag to get fancy star-bursts of the egg yolk topping.
  • After cracking eggs, let them set in a bowl of water for 10 minutes. This will loosen the shell.
  • Store peeled hard boiled eggs in a sealed container of water in the refrigerator.  They tend to pick up smells from other foods.

Easy – Fail Safe

Prepare your Hard-Boil Eggs

  • Let fully cool – great if they can be refrigerated overnight before the next steps.
  • Cut 6 eggs in half lengthwise – creating 12 halves.
  • Carefully remove yolk and put into mixing bowl.
  • Crush yolks with a fork
  • Mix in 1 TBL each of mayo and mustard (I prefer to use dijon)
  • Mix well with half teaspoon each of dry mustard, salt and vinegar
  • Spoon yolk mixture into egg halves.
  • Sprinkle lightly with paprika and refrigerate up to two days
  • When serving (if for a potluck) keep the egg tray on a very damp frozen towel

Good

Prepare as above (in Easy) but add a dash of Tabasco
Put egg yolk mixture into the corner of a plastic bag
Cut the tip off, and use this to pipe filling into the white egg half.
Top some with alternate toppings: paprika, tarragon, Parmesan cheese, wasabi and chives, chipotle and cilantro, capers, etc. Use your imagination.


Better

Rather than Tabasco, use a teaspoon of prepared horseradish
Also, add a teaspoon of sour cream
Top with chives, toast points, parsley, cilantro, caviar, etc. Use your imagination.

Best

This is the receipe that I usually use
Even I like to break it up though. Don’t be afraid to use your imagination.

I like to add a dash of Worchestershire Sauce
Sometimes I top the egg with a dash of Choloula
Another topping is fresh grated garlic or onion
I like to sprinkle ground cayenne pepper rather than paprika

Alternate Topping Suggestions

  • Green Olives
  • Black Olives
  • Red Bell Pepper
  • Anchovies
  • Taco Chip
  • Mint Leaf
  • Spinach
  • … and so forth – again… use your imagination


Grandpas Frappuccino

Why spend $4 for a small bottle of Frappuccino, when you can make a good Copy Cat Frappuccino for under a buck?

Grandpa’s Copy Cat Frap

There is a lot of internet chatter about canning your own coffee, while (in theory) it can be done, flavor will suffer. I’ve tried it.  It seems a bit more cardboardy and bitter.  I prefer to make my coffee fresh, in a large batch, on the stove, and have found that this recipe gives me nearly an entire weeks worth of coffee, with decent flavor.

Purists would tell me that as soon as I started adding sugar, milk, etc I had lost the entire coffee experience anyway, so I figure that this makes me happy, so it might make you happy.  This is the recipe that I use.

For storage I use

  • ONE – 64 ounce bottle (from apple juice or similar) for storing the entire recipe after it has been filtered, but not flavored: BLACK
  • TWO – 32 ounce PowerAde bottles for storing flavored Frap Concentrate: DARK BROWN (Chocolate brown)
  • FIVE – 16 ounce bottles (Gatorade or Body Armor, emptied) for ready to drink Frapp:  TAN (Light brown)

SEE BOTTOM OF THIS PAGE FOR SINGLE SERVING RECIPE

Grandpa’s Frappuccino

Ten Servings – Coffee Concentrate

This makes a total of ten 16 ounce bottles, but I split the 64 ounces of brewed coffee into two 32 ounce bottles, which allows me to prepare only five bottles of Frap at a time.

SUMMARY:  Prepare 8 C (64 ounces) of strong coffee.

  • 8 CU (64 ounces) water in a large pot
  • 2 C ground coffee or two hotel coffee bags (caf or decaf)

STEP BY STEP

  1. Put ground coffee into 9 C cold water and cover
  2. Heat cold water on high for about 6-8 minutes
  3. DO NOT BRING TO A BOIL
  4. Reduce to lowest hot setting and cook 3-4 hours
    (too hot to touch, but not hot enough to bring water to a full boil)
  5. Stir once half-way through
  6. Turn off stove, leave covered
  7. Let steep (cool) for an additional 60 minutes
  8. Lift carefully off stove and pour into two large 4 C measuring cups leaving as many of the grounds behind as possible.  I use a strainer purchased from AMAZON.   Discard or compost the grounds.
  9. Let cool completely (just warm to the touch is OK) before pouring the coffee into your plastic bottle.  Then, pour the coffee into your large 64 ounce bottle and refrigerate overnight to let the grounds completely settle

Grandpa’s Frap Concentrate

TWO BATCHES – Frap Concentrate

SUMMARY:  Here you will flavor half the coffee from the previous night, and store the other half for later use.

  • You will need TWO 32 ounce bottles – such as a Powerade bottle
  • 1/4 C sugar
  • 1 TBL Stevia (buy it in bulk)
  • 1-2 TBL Toriani coffee syrup (I like French Vanilla or Hazelnut)
  • 1 tsp of vanilla
  • 2 TBL whole milk (to color the Concentrate)
  1. Fill one 32 ounce bottle and store it in the fridge for use another day
  2. Pour 8 ounces of your coffee into a measuring cup and the remainder into your 32 ounce bottle
  3. At this point you have 8 ounces in a measuring cup, and 24 ounces remaining in your bottle.
  4. Heat the 8 ounces for about 90 seconds
  5. Add the sugar and Stevia and stir until completely dissolved
  6. Add all other ingredients
  7. Pour the mixture into your 32 ounce bottle
  8. You will notice the color difference between the two bottles.  The dark brown bottle contains the flavoring, the black coffee is unflavored.
  9. We will use the dark brown bottle as the source for the next recipe.  When you are ready to prepare the second bottle, just start with step three of this recipe.

Grandpa’s Frappuccino

FIVE BOTTLES – Ready-to-drink Frappuccino

SUMMARY:  We will now finish our Frap and pour into bottles.

  1. The most complex step was making the Frap Concentrate.  Now it is an easy job of just combining ingredients.
  2. Pour 3/4 C of concentrate into each of your five bottles
  3. Now, I know you were not THAT precise, so spread the rest of the concentrate across the other bottles to even things up
  4. Add 1/4 C milk to each bottle
  5. Top off each bottle with water (or milk) and refrigerate.

Single Servings of Grandpa’s Frap

  1. Pour 3/4 C of concentrate or 1 C strong coffee into a single 16 ounce bottle
  2. Add 1/2 C milk onto the bottle
  3. Top off the bottle with water (or milk) and enjoy

Flavor Variations – for one serving

  • Add 1/8 tsp cocoa for a type of Mocha
  • Add 1 tbs hot fudge for a different flavor of Mocha
  • Try a few drops only of almond extract

What does it all mean? – Start out with 4 oz of espresso, then add…

  • Cappuccino – 6 oz of milk
  • Latte – 8-12 oz milk
  • Mocha – 2 oz chocolate, 8 oz milk
  • Macchiato – 1 oz foamed milk
  • Doppio – just add another 4 oz espresso (double espresso or double Dutch)
  • Venti Macchiato – steamed almond milk with mocha topping

Grandpa’s Mashed Potatoes

These are not your traditional potato skins, but instead gives you a yummy use for the left-over skins.

INGREDIENTS

  • 4 “regular” russett potatoes – Use starchy, not waxy
  • 1 carrot – julienne strips
  • 1-2 C raw cauliflower – cut into one inch pieces
  • 1/2 onion – slivers
  • 3 TBL olive oil OR 6 TBL butter
  • 2 TBL “chives” or cut green onion tops
  • 1 tsp oregano
  • 1/4 CU half and half (at the very end) or low-fat buttermilk
    Use whole milk if you must, but not low fat regular milk

STEP BY STEPpotato

  1. Cut the skins off the potatoes into nice large flat hunks. This can be stored in a bowl of salted water and used later for potato skins.
    When ready, bake peels at 400º for 20 minutes.
  2. Rinse remaining potatoes and cut into one inch (or less) sized pieces.
  3. Cut 1/2 onion into slices into mixing bowl
  4. Using a potato peeler, peel the carrot into the mixing bowl.
  5. Toss potatoes, onion and carrot in the mixing bowl
  6. Put the pieces into a steamer basket with one inch of water in the bottom of the pan.
    Alternately you can use a pot of water, but this rinses a lot of the sugars and starches away.
  7. Cook or steam potatoes for about 20 minutes
  8. Drain water from pan and put veggies back into the empty pan.
  9. Add 6 TBL of butter
  10. Using a potato masher, crush the pieces into a mush. If you like “lumpy” potatoes, don’t pot-skinscrush them too much.
  11. Add splashes of milk product, stirring continually, ONLY to the point of giving them a creamy texture
  12. Add chives and oregano and mix with a fork.
  13. Optional:  At this point, you can add a bit of shredded cheddar cheese
  14. For really fancy potatoes, pipe them into mounds using a fluted piping tip, then broil them for about three minutes.  Otherwise, just plate and serve with a side of gravy.
  • Special Steps A “quick release” ice-cream scoop can give you those pretty restaurant mounds of potatoes.
  • Variations For less starch in the potatoes, and less stringent onions, run tap water gently through them after  Step 3.

Healthy Alternative

Use half russet potato and half cauliflower.  Add a bit of extra salt and butter.

Tips: Cast Iron Skillets

This page was created for my brother Steve.

Please also review my post: Care of your Non-Stick Skillets


Starting to Rust?

Steve,

You said that your cast iron was starting to rust.  Also, food probably sticks to it when you use it.

Seasoning Your Cast Iron

  1. You will want to do this with a new cast iron pan as well.
  2. Wash it in warm, soapy water and scrub all rust off of it using steel wool or other abrasive surface.  Towel dry immediately.
  3. Put into your oven and turn heat to 350º.
  4. Using peanut oil, canola oil or corn oil pour oil and smear it in with a paper towel, rubbing it into the iron.  Both sides, including handles, etc!  Be careful not to burn yourself.
  5. After it has been coated with oil turn off the oven, put in upside down on a baking sheet, and let rest for 1 hour
  6. Let it cool completely, then wipe excess oil off it.  Reseasoning your pan only has to be done once unless it burns or you use soap on it.  Also, don’t cook acidic things like tomato sauce

Cooking with Your Cast Iron

  • If it has been weeks (or more) since using your cast iron, rinse it before starting to heat the pan.
  • Always rub a bit of Canola oil on your pan when it begins to heat up
  • Spread the oil over the surface
  • Use medium to medium-high heat
  • Always let it preheat completely before cooking in it.
  • NEVER cook over 500º
  • Always use potholders or mitts.  The handle will be hot.
  • Never use in a microwave
  • Never allow liquids to completely boil away.
  • If cooking on a ceramic or halogen cooking surface always lift the pan, do not slide it.  Sliding it will damage your cooking surface.

THE PENNY TRICK – If you are boiling water, put a penny in the bottom of your pan.  If it boils dry (which will ruin your pan) the penny will start to rattle because of the boiling water beneath the penny.  The rattling will tell you your pan is nearly empty (usually) before your pot is destroyed.

Cleaning Your Cast Iron

  • Never put water onto the cooking surface until it is UNDER 250º in temperature
  • Let the hot water tap get as HOT as possible.
  • If you want, boil water on the stove.
  • Pour the hot water over the cooking surface.
  • Scrape with a metal spatula if necessary.
  • NEVER use soap on it, that will remove the coating.
    If you DO use soap on it, you must season it again from the beginning.
  • Dry immediately and completely with a towel before putting it away.
  • If I’ve used the oven, I put it into the warm oven to help it thoroughly dry.
  • Never use bleach
  • Never use oven cleaner
  • Never clean in a dish washing machine
  • Never use a Brillo pad without seasoning it afterward.
  • Do not store your pan with the lid on, as it inhibits air flow, or if you do keep the lid on it, place a towel in between the pan and the lid.

Why you Never Want to use Soap

  • The oil eventually creates almost a Teflon surface on the skillet.
  • It was the hot oil time after time after time that gave scientists the idea for Teflon, but cast iron is better because there are no chemicals.
  • If you use soap, it cuts the oil and your pan starts to rust again.
  • If you ever HAVE to wash it in soap, repeat the entire seasoning process again.


Applesauce


Grandma’s Applesauce

By Cynthia Cielle

This is a really healthy and rustic applesauce.

  • 4 apples – cut into about 16 pieces each
  • Cover with water
  • Bring up to a simmer and let cook 15-30 minutes until soft
  • Squish using a potato masher
  • Top with Grandpa’s CinnaSugar®


Basic Applesauce

A far cry from that overly sweetened, grainy mush that dominates supermarket shelves, this applesauce is tart with a hint of sweetness. Try it on latkes, with some braised pork, or on its own.

Ingredients

  • 1 C apple cider or apple juice
  • 1 C water
  • 1 whole cinnamon stick
  • 1/4 cup granulated sugar or brown sugar
  • 1/4 tsp fine salt
  • 3 pounds crisp apples (about 6 large), such as Fuji, Winesap, Gala, or Granny Smith
  • 1 tablespoon freshly squeezed lemon juice
  • 1/2 tsp vanilla at the very end

Step by Step

  1. Add the apple cider, juice, water, and the cinnamon stick. Bring to a gentle boil over medium heat in a large, heavy-bottomed saucepan.
  2. Peel, core, and coarsely chop the apples into 1/2-inch pieces. Add the apple to the hot liquid
  3. Lower the heat to medium low and gently boil for 20 to 30 minutes, stirring occasionally with a wooden spoon and checking to make sure the apples are not scorching.
  4. When the apples are extremely tender and can be broken down to a chunky sauce with vigorous stirring, remove from the heat.
  5. Remove the cinnamon stick and discard. Let mixture cool for a few minutes, then add the vanilla, sugar, a large pinch of salt, and the lemon juice.
  6. Let the apples cool to room temperature.
  7. For smooth applesauce, using a food mill fitted with a medium disk, pass the apple mixture through the mill to form a smooth purée.  Alternately, blend in a food processor to desired consistency.
  8. For chunky sauce, beat the apples with a potato masher or wooden spoon until the desired consistency is reached.

Grandpa’s note:  If you are canning the applesauce, skip step 6 and proceed VERY CAREFULLY.  A Food Processor will work, but steam is explosive: make sure the body of the processor is well vented.  Can in hot water bath about 15 minutes using standard canning guidelines.


Jim Morgan’s Applesauce

2015-10-19 15.47.50
Yes, this recipe is originally from Alton Brown, but this Facebook post of Alton’s recipe was made with Jim’s very own apples. Pretty good recipe too.


Calvados Applesauce

1 lb Gala apples
1/2 cup water
1/2 cup sugar
1/2 teaspoon finely grated fresh lemon zest
1/8 teaspoon cinnamon
2 tablespoons Calvados

Instructions
1. Peel and core apples, then cut into 1-inch pieces.
2. Bring apples, water, sugar, zest, and cinnamon to a boil in a 2-quart heavy saucepan, stirring occasionally, then reduce heat and simmer, covered, 15 minutes.
3. Remove lid and simmer until most of liquid is evaporated, 5 to 10 minutes.
4. Add Calvados and simmer, stirring occasionally, 1 minute.
5. Mash apples with a potato masher or a fork to a coarse sauce, then cool.

Cook’s note: Applesauce can be made 3 days ahead and chilled, covered.

Makes about 1 1/4 cups
* Active time:10 min
* Start to finish:1 hr (includes cooling)

Cacik (Turkish Yogurt soup)

Most people know this as Tzatziki.  Greek yogurt sauce, but the Turks say the Greeks stole it from them.

Ingredients for multiple servings

  • 1 cucumber – deseeded
  • ½ tsp dill
  • 1 tsp mint (minced)
  • 1-2 CU plain yogurt
  • ± 1 tsp garlic to taste
  • scant black pepper
  • 1 TBL lemon juice
  • 1 tsp EVOO
  • pinch of salt

Step by Step

  1. Peel cucumber and scoop out seeds
  2. Slice cucumber into small pieces or slices
    (ALT: Grate cucumber)
  3. Add yogurt and spices
  4. Blend until smooth.
  5. Fold in cucumbers
  6. OPT: Mix in some crumbled feta cheese
  7. Refrigerate at least 3 hours to blend flavors
  8. Serve cold with a dusting of mint on top.

Notes We’ve always said “Kay Sick,” but when visiting in Istanbul, we were told that the proper way to say this is “Jay Jick”


Turkey was created in 1923 from the Turkish remnants of the Ottoman Empire. Soon thereafter the country instituted secular laws to replace traditional religious fiats. In 1945 Turkey joined the UN and in 1952 it became a member of NATO. Turkey occupied the northern portion of Cyprus in 1974 to prevent a Greek takeover of the island; relations between the two countries remain strained. Periodic military offensives against Kurdish separatists have dislocated part of the population in southeast Turkey and have drawn international condemnation.

Biscuits and Gravy

Drop Biscuits and Gravy

Bisquick has the best recipe for drop biscuits. Just buy yourself a box of Bisquick (or use our recipes by CLICKING HERE) and then focus on the gravy.

INGREDIENTS

  • 1/4 onion (minced)
  • Sausage – 2 patties or 3 links
    ROUX – FLOUR BASE
  • 1 TBL butter (softened)
  • 1 TBL EVOO
  • 2 TBL flour
  • 1/4 C stock or broth
  • salt and pepper to taste
    GRAVY
  • 1 CU SKIM milk
  • Add more milk if needed for consistency

STEP BY STEP

  1. Brown 1/2 – 1 C sausage and onion in a skillet, then set aside
  2. Melt butter, EVOO and flour in your skillet
  3. When it starts to brown, add the broth, salt and pepper
  4. Add milk and whisk to incorporate (stirring constantly)
    For a richer gravy, beat 1 egg yolk into your milk
    Drizzle more milk, if needed, and cook until thickened (stirring constantly or it will scorch)


Drop Biscuits

Drop biscuits are just about the easiest and best thing that you can serve with breakfast.

Here is the recipe from the Bisquick box, which is just about perfect. I do like, however, to sometimes add shredded cheddar cheese or chives.

Biscuits and Gravy Recipe

Basic Drop Biscuits

INGREDIENTS & STEP BY STEP

  1. 1 CU Bisquick
  2. 1/3 CU milk
  3. Mix and drop onto ungreased baking pan
  4. Bake at 400 for about 12-15 minutes

For Corn Dogs add 2 TBL corn meal to the above recipe. Roll dough flat, cut into wedges, wrap around hot dogs.  Bake as directed above.

Garlic Cheese Drop Biscuits

INGREDIENTS

  • 2 cups Original Bisquick® mix
  • 2/3 cup milk
  • 1/2 cup shredded Cheddar cheese (2 ounces)
  • 2 tablespoons butter or margarine
  • 1/8 teaspoon garlic powder

STEP BY STEP

  1. Heat oven to 450ºF.
  2. Stir Bisquick mix, milk and cheese until soft dough forms.
  3. Drop dough by 9 spoonfuls onto ungreased cookie sheet.
  4. Bake 12-15 minutes or until golden brown.
  5. Stir together butter and garlic powder; brush over warm biscuits.

Grandpa’s Biscuits

INGREDIENTS

  • 1 CU Bisquick
  • 2 stalks of chives – diced
  • 1/4 CU softened butter
  • (mix above lightly together)
  • 1/4 CU Sour Cream
  • 1/2 CU Buttermilk

STEP BY STEP

  1. Preheat oven to 450 degrees F
  2. Combine (fold) all gently until soft and sticky – DO NOT OVER MIX
    – If too sticky or wet, add more Bisquick
    – If too dry, add ONE tablespoon of milk
  3. Lightly flower your baking surface (preferably a baking stone)
  4. For drop biscuits
    – Pull off golf-ball sized chunks and let drop on baking surfaceBiscuit
    – You can moush into shape, but do not roll.  They should be rustic.
  5. For more traditional biscuits
    Pull off smaller than golf-ball sized chunks and roll lightly into balls
    – Flatten slightly, then place onto baking surface
  6. Brush top of bottom later lightly with butter
  7. Roll another and place it on top of the first layer
  8. Press them together
  9. Bake at 400º for 12-15 minutes or until golden brown

Drop Biscuits from Scratch

INGREDIENTS

  • 2 CU All Purpose Flour
  • 1 TBL Baking Powder
  • 1 TBL Sugar
  • 1 tsp Salt
  • 1 tsp cream of tartar
    (sift above five together)
  • 1/4 CU cold butter
  • 1/2 C cold shortening
    (cut above into dry ingredients)
  • 1/2 CU Sour Cream
  • 1/2 CU Buttermilk

STEP BY STEP

  1. Sift together dry ingredients
  2. In separate bowl, mix wet ingredients
  3. Cut in shortening and butter into dry ingredients
  4. Combine (fold) all together gently – DO NOT OVER MIX
  5. Drop small chunks onto baking stone
  6. Bake @ 350-400º degrees for about 12-15 minutes


Grandpa’s Thunder Powder

Thunder Powder is good for Dry Rub BBQ, topping on a soup or eggs or rice, even on buttered toast to give it an extra zing.  Anything that might benefit from an extra nuance of flavor is a good candidate for Thunder Powder.

A spicy-hot delicious seasoning that is like a thunderstorm…
…always good, but never exactly the same!

INGREDIENTS

ADD THESE BASE INGREDIENTS to make just under 1 cup of Thunder Powder.
…in more or less these quantities!
This is not an exact recipe, so just use what you have available and what appeals to you.

  • 2 TBL Brown Sugar
  • 4 TBL Paprika
  • 2 TBL Garlic powder
  • 2 TBL Onion powder
  • 2 TBL Cayenne pepper
  • 2 TBL Salt
  • 1 TBL Cumin
  • 1 TBL Celery salt
  • 1 TBL ground oregano
  • 1 TBL Dry mustard
  • 1 tsp Black Pepper
  • 1 tsp White Pepper
  • 1 tsp Turmeric
  • 1 tsp Ground Bay Leaf (Not Old Bay Seasoning)
  • 1 tsp Ground Clove
  • 1 tsp Ground Chipotle – Smokey jalapeño

STEP BY STEP

  1. Mix above and store.
  2. Don’t worry if you don’t have all of the above ingredients.
  3. This is a general flavor mixture, and a few missing ingredients are not going to spoil the mix.
  4. Mix in a large bowl and spoon into storage containers or shaker.
  5. Makes about 1 Cup of Thunder Powder

LABEL
 

Grandpa’s Thunder Powder
A spicy, hot, delicious powder that is like a thunderstorm…

always good, but never the same.

Probably contains chili powder, garlic, onion, salt, cayenne pepper and black pepper.
May contain adana, sumac, paprika, clove, bay, crushed red pepper, cumin,
celery salt, turmeric, curry powder, white pepper, and chipotle powder

Simple Spice Mix

  • 2 TBL Cumin
  • 2TBL Ancho chili powder – alt red chili
  • 1 TBL garlic powder
  • 1 TBL onion poder
  • 1 TBL celery salt
  • 1 tsp black pepper
  • 1/2 tsp ground clove
HTML Snippets Powered By : XYZScripts.com