Cast Iron: Never use soap or steel wool with your cast iron skillet. If you have a particularly nasty pan to clean, create a thick paste with salt and water. Use a scrap cotton cloth to rub it in. If entirely necessary, heat up some water and scrape with a spatula. After cleaning, make sure it is completely dry, then re-season with a dab of canola oil.
Raw Meat: Always use a paper towel to wipe off if you are touching raw meats. After wiping off, use soap and water to finish up. Any utensils that touch raw meat should be equally cared for.
Knife Blocks: As popular as these are, there is nothing in your kitchen that harbors more germs than a knife block. Too frequently people use a knife lightly and then put it back in the block. Consider a knife magnet. There is a good one by Norpro that is really inexpensive from Amazon.
Keeping it Organized
Keeping it Efficient
The Work Triangle: Keep all of your motion within a triangle. (Eg) Stove, refrigerator, counter. You will find that 90% of your movement is within this small area.
Keeping it Safe
The single biggest thing for safety is to keep your senses about you. Most accidents happen when you become distracted.
CONVENTIONAL :: The lowest price for a reason. Four hens per one square foot. Injury and infection are outweighed by the higher egg production. Chickens are usually artificially induced into laying more eggs than their body was intended. When chickens die, they are sometimes unable to lay down, and are held up by the other chicken bodies. Brand: Usually store brands and the eggs that are occasionally on sale for a dollar a dozen.
ORGANIC :: All this means is that the chickens are not fed hormones, pesticides and antibiotics. They are still frequently crammed into living spaces.
CAGE FREE :: Not in cages, but still usually confined to a barn. Space is a bit better, with 1 square foot per bird. Often little to no exposure to sunlight.
FREE RANGE :: Conditions are getting better, but eggs are getting more expensive. The birds are allowed to roam outdoors, similar to what they should expect. Space is still limited though, and “free to roam outdoors” may mean one small door for thousands of birds. Also, birds must be antibiotic free. Brand: Pete and Gerry’s and Organic Valley
PASTURE RAISED :: Dozens to hundreds of square feet per bird. Usually from smaller farms, just because of the space the birds get. This is what egg production was a hundred years ago. The egg yolks are darker, and the eggs taste better. Brand: Vital Farms and Simple Truth
CERTIFIED HUMANE :: A non-government category. These birds are monitored by a watch group called Certified Humane, one of the most respected animal welfare groups in the world.
NUTRIENT ENHANCED :: Similar to Certified Humane, but not monitored. Birds are given a nutritionally balanced vegetarian feed. Recycled, processe, hormones or antibiotics are also avoided.Brand: England’s Best
————–
AA :: Freshest – white is firm, yolk is round and sturdy. Good for over easy, poached and hollandaise sauces
A :: A week or two old – white is aceptable, and yolk is starting to sag. Good general purpose egg, but use within the week.
B :: Old – White is beginning to look milky and sad. Yolk will break easily. HOWEVER, these eggs make the best Hard Boiled Eggs because the white has lost its attachment to the shell.
————–
Keep eggs in the fridge at (or near) 40º – An egg on the counter ages about 7x faster than eggs in the fridge. Storing eggs in their original carton ON THE SIDE will help the yolk stay centered. Also, pasturized eggs are complete safe these days to eat poached, over easy, or even raw.
Hard Boiled Eggs
There are many ways to hard boil an egg. Here are several methods. Try them all, and pick your favorite
Grandpa’s Way of Doing It
It doesn’t matter if you start with cold or room temperature eggs. Put eggs into a large pot, and cover (by two inches) with water. Bring the water up to a quick boil, then cover and leave for 15 minutes. After 15 minutes, dump the hot water and cover the eggs with ice and then run cold water into the pot. Let set for at least 5-10 minutes
Start with eggs that are at least a week old, preferably about 10 days. This gives time for the albumin, the white, to separate from the shell membrane.
Least amount of sticking will happen if you peel under slow running water tap.
In my family, we put a pencil or grease-marker circle around the eggs to show that they have been hard-boiled.
Test an unmarked egg to see if it is hard boiled or raw, by SPINNING the egg on its point. A raw egg will not spin, while a hard-boiled egg will spin like a top.
When you hard-boiled eggs, and air sac is usually on the fat and. Start peeling here.
Eggs should always be stored pointy end down.
Refrigerate cooked eggs for up to two weeks.
Third Party Hints
The information below this section is from a third party. It is part of Grandpa's Personal Recipe box. Feel free to browse, but know that this information is from someone else.
It will take longer to heat up a cold than a warm egg to the desired temperature. Start with an egg that has been brought to room temperature (set out on counter 1 hour)
Alton Brown notes that carefully cooking an egg at 67 degrees Celsius (153°F) yields a yolk that bends to the scientist’s will. 10 minutes in boiling water—is not ideal. 212 degrees Fahrenheit is far higher than the temperature at which the egg whites and the yolks coagulate. – (My personal preference is water heated to about 185 degrees)
Egg white begins to set at 145º
Egg yolks set at about 158º
Egg white firms completely at 180º
AB says that because the yolk contains fat, it floats above the aqueous white, both in the shell and in a beaker. To achieve a centered yolk, one must rotate the egg while cooking it.
As eggs cook, their balled-up proteins uncoil into strands, and the strands bind together to form an intricate mesh that traps water. In essence, the proteins form a gel, a liquid dispersed in a solid. Boiling causes too many egg proteins to bind and form dense meshes, “so there is less sensation of water in the mouth,” says Alton Brown (Good Eats). Voilà: rubbery egg whites and sandy, grayish yolks.
IF YOU ARE GOING TO USE THEM RIGHT AWAY, at the tail end of the cooking process, shake them against the side of the pan to lightly crack the shell to let water in. This will make them easier to peel. DO NOT do this if you are planning on storing the eggs for later use.
Cooking with Eggs
Large eggs are the standard for cookbooks. If you use a medium or extra large egg, adjust the recipe accordingly.
1 egg is 1.5 ounces – two is 3.0 ounces – three is 4.5 ounces
Storing Eggs
Eggs, fresh from the chicken, do not have to be refrigerated if used within a week or so. Look for tell-tale signs such as a bit of chicken poop or feathers. This is actually good news. Just be sure to wash it before cracking it.
United States markets wash the eggs, which remove the protective coating. Refrigerate these eggs – or at least don’t set out for more than a few days. Warm them to room temperature an hour before cooking.
Using Egg Whites
When egg whites are beaten, the whites stretch and trap air bubbles. The smaller and more even the size of the bubbles; the more stable the foam.
Large bubbles break more quickly, and the foam collapses faster.
A large whisk with many fine wires will create smaller bubbles and a better foam.
Whites foam better when beaten at a cool temperature: About 65-75º
Whites will generally increase about 8-10 times in volume
If whites are underbeaten, they haven’t stabilized enough to hold bubbles. Overbeaten, and the bubbles are stretched too far and will pop easily. When overbeaten, you will see cottony bits of solidified (coagulated) egg whites.
Plain whipped whites make a fragile and short-lived foam. Even their own weight will cause the bubbles to burst.
Bubbles that burst become liquid again, and will not whip up again.
Cream of Tartar or a little white vinegar will stabilize the foam. Use about 1/8 tsp cream of tartar for 1 large egg white.
Sugar also strengthens the egg white protein, but you should still use cream of tartar.
Once a foam is established, 1 TBL every 30-45 seconds will dissolve uniformly.
If sugar is added too quickly, it won’t dissolve and your whites will be grainy.
If sugar is added BEFORE the foam is established, the whites can’t incorporate enough air to make a stiff foam.
Even a slight bit of egg yolk will keep your egg whites from foaming. Even oil on the side of your bowl or your whisk will prevent the whites from foaming.
Use a large bowl. Whisking in a small bowl will allow the bubbles to escape as quickly as they form.
A copper bowl is best. In a metal bowl, the simple action of beaters or whisks will increase the temperature enlarging the bubbles. Copper will transfer the heat rapidly from the whites, keeping them cooler. Copper ions will also help bubbles to form.
REMINDER: Keep the handle of your pan pointed to the back of the stove to avoid an accidental spill or burn.
This recipe will actually work with old scalloped potatoes, hashed browns from another morning, and baked potatoes. I would probably draw the line at potato salad.
CLICK EITHER IMAGE FOR AN ENLARGEMENT
STEP BY STEP
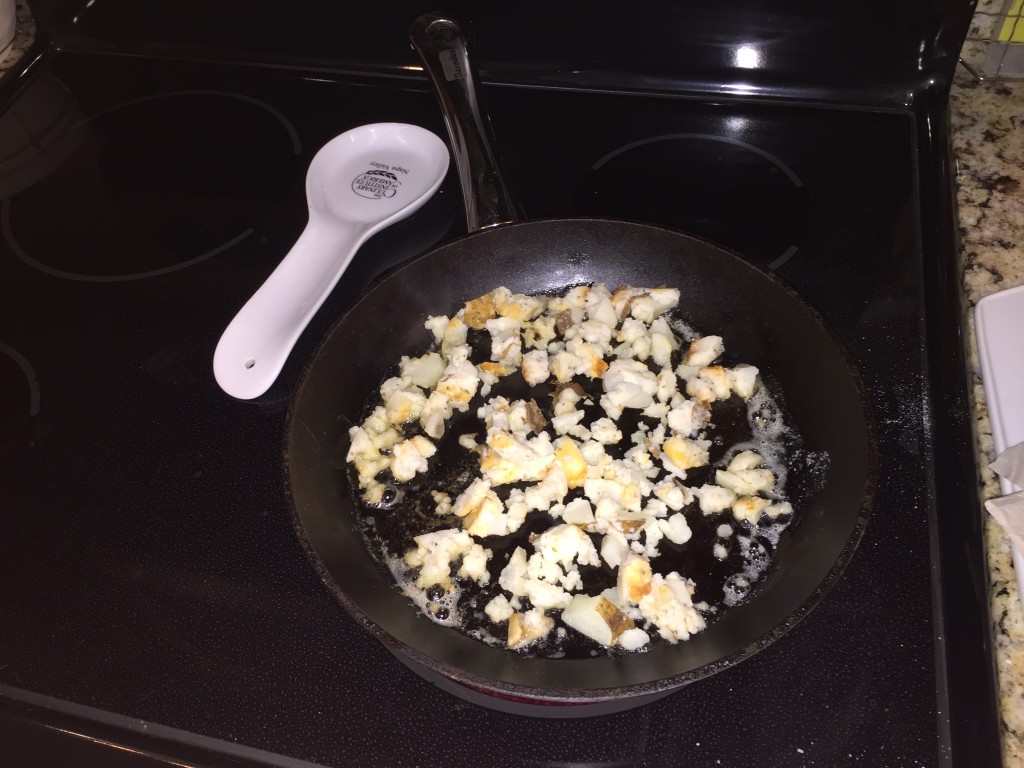
Put at least 1 cup of leftover mashed potatoes on a cutting board (or a clean counter)
Cut them into fairly large pieces (about the size of a regular marble)
PREHEAT the butter and oil in your skillet to a medium high heat
– If you put mashed potatoes into cold oil, they will become greasy
Put mashed potatoes into your skillet and let them brown
Handle or flip them AS LITTLE AS POSSIBLE because they will fall apart otherwise
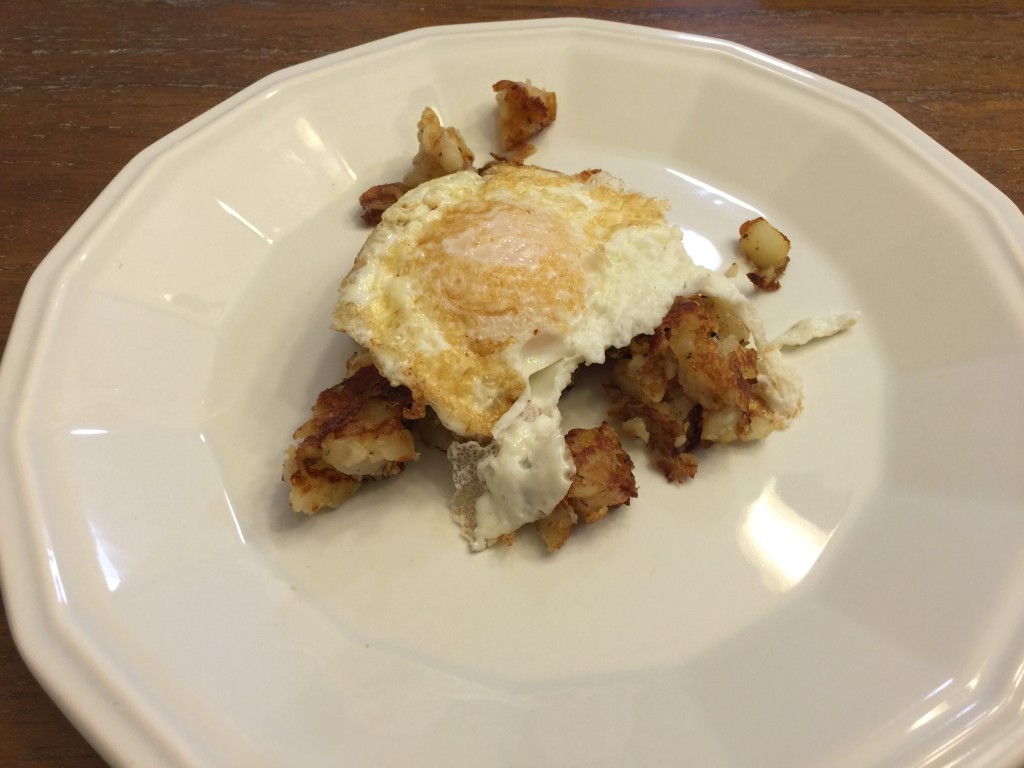
As soon as they are to your liking, plate them and fry your egg
Put 1-2 egg in a skillet and let them cook on the bottom just a bit
Flip them carefully to avoid breaking the yolk
Plate them on top of the potatoes and serve
NOTE: You can eliminate steps 7 and 8 if you use an egg poacher or poach the egg in a pan of simmering water
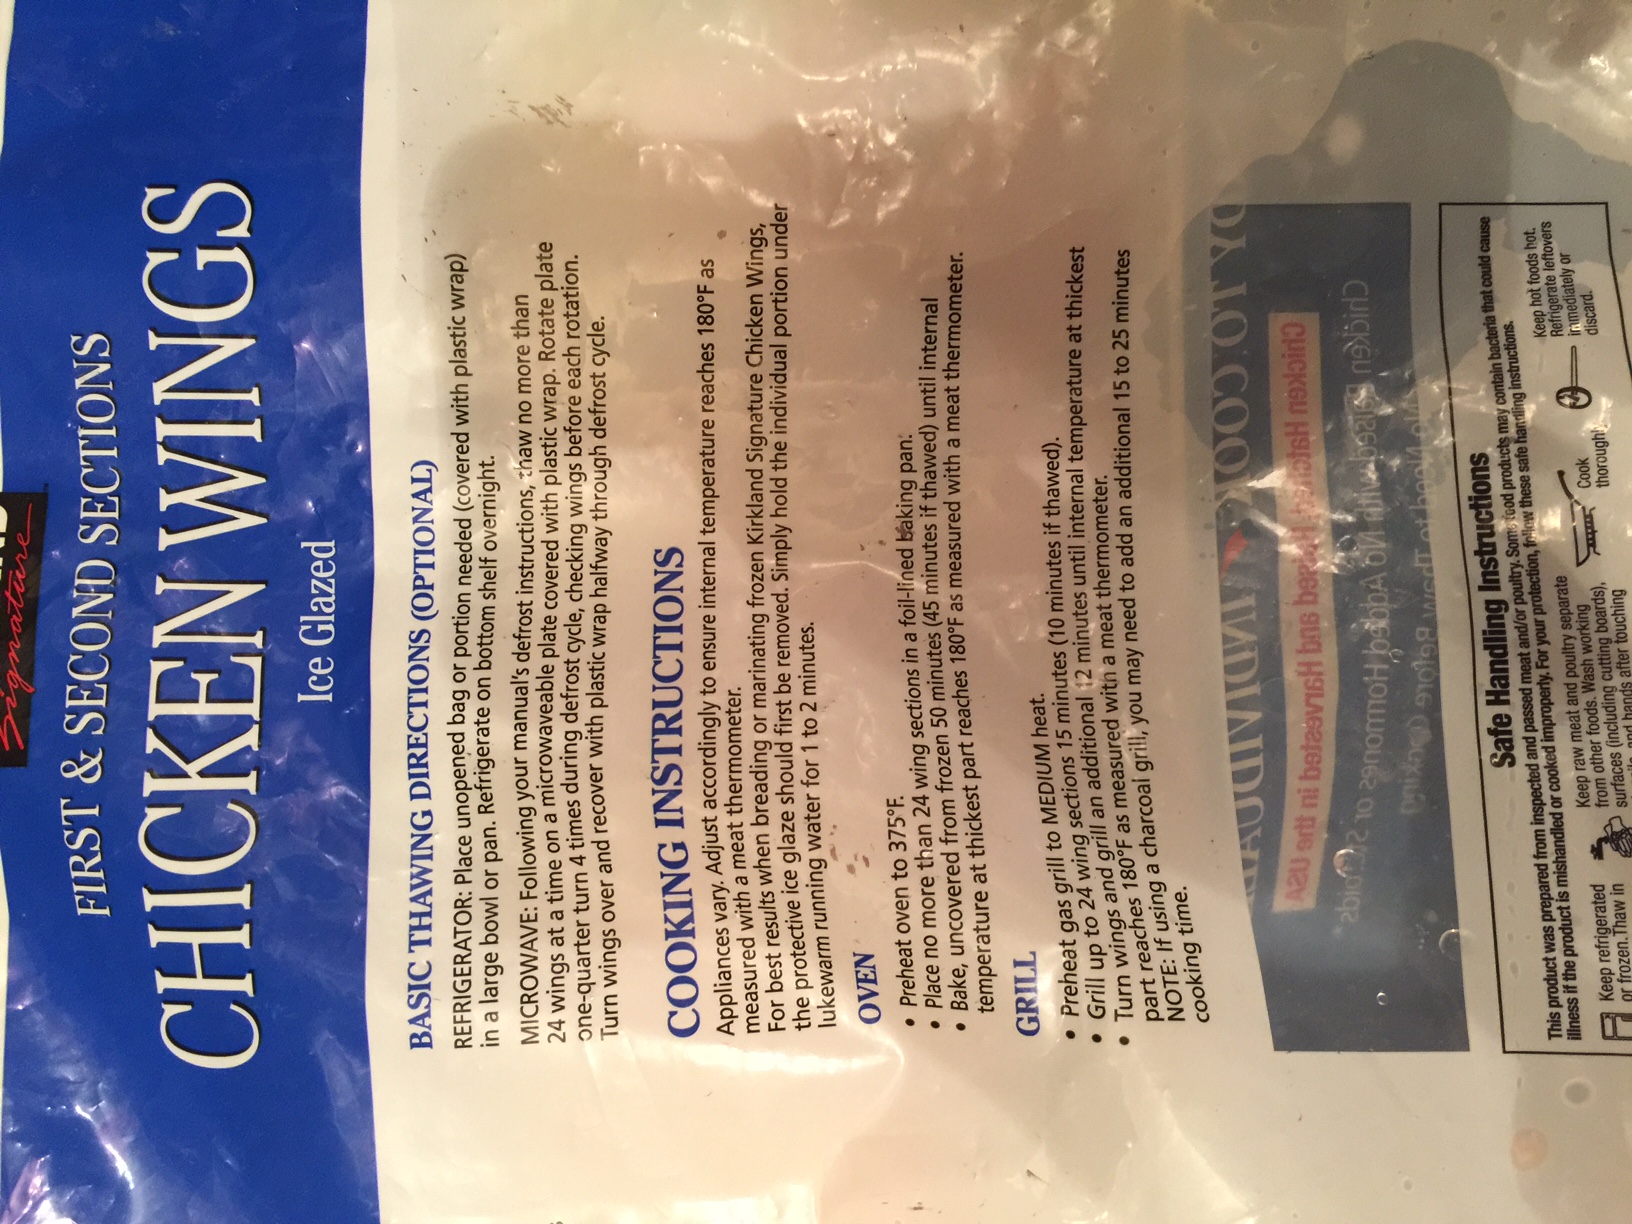
This is the basic recipe for cooking pretty much any frozen chicken wings.
CLICK THE IMAGE ABOVE TO DISPLAY THE RECIPE.
It is actually better to get a “Party Wing Pack” from the grocery store. Cut the wing tip off and safe for stock. Cut the remaining two pieces right at the joint.
Thaw wings overnight in the fridge (recipe for 12)
DO NOT USE FRESH EGGS. Eggs should be at least near (or past) their last day of sale. This is not an expiry date. They plan on eggs being in your fridge for a couple of weeks after his date.
The time allows the shell to separate from the membrane making them much easier to peel.
Put a dozen eggs (room temperature) into a deep pot, and add cold tap water until covering the eggs with an extra 2-3 inches of water
Add 2 TBL salt and 1/4 cup white vinegar to water and stir until salt is dissolved.
Turn burner on highest heat possible. Watch closely to make sure it does not come up to a rolling (or roiling) boil. If you have an immersible thermometer, you are looking for about 205º
Meanwhile, prepare bowl of water containing about four cups of ice cubes, for when eggs are done. Set aside.
When water starts to steam or lightly boil, turn heat to low and start timing
Cover and let cook for 10 minutes
(optional) Every 2 minutes or so, use a tongs to gently stir and rotate egg (to center yolk)
At the eight minute mark, put water into your bowl of ice
At 10 minute mark, use a slotted spoon to carefully transfer eggs from the hot water into the ice water.
Let cool for 15 minutes.
Eggs are done.
Drain, dry and refrigerate.
Peeling Tips
Start peeling from the fat end – the air sac usually makes this end float
If you peel within 24 hours, they will peel more easily. Any longer than that and the moisture evaporates through the shell, and makes them harder to peel.
Use eggs that are several days past their “Sell by” date. These are older eggs, and the membrane has begun to let go. They will peel more easily.
THE STEAM METHOD
Another method that produces consistent results because the temperature is highly regulated is to put 1-2 inches of water in a steamer. Put the eggs into the basket, but don’t put the basket on the steamer yet. Bring the water up to a boil, and THEN put the basket back on the steamer and cover.
Eggs should be room temperature.
For large eggs, time 13 minutes exactly, then remove the eggs to a bowl of iced tap water to cool – about 30 seconds. 12 minutes will give you a softer white and creamy yolk. 15 minutes will give you a drier yolk and very firm white. Peel underwater.
OR 1 package Spinach Souffle (Skip steps 2 through 14)
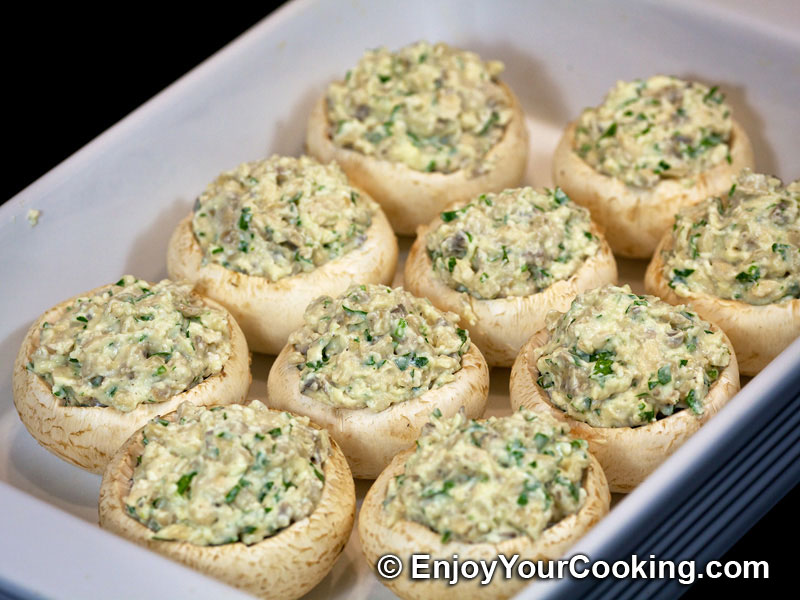
Clean mushrooms by rubbing with dry paper towel (See note at bottom)
Thaw spinach completely
Squeeze as much water from the spinach as you are able and set aside
Separate yolks from eggs, and set both yolks and whites aside
Shred 1/4 C Parmesan cheese
Add 1/2 tsp paprika to cheese and 1/2 tsp salt and set aside
In a hot skillet, melt the butter and stir in the flour, cooking until it starts to brown – this creates a roux
Add milk whisking continually – this creates a bechemel sauce
Temper half your bechemel into your egg yolks, then mix back into the pan
Remove from heat and set aside
Add 1/2 tsp cream of tartar to egg whites
Beat egg whites until stiff peaks form
Break apart dried spinach, then gently mix in with the cheese and bechemel
Gently fold spinach mixture into the beaten egg whites
ALTERNATE TO STEPS 2 – 14: Buy a premade Spinach Souffle, and defrost
Fill mushroom caps with spinach souffle
Bake at 350º for 15 minutes or until souffle is puffy
Serve immediately
Cleaning mushrooms: The common wisdom is don't wash mushrooms, just use a dry paper towel. Also, don't wash them until you are ready to use them. That being said: Do not wash them if they are being used in a dry application, such as a salad. You can, however, give them a quick rinse underwater if you are immediately baking with them or using them immediately in some sort of soup or other wet application. The towel cleaning should be a suggestion rather than a rule, but when in doubt, just use a dry paper towel.
2 TBL butter, 2 TBL flour, 1 C chicken stock or milk
Create a lid with puff pastry – Dock the crust – Alternate, cut moons or shapes
Bake before filling at 350º for 5 minutes
Basic Chicken Pot Pie
This recipe is much like the one shown below. You may use my ingredients, but be sure to watch the video for some important tips. Ingredients – Filling
4 TBL butter
1/4 C AP flour
1-1/2 C chicken broth (or 1 can CampbellsCream of Potato Soup instead of above three ingredients) IN A SEPARATE MIXING BOWL, COMBINE
1 small carrot – diced small
1/2 C baby peas
1 small stalk celery – diced small (or 1 C mixed veggies instead of above three ingredients – Skip to Step 7)
1 C shredded chicken
1/2 C shredded cheese
4-6 black olives – diced – Optional
Ingredients – Crust
1 C AP flour
1/2 tsp salt
1 tsp baking powder
1/4 C shortening
3 TBL cold butter
2 TBL granulated sugar
1/4 C ice water (or prepared pie crust from the grocery store)
You will also need one egg yolk and one egg white (separated) in two separate bowls.
A pastry brush will be helpful, but you can use your fingers at the pastry brush step. Step by Step
Bring sauce pan up to medium heat
FILLING – – – –
Add butter to hot pan
As soon as butter is melted, add flour
As soon as flour starts to ball, add half your broth
Stir until it starts to turn smooth
Add the rest of your broth
Stir until it starts to thicken
When it has thickened (per video below) add it to the mixing bowl with your chopped veggies
CRUST
Pulse flour, salt, baking powder, shortening and butter in a food processor till combined
Add 1/4 C ice water all at once and pulse until a ball forms
Dump onto the counter to finish kneading
Separate into 4 pieces and let rest five minutes
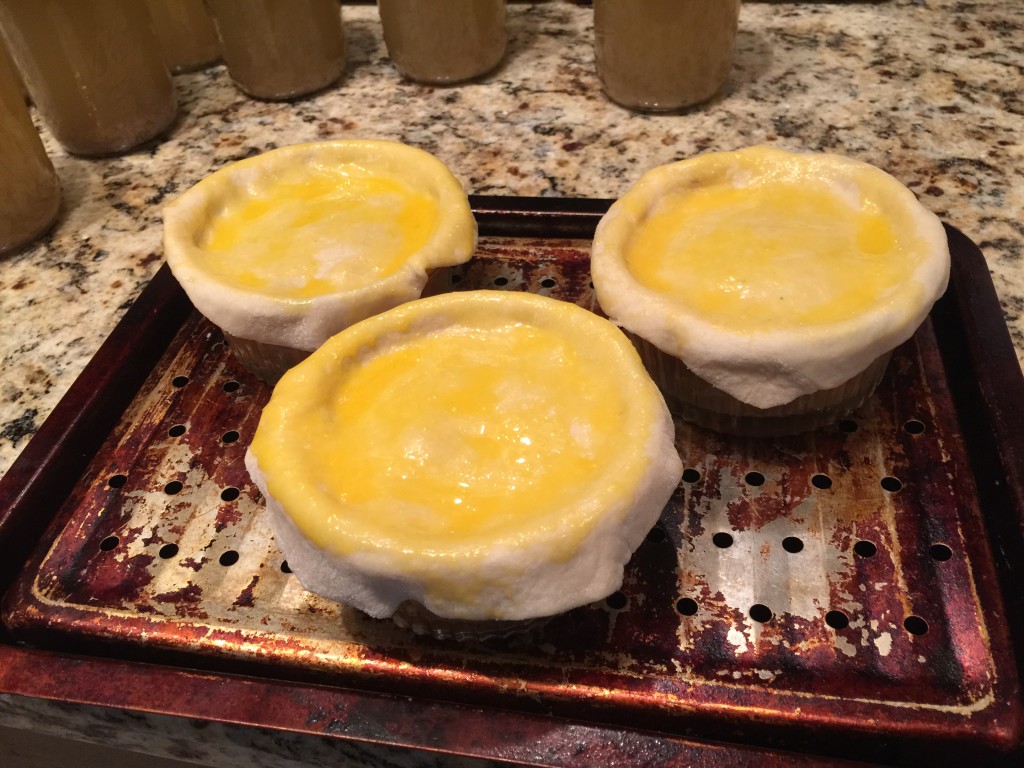
Meanwhile, spoon your filling into ramekins for cooking
Roll out your crust to a near circle. If necessary, cut slightly bigger than diameter across top of ramekin.
NOTE: My cutter was the exact size of my ramekin top, so I cut it, then rolled it more to make it slightly larger
Brush the bottom with egg white and press into your pot pie filling, pressing around the edge
Brush the top with egg yolk
Poke holes in the top so that steam can escape, otherwise your pie crust will fail.
Bake at 350º for 35 minutes until browned
Let rest five minutes before serving, or cool on counter and refrigerate for reheating later.
Scratch Chicken Pot Pie
1 C chopped onion (1/4 inch pieces)
1 C chopped celery (1/4 inch pieces)
1 C chopped carrot (1/4 inch pieces)
1/2 C melted butter
1 C frozen tiny English peas (canned peas, in a pinch)
1/4 C AP flour
2 C chicken broth
1 C whole milk
1 tsp salt
1/4 tsp pepper
4 C diced cooked chicken
2 pkg. frozen puff pastry, thawed
1 egg yolk
1 TBL whole milk
1. Saute onion, celery and carrot in butter for 10 minutes.
2. Stir in peas and flour, cook 1 minute, stirring constantly.
3. Gradually add broth and 1 cup whole milk; cook over medium heat, stirring constantly, until thick and bubbly.
4. Stir in salt and pepper.
5. Add chicken, stirring well.
6. Ladle chicken mixture into cooking ramikins – just to the top
7. Set aside.
8. Roll pastry sheets to 1/8 inch thickness.
9. Cut pastry 1/2 inch larger than bowl(s).
10. Combine egg yolk and 1 tablespoon milk.
11. Brush one side of pastry. Place brushed side down over bowl(s), folding edges under and pressing firmly to sides of bowl.
12. Brush top with remaining egg mixture.
13. Bake at 350 degrees for 35 minutes until top is puffed and browned.
Chicken Pot Pie – From a whole chicken
Piece an entire chicken.
Use dark meat (legs and thighs) or light meat (breast and back)
Place into stock pot with cut up carrots, celery, onion and garlic
Pour one can of chicken stock into pot, then add water until it covers the chicken
Bring up to simmer over medium high heat
When it starts to simmer, reduce heat to medium low and simmer for 30 minutes
Strain out solids, retaining liquid
Set both aside to cool
To prepare dough:
(Bisquick or Puff Pastry is also acceptable)
Add to a food processor:
– 1 1/2 C flour
– pinch of salt
– 1 stick of cold butter – cubed
– 8 ounces of cold cream cheese – pieces
Pulse together until it forms crumbs
– Add 1 egg yolk
– Drizzle in water until it STARTS to come together
Remove from food processor and finish on a floured surface (the counter)
Wrap in plastic wrap and refrigerate for an hour to 24 hours
To prepare vegetables:
Cut butternut or acorn squash into 1/2 inch cubes
Cut 1/4 onion into pieces
Cut 1/2 stalk celery into 1/4 inch pieces
Cut carrots into 1/4 inch pieces
Toss in EVOO and salt and bake on baking sheet for 30 minutes at 350 degrees
Cut string beans into 1/2 inch pieces
Add a small can of peas (or fresh if you desire)
To finish up:
Set dough on counter to start to come up to room temperature
Shred or cube chicken
Make a roux (see recipe here) with the leftover strained chicken stock – be sure to stir constantly
Mix chicken, fresh veggies and cooked veggies together
Roux should be thickened, but not pasty or lumpy
– If necessary, thin by whisking in 1/2 C chicken stock
Flatten dough to about 1/4 inch
Fill ramekin with veggie mixture
Label roux over top of veggies about 1/2 to 3/4 of the way up
Top with dough, brush with melted butter and trim edges
Poke holes (or a smiley face) into top of crust to let steam vent
Bake at 350 degrees for about 35 minutes
Third Party Recipes
The information below this section is from a third party. It is part of Grandpa's Personal Recipe box. Feel free to browse, but know that this information is from someone else.
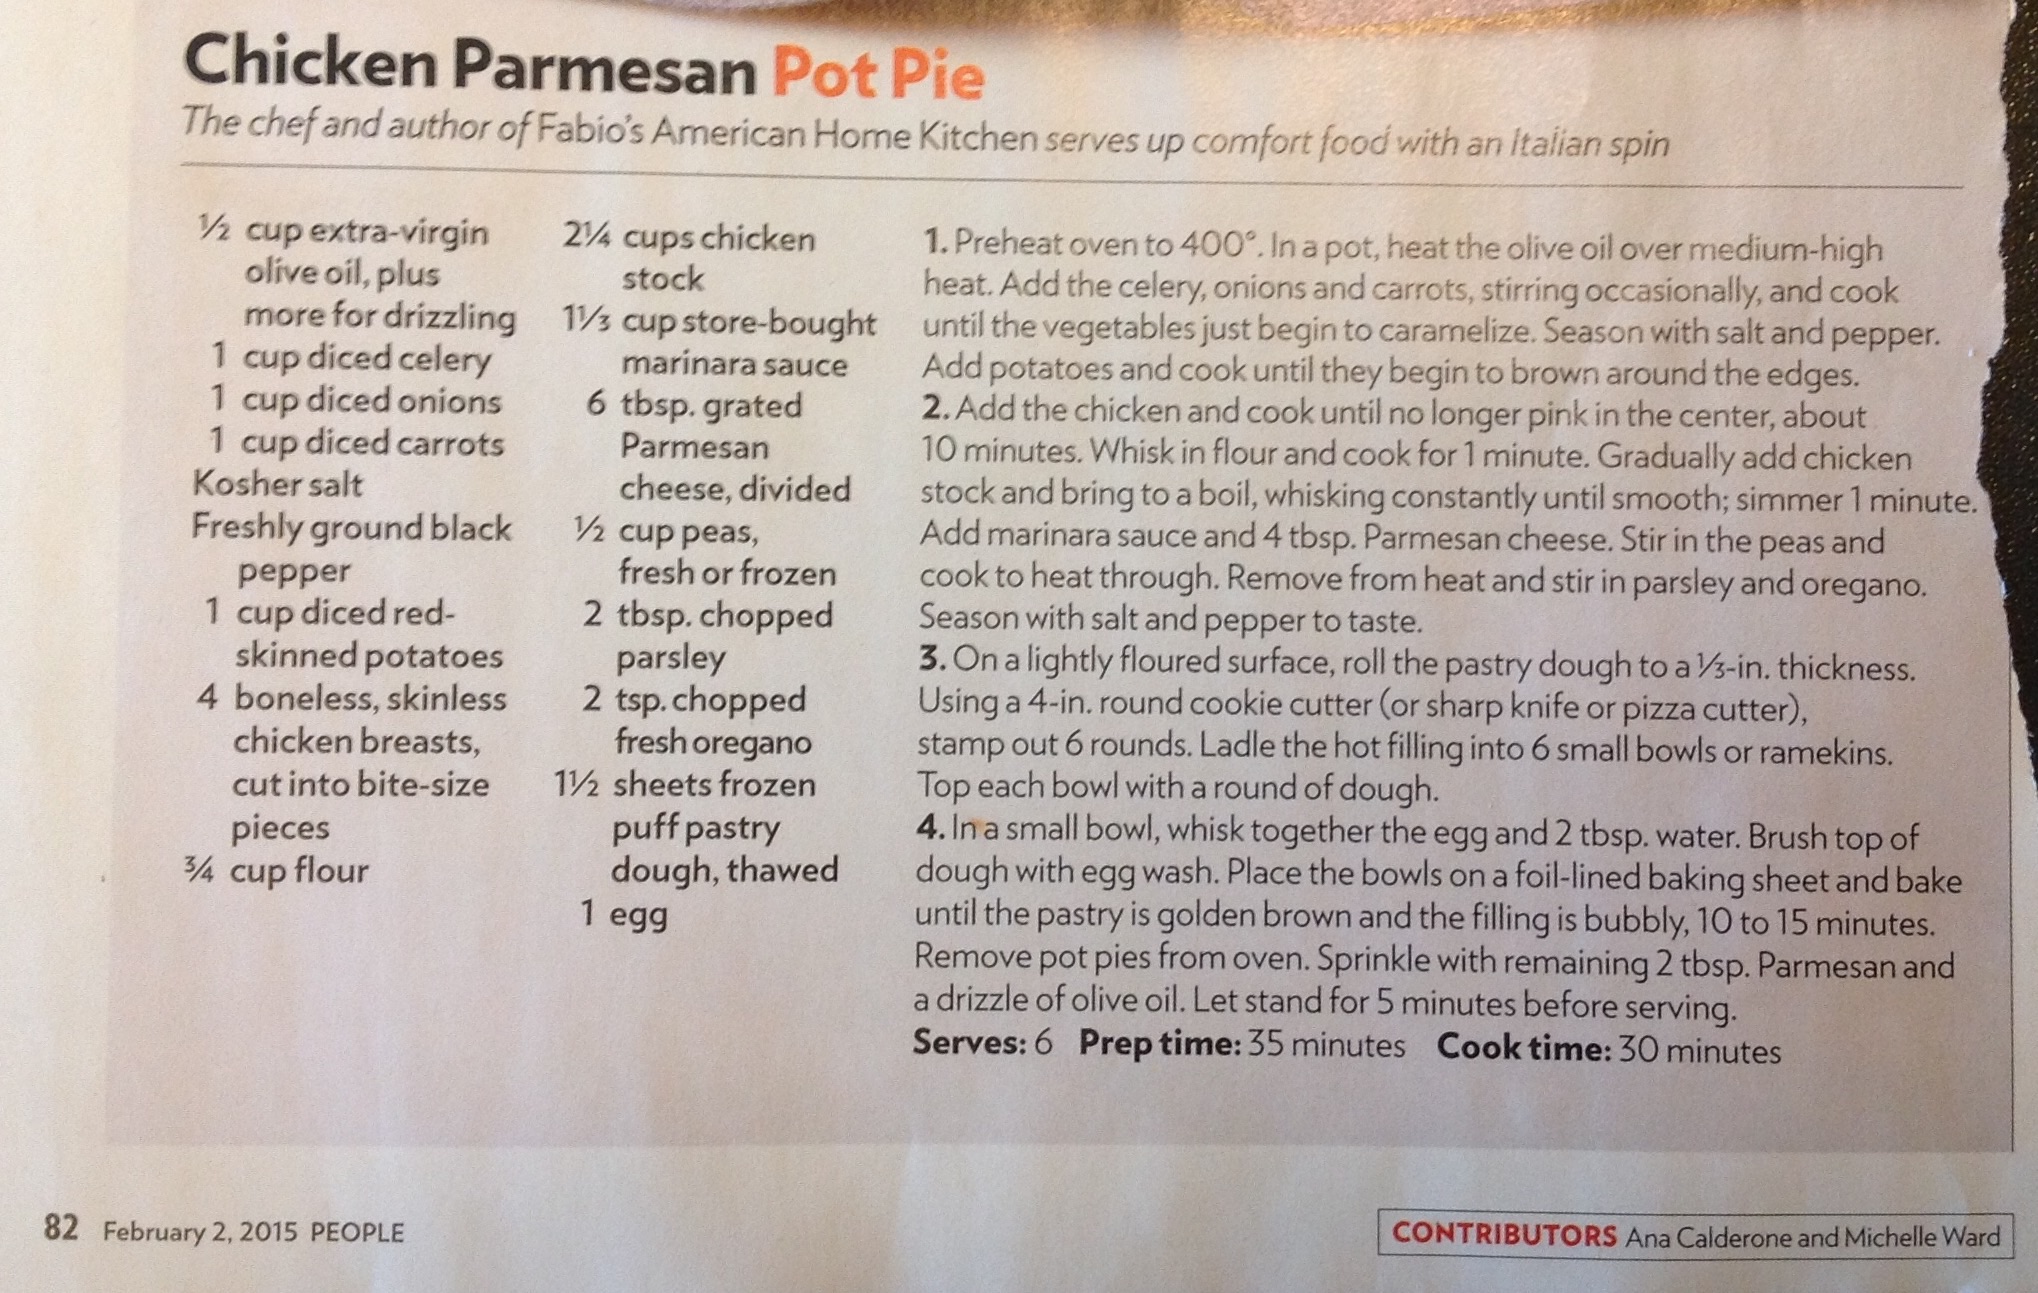
Clipped from People Magazine
Easy Chicken Pot Pie
1 can cream of chicken soup
1 PKG (about 8 OZ) frozen vegetables
1 CU cubed or shredded cooked chicken or turkey
1/2 CU milk (or less)
1 egg
1 CU Bisquick
1 prepared pie plate
Instructions
1. Mix soup, vegetables and chicken in bowl, then pour into 9″ pie plate
2. Mix milk, egg and Bisquick (very thick) and spread over chicken mixture
3. Bake @ 400 degrees for 30 minutes or until golden
Special Steps
Variations If you are feeling energetic, cut your own vegetables: onion, broccoli, bell pepper, carrot, green beans, Anaheim chilies
Corn on the cob should be cooked and eaten as soon as possible. Definitely within 48 hours of being picked, or the sugars will turn to starch, and the corn will become tough as time passes.
When buying corn ASK when it was picked. If it has been anything other than “this morning” don’t get it – or at least know that you are buying inferior tasting corn.
When not using the tip above, use a steamer (10 minutes) or a pot of boiling salted water (5 minutes) Actually, the microwave idea is pretty cool, but does not cook the corn as nicely as steam or boiling water.
Yellow kernel corn has a more fully developed flavor, but white kernel corn tends to be sweeter.
MEXICAN CORN ON THE COB
Grill the corn off the husk and on sticks
Coat the cooked corn with sour cream or mayo
Sprinkle with Tajin and salt – If you can’t find Tajin, use ground cayenne
Preheat oven to 375°F. Drain chickpeas in a colander and let them dry completely. Pat dry with a paper towel if needed, I usually leave them on the counter an hour to make sure they are very dry.
Arrange on a baking sheet in a single layer and roast for about 35 to 45 minutes, shaking the pan every ten minutes. All ovens are different so make sure they don’t burn. They will be golden brown and crunchy on the inside when done, not moist.
In a medium bowl, combine all the spices. Remove chickpeas from oven when done and spray with olive oil. Immediately toss with spices while hot. Eat at room temperature.
Lightly spray a baking sheet with non-stick spray. Set aside.
Rinse and thoroughly dry the chickpeas.
In a small bowl, mix together cumin, paprika, garlic powder, sea salt, onion powder and pepper. Set aside.
Bake dried chickpeas in the preheated oven on prepared baking sheet for 15 minutes (do not add any of the other ingredients yet)!
Remove the chickpeas from the oven and drizzle ½ TBS olive oil over the chickpeas, stirring until evenly coated. If necessary, slowly add more olive oil until all the chickpeas are lightly coated with olive oil.
Add spices to chickpeas and stir until evenly coated.
Bake at 400 for 10 more minutes, then stir.
Return stirred chickpeas to the oven and bake them for an additional 5-10 minutes, until desired crispiness is achieved (a total of 35-40 minutes of baking).
Turn off oven and crack the door a bit. Let chickpeas cool in the oven to achieve maximum crispiness
Notes
Store
Store these roasted chickpeas in an airtight container at room temperature.
Re-crisp
If you don’t bake them long enough the chickpeas could get a little soft, simply re-crisp them in the oven for 2-5 minutes.
Ingredient notes:
Olive oil: I enjoy using flavored olive oil to make these! Some of my favorite varieties come from this store in my hometown! You can use your favorite oil of any kind (avocado, sunflower, etc)!
Spices: Let your imagination run wild! I have given you my favorite combination of delicious flavors here, but feel free to use whatever you prefer! You can even just use simple old salt and pepper if you like!
Recipe Five
Ingredients
2 (15-ounce) cans chickpeas
2 tablespoons olive oil
1 to 1 1/2 teaspoons kosher salt
2 to 4 teaspoons spices or finely chopped fresh herbs, such as chili powder, curry powder, garam masala, cumin, smoked paprika, rosemary, thyme, or other favorite spices and herbs
Instructions
Heat the oven to 400°F. Arrange a rack in the middle of the oven and heat to 400°F.
Rinse and drain the chickpeas. Open the cans of chickpeas and pour the chickpeas into a strainer in the sink. Rinse thoroughly under running water.
Dry the chickpeas. Pat the chickpeas very dry with a clean dishtowel or paper towels. They should look matte and feel dry to the touch; if you have time, leave them to air-dry for a few minutes. Remove any chickpea skins that come off while drying, but otherwise don’t worry about them.
Toss the chickpeas with olive oil and salt. Spread the chickpeas out in an even layer on a rimmed baking sheet. Drizzle with the oil and sprinkle with the salt. Stir with your hands or a spatula to make sure the chickpeas are evenly coated.
Roast the chickpeas for 20 to 30 minutes. Roast, stirring the chickpeas or shaking the pan every 10 minutes. A few chickpeas may pop – that’s normal. The chickpeas are done when golden and slightly darkened, dry and crispy on the outside, and soft in the middle, 20 to 30 minutes total.
Toss the chickpeas with the spices. Sprinkle the spices if using over the chickpeas and stir to coat evenly. Serve while the chickpeas are still warm and crispy. They will gradually lose their crispiness as they cool, becoming addictively chewy.
Recipe Notes
Using roasted chickpeas: Besides eating these chickpeas as a snack, you can toss them with salads or sprinkle over soup in place of croutons.
Recipe Six
Roasting chickpeas is simple! Start with three basic ingredients: cooked or canned chickpeas, extra-virgin olive oil, and salt. Then…
Preheat the oven to 425° and drain and rinse your chickpeas.
Spread the chickpeas on a kitchen towel and gently pat them dry. It’s essential to make sure they’re totally dry before you toss them with the olive oil – damp chickpeas won’t crisp up in the oven. Discard any loose skins from the outside of the chickpeas.
Transfer the chickpeas to a parchment-lined baking sheet and toss them with a drizzle of olive oil and generous pinches of sea salt. Spread evenly on the baking sheet.
Transfer the baking sheet to your preheated oven and roast until crispy. I start checking at 20 minutes, but it can take up t0 30 minutes for them to become really crisp.
Remove from the oven and, while the chickpeas are still warm, toss with pinches of your favorite spices.
Preheat the oven to 425°F and line a large baking sheet with parchment paper.
Spread the chickpeas on a kitchen towel and pat them dry. Remove any loose skins.
Transfer the dried chickpeas to the baking sheet and toss them with a drizzle of olive oil and generous pinches of salt.
Roast the chickpeas for 20 to 30 minutes, or until golden brown and crisp. Ovens can vary, if your chickpeas are not crispy enough, keep going until they are!
Remove from the oven and, while the chickpeas are still warm, toss with pinches of your favorite spices, if using.
Store roasted chickpeas in a loosely-covered container at room temperature. They are best used within two days.
Recipe Seven
How to roast chickpeas
This easy, savory snack is very easy to make, all you need is a hot oven and three key ingredients: chickpeas, olive oil, and salt. Here is what you do:
First, Dry Chickpeas very very well! In this recipe, I start with 2 cans of chickpeas. The most important step is to make sure the chickpeas are absolutely dry. So once you’ve rinsed the chickpeas, use paper towels to dry them very well. Then leave them in a colander for a while so that they would release any moisture. The dryer and less moist (not my favorite word btw!) the chickpeas, the crispier they will be once roasted.
Coat with olive oil and a good pinch of kosher salt. And transfer the chickpeas to a large baking sheet, making sure to spread the chickpeas well so that they are in one layer.
Roast in a high heated oven at 400 degrees F for 20 to 35 minutes or until the chickpeas turn golden brown and crispy to your liking. Shake the sheet pan on occasion (every 10 minutes or so).
Season the chickpeas immediately after roasting. In this recipe, only kosher salt and olive oil are applied to the chickpeas before roasting. I like to wait until I pull the chickpeas from the oven before adding any more spices or seasonings. This way, the spices don’t interfere with the “crisping” process. More importantly, spices have the tendency to burn and become bitter.
Drain and dry chickpeas very well. Dry them up using some paper towels and leave them in a colander until they have dried as much as possible (OR you can spread them on a large baking sheet lined with paper towel for a while.)
Heat the oven to 400 degrees F and position a rack right in the middle.
Spread the chickpeas well on a bare baking sheet (do not line the baking sheet with parchment or foil.) Drizzle a generous amount of extra virgin olive oil and season with kosher salt. Toss chickpeas and make sure they are well-coated with the olive oil. Spread them out well on the sheet.
Roast in heated oven anywhere from 20 to 35 minutes, shaking the pan every 10 minutes or so for even cooking. Don’t rush it, make sure the chickpeas turn a deeper golden brown and the exterior is nice and crispy, that’s when they’re ready.
Season roasted chickpeas. Once you take the chickpeas out of the oven, immediately season with spices of your choice. This time, I used za’atar, sumac, and harissa blend (up to 2 teaspoon each) for warm Middle Eastern and Moroccan notes. Play with the amounts to your liking, and change up the spices according to what you have. (see more flavor ideas up in the post)
Notes
Makes nearly 2 cups or 30 tablespoons. The serving size here is 1 tablespoon.
Roasted chickpeas from dried: If you’d like to make this recipe from dry chickpeas, do not cook them! Simply soak the dry chickpeas in plenty of water for 24 hours. They will expand and at least double in size, that’s what you want. Follow the same instructions for drying and roasting.
How to Keep Chickpeas Crispy: roasted chickpeas are best warm right out of the oven, they are crispiest at this point. Once they cool off and are stored for a time, they will maintain some crunch, but they will soften a bit on the inside. Still a very tasty and additive snack. If you want to re-crisp them, you can put them in the oven for 2 to 3 minutes when you need to.
Storage Tip: You can store cooled roasted chickpeas in a glass jar. They’ll last for 4 to 5 days. And Leaving the jar lid a bit lose allows the chickpeas to breath, keeping them crispy for longer. You can also freeze them for later.
GOTHAM STEEL 9.5 inche Non-stick Titanium Skillet Product Review: Actual Performance Test
I put this to the test. Bacon first, then hashed browns, then eggs. I recorded the performance on YouTube. Kind of slow watching, but if you are looking for a real performance test, give it a look. In a later use (not recorded) I did scrambled eggs with NO OIL. While there was some sticking, it cleaned up nicely with just a damp paper towel. For the money, this is a great pan, but I would only give about 85% credence to the claims that things NEVER stick. To watch the video, just search YouTube for ” GOTHAM STEEL 9.5 inche Non-stick Titanium Skillet Product Review: Actual Performance Test” by GrandpaCooks – SUMMARY: Am I sorry I bought it? No. Am I going to buy the larger skillet so that I have both? No.
Pork shoulder is also called pork butt (also called a boneless chuck roast) . It is, however, from the shoulder. This is the best meat for a pot roast.
The reason it is called Pork BUTT is because the pieces of meat were thrown into a barrel called a butt. This originally took place around Boston, so it used to be called Boston Butt. As the cut gained popularity across the country, it became simply Pork Butt – Leaving Boston’s claim to fame as Boston Cream Pie and Boston Baked Beans.
INGREDIENTS
2-4 LB Pork shoulder – Much (but not all) of fat trimmed – Cut into large pieces that are about 3/4 pound each
2 TBL safflower oil for searing
Accompanying veggies
4-8 cloves garlic (sliced)
14-16 oz frozen pearl onions
8-10 oz button mushrooms (halved)
1 LB carrots (peeled and pieced
1 LB baby fingerling potatoes, red potatoes or Yukon gold (pieces)
Wrap each cut in plastic and let rest overnight in the refrigerator
Let butt come up to room temperature for 30-60 minutes when you are ready to cook.
Pat the meat dry, leaving as much seasoning remaining on the meat as you are able. Then sear the meat (all sides) in a heavily oiled pan VERY HOT cast iron pan. Don’t overcrowd the pan.
Set steaks aside and put HALF of your veggies (including the ginger, but not the potatoes) into the pot and stir to caramelize.
Add in your deglazing liquid
Deglaze the pan with 1/2 C white wine and 2 TBL EVOO
Bring to a boil, then reduce heat
Add meat back into pan
Sprinkle with just a bit more Thunder Powder
Cover and bake at 250º for 4-6 hours.
Remove meat (briefly), turn up heat to 300º, and remove and discard all solids in the pot.
Add meat back in with the uncooked half of your veggies, cover and cook for another two hours
Uncover, flip meat and cook for 30 more minutes at 325º
Remove meat and veggies and set aside. Cover with foil.
Pour into a glass and let cool for 10 minutes, then spoon off the fat that will rise to the top.
Put the cleared liquid back into the pan, and return to a simmer to reduce the liquid on medium high
Combine meat, veggies and broth. Serve half tonight, and refrigerate the rest until another day.
When ready, but the Dutch oven back in the oven at 400º for 45 minutes.
Cut thin slices against the grain and serve a nice thick slice as a meal,
or shred remainder for BBQ sandwiches, tacos, burritos, etc.
Optionally, at Step 13, you an cook on the stovetop for 2 hours or a crock pot for 5 hours
BRAISING LIQUID
Brown sugar
Soy sauce
Rice wine vinegar
Sambal olek, Sriracha or Franks Red Hot Cayenne Pepper Sauce