-
- Mash one boiled potato
- Add
- 2 eggs
- 1/2 C Greek Yogurt
- Baking powder
- Salt
- Brush with egg yolk
- Sprinkle with Sesame Seeds
- Bake @ 350º till browned (8-12 minutes)
Author: Robert Andrews
Grandpa’s Asian Chicken Salad Dressing
SEE THIS PAGE FOR ENTIRE HISTORY OF THIS POST
This is a recipe tweaked by Robert.
- 1/4 C rice wine vinegar
- 2 TBL soy sauce
- 2 TBL hoisin sauce
- 2 TBL honey or Karo
- 2 TBL stevia
- 1 TBL sesame seeds
- 1 tsp citric acid
- 1/2 tsp cayenne pepper
- 1/2 tsp salt
–
Step 3 - 1/4 C sesame oil
- Do not mix in sesame oil yet
–
Step 4-6 - 1/2 C orange or peach juice
- 1 TBL corn starch
Mix first set of ingredients:
- Whisk together in a saucepan
- Simmer: Heat over medium, stirring constantly,
- While heating, whisk in 1/4 C sesame oil – whisking continually to emulsify
- Meanwhile: Make slurry – Dissolve 1 TBL cornstarch in 1/2 C orange juice
Whisk into the mixture - Continue heating until thickened to your liking.
- If needed, drizzle in slurry until thickened
- Cool before putting in a 16 ounce bottle
Diane’s Asian Chicken Salad Dressing
SEE THIS PAGE FOR ENTIRE HISTORY OF THIS POST
The search goes on. Here is a follow-up contribution from Diane Mathison. She sent a letter a couple of years ago. Here is her take on making a small amount of the dressing. Tweak it based on your preferences.
I have been working on recreating this dressing. It only makes enough for one salad, so it’s not too expensive to experiment. I think I have it 99% there. Waiting for this last batch to cool .
- 2 TBL Hoisin Sauce
- ½ TBL oil
- ¼ TBL vinegar
- ¼ TBL sesame oil
- ½ tsp Corn Syrup
- ¼ tsp Garlic
- ½ tsp Paprika
- Sesame seeds
- Bring to a boil or cover and microwave for 20 seconds
- Let cool before putting on your salad.
Coco’s Conversations and Feedback
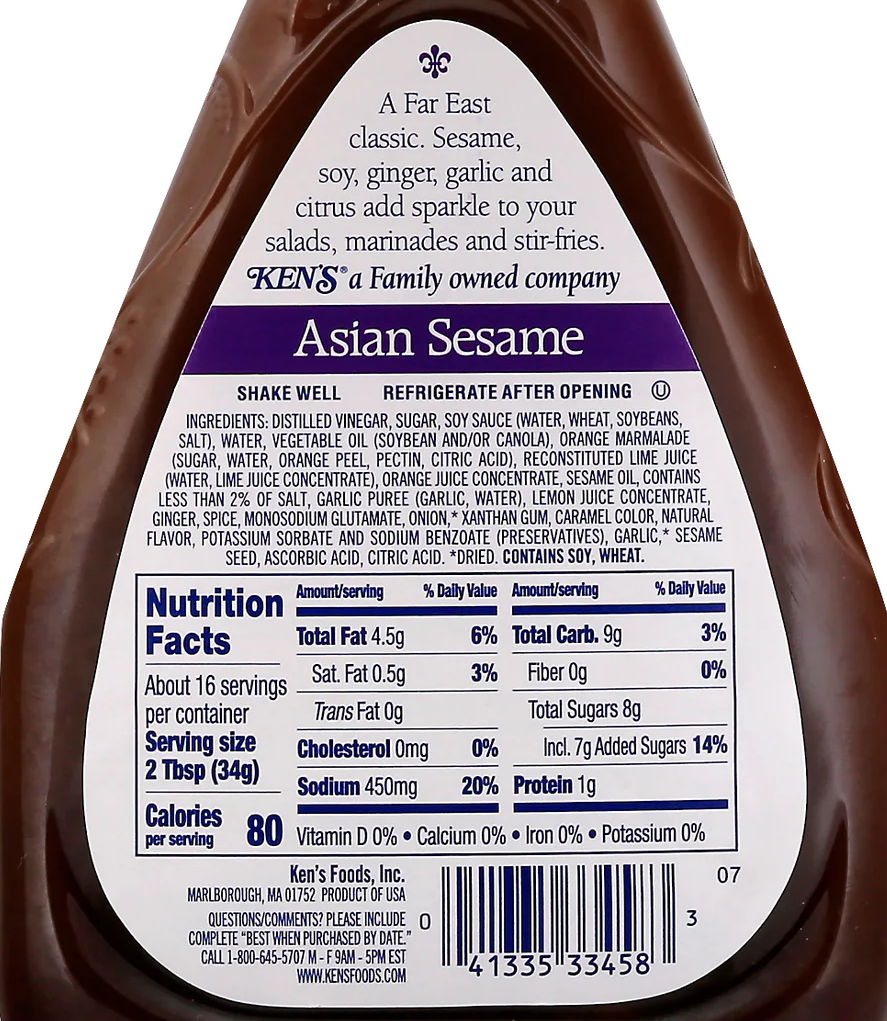
Ken’s Asian Chicken Salad Dressing
SEE THIS PAGE FOR ENTIRE HISTORY OF THIS POST
BE CAREFUL. SOME OF THE RESULTS USED HIGH FRUCTOSE CORN SYRUP.

So in the emails with Coco’s Corporate, I told them “there is no contender.”
I have, however, found a contender!
The Asian Chicken Salad here at Beatitudes has an incredible dressing. I was sure that it was made from scratch, so I had tried to re-create it.
CLICK HERE FOR MY COPY-CAT RECIPE.
I finally asked them for the recipe, and they told me it was Ken’s Asian Dressing.
Click here for a link. I think you will like it.
I have discovered that it is actually less expensive if I buy it at my local Fry’s, Safeway, or Albertsons.
Applebee’s Asian Chicken Salad Dressing
SEE THIS PAGE FOR ENTIRE HISTORY OF THIS POST
Very simple. A few user comments below recipe.
- 3 tablespoons honey
- 1 1⁄2 tablespoons rice wine vinegar
- 1⁄4 cup mayonnaise or Miracle Whip
- 1 teaspoon Dijon mustard
- 1⁄8 teaspoon sesame oil
Mix together and you are good to go.
-
- To get the consistency of the Applebee’s dressing, add a little more sesame oil and take out the honey and sub 3 tablespoons of sugar diluted in a tiny bit of water.
- Loved this recipe! I am on a no carb, no sugar diet at the moment so I substitued the honey for 3 tbls Splenda diluted in a bit of water and light Mayo.
- Next time I make it, I will use only sugar, as the flavor of honey is too strong and doesn’t really taste like the dressing should.
- For those of you who don’t have rice wine vinegar, you can use regular white vinegar– after diluting it. For every 2 tbsp of white vinegar, add 1 tsp of water. Since this recipe just calls for 1 1/2 tbsp of rice wine vinegar, just discard the extra.
Easy 4 Ingredient Bread
Homemade Artisan Bread Recipe
- Prep Time: 4 hours
- Cook Time: 25 minutes
- Total Time: 4 hours, 25 minutes
- Yield: 2 8-inch loaves
Even if you’ve never made homemade bread or worked with yeast before, this homemade artisan bread is for you. Watch the video tutorial below and review the recipe instructions and recipe notes prior to beginning. If you’re new to working with yeast, reference my Baking with Yeast Guide for answers to common yeast FAQs.
Ingredients
- 3 and 1/4 cups (about 430g) bread flour (spooned & leveled), plus more for hands and pan
- 2 teaspoons (about 6g) instant yeast
- 2 teaspoons (about 9g) coarse salt (see note)
- 1 and 1/2 cups (360ml) water, close to room temperature at about 70°F (21°C)
- optional: cornmeal for dusting pan
Instructions
- In a large ungreased mixing bowl, whisk the flour, yeast, and salt together. Pour in the water and gently mix together with a silicone spatula or wooden spoon. The dough will seem dry and shaggy, but keep working it until all the flour is moistened. If needed, use your hands (as I do in the video tutorial below) to work the dough ingredients together. The dough will be sticky. Shape into a ball in the bowl as best you can.
- Keeping the dough in the bowl, cover the dough tightly with plastic wrap or aluminum foil and set on the counter at room temperature (honestly any normal room temperature is fine!). Allow to rise for 2-3 hours. The dough will just about double in size, stick to the sides of the bowl, and have a lot of air bubbles.
- You can continue with step 4 immediately, but for absolute best flavor and texture, I strongly recommend letting this risen dough rest in the refrigerator for at least 12 hours and up to 3 days. Place covered dough in the refrigerator for 12 hours – 3 days. I usually let it rest in the refrigerator for about 18 hours. The dough will puff up during this time, but may begin to deflate after 2 days. That’s fine and normal—nothing to worry about.
- Lightly dust a large nonstick baking sheet (with or without rims and make sure it’s nonstick) with flour and/or cornmeal. Turn the cold dough out onto a floured work surface. Using a sharp knife or bench scraper, cut dough in half. Some air bubbles will deflate as you work with it. Place dough halves on prepared baking sheet. Using floured hands, shape into 2 long loaves about 9×3 inches each (doesn’t have to be exact) about 3 inches apart. Loosely cover and allow to rest for 45 minutes. You will bake the dough on this prepared baking sheet.
- During this 45 minutes, preheat the oven to 475°F (246°C).
- When ready to bake, using a very sharp knife or bread lame (some even use kitchen shears), score the bread loaves with 3 slashes, about 1/2 inch deep. (“Score” = shallow cut.) If the shaped loaves flattened out during the 45 minutes, use floured hands to narrow them out along the sides again.
- Optional for a slightly crispier crust: After the oven is preheated and bread is scored, place a shallow metal or cast iron baking pan or skillet (I usually use a metal 9×13-inch baking pan) on the bottom oven rack. Carefully and quickly pour 3-4 cups of boiling water into it. Place the scored dough/baking pan on a higher rack and quickly shut the oven, trapping the steam inside. The steam helps create a crispier crust.
- Place the shaped and scored dough (on the flour/cornmeal dusted pan) in the preheated oven on the center rack. Bake for 20-25 minutes or until the crust is golden brown. Gently tap the loaves—if they sound hollow, the bread is done. For a more accurate test of doneness, the bread is done when an instant read thermometer inserted in the center reads 195°F (90°C).
- Remove the bread from the oven and allow to cool for at least 20 minutes before slicing and serving. Store leftovers loosely covered at room temperature for up to 5 days or in the refrigerator for up to 1 week.
Notes
-
- Make Ahead & Freezing Instructions: The dough can sit in the refrigerator for up to 3 days, so this is a wonderful recipe to begin ahead of time. You can also bake the bread, allow it to cool, and freeze for up to 3 months. Thaw at room temperature before serving. You can also freeze the dough. Complete the recipe through step 3. Wrap in plastic wrap and place in a freezer-friendly container. To bake, allow dough to thaw overnight in the refrigerator, or for 2-3 hours at room temperature. Continue with step 4 and the rest of the recipe instructions.
-
- Special Tools (affiliate links): Glass Mixing Bowls | Silicone Spatula or Wooden Spoon | Baking Sheets | 2-cup Measuring Cup | Bread Lame | Instant Read Thermometer
- Flour: For absolute best flavor and chewy texture, I strongly recommend using bread flour. You can use a 1:1 substitution of all-purpose flour in a pinch with no other changes to the recipe. I recommend avoiding whole wheat flour in this dough. If necessary, use half bread flour and half whole wheat flour. The bread will taste dense.
- Yeast: You can use instant or active dry yeast, but I highly recommend an instant (aka “rapid rise” or “quick rise” yeast). The bread will rise faster. I usually use Platinum yeast by Red Star, which is an instant yeast. 2 teaspoons is a little less than 1 standard packet. If using active dry yeast, there are no changes needed to the recipe. The rise time in step 2 may take longer.
- Salt: Use a coarse salt, such as coarse sea salt, in this bread. I find the flavor slightly lacking when using regular table fine salt. If you only have fine salt, reduce to 1 and 1/2 teaspoons.
- Water: Use cool water. 70°F (21°C) is great, but the exact temperature doesn’t matter as long as it’s not hot or warm.
- Round Loaf: If you want to shape the dough into a boule (round loaf) simply shape into a round ball instead of 2 loaves in step 4. Baking instructions are the same, but the loaf will take a few extra minutes in the oven. If you want to bake the boule in a dutch oven, see next note.
- Using a Dutch Oven: Follow this dough recipe through step 3, then follow the simple shaping/baking instructions (steps 2-5) in my Cranberry Nut No Knead Bread recipe including using the parchment paper. If your parchment paper can’t withstand heat this high, you can either lower the oven temperature and bake the bread for longer or grease the Dutch oven instead.
- Using a pizza stone: If you want to bake your bread loaves on a pizza stone, place pizza stone in the preheating oven. In step 8, place the shaped and scored dough on your preheated pizza stone. If the bottom of the shaped dough is pretty sticky, dust the hot pizza stone with some extra cornmeal. Bake as directed.
- No Nonstick Pan: If you don’t have a nonstick baking sheet, line it with parchment paper instead. Coat with a dusting of flour and/or cornmeal before placing the dough on top. Parchment paper can burn, so it’s best to check the box to see how much heat yours can tolerate. Lower your oven heat if necessary and bake the bread for longer until golden brown and when gently tapped, sound hollow.
- Flavor ideas: Before pouring in the water in step 1, add any of the following ingredients/combination of ingredients to the dry ingredients in the bowl: 4 cloves minced garlic + 3 Tablespoons chopped rosemary, 3 Tablespoons your favorite fresh herb (chopped), 1 cup your favorite shredded cheese, a diced jalapeño, 3/4 – 1 cup dried cranberries and/or chopped nuts, 2 teaspoons garlic powder, etc.
- Reference my Baking with Yeast Guide for answers to common yeast FAQs.
- Recipe adapted from King Arthur Flour & Red Star Yeast, similar method originally from Jim Lahey.
Find it online: https://sallysbakingaddiction.com/homemade-artisan-bread/
Homemade Artisanal Crackers
FROM SALLY’S BAKING ADDICTION
Homemade Artisan Crackers
- Prep Time: 40 minutes
- Cook Time: 12 minutes
- Total Time: 1 hour, 20 minutes (includes cooling)
- Yield: 75–80 crackers
Give snack time an upgrade with flavorful homemade artisan crackers. Crispy, salty, savory, and endlessly customizable, the simple dough comes together quickly and easily in one bowl from basic pantry ingredients.
Ingredients
Crackers
- 2 cups (250g) all-purpose flour, plus more for kneading and rolling
- 1 teaspoon granulated sugar
- 1 teaspoon salt
- 1/2 teaspoon onion powder
- 1/4 tsp garlic powder
- 1 Tablespoon finely chopped fresh rosemary or other add-in (see Notes)*
- 2/3 cup (160g/ml) water
- 3 Tablespoons (41g/45ml) extra-virgin olive oil, plus more for brushing on top
- flaky sea salt, for topping
Instructions
-
- In a large bowl, whisk together the flour, sugar, salt, onion powder, garlic powder, and rosemary (or other add-ins). Pour in the water and olive oil and stir with a wooden spoon or silicone spatula until the dough comes together in a clump.
-
- Turn the dough out onto a lightly floured work surface. Lightly flour your hands and the dough and knead it, sprinkling on a little more flour as you go, until it’s no longer sticking to your hands and you can shape it into a rough ball, about 1 to 2 minutes. Return the dough to the bowl and cover the bowl with plastic wrap. Let the dough rest for at least 10 minutes, and up to 1 hour at room temperature.
- Preheat the oven to 425°F (218°C) and line large silver baking sheets with parchment paper.
- Cut the dough in half. Keep one half of the dough covered while you work with the other half.
- On a lightly floured work surface with a lightly floured rolling pin, roll one half of the dough out into a rectangle. Roll the dough very thin—about 1/16th of an inch (1.5mm). If the dough keeps shrinking back as you try to roll it out, lightly cover it and let it rest for 5 minutes, then try again. (Don’t worry if it shrinks, that’s completely normal and expected.)
- Using a ruler and a pizza cutter, cut the dough into small rectangles about 3 x 1.5 inches in size. Carefully transfer the crackers to the prepared baking sheet(s).
- Repeat steps 5 and 6 with the second half of dough.
- Dock (poke holes in) the crackers several times with a fork. Brush with olive oil, then sprinkle with flaky sea salt (and everything bagel seasoning or sesame seeds, if making those varieties. Note that extra seasonings on top can sometimes fall off of the crackers when eating them).
- Bake until golden brown and crispy, about 9–12 minutes. To ensure even browning, rotate the baking sheet(s) halfway through baking.
- Let crackers cool completely on the baking sheet(s) set on a cooling rack. Crackers need several minutes of cooling before they taste crispy. They taste fantastic with hummus, crab dip or other dips, various cheeses, or serve with a cranberry pecan cheese ball.
- Store in an airtight container at room temperature in a dry place for up to 2 days. To re-crisp crackers, spread them on a baking sheet and bake at 350°F for 10 minutes. Cool completely before serving.
Notes
-
- Make Ahead & Instructions: These crackers taste best for up to 2 days after you make them. See step 11 for how to re-crisp them, if desired. You can freeze cooled crackers. Cover tightly and freeze up to 3 months. Thaw at room temperature. Re-crisp if needed (see step 11).
- Other Flavors/Add-Ins: Do not leave the crackers plain. You need a flavor in the dough. Instead of rosemary, try another favorite herb, or any of these team favorites:
- Black Pepper & Thyme: 2 teaspoons freshly cracked black pepper (do not use pre-ground fine pepper) + 1 Tbsp finely chopped fresh thyme
- Everything & Chives: 1 Tbsp everything bagel seasoning (plus more for sprinkling on top) + 1 Tbsp dried chives
- Sesame Seed: 1 and 1/2 Tbsp sesame seeds (plus more for sprinkling on top)
- Gluten-Free Flour? We don’t recommend using gluten-free flour in this recipe. The test batches we tried with different brands of GF flour came out break-your-teeth hard. You’re better off looking for a cracker recipe that has been developed specifically to be gluten free.
- Whole Wheat Flour? Crackers made with whole wheat flour were also quite hard. If you want to use whole wheat flour, try using half all-purpose and half whole wheat. Expect a slightly dense, less crisp cracker.
Find it online: https://sallysbakingaddiction.com/homemade-artisan-crackers/
Success Tips for Making Homemade Crackers
- Let the dough rest. Trying to roll it out too soon is an exercise in frustration, trust me on this!
- Roll the dough out suuuuuper thin. The crackers need to be very thin to bake up crispy. Too thick and they taste a little chewy.
- If the dough keeps shrinking back as you roll it out, cover it lightly and let it rest for 5 minutes to allow the gluten to relax, then try again.
- Use a light-colored (silver) baking sheet, not a dark baking sheet, and make sure your parchment paper is safe for high-temperature baking.
- Rotate the pan(s) halfway through baking, for even browning. Ovens can have hot spots, and this recipe will show you where they are!
- We don’t recommend using gluten-free flour in this recipe. The test batches we tried with different brands of GF flour came out chip-your-teeth hard. You’re better off looking for a cracker recipe that has been developed specifically to be gluten free.
- Homemade crackers get stale a lot faster than store-bought crackers, because they don’t have added preservatives. Store them in an airtight container in a dry spot, and, if needed, re-crisp them in the oven at 350°F (177°C) for up to 10 minutes.
Homemade Cheese Crackers
- Prep Time: 1 hour
- Cook Time: 16 minutes
- Total Time: 1 hour, 30 minutes
- Yield: 64 small crackers
Make homemade cheese crackers with only 6 ingredients! Chilling the dough for 45 minutes is important– the crackers won’t hold their shape otherwise. You’ll appreciate the straightforward instructions and quick baking time!
Ingredients
- 3 ounces sharp yellow cheddar cheese, shredded (3/4 cups shredded)*
- 1/2 cup (65g) all-purpose flour (spooned & leveled)
- 1 tsp cornstarch*
- 3 Tablespoons (40g) unsalted butter, cold and cut into 3 pieces
- 1 TBL cold water
- Sea salt for sprinkling
Instructions
-
- Process cheddar cheese, flour, cornstarch, and salt together in a food processor until combined, about 30 seconds.
- Add butter and process until mixture resembles wet sand, about 20 seconds.
- Add water and pulse until dough forms large clumps, about 10 pulses.
- Transfer dough to a lightly floured work surface, and pat each into a 6-inch square. (No need to use a rolling pin, just pat with hands.) If the dough feels dry, moisten your fingers with cold water.
- Carefully wrap in plastic wrap and refrigerate until firm, about 45 minutes and up to 2 days.
- Preheat oven to 350°F (177°C). Line large baking sheets with parchment paper or silicone baking mats.
- Unwrap dough square and place on a lightly floured work surface.
- Roll out into a 9-inch square. Doesn’t need to be perfect! Using a fluted pastry wheel, pizza cutter, crinkle cutter, or small sharp knife, trim dough into a neat 8 inch square. Slice square into 8 strips, each 1 inch wide, then make 8 perpendicular slices, each 1 inch wide. Each 8-inch square will have 64 squares (crackers).
- Place squares on prepared baking sheet. Use a skewer or large toothpick to poke a hole through the center of each.
- Lightly sprinkle with sea salt, if desired.
- Bake until golden brown around the edges, about 16-18 minutes, rotating the baking sheets halfway through baking. For crunchier crackers, bake for 20 minutes.
- Remove from the oven and cool completely on the baking sheet before serving.
- Store leftover crackers at room temperature for up to 1 week. If tightly sealed, they’ll lose their crunch. Feel free to keep the lid slightly ajar to maintain some crunchiness.
Notes
-
- Freezing Instructions: You can freeze the wrapped dough instead of refrigerating it in step 2. Freeze up to 3 months. Thaw in the refrigerator and bring to room temperature for 10 minutes before continuing with the recipe.
- Instead of classic yellow cheddar, white cheddar is a wonderful substitute. In fact, any medium-hard cheese is great. Avoid soft cheeses.
HAVING A PARTY? DOUBLE RECIPE BELOW.
Ingredients
- 6 ounces sharp yellow cheddar cheese, shredded (1 and 1/2 cups shredded)*
- 1 cup (125g) all-purpose flour (spooned & leveled)
- 1 and 1/2 teaspoons cornstarch*
- 1/4 teaspoon salt
- 6 Tablespoons (85g) unsalted butter, cold and cut into 6 pieces
- 2 Tablespoons cold water
- optional: sea salt for sprinkling
Instructions
- Process cheddar cheese, flour, cornstarch, and salt together in a food processor until combined, about 30 seconds. Add butter and process until mixture resembles wet sand, about 20 seconds. Add water and pulse until dough forms large clumps, about 10 pulses.
- Transfer dough to a lightly floured work surface. Divide in half and pat each into a 6-inch square. (No need to use a rolling pin, just pat with hands.) If the dough feels dry, moisten your fingers with cold water. Carefully wrap each in plastic wrap and refrigerate until firm, about 45 minutes and up to 2 days.
- Preheat oven to 350°F (177°C). Line 2 large baking sheets with parchment paper or silicone baking mats.
- Unwrap each dough square. Place each on a lightly floured work surface and roll out into a 9-inch square. Doesn’t need to be perfect! Using a fluted pastry wheel, pizza cutter, or small sharp knife, trim dough into a neat 8 inch square. Slice square into 8 strips, each 1 inch wide, then make 8 perpendicular slices, each 1 inch wide. Each 8-inch square will have 64 squares (crackers).
- Place squares on prepared baking sheet. Use a skewer or large toothpick to poke a hole through the center of each. Lightly sprinkle with sea salt, if desired. Bake until golden brown around the edges, about 16-18 minutes, rotating the baking sheets halfway through baking. For crunchier crackers, bake for 20 minutes.
- Remove from the oven and cool completely on the baking sheet before serving.
Soft Dinner Rolls
LOTS OF DUPLICATION. GRANDPA – CLEAN THIS UP!
From: https://sallysbakingaddiction.com/
You only need 7 ingredients to make these dinner rolls. Flaky, soft, and buttery, these fresh dinner rolls outshine any main dish. If you’re a bread beginner, read this blog post to learn more about the yeast rolls recipe, including how to prep the rolls ahead of time. You can also reference my Baking with Yeast Guide for answers to common yeast FAQs.
This recipe is brought to you in partnership with Red Star Yeast.
Overview: How to Make Homemade Dinner Rolls
- Make the dough. Continue below to learn more about this dough recipe.
- Knead the dough. Reference my How to Knead Dough video tutorial if you need extra help with this step.
- Cover the dough and let it rise. The dough rises in about 1-2 hours in a relatively warm environment.
- Punch down the dough to release the air and shape into rolls.
- Let the rolls rise for about 1 hour.
- Bake for 20-25 minutes until golden brown. If desired, brush the warm rolls with a little honey and melted butter for extra flavor.
Soft Dinner Rolls Require a Rich Dough
The crustier and chewier the bread, the less fat in the dough. This is known as a lean dough. The softer and richer the bread, the more fat in the dough. This is known as a rich dough. Unlike chewy homemade bagels, focaccia, ciabatta, and my artisan bread, soft dinner rolls require a rich dough. Unfortunately, this doesn’t mean that the dough is swimming in cash. Rather, “rich” correlates with the amount of fat. For example, this dough has milk, butter, and egg.
You need 7 ingredients total. They’re the same ingredients in my easy cinnamon rolls and homemade brioche, which are also rich doughs. (Though I use more sugar for sweeter cinnamon rolls, of course.)
- Milk: Liquid activates the yeast. For the softest dinner rolls, use whole milk. Nondairy or low fat milks work too, but whole milk produces phenomenal flavor and texture.
- Yeast: You can use active dry yeast or instant yeast. If using active dry yeast, the rise times will be a little longer. I recommend Platinum Yeast from Red Star, which is an instant yeast blended with natural dough improvers.
- Sugar: Sugar feeds the yeast, increases its activity, and tenderizes the dough.
- Egg: 1 egg provides structure and flavor.
- Butter: Butter promises a flavorful and soft dinner roll. Make sure it’s room temperature.
- Salt: You can’t make flavorful bread without salt!
- Flour: You can use all-purpose flour or bread flour in this recipe. All-purpose flour is convenient for most, but bread flour produces chewier dinner rolls. There are no other changes to the recipe if you use bread flour.
3 Success Tips
- Reference my Baking with Yeast Guide, which answers many common yeast FAQs.
- Make sure your yeast isn’t expired. Expiration date is on the package.
- Directly from the pros at Red StarYeast: Measuring flour correctly is key to avoiding a dense dough, which leads to heavy (not soft!) rolls. Spoon and level your flour, do not scoop it out of the package.
My final piece of advice? Don’t limit these rolls to suppertime. They’re welcome anywhere, with any meal, any time of day. Use for sliders, breakfast sandwiches, soaking up your favorite tomato sauce with slow cooker turkey meatballs, alongside salad, or dunking into a bowl of creamy chicken noodle soup. Above all, don’t doubt yourself because you, too, can become a bread baking pro.
Soft Dinner Rolls Recipe
- Prep Time: 3 hours, 25 minutes
- Cook Time: 22 minutes
- Total Time: 3 hours, 45 minutes
- Yield: 14-16 rolls
Description
You only need 7 ingredients to make these dinner rolls. Flaky, soft, and buttery, these fresh dinner rolls outshine any main dish. See recipe notes for freezing and overnight instructions. You can also reference my Baking with Yeast Guide for answers to common yeast FAQs. This recipe is also in my cookbook, Sally’s Baking 101.
Ingredients
- 1 cup (240ml) whole milk, warmed to about 110°F (43°C)
- 2 and 1/4 teaspoons Platinum Yeast from Red Star instant yeast (1 standard packet)
- 2 Tablespoons granulated sugar, divided
- 1 large egg
- 1/4 cup (4 Tbsp; 56g) unsalted butter, softened to room temperature and cut into 4 pieces
- 1 teaspoon salt
- 3 cups (390g) all-purpose flour or bread flour* (spooned & leveled)
- optional topping: 2 Tablespoons (28g) melted unsalted butter mixed with 1 Tablespoon honey
Instructions
-
- Prepare the dough: Whisk the warm milk, yeast, and 1 Tablespoon of sugar together in the bowl of your stand mixer. Cover and allow to sit for 5 minutes. *If you do not own a stand mixer, you can do this in a large mixing bowl and in the next step, mix the dough together with a large wooden spoon/silicone spatula. It will take a bit of arm muscle. A hand mixer works, but the sticky dough repeatedly gets stuck in the beaters. Mixing by hand with a wooden spoon or silicone spatula is a better choice.*
- Add the remaining sugar, egg, butter, salt, and 1 cup flour. With a dough hook or paddle attachment, mix/beat on low speed for 30 seconds, scrape down the sides of the bowl with a silicone spatula, then add the remaining flour. Beat on medium speed until the dough comes together and pulls away from the sides of the bowl, about 2 minutes. If the dough seems too wet to a point where kneading (next step) would be impossible, beat in more flour 1 Tablespoon at a time until you have a workable dough, similar to the photos above. Dough should be soft and a little sticky, but still manageable to knead with lightly floured hands.
-
- Knead the dough: Keep the dough in the mixer and beat for an additional 5 full minutes, or knead by hand on a lightly floured surface for 5 full minutes. (If you’re new to bread-baking, my How to Knead Dough video tutorial can help here.) If the dough becomes too sticky during the kneading process, sprinkle 1 teaspoon of flour at a time on the dough or on the work surface/in the bowl to make a soft, slightly tacky dough. Do not add more flour than you need because you do not want a dry dough. After kneading, the dough should still feel a little soft. Poke it with your finger—if it slowly bounces back, your dough is ready to rise. You can also do a “windowpane test” to see if your dough has been kneaded long enough: tear off a small (roughly golfball-size) piece of dough and gently stretch it out until it’s thin enough for light to pass through it. Hold it up to a window or light. Does light pass through the stretched dough without the dough tearing first? If so, your dough has been kneaded long enough and is ready to rise. If not, keep kneading until it passes the windowpane test.
- 1st Rise: Lightly grease a large bowl with oil or nonstick spray. Place the dough in the bowl, turning it to coat all sides in the oil. Cover the bowl with aluminum foil, plastic wrap, or a clean kitchen towel. Allow the dough to rise in a relatively warm environment for 1-2 hours or until double in size. (I always let it rise on the counter. Takes about 2 hours. For a tiny reduction in rise time, see my answer to Where Should Dough Rise? in my Baking with Yeast Guide.)
- Grease a 9×13 inch baking pan or two 9-inch square or round baking pans. You can also bake the rolls in a cast iron skillet or on a lined baking sheet.*
- Shape the rolls: When the dough is ready, punch it down to release the air. Divide the dough into 14-16 equal pieces. (Just eyeball it– doesn’t need to be perfect!) A bench scraper is always helpful for cutting dough. Shape each piece into a smooth ball. Arrange in prepared baking pan.
- 2nd Rise: Cover shaped rolls with aluminum foil, plastic wrap, or a clean kitchen towel. Allow to rise until puffy, about 1 hour.
- Adjust oven rack to a lower position and preheat oven to 350°F (177°C). (It’s best to bake the rolls towards the bottom of the oven so the tops don’t burn.)
- Bake the rolls: Bake for 20-25 minutes or until golden brown on top, rotating the pan halfway through. If you notice the tops browning too quickly, loosely tent the pan with aluminum foil. Remove from the oven, brush with optional honey butter topping, and allow rolls to cool for a few minutes before serving.
- Cover leftover rolls tightly and store at room temperature for 2-3 days or in the refrigerator for up to 1 week.
Notes
-
- Freezing Instructions: Prepare recipe through step 6. Place shaped rolls in a greased baking pan, cover tightly, and freeze for up to 3 months. Once frozen, the dough balls won’t stick together anymore and you can place them in a freezer bag if needed. On the day you serve them, arrange the dough balls in a greased baking pan, cover tightly, then let them thaw and rise at room temperature for about 4-5 hours. Bake as directed. You can also freeze the baked dinner rolls. Allow them to cool completely, then freeze for up to 3 months. Thaw in the refrigerator or at room temperature, then reheat as desired. If reheating the whole pan, lightly cover and reheat in a 300°F (149°C) oven for about 10 minutes or until warm.
- Overnight Instructions: Prepare the recipe through step 6. Cover the shaped rolls tightly and refrigerate for up to about 15 hours. At least 3 hours before you need them the next day, remove the rolls from the refrigerator, keep covered, and allow to rise on the counter for about 1-2 hours before baking. Alternatively, you can let the dough have its 1st rise in the refrigerator overnight. Cover the dough tightly and place in the refrigerator for up to about 15 hours. Remove from the refrigerator and allow the dough to fully rise for 2 more hours. Continue with step 5.
- Special Tools (affiliate links): Electric Stand Mixer or Glass Mixing Bowl and Wooden Spoon / Spatula | 9×13-inch Glass Baking Pan | Bench Scraper | Pastry Brush
- Baking Pan: I prefer baking the rolls in a glass 9×13 inch baking pan because I find they brown a little too quickly in metal. As long as you bake the rolls on a lower oven rack and keep your eye on them, any pan is great.
- Yeast: Platinum Yeast from Red Star is an instant yeast. You can use Red Star Yeast active dry yeast instead. Rise times will be slightly longer using active dry yeast. Reference my Baking with Yeast Guide for answers to common yeast FAQs.
- Flour: You can use all-purpose flour or bread flour. All-purpose flour is convenient for most, but bread flour produces chewier dinner rolls. The rolls are still soft and fluffy no matter which you use. Either flour is fine and there are no other changes to the recipe if you use one or the other.
Adapted from Homemade Bread Bowls and Honey Butter Rolls
x-x-x-x-x-x-
Soft Dinner Rolls Recipe
- Prep Time: 3 hours, 25 minutes
- Cook Time: 22 minutes
- Total Time: 3 hours, 45 minutes
- Yield: 14-16 rolls
You only need 7 ingredients to make these dinner rolls. Flaky, soft, and buttery, these fresh dinner rolls outshine any main dish. See recipe notes for freezing and overnight instructions. You can also reference my Baking with Yeast Guide for answers to common yeast FAQs. This recipe is also in my cookbook, Sally’s Baking 101.
Ingredients
-
- 1 cup (240ml) whole milk, warmed to about 110°F (43°C)
- 2 and 1/4 teaspoons Platinum Yeast from Red Star instant yeast (1 standard packet)
- 2 Tablespoons granulated sugar, divided
- 1 large egg
- 1/4 cup (4 Tbsp; 56g) unsalted butter, softened to room temperature and cut into 4 pieces
- 1 teaspoon salt
- 3 cups (390g) all-purpose flour or bread flour* (spooned & leveled)
- optional topping: 2 Tablespoons (28g) melted unsalted butter mixed with 1 Tablespoon honey
Instructions
-
- Prepare the dough: Whisk the warm milk, yeast, and 1 Tablespoon of sugar together in the bowl of your stand mixer. Cover and allow to sit for 5 minutes. *If you do not own a stand mixer, you can do this in a large mixing bowl and in the next step, mix the dough together with a large wooden spoon/silicone spatula. It will take a bit of arm muscle. A hand mixer works, but the sticky dough repeatedly gets stuck in the beaters. Mixing by hand with a wooden spoon or silicone spatula is a better choice.*
- Add the remaining sugar, egg, butter, salt, and 1 cup flour. With a dough hook or paddle attachment, mix/beat on low speed for 30 seconds, scrape down the sides of the bowl with a silicone spatula, then add the remaining flour. Beat on medium speed until the dough comes together and pulls away from the sides of the bowl, about 2 minutes. If the dough seems too wet to a point where kneading (next step) would be impossible, beat in more flour 1 Tablespoon at a time until you have a workable dough, similar to the photos above. Dough should be soft and a little sticky, but still manageable to knead with lightly floured hands.
-
- Knead the dough: Keep the dough in the mixer and beat for an additional 5 full minutes, or knead by hand on a lightly floured surface for 5 full minutes. (If you’re new to bread-baking, my How to Knead Dough video tutorial can help here.) If the dough becomes too sticky during the kneading process, sprinkle 1 teaspoon of flour at a time on the dough or on the work surface/in the bowl to make a soft, slightly tacky dough. Do not add more flour than you need because you do not want a dry dough. After kneading, the dough should still feel a little soft. Poke it with your finger—if it slowly bounces back, your dough is ready to rise. You can also do a “windowpane test” to see if your dough has been kneaded long enough: tear off a small (roughly golfball-size) piece of dough and gently stretch it out until it’s thin enough for light to pass through it. Hold it up to a window or light. Does light pass through the stretched dough without the dough tearing first? If so, your dough has been kneaded long enough and is ready to rise. If not, keep kneading until it passes the windowpane test.
- 1st Rise: Lightly grease a large bowl with oil or nonstick spray. Place the dough in the bowl, turning it to coat all sides in the oil. Cover the bowl with aluminum foil, plastic wrap, or a clean kitchen towel. Allow the dough to rise in a relatively warm environment for 1-2 hours or until double in size. (I always let it rise on the counter. Takes about 2 hours. For a tiny reduction in rise time, see my answer to Where Should Dough Rise? in my Baking with Yeast Guide.)
- Grease a 9×13 inch baking pan or two 9-inch square or round baking pans. You can also bake the rolls in a cast iron skillet or on a lined baking sheet.*
- Shape the rolls: When the dough is ready, punch it down to release the air. Divide the dough into 14-16 equal pieces. (Just eyeball it– doesn’t need to be perfect!) A bench scraper is always helpful for cutting dough. Shape each piece into a smooth ball. Arrange in prepared baking pan.
- 2nd Rise: Cover shaped rolls with aluminum foil, plastic wrap, or a clean kitchen towel. Allow to rise until puffy, about 1 hour.
- Adjust oven rack to a lower position and preheat oven to 350°F (177°C). (It’s best to bake the rolls towards the bottom of the oven so the tops don’t burn.)
- Bake the rolls: Bake for 20-25 minutes or until golden brown on top, rotating the pan halfway through. If you notice the tops browning too quickly, loosely tent the pan with aluminum foil. Remove from the oven, brush with optional honey butter topping, and allow rolls to cool for a few minutes before serving.
- Cover leftover rolls tightly and store at room temperature for 2-3 days or in the refrigerator for up to 1 week.
Notes
-
- Freezing Instructions: Prepare recipe through step 6. Place shaped rolls in a greased baking pan, cover tightly, and freeze for up to 3 months. Once frozen, the dough balls won’t stick together anymore and you can place them in a freezer bag if needed. On the day you serve them, arrange the dough balls in a greased baking pan, cover tightly, then let them thaw and rise at room temperature for about 4-5 hours. Bake as directed. You can also freeze the baked dinner rolls. Allow them to cool completely, then freeze for up to 3 months. Thaw in the refrigerator or at room temperature, then reheat as desired. If reheating the whole pan, lightly cover and reheat in a 300°F (149°C) oven for about 10 minutes or until warm.
- Overnight Instructions: Prepare the recipe through step 6. Cover the shaped rolls tightly and refrigerate for up to about 15 hours. At least 3 hours before you need them the next day, remove the rolls from the refrigerator, keep covered, and allow to rise on the counter for about 1-2 hours before baking. Alternatively, you can let the dough have its 1st rise in the refrigerator overnight. Cover the dough tightly and place in the refrigerator for up to about 15 hours. Remove from the refrigerator and allow the dough to fully rise for 2 more hours. Continue with step 5.
- Special Tools (affiliate links): Electric Stand Mixer or Glass Mixing Bowl and Wooden Spoon / Spatula | 9×13-inch Glass Baking Pan | Bench Scraper | Pastry Brush
- Baking Pan: I prefer baking the rolls in a glass 9×13 inch baking pan because I find they brown a little too quickly in metal. As long as you bake the rolls on a lower oven rack and keep your eye on them, any pan is great.
- Yeast: Platinum Yeast from Red Star is an instant yeast. You can use Red Star Yeast active dry yeast instead. Rise times will be slightly longer using active dry yeast. Reference my Baking with Yeast Guide for answers to common yeast FAQs.
- Flour: You can use all-purpose flour or bread flour. All-purpose flour is convenient for most, but bread flour produces chewier dinner rolls. The rolls are still soft and fluffy no matter which you use. Either flour is fine and there are no other changes to the recipe if you use one or the other.
Adapted from Homemade Bread Bowls and Honey Butter Rolls
Find it online: https://sallysbakingaddiction.com/soft-dinner-rolls/
Artisan Bread Recipe (4 Ingredients)
Homemade Artisan Bread Recipe
- Prep Time: 4 hours
- Cook Time: 25 minutes
- Total Time: 4 hours, 25 minutes
- Yield: 2 8-inch loaves
Even if you’ve never made homemade bread or worked with yeast before, this homemade artisan bread is for you. Watch the video tutorial below and review the recipe instructions and recipe notes prior to beginning. If you’re new to working with yeast, reference my Baking with Yeast Guide for answers to common yeast FAQs.
Ingredients
-
- 3 and 1/4 cups (about 430g) bread flour (spooned & leveled), plus more for hands and pan
- 2 teaspoons (about 6g) instant yeast
- 2 teaspoons (about 9g) coarse salt (see note)
- 1 and 1/2 cups (360ml) water, close to room temperature at about 70°F (21°C)
- optional: cornmeal for dusting pan
Instructions
-
- In a large ungreased mixing bowl, whisk the flour, yeast, and salt together. Pour in the water and gently mix together with a silicone spatula or wooden spoon. The dough will seem dry and shaggy, but keep working it until all the flour is moistened. If needed, use your hands (as I do in the video tutorial below) to work the dough ingredients together. The dough will be sticky. Shape into a ball in the bowl as best you can.
-
- Keeping the dough in the bowl, cover the dough tightly with plastic wrap or aluminum foil and set on the counter at room temperature (honestly any normal room temperature is fine!). Allow to rise for 2-3 hours. The dough will just about double in size, stick to the sides of the bowl, and have a lot of air bubbles.
- You can continue with step 4 immediately, but for absolute best flavor and texture, I strongly recommend letting this risen dough rest in the refrigerator for at least 12 hours and up to 3 days. Place covered dough in the refrigerator for 12 hours – 3 days. I usually let it rest in the refrigerator for about 18 hours. The dough will puff up during this time, but may begin to deflate after 2 days. That’s fine and normal—nothing to worry about.
- Lightly dust a large nonstick baking sheet (with or without rims and make sure it’s nonstick) with flour and/or cornmeal. Turn the cold dough out onto a floured work surface. Using a sharp knife or bench scraper, cut dough in half. Some air bubbles will deflate as you work with it. Place dough halves on prepared baking sheet. Using floured hands, shape into 2 long loaves about 9×3 inches each (doesn’t have to be exact) about 3 inches apart. Loosely cover and allow to rest for 45 minutes. You will bake the dough on this prepared baking sheet.
-
- During this 45 minutes, preheat the oven to 475°F (246°C).
- When ready to bake, using a very sharp knife or bread lame (some even use kitchen shears), score the bread loaves with 3 slashes, about 1/2 inch deep. (“Score” = shallow cut.) If the shaped loaves flattened out during the 45 minutes, use floured hands to narrow them out along the sides again.
- Optional for a slightly crispier crust: After the oven is preheated and bread is scored, place a shallow metal or cast iron baking pan or skillet (I usually use a metal 9×13-inch baking pan) on the bottom oven rack. Carefully and quickly pour 3-4 cups of boiling water into it. Place the scored dough/baking pan on a higher rack and quickly shut the oven, trapping the steam inside. The steam helps create a crispier crust.
- Place the shaped and scored dough (on the flour/cornmeal dusted pan) in the preheated oven on the center rack. Bake for 20-25 minutes or until the crust is golden brown. Gently tap the loaves—if they sound hollow, the bread is done. For a more accurate test of doneness, the bread is done when an instant read thermometer inserted in the center reads 195°F (90°C).
- Remove the bread from the oven and allow to cool for at least 20 minutes before slicing and serving. Store leftovers loosely covered at room temperature for up to 5 days or in the refrigerator for up to 1 week.
Notes
-
- Make Ahead & Freezing Instructions: The dough can sit in the refrigerator for up to 3 days, so this is a wonderful recipe to begin ahead of time. You can also bake the bread, allow it to cool, and freeze for up to 3 months. Thaw at room temperature before serving. You can also freeze the dough. Complete the recipe through step 3. Wrap in plastic wrap and place in a freezer-friendly container. To bake, allow dough to thaw overnight in the refrigerator, or for 2-3 hours at room temperature. Continue with step 4 and the rest of the recipe instructions.
-
- Special Tools (affiliate links): Glass Mixing Bowls | Silicone Spatula or Wooden Spoon | Baking Sheets | 2-cup Measuring Cup | Bread Lame | Instant Read Thermometer
- Flour: For absolute best flavor and chewy texture, I strongly recommend using bread flour. You can use a 1:1 substitution of all-purpose flour in a pinch with no other changes to the recipe. I recommend avoiding whole wheat flour in this dough. If necessary, use half bread flour and half whole wheat flour. The bread will taste dense.
- Yeast: You can use instant or active dry yeast, but I highly recommend an instant (aka “rapid rise” or “quick rise” yeast). The bread will rise faster. I usually use Platinum yeast by Red Star, which is an instant yeast. 2 teaspoons is a little less than 1 standard packet. If using active dry yeast, there are no changes needed to the recipe. The rise time in step 2 may take longer.
- Salt: Use a coarse salt, such as coarse sea salt, in this bread. I find the flavor slightly lacking when using regular table fine salt. If you only have fine salt, reduce to 1 and 1/2 teaspoons.
- Water: Use cool water. 70°F (21°C) is great, but the exact temperature doesn’t matter as long as it’s not hot or warm.
- Round Loaf: If you want to shape the dough into a boule (round loaf) simply shape into a round ball instead of 2 loaves in step 4. Baking instructions are the same, but the loaf will take a few extra minutes in the oven. If you want to bake the boule in a dutch oven, see next note.
- Using a Dutch Oven: Follow this dough recipe through step 3, then follow the simple shaping/baking instructions (steps 2-5) in my Cranberry Nut No Knead Bread recipe including using the parchment paper. If your parchment paper can’t withstand heat this high, you can either lower the oven temperature and bake the bread for longer or grease the Dutch oven instead.
- Using a pizza stone: If you want to bake your bread loaves on a pizza stone, place pizza stone in the preheating oven. In step 8, place the shaped and scored dough on your preheated pizza stone. If the bottom of the shaped dough is pretty sticky, dust the hot pizza stone with some extra cornmeal. Bake as directed.
- No Nonstick Pan: If you don’t have a nonstick baking sheet, line it with parchment paper instead. Coat with a dusting of flour and/or cornmeal before placing the dough on top. Parchment paper can burn, so it’s best to check the box to see how much heat yours can tolerate. Lower your oven heat if necessary and bake the bread for longer until golden brown and when gently tapped, sound hollow.
- Flavor ideas: Before pouring in the water in step 1, add any of the following ingredients/combination of ingredients to the dry ingredients in the bowl: 4 cloves minced garlic + 3 Tablespoons chopped rosemary, 3 Tablespoons your favorite fresh herb (chopped), 1 cup your favorite shredded cheese, a diced jalapeño, 3/4 – 1 cup dried cranberries and/or chopped nuts, 2 teaspoons garlic powder, etc.
- Reference my Baking with Yeast Guide for answers to common yeast FAQs.
- Recipe adapted from King Arthur Flour & Red Star Yeast, similar method originally from Jim Lahey.
Find it online: https://sallysbakingaddiction.com/homemade-artisan-bread/
Dough Hydration
Sourdough Bagels

Sourdough Bagel
- Prep Time: 24 hours
- Total Time: 24 hours
- Yield: 12 bagels
Description
My recipe for flavorful and chewy sourdough bagels with a thin and slightly crispy crust. Delicious topped with an everything bagel mix, coarse sea salt, oats, seeds, or anything else you can dream up!
Ingredients
Levain
- 116g high protein flour
- 58g water
- 23g sourdough starter, ripe
Main Dough
-
- 848g high protein flour
- 472g water
- 29g sugar, caster
- 29g barley malt syrup
- 18g salt
- 7g diastatic malt
- 197g levain
Instructions
- Levain (the night before mixing, 9:30 p.m.)
Mix all the Levain ingredients in a container and leave it at a warm temperature for 12 hours. - Mix (9:30 a.m.)
Add a splash of the mixing water, sugar, barley malt syrup, diastatic malt powder, and salt to a small bowl and mix together. To your stand mixer’s mixing bowl, add the malt syrup slurry, flour, water, and ripe levain. Mix on low speed for approximately 5 minutes until the dough strengthens and begins to smooth. Transfer your dough to a bulk fermentation container and cover. - Bulk Fermentation (9:45 a.m. to 12:45 p.m.)
Give this dough a single fold after 1 hour and 30 minutes into bulk fermentation. - Divide and Shape (12:45 p.m.)
Use a half baking sheet (so it fits into your refrigerator) to hold the 12 pieces of shaped dough. Spread a thin layer of cornmeal on the half sheet to prevent sticking. Divide the dough into twelve 125g pieces. First, degas the piece by tamping down a bit with your hand. Then, form the piece into a rough rectangle and cinch down from the top, so the dough ends up in a little tube. Roll the tube out to a 12″ long tube. Wrap the dough around the backside of your hand and pinch it together in the front. Roll a few times on the counter to seal. Transfer to the cornmeal-dusted baking sheet. Repeat for remaining dough pieces. - Proof (1:00 p.m. to 3:00 p.m.)
Cover the baking sheet with a large, reusable plastic bag and seal shut. Let the dough proof at room temperature, around 72-74°F (22-23°C), for 2 hours. The dough should puff up slightly after this time but not excessively. If the dough still feels very dense to the touch, give it another 15-30 minutes and check again. After 2 hours, place the covered baking sheet into the fridge overnight at around 39°F (4°C). - Boil and Top (9:30 a.m., Day Three)
Oven prep: Before you begin boiling your bagel dough, preheat your oven to 475°F (245°C) with convection or 500°F (260°C) without convection. Place one rack at the bottom third of the oven. Place a baking stone or baking steel on the rack to preheat. Place a roasting pan on the bottom filled with lava rocks to prepare to steam. I also fill a cup of ice and place it next to my oven (I will pour this over the lava rocks to steam the oven).
Boiling equipment prep: Fill a wide pot with water and bring to a low boil. Next to your stovetop, place a half baking sheet with a cooling rack inside, this will hold the wet bagels for a minute and allow them to drain. Next, line a full baking sheet with parchment paper — this will hold the dough as it bakes. Finally, grab any toppings you’d like (poppy, oat, everything bagel mix, sesame, etc.) and place them in bowls on your work surface.
Boil: Once the water is at a low boil, boil the proofed sourdough bagel dough straight from the fridge, about 40 seconds per side. Using a spider strainer, transfer each piece to the cooling rack inside the baking sheet to drain while you boil the rest of the dough. Then, transfer the boiled bagels to the full baking sheet and top, if desired. - Bake (9:45 a.m.)
Slide the pan with all the bagel dough into the oven and pour the cup of ice over the roasting pan with lava rocks. Quickly close the oven.
Bake at 475°F (245°C) convection (500°F (260°C) without convection) for 10 minutes with steam. After 10 minutes, vent the oven and remove the steaming pan, rotate the baking sheet 180°, and bake for 5 minutes longer. After this 5 minutes, turn the oven down to 450°F (235°C) and bake for 5 minutes longer for a total of 20 minutes. Remove the sheet when the bagels are nicely colored. Let cool 15-20 minutes on a wire rack.
Notes
- These are wonderful topped with an Everything Bagel mix, rolled oats, sesame seed mixture, or any other topping you’d like.
Find it online: https://www.theperfectloaf.com/sourdough-bagel/
Sally’s Homemade Tomato Soup
Description
Look no further for a creamy and ultra smooth classic cheesecake recipe! Paired with a buttery graham cracker crust, no one can deny its simple decadence. For the best results, bake in a water bath. This recipe is also in my cookbook, Sally’s Baking 101.
Ingredients
Graham Cracker Crust
- 1 and 1/2 cups (180g) graham cracker crumbs (about 12 full-sheet graham crackers)
- 1/4 cup (50g) granulated sugar
- 5 Tablespoons (71g) unsalted butter, melted
Cheesecake
- 32 ounces (904g) full-fat brick cream cheese, softened to room temperature
- 1 cup (200g) granulated sugar
- 1 cup (240g) full-fat sour cream, at room temperature
- 1 teaspoon pure vanilla extract
- 2 teaspoons fresh lemon juice (optional, but recommended)
- 3 large eggs, at room temperature
Instructions
-
- Adjust the oven rack to the lower-middle position and preheat oven to 350°F (177°C).
- Make the crust: If you’re starting out with full graham crackers, use a food processor or blender to grind them into fine crumbs. Pour into a medium bowl and stir in the sugar until combined, and then stir in the melted butter. Mixture will be sandy. Try to smash/break up any large chunks. Pour into an ungreased 9-inch or 10-inch springform pan. With medium pressure using your hand, pat the crumbs down into the bottom and partly up the sides to make a compact crust. Do not pack down with heavy force because that makes the crust too hard. Simply pat down until the mixture is no longer crumby/crumbly (you can use the flat bottom of a small measuring cup to help smooth it out if needed). Bake for 10 minutes. Remove from the oven and set aside while you prepare the filling.
-
- Make the filling: In a large bowl using a handheld or stand mixer fitted with a paddle attachment, beat the cream cheese and granulated sugar together on medium-high speed until the mixture is smooth and creamy, about 2 minutes. Add the sour cream, vanilla extract, and lemon juice and beat until fully combined. With the mixer on medium speed, add the eggs one at a time, beating after each addition until just combined. Stop the mixer as soon as the final egg is fully incorporated into the batter; over-mixing can cause the cheesecake to deflate. You will have nearly 6 cups of batter.
- Prepare the simple water bath (see Note): (If needed for extra visuals, see How to Make a Cheesecake Water Bath; the visual guide and video will assist you in this step.) Boil a kettle/pot of water. You need 1 inch of water in your roasting pan for the water bath, so make sure you boil enough. I use an entire kettle of hot water. As the water is heating up, wrap 1 or 2 sheets of heavy-duty aluminum foil around the springform pan—be careful if it’s still warm from baking the crust! Place the wrapped springform pan inside of a large roasting pan. Pour the cheesecake batter on top of the crust. Use a spatula to smooth it into an even layer. Carefully pour the hot water inside of the pan and place in the oven. (Or you can place the roasting pan in the oven first, then pour the hot water in—whichever is easier for you.)
- Bake the cheesecake for 55–70 minutes or until the center is almost set. If you notice the cheesecake browning too quickly on top, tent it with aluminum foil halfway through baking. When it’s done, the center of the cheesecake should still slightly wobble if you gently tap or shake the pan. Turn the oven off and open the oven door slightly. With the door ajar, let the cheesecake sit in the oven in the water bath as it cools down for 1 hour. After 1 hour, remove from the oven and water bath, discard the foil, and place the springform pan on a cooling rack to cool completely at room temperature. When it has cooled, cover and refrigerate the cheesecake for at least 4 hours or up to 2 days.
- Run a knife around the edges of the springform pan to help loosen the cheesecake, then remove the outer rim. Using a sharp knife, cut into slices for serving. For neat slices, wipe the knife clean and dip it into warm water between each slice.
- Serve cheesecake with desired toppings (see Note). Cover and store leftover cheesecake in the refrigerator for up to 4 days.
Notes
-
- Make Ahead Instructions: This cheesecake can be made the day before. It has to chill for quite some time before serving. See step 5. Another way to make this cheesecake ahead of time is to freeze it. Cheesecake can be frozen up to 3 months. See instructions in blog post above.
- Special Tools (affiliate links): Food Processor | Glass Mixing Bowl | 9-inch Springform Pan or 10-inch Springform Pan | Electric Mixer (Handheld or Stand) | Roasting Pan | Silicone Spatula
- Oreo Cookie Crust: Feel free to replace the graham cracker crust with this Oreo cookie crust. Spray bottom of springform pan with nonstick spray, as Oreo cookie crusts tend to stick. Pre-bake the crust, just as you do with the graham cracker crust in step 2 above.
- Toppings: One of my favorite toppings for this cheesecake is raspberry sauce. Or you could top the baked and cooled cheesecake with salted caramel, lemon curd, strawberry topping, chocolate ganache, red wine chocolate ganache, fresh fruit, or whipped cream. The topping from my pecan pie cheesecake is also an option!
- Alternate Water Bath Method: This method works as well, and you don’t have to bake the cheesecake IN water. Boil a kettle or pot of water. You need 1 inch of hot water in your roasting pan for the water bath, so make sure you boil enough. Place the cheesecake on the center oven rack of the preheated oven. Place a large metal baking or roasting pan (do not use glass—I usually use a 9×13-inch baking pan or an extra-large cast iron skillet) on the bottom rack. Pour boiling water into the empty pan, about 1 inch deep. Immediately close oven to trap the steam inside. This unique water bath adds steam to the oven without having the cheesecake sit inside the water itself. No need to wrap the springform pan in foil. See How to Make a Cheesecake Water Bath for more information.
- Room Temperature Ingredients: Bring all cold ingredients to room temperature before beginning. Room temperature ingredients combine quickly and evenly, so you won’t risk over-mixing. Also, beating cold ingredients together will result in a chunky cheesecake batter, hardly the way you want to begin!
- Non-US Readers: Don’t have graham crackers where you live? Use 200g ground digestive biscuit crumbs (about 2 cups; 13–14 biscuits), 1/3 cup (67g) granulated sugar, and 6 Tablespoons (85g) melted butter. Pre-bake the crust for a bit longer, about 12–14 minutes. And from what I understand, spreadable cream cheese sold in a tub in countries outside of the US is a little different from the spreadable cream cheese in the US. It’s thicker, sturdier, and more solid and should be OK for this recipe. I have no experience with it, but this is what I’ve heard from other non-US readers. If you try it, let us know how it turns out!
Classic Cheesecake Recipe
Description
Look no further for a creamy and ultra smooth classic cheesecake recipe! Paired with a buttery graham cracker crust, no one can deny its simple decadence. For the best results, bake in a water bath. This recipe is also in my cookbook, Sally’s Baking 101.
Ingredients
Graham Cracker Crust
- 1 and 1/2 cups (180g) graham cracker crumbs (about 12 full-sheet graham crackers)
- 1/4 cup (50g) granulated sugar
- 5 Tablespoons (71g) unsalted butter, melted
Cheesecake
- 32 ounces (904g) full-fat brick cream cheese, softened to room temperature
- 1 cup (200g) granulated sugar
- 1 cup (240g) full-fat sour cream, at room temperature
- 1 teaspoon pure vanilla extract
- 2 teaspoons fresh lemon juice (optional, but recommended)
- 3 large eggs, at room temperature
Instructions
-
- Adjust the oven rack to the lower-middle position and preheat oven to 350°F (177°C).
- Make the crust: If you’re starting out with full graham crackers, use a food processor or blender to grind them into fine crumbs. Pour into a medium bowl and stir in the sugar until combined, and then stir in the melted butter. Mixture will be sandy. Try to smash/break up any large chunks. Pour into an ungreased 9-inch or 10-inch springform pan. With medium pressure using your hand, pat the crumbs down into the bottom and partly up the sides to make a compact crust. Do not pack down with heavy force because that makes the crust too hard. Simply pat down until the mixture is no longer crumby/crumbly (you can use the flat bottom of a small measuring cup to help smooth it out if needed). Bake for 10 minutes. Remove from the oven and set aside while you prepare the filling.
-
- Make the filling: In a large bowl using a handheld or stand mixer fitted with a paddle attachment, beat the cream cheese and granulated sugar together on medium-high speed until the mixture is smooth and creamy, about 2 minutes. Add the sour cream, vanilla extract, and lemon juice and beat until fully combined. With the mixer on medium speed, add the eggs one at a time, beating after each addition until just combined. Stop the mixer as soon as the final egg is fully incorporated into the batter; over-mixing can cause the cheesecake to deflate. You will have nearly 6 cups of batter.
- Prepare the simple water bath (see Note): (If needed for extra visuals, see How to Make a Cheesecake Water Bath; the visual guide and video will assist you in this step.) Boil a kettle/pot of water. You need 1 inch of water in your roasting pan for the water bath, so make sure you boil enough. I use an entire kettle of hot water. As the water is heating up, wrap 1 or 2 sheets of heavy-duty aluminum foil around the springform pan—be careful if it’s still warm from baking the crust! Place the wrapped springform pan inside of a large roasting pan. Pour the cheesecake batter on top of the crust. Use a spatula to smooth it into an even layer. Carefully pour the hot water inside of the pan and place in the oven. (Or you can place the roasting pan in the oven first, then pour the hot water in—whichever is easier for you.)
- Bake the cheesecake for 55–70 minutes or until the center is almost set. If you notice the cheesecake browning too quickly on top, tent it with aluminum foil halfway through baking. When it’s done, the center of the cheesecake should still slightly wobble if you gently tap or shake the pan. Turn the oven off and open the oven door slightly. With the door ajar, let the cheesecake sit in the oven in the water bath as it cools down for 1 hour. After 1 hour, remove from the oven and water bath, discard the foil, and place the springform pan on a cooling rack to cool completely at room temperature. When it has cooled, cover and refrigerate the cheesecake for at least 4 hours or up to 2 days.
- Run a knife around the edges of the springform pan to help loosen the cheesecake, then remove the outer rim. Using a sharp knife, cut into slices for serving. For neat slices, wipe the knife clean and dip it into warm water between each slice.
- Serve cheesecake with desired toppings (see Note). Cover and store leftover cheesecake in the refrigerator for up to 4 days.
Notes
-
- Make Ahead Instructions: This cheesecake can be made the day before. It has to chill for quite some time before serving. See step 5. Another way to make this cheesecake ahead of time is to freeze it. Cheesecake can be frozen up to 3 months. See instructions in blog post above.
- Special Tools (affiliate links): Food Processor | Glass Mixing Bowl | 9-inch Springform Pan or 10-inch Springform Pan | Electric Mixer (Handheld or Stand) | Roasting Pan | Silicone Spatula
- Oreo Cookie Crust: Feel free to replace the graham cracker crust with this Oreo cookie crust. Spray bottom of springform pan with nonstick spray, as Oreo cookie crusts tend to stick. Pre-bake the crust, just as you do with the graham cracker crust in step 2 above.
- Toppings: One of my favorite toppings for this cheesecake is raspberry sauce. Or you could top the baked and cooled cheesecake with salted caramel, lemon curd, strawberry topping, chocolate ganache, red wine chocolate ganache, fresh fruit, or whipped cream. The topping from my pecan pie cheesecake is also an option!
- Alternate Water Bath Method: This method works as well, and you don’t have to bake the cheesecake IN water. Boil a kettle or pot of water. You need 1 inch of hot water in your roasting pan for the water bath, so make sure you boil enough. Place the cheesecake on the center oven rack of the preheated oven. Place a large metal baking or roasting pan (do not use glass—I usually use a 9×13-inch baking pan or an extra-large cast iron skillet) on the bottom rack. Pour boiling water into the empty pan, about 1 inch deep. Immediately close oven to trap the steam inside. This unique water bath adds steam to the oven without having the cheesecake sit inside the water itself. No need to wrap the springform pan in foil. See How to Make a Cheesecake Water Bath for more information.
- Room Temperature Ingredients: Bring all cold ingredients to room temperature before beginning. Room temperature ingredients combine quickly and evenly, so you won’t risk over-mixing. Also, beating cold ingredients together will result in a chunky cheesecake batter, hardly the way you want to begin!
- Non-US Readers: Don’t have graham crackers where you live? Use 200g ground digestive biscuit crumbs (about 2 cups; 13–14 biscuits), 1/3 cup (67g) granulated sugar, and 6 Tablespoons (85g) melted butter. Pre-bake the crust for a bit longer, about 12–14 minutes. And from what I understand, spreadable cream cheese sold in a tub in countries outside of the US is a little different from the spreadable cream cheese in the US. It’s thicker, sturdier, and more solid and should be OK for this recipe. I have no experience with it, but this is what I’ve heard from other non-US readers. If you try it, let us know how it turns out!
Seriously Fudgy Homemade Brownies

Seriously Fudgy Homemade Brownies
- Total Time: 3 hours
- Yield: 16 brownies
- Category: Baking, Bars, Brownies, Dessert
- Method: Baking
- Cuisine: American
Description
This recipe has been *slightly updated* since my team and I originally published it in 2016. These seriously fudgy homemade brownies are thick, dense, and intensely chocolatey thanks to cocoa powder, melted baking chocolate, and chocolate chips. With shiny crackly tops and melt-in-your-mouth centers, this is our go-to brownie recipe.
Ingredients
-
- 3/4 cup (12 Tbsp; 170g) unsalted butter, sliced into 12 Tbsp-size pieces
- 4-ounce (113g) semi-sweet chocolate bar, coarsely chopped and divided*
- 1 and 2/3 cups (333g) granulated sugar
- 3 large eggs, at room temperature
- 2 teaspoons pure vanilla extract
- 1 cup (84g) unsweetened natural or Dutch-process cocoa powder*
- 1 cup (125g) all-purpose flour (spooned & leveled)
- 3/4 teaspoon salt
- 1 cup (180g) semi-sweet chocolate chips
Instructions
-
- Preheat the oven to 350°F (177°C) and line a 9-inch square metal baking pan with parchment paper, leaving an overhang on two opposite sides to lift out the finished brownies (makes cutting easier!). Set aside.
-
- In a small microwave-safe bowl or liquid measuring cup, combine the butter and half (2oz/56g) of the chopped chocolate. Melt in 30-second increments, stirring after each, until completely melted and smooth. Set aside to slightly cool while you continue.
- In a large bowl with a handheld or stand mixer fitted with a whisk attachment, combine the sugar and eggs. Beat on medium-high speed until the sugar is dissolved and the mixture is pale and ribbon-y, about 3 minutes.
- Pour the warm melted butter/chocolate into the bowl with the sugar/eggs, add the vanilla, and beat or whisk to combine.
- With a fine-mesh sieve, sift the cocoa powder, flour, and salt into the batter, then whisk or beat on low speed to incorporate. Fold in the remaining 2 ounces/57g chopped chocolate and the chocolate chips. The batter will be very thick. Spread it evenly into the prepared pan. (A small offset spatula can help here.)
- Bake for 28–30 minutes, then test the brownies with a toothpick. Insert the toothpick into the center of the pan. If it comes out coated with wet batter, the brownies are not done. If there are only a few moist crumbs, the brownies are done. Keep checking every 2 minutes until you have moist crumbs. Brownies typically take 30–32 minutes in my oven. Err on the side of under-baking, as the brownies will continue to set as they cool.
- Remove from the oven and place on a cooling rack to cool completely in the pan. When cool, lift the brownies out by gripping the parchment overhangs and transfer to a cutting board. Use a sharp knife to cut into squares.
- Cover and store leftover brownies at room temperature for up to 1 week.
Notes
-
- Make-Ahead & Freezing Instructions: Brownies freeze well up to 3 months. Thaw overnight in the refrigerator then bring to room temperature before serving.
- Special Tools (affiliate links): 9-inch Square Baking Pan | Glass Mixing Bowls | Electric Mixer (Handheld or Stand) | Fine Mesh Sieve | Whisk | Wooden Spoon or Silicone Spatula | Cooling Rack
- Chocolate: Baking chocolate is typically sold in 4-ounce (113g) bars. Half will be melted with the butter, and half will be chopped up and folded into the batter with the chocolate chips. I suggest Ghirardelli, Baker’s, or Lindt brands; in either semi-sweet (56% cacao) or bittersweet (60% cacao).
- Cocoa Powder: You can use either natural or Dutch-process cocoa powder in this recipe. I prefer Dutch-process (such as this brand) for a smoother chocolate flavor.
- Recipe Update in 2026: My team and I made a couple slight updates to this recipe based on reader feedback. To make it the way it was originally written, increase the sugar to 2 cups (400g) and increase the chocolate chips to 1.5 cups (270g). Proceed with steps 1 and 2 in the recipe above. Skip step 3. Then, whisk the 2 cups (400g) sugar into the melted butter and chocolate mixture. Whisk in the eggs and vanilla, followed by the remaining ingredients. Spread into a lined 9×13-inch pan and bake for 30-32 minutes.
Sally’s Baking Index
CLICK HERE
subscribe to her YouTube channel
View Sally’s Baking with Yeast beginners guide by clicking here.
My cookbook, Sally’s Baking 101, includes 101 recipes. 70 of which are not available on my website.
Mini Quiche

Mini Quiche (Any Flavor!)
Description
This is a perfect base recipe for mini quiches where you can add your favorite add-ins and flavors. Bake in my super flaky homemade pie crust. Review video tutorial above and read recipe notes below before beginning.
Ingredients
-
- 2 unbaked Flaky Pie Crust (what I used) or All Butter Pie Crust*
- 4 large eggs
- 1/2 cup whole milk*
- 1/2 cup heavy cream or heavy whipping cream*
- 1/4 teaspoon each salt and pepper
- 3/4 cup add-ins (see recipe note)
- 1/2 cup shredded or crumbled cheese (see recipe note)
Instructions
-
- Pie crust: I like to make sure my pie dough is prepared before I begin mini quiche. Make pie dough the night before because it needs to chill in the refrigerator for at least 2 hours before using.
- Prep the egg filling: In a large bowl with a handheld or stand mixer fitted with a whisk attachment—or simply using a whisk and mixing bowl—beat/whisk the eggs, whole milk, heavy cream, salt, and pepper together (on high speed if using a mixer) until completely combined, about 1 minute. Cover and refrigerate egg filling until step 6.
-
- Preheat oven to 375°F (191°C). Grease two 24-count mini muffin pans. (Nonstick spray is best.) If you only have 1 mini muffin pan, bake these in batches. Roll out first pie dough, fill, and bake then roll out the 2nd pie dough, fill, and bake.
- Shape the mini crusts: Working with 1 chilled pie dough at a time, place the dough onto a floured work surface. Roll into a large 12-inch circle. Use your warm hands to mold any cracking edges back together as you see me doing in the video tutorial above. From the circle, cut rounds using a 2.5 inch cookie cutter. (Sometimes I use my 1/3 cup measuring cup, which is 2.5 inches in diameter.) You’ll have to re-roll the dough scraps a few times. Work quickly, as the dough becomes much more delicate the longer it’s at room temperature. You’ll get about 24 rounds per pie crust. Repeat with 2nd chilled pie dough for a total of about 48.
- Place the dough rounds into greased 24-count mini muffin pan(s). Press the dough flat into the bottom of the crevice and up the sides.
- Evenly pour cold egg filling into each unbaked crust. Top evenly with add-ins, then sprinkle each with cheese.
- Bake mini quiches until the center is just about set and edges are lightly browned, about 25-28 minutes. Allow to cool for 5 minutes before removing from the pan. If greased well, the mini quiches pop right out using a spoon to scoop them up. Serve warm or at room temperature
- Mini quiches make great leftovers! Cover tightly and store in the refrigerator for up to 4 days.
Notes
-
- Make Ahead & Freezing Instructions: The pie dough can be prepared ahead of time and stored in the refrigerator for up to 5 days or in the freezer for up to 3 months. To freeze, cool baked mini quiches completely, then layer between sheets of parchment paper in a large freezer-friendly container. Freeze for up to 3 months. Thaw in the refrigerator or on the counter, then bake at 300°F (149°C) for 15 minutes or until warmed.
- Special Tools (affiliate links): Electric Mixer (Handheld or Stand) or Glass Mixing Bowl & Whisk | 24-count Mini Muffin Pan | 2.5-inch Cookie Cutter
-
- If using a 12-count standard muffin pan: Cut the pie dough into 3.5 inch circles. Other assembly instructions are the same for a 12-count muffin pan. Bake for about 27-30 minutes until the centers are set and edges are lightly browned. Yields about 16.
- Pie Crust & Crustless Option: Both linked pie crust recipes make 2 crusts. You need 2 crusts for this recipe. You can use store-bought pie crust if desired. Make sure it is thawed. For crustless quiches, spray your mini muffin pan or regular size muffin pan with nonstick spray and pour the filling directly into the greased pan. Top with add-ins, then cheese. Bake mini quiches for 16-19 minutes and regular size (in a 12-count pan) for 20-23 minutes.
- Whole Milk & Heavy Cream: Use this combination for best taste. If desired, use 1 cup of half-and-half instead. In a pinch, using all milk (whole milk, lower fat milk, or unflavored nondairy milk) works just fine.
- Add-Ins: You need about 3/4 cup add-ins including vegetables and meat/seafood. Most quiche add-ins should be pre-cooked and can still be warm when adding on top of each quiche. See blog post for my favorite add-ins. No need to pre-cook or sauté add-ins like mushrooms or bell peppers unless you want to.
- Cheese: Some favorites include feta cheese, goat cheese, white cheddar cheese, Swiss cheese, and gruyere.
Find it online: https://sallysbakingaddiction.com/mini-quiche-recipe/
SALLY – Great Site for Recipes
Sally’s Baking Addiction

Here are a few recipes. I’ve also abbreviated some of her recipes at this site. Use the links provided to visit her more detailed page.
- Home-made Whipped Cream
- Glazed Lemon-Blueberry Scones
- Home-made Strawberry Shortcake
- Home-made Hot Fudge Sauce
- Pan Brownie Recipe
- Blueberry Pie Bars
Here are the recipes reflected at GrandpaCooks.com
Sally’s Favorite Banana Bread Recipe
My Favorite Banana Bread
- Prep Time: 10 minutes
- Cook Time: 65 minutes
- Total Time: 3 hours
- Yield: 1 loaf
With its super-moist and buttery texture, banana and brown sugar flavors, soft crumb, and 1,000+ reviews, this is a delicious AND undeniably popular banana bread recipe. You need 4 large ripe bananas. This recipe is also in my cookbook, Sally’s Baking 101.
Ingredients
-
- 2 cups (250g) all-purpose flour (spooned & leveled)
- 1 teaspoon baking soda
- 1/4 teaspoon salt
- 1/2 teaspoon ground cinnamon
- 1/2 cup (8 Tbsp; 113g) unsalted butter, softened to room temperature
- 3/4 cup (150g) packed light or dark brown sugar
- 2 large eggs, at room temperature
- 1/3 cup (80g) plain Greek yogurt or full-fat sour cream, at room temperature
- 1 and 1/2 cups (345g) mashed bananas (about 3–4 ripe bananas)
- 1 teaspoon pure vanilla extract
- optional: 3/4 cup (90g) chopped pecans or walnuts, or 1 cup (180g) semi-sweet chocolate chips
Instructions
-
- Adjust the oven rack to the lower third position and preheat the oven to 350°F (177°C). Lowering the oven rack prevents the top of your bread from browning too much, too soon. Grease a 9×5-inch loaf pan with nonstick spray. Set aside.
-
- In a medium bowl, whisk the flour, baking soda, salt, and cinnamon together. Set aside.
- In a large bowl using a handheld or stand mixer fitted with a paddle attachment, beat the butter and brown sugar together on medium-high speed until light and creamy, about 3 minutes. (Here’s a helpful tutorial if you need guidance on how to cream butter and sugar.) With the mixer running on medium speed, add the eggs one at a time, beating well after each addition. Scrape down the sides of the bowl as needed. Beat in the yogurt, vanilla, and mashed bananas until combined.
- Add the dry ingredients into the wet ingredients and beat on low speed just until combined. Do not over-mix. Fold in the nuts/chocolate chips, if using. The batter should be thick.
- Pour and spread the batter into the prepared baking pan. Bake for 60–65 minutes, making sure to loosely cover the pan with aluminum foil halfway through, to prevent the top from getting too brown. The bread is done when a toothpick inserted in the center comes out clean with only a few small moist crumbs. Cool the bread in the pan set on a cooling rack for 1 hour. Remove the bread from the pan and cool it directly on the rack until ready to slice and serve.
- Store wrapped tightly at room temperature for up to 3 days or in the refrigerator for up to 1 week.
Notes
-
- Special Tools (affiliate links): 9×5-inch Loaf Pan | Electric Mixer (Handheld or Stand) | Glass Mixing Bowls | Whisk | Silicone Spatula | Cooling Rack
- Update in 2025: With enough reader feedback stating the bread can often be too moist and dense, and therefore not bake properly, my team and I retested the bread multiple times over the past 2 years; we slightly reduced the amount of mashed bananas from 2 cups to 1 and 1/2 cups.
- Butter: If needed, you can use salted butter in this recipe with no other changes needed. I’ve also successfully reduced the butter down to 6 Tablespoons (85g) with no issue (just as tasty).
-
- Brown Sugar: This is not an overly sweet quick bread. If you want a sweeter banana bread, increase to 1 cup (200g) brown sugar. Feel free to replace some or all of the brown sugar with regular white granulated sugar.
- Cream Cheese Frosting: This banana bread also tastes fantastic with cream cheese frosting on top! To make it, beat 4 ounces (112g) of softened cream cheese and 1/4 cup (60g) of softened unsalted butter together on medium speed until smooth. Beat in 1 cup (120g) of confectioners sugar, 1/2 teaspoon of pure vanilla extract, and a pinch of salt until combined. Spread on cooled loaf.
- Banana Bread Muffins: Use this banana bread recipe to make 15 banana bread muffins. Spoon the batter into a lined or greased muffin pan (fill each to the top with batter) and bake for 5 minutes at 425°F (218°C); then, keeping the muffins in the oven, reduce the oven temperature to 350°F (177°C). Bake for an additional 16–17 minutes or until a toothpick inserted in the center comes out clean. The total bake time for the banana bread muffins is about 21–23 minutes. The initial burst of hot air helps those muffins rise nice and tall! Or try my quick & easy banana muffins.
- Brown Sugar: Feel free to substitute the same amount of regular white granulated sugar or coconut sugar. I do not recommend any liquid sweeteners.
- No Sour Cream or Yogurt? Feel free to use 1/3 cup mashed banana (in addition to what is called for in the recipe), unsweetened applesauce, or even canned pumpkin puree.
- Frozen Bananas: You can use frozen bananas here. Thaw the frozen bananas. Drain off any excess liquid, mash, then use as instructed in the recipe. See How to Freeze & Thaw Bananas for Baking. Try not to mash too much or else you’ll be left with banana-y liquid; some chunks are great.
- Chocolate Chips: I love this bread with chocolate chips, too. Feel free to add 1 cup of your favorite chocolate chips. No need to leave out the nuts if you add the chocolate chips. Chocolate chips and nuts are both optional.
- Can I Turn This Into Banana Bundt Cake? There isn’t enough batter. I recommend using my extremely similar, scaled-up recipe for chocolate marble banana Bundt cake instead. You can leave out the chocolate swirl in that recipe.
Find it online: https://sallysbakingaddiction.com/best-banana-bread-recipe/


This has turned out to be a really hot topic. This is kind of a summary page. With the advent of AI, I’ve taken 20 printed pages of comments and decanted them down to what follows. Also, at the end of the comments, is AI’s version of the dressing.
Here are contenders and other recipes based on comments and feedback:
Coco’s Asian Sesame Dressing — Chat Summary from Claude.AI
The Product
The On-Again, Off-Again History
Current Status (as of the page’s last updates)
The Copycat Recipe Effort