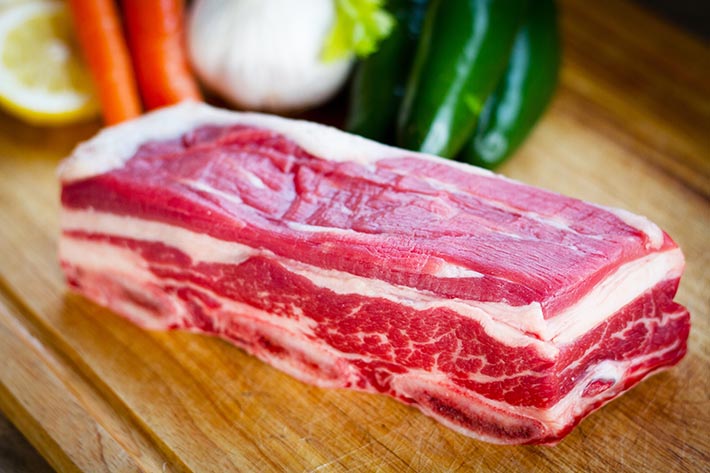
Pork Chops – COLLECTION

Pork Chop Notes

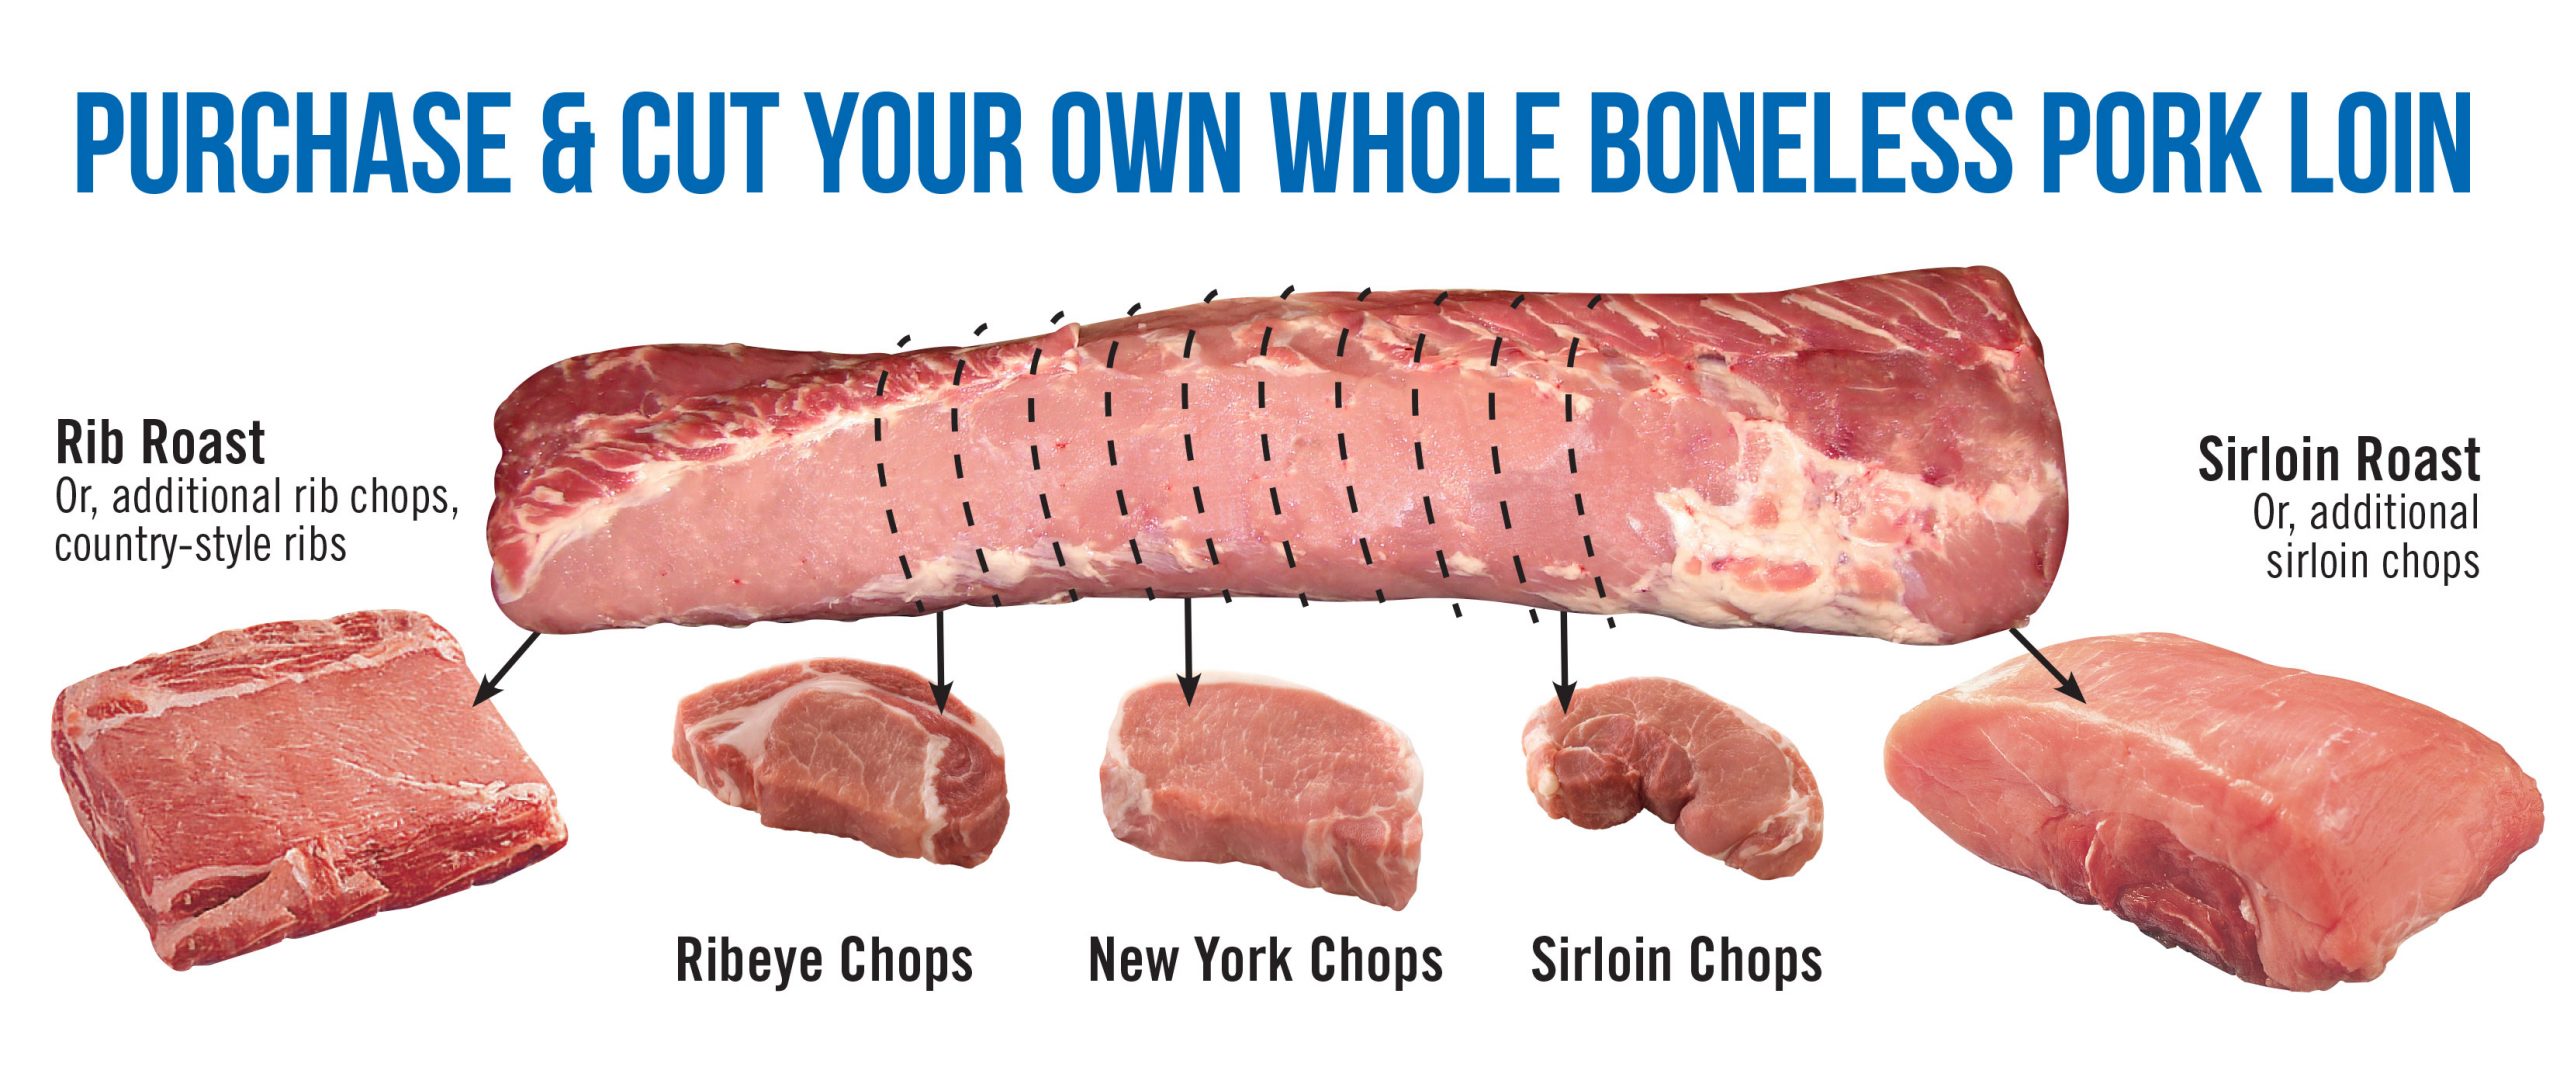
  1. All Pork Chops are taken from the loin – or the back
    1. Shoulder chop is closest to the head
      Lots of muscles and connective tissue
      Good for braising and slow cooking, but not for pan frying
    2. The rib chop is next – This is the front part of the center cut
      Cut these thick and cook with fast dry heat – like a BBQ grill
      Good for stuffing since it is an entire muscle
    3. The tenderloin and loin chop – This is the back of the center cut
      The pork equivalent of the T-bone and Porterhouse
      The loin and tenderloin cook at different rates
      Wrap the tenderloin with foil for the first half of the cooking process
    4. The sirloin chop is near the back of the hog
      Most amount of muscles and connective tissue
      Good for braising and slow cooking, but not for pan frying
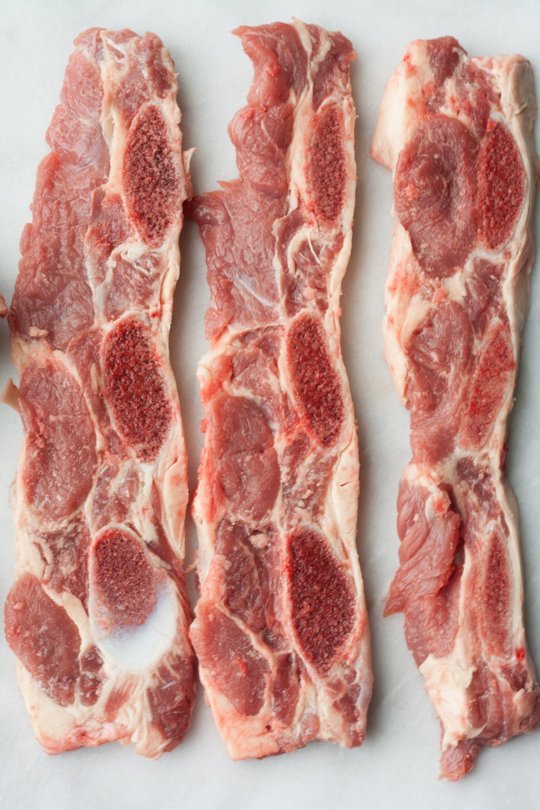
  2. Bone-in means more flavor.  Unless you have a specific reason, always use bone-in pork chops.
  3. Frenching the pork chop means to scrape the meat off the bone to create a “handle.”
  4. Consider a two-day brine otherwise it will taste dry – Bring 2 C apple cider to about 185º :: and add 1 C brown sugar, 1 C salt, 8 cloves, bay leaf, 1 tsp corriander and 1 TBL peppercorns, 1 TBL dry mustard.  Add 1.5 C ice after all solids are dissolved. Let cool, then marinate 24-48 hours in the fridge.  This will really enhance the flavor of your pork chops.

Basic Pork Chops

Beginner Pork Chops

A very easy recipe.  Use the above link or CLICK HERE

Novice Pork Chop

  1. Season 2 bone-in pork chops with salt and pepper
  2. Heat 2 TBL EVOO in a hot cast iron skillet
  3. Sear pork chops till brown
  4. Flip chops, then cook 1 minutes more
  5. Set pork chops aside on a plate
  6. Add minced garlic, onion, tomatoes, kalamata olives, capers and one chopped anchovy to the hot skillet.
  7. When softened, add pork chops back into the pan.
  8. Cook at 450º for 5 minutes

Fancy Pork Chop

INGREDIENTS

  • 2 (bone-in) pork chops, 1 inch thick (with pockets for stuffing)
  • BRINE – Let soak in brine overnight
    • 1/2 C orange juice
    • 1 TBL Worcestershire
    • 1/4 C white vinegar
    • 2 TBL sugar or Karo syrup
  • STUFFING
    • 1 TBL butter
    • 2 TBL onion, finely chopped
    • 1 apple, finely chopped
    • 2 TBL water
    • 1 tsp celery – finely chopped
    • 1/2 tsp salt
    • 1/4 tsp pepper
  • DREDGE INGREDIENTS
    • 2 eggs – beaten
    • 1/2 C flour
    • 1/2 C bread crumbs

STEP BY STEP

  1. Mix brine in a baggie.  Marinate pork chop overnight, or at least 6 hours.
    PREPARE YOUR MEAT
  2. When you are ready to cook, drain baggie and pat pork chop dry
  3. Put pork chops in freezer to firm up
  4. Heat oven to 350 degrees.
    CREATE YOUR STUFFING
  5. Place butter in saucepan and saute onions in large skillet
  6. Add apple and celery and saute 1 minute
  7. Add all remaining stuffing ingredients to skillet
    STUFFING YOUR PORK CHOP
  8. Remove pork chops from freezer and cut a pocket in them
  9. Fill pork chops with prepared stuffing.
  10. Fasten edges with wooden picks.
    COAT YOUR PORK CHOP
  11. Dip pork chop in egg, then flour, then again in egg, then in bread crumbs
  12. Place stuffed chops flat side down in single layer on top of a draining rack in a shallow baking pan
  13. Cover pan tightly with foil.
  14. Bake in moderate oven at 350 degrees about 1 hour.
  15. Uncover and continue baking another 30 minutes

VARIATIONS

  • Serve with cinnamon apple wedges or hot spiced applesauce

Braised Pork Chop

You can also use this recipe with ribs.

INGREDIENTS

  • 4 pork loin or rib chops, about 1/2 inch thick
  • 1 teaspoon salt
  • 1/4 tsp. pepper
  • 1/4 cup pineapple juice, apple juice or water (Try a can of pineapple slices)

STEP BY STEP

  1. Cook pork chops over medium heat until brown: drain. Sprinkle with salt and pepper. Reduce heat; pour juice on pork. Cover and simmer untildone, 20 to 25 minutes.
  2. My special touch with this recipe is to place pineapple slices on the chops and leave them while they simmer. I also salt and pepper to taste.
  3. This recipe comes from a 30 year old Betty Crocker cookbook, so there’s no calorie information.

Use Grandpa's Thunder Powder or Arghhh Powder for a dry rub, and coat liberally.

Stuffed Pork Chops

Fig-Stuffed Pork Chop

Pork Chops
Figs
Sugar
Sal/pepper
Rosemary
1 tblOil
1 Shallots
1 clove garlic
1 tsp Dijon
¾ cu beef stock
½ cu red wine
t tbl corn starch
1 tblbutter
chives
mustard seed

Step by Step

  1. Halve figs, cut off ends, puree in chopper
  2. Add scant sugar, salt/pepper, 1 tsp rosemary (some liquid).
  3. With boning knife stick into middle to create pocket as small as possible. 
  4. Use pastry bag inject stuffing.
  5. Sear in hot oil 7-8 minutes, toast mustard seed in pan.

Rosemary Sauce
1 tbl oiol, 1 shallot, 1 clove garlic, ¾ beef stock, ½ cu red wine, 1 tsp Dijon, salt/pepper. Reduce/whisk, add 1 tbl cornstarch to thicken, 1 tbl butter.

Top w/ chives, rosemary, mustard seed

Pork Chop with Mushroom Stuffing

Ingredients

2 tsp olive oil
2 TBS green onions
4 oz mushrooms (coarsely chopped)
2 tsp fresh rosemary or oregano
pinch of salt & black pepper
2 TBS Worcestershire sauce
2 pork chops WITHOUT marbeling

Instructions

1. Saute green onions
2. Add mushrooms and spices – cook 3-5 minutes
3. Make a pocket in each pork chop – Cut into, but not through
4. Spoon stuffing mixture into pork chop
5. Secure with wooden toothpicks
6. Grill as usual
7. Remove toothpicks before serving

Variations: Use brown crimini mushrooms for better mushroom flavor

Grandpa’s Stovetop Pork Chop

This is great for when you are on vacation and only have a skillet.

Ingredients

2 pork chops, 1 inch thick
1 Granny Smith apple (peeled, cored, diced)
1/2 small onion (sliced very thin)
1 tsp grated ginger
a few shakes allspice
a few shakes cayenne
1 CU appled cider
3 TBL brown sugar
1/8 tsp. Pepper

Instructions

1. Brine the pork chops (soak in salt water 1 hour)
2. Heat oil in dutch oven to smoke point
3. Put pork chop in and cover – cook 3 minutes
4. Flip pork chop – cook 3 more minutes
5. Remove pork chop from pan, cover with foil, set aside – let rest

– PREPARE SAUCE
6. Put onions into hot pan for two minutes
7. Add diced apple pieces – cook five minutes
8. Add all dry spices – cook three minutes
9. Add apple cider – cook until reduced and slightly thickened (about 5 minutes)
10. Dump any pork chop drippings back into pan and mix

Variations Serve with steamed asparagus

Notes Serve with cinnamon apple wedges or hot spiced applesauce

Korean Short Ribs

flankenINGREDIENTS

MEAT

Buy ribs cut “Flanken style” – aka Korean Style Short Ribs – that is 1/4 inch thick strips, cut across the bones so that you get small medallions of bone.

MARINADE

  • 6 tbl soy sauce
  • 2 TBL rice vinegar
  • 2 tsp Worchestershire sauce
  • 2 TBL apple juice
  • 2 tsp Sesame seeds
  • 2 tsp minced garlic
  • 2 tsp freshly grated ginger
  • 2 TBL brown sugar
  • 1 tsp crushed red pepper
  • 1/4 C scallions – cut at an angle

STEP BY STEP

  1. Pour your marinade into a heavy duty Zip Lock baggy
  2. Place strips into the sauce
  3. Let marinate 12-24 hours in the refrigerator
  4. When you are ready to cook let meat come up to room temperature
  5. GRILL OR GRILL PAN
    • Cook over high heat on a grill or on a grill pan
  6. OVEN
    • Cover sheet pan with foil
    • Bake at 350 for 20 minutes
    • Pour juice into a pan with a bit of corn starch to make a glaze
  7. Prepare lettuce cups with butter lettuce
  8. Fill cup with kimchi and cooked white rice
  9. Serve the cup along side of your cooked short ribs


Oxtail / Beef Shank

  • These used to be actually from oxen, but in today’s market beef or veal is used.
  • Oxtail does not have much meat.  It is similar to beef shank (the lower leg of a cow) which has more meat; so use a beef shank rather than an oxtail.
  • The tail is good for soups, while the shanks are better for braising and serving as the main meat dish.
  • Beef shanks have much less cartilage and tendon than oxtail so you won’t get as much gelatin, but will get more meat.
  • The shanks come from the lower leg (between the knee and the foot) of the cow. If you get pieces that are lower down the leg, you’ll get more tendon but less meat. But still a better amount of meat than true oxtail.
  • Tails are usually cut at about 1-1/2 inch pieces. Beef shanks are usually about 2 inches thick.

INGREDIENTS

  • Six beef shanks
  • 1 C flour – seasoned with lots of salt and pepper and a bit of sugar
  • Red wine

STEP BY STEP

  1. Season your shanks very generously with salt and pepper.
  2. Coat all sides with your seasoned flour
  3. Preheat oven to 275º
  4. Put into hot braising pan with 2 TBL hot canola or safflower oil.
  5. Fry until you get a good caramelization on the meat – about 5 minutes per side.  Remove much of the grease with a spoon or ladle.  Set meat aside.
  6. Add onion slices and julienne carrot slices.
  7. Cook till onion begins to become translucent
  8. Add 2 cloves garlic and 2 TBL tomato paste
  9. Add paprika, red pepper and oregano to taste
  10. Add 2 C beef stock to your braising pan
  11. Add 1/2 C red wine
  12. Add a 28 oz can of whole tomatoes
  13. Bring contents of pan back to a simmer
  14. Put meat back into the pot
  15. Cover and put into oven
  16. Let cook for about 3 hours
  17. Remove meat and set aside on plate
  18. Pour the liquid through a sieve into a large measuring cup
  19. Let rest ten minutes
  20. Use a mixing spoon to scoop off the fat and put into an old jar.  DO NOT pour down your sink or you will have an expensive repair down the line.  Let the fat cool slightly, and then pour into empty milk container or something else with a secure lid.  Discard.
  21. Place the meat back in the braising pan, and add the stock back into the pan.
  22. Sprinkle with chopped watercress and bring back up to a simmer
  23. Add 1 TBL sherry vinegar and 2 tsp fresh oregano
  24. Optionally, add 1 can navy beans
  25. You can use some of the juice as an au-jus or use it as a base for gravy to be used with mashed potatoes.
  26. Serve your oxtail with risotto, noodles, steamed rice, potatoes, or make it all into a nice hearty oxtail soup by adding potatoes, onion, tomatoes, celery, carrots, and cabbage.
  27. Add more water if required.
  28. Let simmer until veggies are fully cooked (about 15 minutes)

Tex Mex Cheese Enchiladas

INGREDIENTS

  • Tex Mex Chili Sauce (see recipe below)
  • 1/4 C Shredded cheddar Cheese
  • 1/4 C Monterrey Jack cheese
  • Corn tortillas
  • 1/2 Vadalia or other sweet onion

Text Mex Chili Sauce

  • 2 TBL AP flour
  • 2 TBL butter
  • 1 TBL ground cumin
  • 1 TBL ground Ancho chili
  • Salt, pepper and garlic powder to taste (just a tiny bit)
  • 2 C chicken stock
  1. Heat flour and butter together until it starts to brown
  2. Add cumin, chili, salt, pepper and garlic
  3. Stir for two minutes
  4. Whisk in 2 C chicken stock a little bit at a time
  5. Stir until smooth, then add more stock – REPEAT
  6. Cook until thickened

STEP BY STEP for Cheese Enchiladas

  1. Mix together your cheeses
  2. Put chili sauce on the bottom of a glass baking dish
  3. Heat your corn tortilla 10 seconds in the microwave
  4. Wrap 2 TBL cheese and 1 TBL chopped sweet onions in a corn tortilla
  5. Place it seam side down
  6. Repeat Steps 3-5 until your pan is full
  7. Put more sauce on top
  8. Top with cheese
  9. Bake for about 14 minutes at 350º
  10. Top with more chopped onion
  11. Bake for another 5 minutes
  12. Serve bubbling and hot


Potato Fondant

INGREDIENTS

  • 1 Idaho potato per person
  • 1 stick butter
  • Salt, pepper, EVOO

STEP BY STEP

  1. Peel potato
  2. Cut two sides off so that you have a “steak”
  3. Season potato
  4. Pour about 2 TBL EVOO in a cast iron fry pan
  5. Fry in EVOO at about 365º until both sides are a golden brown
  6. Add a stick of butter to the fry pan and reduce heat to about 350º
  7. Monitor butter. It will foam, and should turn brown (beurre noisette) but should not blacken (beurre noir)
  8. When adequately browned, add 1-2 C chicken stock
  9. Add a sprig of rosemary and thyme and several cloves of garlic
  10. Simmer for about an hour
  11. Baste occasionally
  12. Cut on the bias and serve

Potato Latkes – Potato Rosti – Hash Browns – Potato Pancakes

I started researching the difference between American Hash Browns, Jewish Latkes and German Rösti, but the bottom line is there really isn’t a whole lot of difference.

  • Hash Browns: A traditional staple in America that you would get at Mel’s Diner. Shredded potatoes fried until browned.
  • Latkes: A Hanukkah potato that is grated (or spiralized) mixed with egg and onion slivers, and then pressed into small loose pancakes and then fried.
  • Rosti: A German/Swedish grated parboiled potato that is pressed into a slightly larger pancake and then baked. Most of the rösti recipes that I reviewed had rosemary in them.

The end result is very similar.

PLEASE READ: The key to successful deep frying is temperature. As long as bubbles are going out, oil cannot be going in. Too cool and the oil will seep into whatever you are frying. Too hot and it will burn, but still not be cooked inside. As soon as the bubbles stop, get it out of the oil. Use a submersible or candy thermometer to monitor temperature closely and keep your temperature as closed to 365º as possible. If you do it right, very little oil will be absorbed.

INGREDIENTS FOR PANKO POTATO LATKES

  • 1 lemon
  • 1 TBL salt
  • 3 Russet or Yukon Gold potatoes (grated)
  • 1 small sweet onion (grated or minced)
  • 1/4 C flour – Bluebird Flour if possible
  • 1 eggs, beaten
  • 1/4 C yogurt
  • 1/2 tsp baking powder
  • 1 TBL potato starch (use corn starch if you have no potato starch)
  • 1/4 tsp pepper or Grandpa's Thunder Powder or Arghhh Powder
  • Peanut or grapeseed oil for frying – both have a high smoke point
    Alternatives are olive oil and/or schmaltz.

This recipe is adapted from ToriAvey.com.  CLICKING HERE will give you a page of quite extensive instructions and a lot of good information and history about latkes.  I recommend you visit Tori’s web page and read about latkes, then stop back here to print out this brief recipe summary, that makes a smaller amount than Tori’s recipe. (Internal Link)

SETUP

  • Place a cooling rack near your oil with a newspaper beneath it to catch the drips.

STEP BY STEP

  1. Peel the potatoes, then grate them using a food processor.  If you don’t have one, use a hand grater.
  2. Place grated potato into a bowl and immediately cover with cold water and squeeze juice from one lemon and 1 TBL salt into the water.  Mix well.
  3. No need to clean the grater.  Grate the onion and put into the water with the grated potato.
  4. Drain the potato/onion mixture and place in the center of a clean tea towel.
  5. Let rest for 5 minutes, then pour through a colander.  Let drain for 20 minutes.  If you are in a hurry, continue straight to Step 6.
  6. Firmly squeeze all excess liquid from the shreds.
  7. Place potato/onion mixture in a large bowl and separate the shreds with a fork.
  8. Mix flour, beaten eggs, potato starch and pepper
  9. Fold panko into the potatoes and mix well.
  10. Pour peanut oil in a cast iron skillet to a depth of 1/8 inch and heat to 365º – You should use a thermometer to assure correct oil temperature.
  11. Put 3 TBL of the mixture into your hand and squeeze it into a fairly flat disk.
  12. Lower the disk carefully into the hot oil.  The latke can break apart easily, but if you can get them into the oil, they should be OK.
  13. Shape each subsequent latke just before it is slid into the oil.  Don’t fry any more than five at a time.  Don’t crowd the pan.
  14. Fry until brown and crispy (about 3-5 minutes per side)
    NOTE: If your latkes are not holding together, stir 2 tsp potato starch and 1 tsp beaten egg till the batter holds its shape.
  15. Remove the latkes to drain using a metal spatula, and place on the wire rack.
  16. Serve within 10 minutes of frying them.  Always serve latkes hot and fresh if possible. The longer they sit, the less crisp they’ll be.
  17. If you can’t do this, leave them on the rack to cool. When ready to serve, place in 375º oven for 10 minutes until heated through.
  18. Serve latkes with applesauce and/or sour cream, if desired.

Serving Options

  • Horseradish mixed with sour cream
  • Sauteed mushrooms
  • Slices of smoked salmon
  • Cherry tomato salsa

NOTES

  • Latkes are traditionally cooked on Hanukkah, along with other fried foods, to commemorate the miracle of the menorah oil in the Jewish Temple.
  • Chremslach (singular: chremsel) is the Yiddish word for a fried pancake. Potato chremslach are often mistaken for latkes. They are similar to latkes, with one major difference. Instead of shredding the potatoes, as we do with latkes, the potatoes are mashed and made into a thick batter before frying. Chremslach often appear on deli menus as “potato pancakes.” Latkes are thinner and more crispy due to the shredded texture of the potatoes. Chremslach are thicker and fluffier.
  • The perfect latke is crispy on the outside while hot, soft and fluffy in the center. It’s aromatic and salty and oniony and delectable. A well made latke is nearly impossible to resist.
  • This recipe is summarized/adapted from ToriAvey.com.  CLICKING HERE will give you a page of quite extensive instructions.  There is also quite a bit of information and history about latkes.  I recommend you visit Tori’s web page and read about latkes, then stop back here to print out this brief recipe summary.
Simple Potato Pancake

  • 1/2 C left over mashed potatoes
  • 1/2 C grated russet potatoes
  • 1/2 C flour
  • 2 eggs
  • 1/4 C cheddar cheese
  • garlic, salt and pepper to taste
  • Form into loose (not tight) patties
  • Fry in hot oil until browned


ANOTHER RECIPE BRIEF – IRISH POTATO PANCAKES

  • Make your Creme Fraiche
    • 1/4 C Sour Cream
    • 2 tsp whole grain mustard
    • 1 tsp Fresh Chives
    • salt and pepper
  • Prepare your mashed potatoes
    • 1/2 C mashed potatoes
    • 1 TBL butter
    • 2 TBL Half and Half
    • Put ingredients into a pot
    • Heat, melt and blend
  • 1/2 C grated russet potato
    • Squeeze out as much water content as you can
  • Make the batter
    • Add 1 egg (beaten)
    • 1/4 C Half and Half
    • 3 TBL AP flour
    • scant baking powder
  • Combine all ingredients
  • Add salt and pepper
  • Butter a cast-iron skillet
  • Drop by spoonfuls onto hot skillet
  • Flip when edges are brown
  • Plate and top with a dollop of Creme Fraiche
  • Add a thin slice of smoked salmon
  • and garnish with chives


NOTES FROM CHOMPIES

  • 1 C Fresh grated potato
  • Chopped onion 1/2 C
  • 1/2 C masa meal
  •  (or flour)
  • 1/2 tsp black pepper
  • 1/2 tsp kosher salt
  • 1 tsp canola oil
  • 2 eggs
    • Rest 10 minutes
  • Create patty and put into 1/4 C hot canola oil
  •  

Simple Baked Potato

INGREDIENTS

  • Idaho Russet Potato
  • Butter or EVOO
  • Salt

STEP BY STEP

  1. Rinse your potato well and then dry it
  2. Poke a lot of holes in it using a fork or a corn cob holder – See notes below.
  3. To crisp up the skin, brush it with butter or EVOO, and then sprinkle with salt
  4. Bake at 400º for 50-60 minutes.  Really large baked potatoes should go about 70 minutes.
  5. Your choices for toppings include serving with butter, sour cream, chives, steamed broccoli, and bacon.  Use your imagination.

NOTES

  • If you don’t poke holes in your potato, the steam cannot escape and 215º is the hottest that your potato will get inside.  With holes poked, the inside of the potato will get closer to 300º and caramelization of the sugars can occur, so it will taste better and be fluffier.

Reverse Sear

  • You need to season it based upon the thickness of the cut. Most of our cuts are at least an inch thick so you need a good amount of seasoning because that seasoning is only going to be on a VERY small portion of each bite. So, you need a LOT of it to actually season the ENTIRE bite.
  • I

XFor a hard sear – Regular sear

Bring cast iron skillet up to 425º and sear.
Brush with hoisin and put in oven at 400º till 120-125º
Let rest 8 minutes before serving

Cooking a lot of steaks for a group – Reverse sear

If you have guests that want their meat cooked to different levels of doneness, here is something that you can do. The only drawback is that it takes a bit longer to cook the meat, but because of that you have more control.

INGREDIENTS

  1. Preheat your oven to 225 – 250º.
  2. This is assuming a standard one inch bone-in T-bone, Porterhouse or Tenderloin, but (special times) are also posted for a two-inch ribeye.  If you are serving Filet Mignon, and your guest wants it well done; send them home.
  3. This is not for lesser cuts of meat such as a skirt steak.  They do better quickly cooked at a high heat.
  4. You will be placing the meat on a rack that is set within a cooking tray.  Use toothpicks to indicate level of doneness.
    (5) Well done (4) Medium well (3) Medium (2) Medium rare (1) Rare
  5. Start cooking meat for the person who wants their meat well done first.  This will cook for eight minutes for a one-inch steak (and twelve minutes for a thick ribeye).
    • After the eight (or twelve) minutes has elapsed, put in the meat that will be medium well.  Baste all pieces.
    • Eight minutes later, put in the meat that will be medium.  Baste all pieces.
    • Eight minutes later, put in the meat that will be medium rare.  Baste all pieces.
    • Eight minutes after that, put in the meat that will be rare.  Baste all pieces.
  6. Cook all pieces of meat together for another 45 minutes from this point forward.
  7. At this point, if you are cooking for a group, you can set them aside, or refrigerate overnight.  If storing overnight though, be sure to bring them up to room temperature for an hour before cooking.
  8. With 10 minutes left on the clock, bring a cast iron skillet up to about 500º
  9. Bring out the trays of meat.  DO NOT baste this time.  You want them relatively dry.
    To reverse sear the steaks
    Make sure your skillet is at least 450º before you start
  10. Starting with the steak with five toothpicks, sear it in the skillet for 60 seconds.
    • After a minute, add a second steak and flip the first. 
    • In 60 seconds, the first will be ready to come off, and you can flip the next.
    • Continue searing two at a time, working your way up so that you are eventually serving a steak about every 60 seconds.

Two-inch ribeye works well for this.  You should also consider purchasing one or two nice thick Rib Eye Steaks.  You will be able to cook them more efficiently, control the temperature better, and enjoy the party.


NOTES FROM AN EMAIL

  • You need to season it based upon the thickness of the cut. Most of our cuts are at least an inch thick so you need a good amount of seasoning because that seasoning is only going to be on a VERY small portion of each bite. So, you need a LOT of it to actually season the ENTIRE bite.
  • I lke to ‘reverse sear’ my steaks. That means I put them in the oven, bring them up to temperature and THEN I throw them on the grill to sear the outside. That usually gets them up to about 150 degrees or so total. Then I let them rest for about 10 minutes, during that time they continue to cook and the temperature continues to rise. The juices also soak back into the meat making it nice and juicy.

We also REGULARLY sell quite a few variations.

  1. ‘Choice’ steaks – these are grass fed until the last 90 days of the animal’s life, at which point the animal is fed grain. They are labeled as ‘Choice or higher’ because the inspectors are looking at the outside of the primal. The meat might be ‘Prime’ but they can’t see the inside so often it’s ‘Prime’ meat.
  2. Dry Aged Steaks – less water and a more concentrated flavor.
  3. Prime steaks – more internal marbling, very nice but not as nice as Dry Aged.
  4. Grass Fed – a phenomenon, as these steaks actually lack EVERYTHING that makes a steak good. It’s very lean, tends to be small and a very ‘gamey’ flavor.

NONE of our steaks are EVER given antibiotics or steroids.

Cook it right and it will taste as good as a restaurant steak.

Tips: Terminology

  • Temperature
    • Low heat: 225°F to 249° F – (107°C to 120°C)
      – Boiling, simmering, poaching
      – Unrefined canola oil
    • Medium low heat: 250°F to 324°F – (121°C to 162°C)
      – Slow cooking, stews, stocks, reductions
      – Unrefined corn oil
    • Medium heat: 325°F to 374° – (162°C to 190°C)
      – Gentle cooking temperature, also for finishing food started at high heat
      – Extra virgin olive oil and butter – Low temperature frying
    • Medium high heat: 375° to 449°F – (190°C to 232°C)
      – Pan fry and quicker general cooking of foods
      – Refined canola oil – High temperature frying
    • High heat: 450°to 650°F – (232°C to 343°C)
      – Saute, sear, Wok stir fry
      – Refined sunflower and peanut oil – Very high temperature quick frying
  • Braise
  • Sauteé
  • Sear

Good Housekeeping has quite a comprehensive dictionary of cooking terminology.


TERMINOLOGY

  • TEMPER – If you combing your egss and hot liquid all at once, you will cook some of your eggs, resulting in lumps. To temper your eggs and liquid together means that you take just a little tiny bit of your hot liquid and whisk it into your eggs, then a bit more, then a bit more. Once they are combined, about 50/50 you can mix the entire thing together.
  • CLARIFIED BUTTER – Melt butter slowly, and the milk solids will settle on the bottom. Pour off the clear oil, leaving (and discarding) the milk solids.
  • ZEST – Use a microplane and shave off the colored part of an orange, lime or lemon. Try not to get the pith.
  • MICROPLANE – Essentially the same as a file, but this is for food. You SHAVE off tiny pieces of citrus, nutmeg, etc and use it as part of your flavoring.
  • PITH – The white part of citrus that is just under the colored skin. Usually very bitter.


Tips: Steaks (Beef)

See also Tips: Burgers and Tips: Steaks and Cow Parts

Buying your Meat

  • Don’t skimp on buying a steak.  You would spend $40 on a really good steak at a restaurant, consider spending nearly that much on a quality piece of meat with good marbling.  See the chart below from Food Beast for price ranges of different cuts of meat.
  • Buy an aged steak.  More developed flavor.  Better yet, buy a nice cut and dry age it yourself.  Put on a rack and salt both sides.  Put in the refrigerator for 48 hours uncovered.
  • The ONLY time you should press down on your steak is when it is first put on the grill.  Put the “serving side” onto the heat first, then press it down to get maximum contact.  Don’t press down again after you flip it.
  • Consider buying and cooking one thick steak (2 inches is a nice thickness) to serve multiple people.  The overall quality will be better.
  • Bone in cuts of meat will generally have a more complex flavor.

Prepping your Meat for Cooking

  • Searing your Meat:
    • Get a good sear on your meat.  Sear means flavor and appearance will be enhanced.
    • Tie your meat up with a string around the perimeter to hold and shape your meat.
    • Steaks must come up to room temperature before you start to cook it (30-60 minutes)
    • Salt your meat liberally.
    • Salt it the night before, and refrigerate it overnight
    • Dry Age Your Meat:  Place on a wire cooling rack in the refrigerator for 24-36 hours before cooking.  This will allow the moisture to be removed from the surface of the meat.  If you are marinating your meat, just be sure to press it VERY dry before searing.
    • Before searing, add pepper
    • Sear at medium-high (about 400º) for about two minutes per side on a cast iron skillet.  Sear the presentation side first.  Sear even the sides of a thick steak.

Cooking your Meat

  • GENERALLY SPEAKING thin cuts of meat will cook quickly over high heat, while thicker cuts will cook slowly over low or medium heat.
  • When grilling a steak, consider a 2-3 inch thick Rib-eye on the bone steak. This will feed 4-6 people.  Take bone off before serving.  Cut against the grain in thick slices – about 3/4 inch.
  • Cook all FOUR sides on the hot side of the grill, then move to the indirect side of the grill and cook until internal temperature is 125º
  • Start over high heat.
  • Try to get steak to medium rare throughout the entire steak.  About 250º for six hours or until internal temp is about 120º
  • Rest for ten minutes before cutting
  • I consider two thermometers critical for any serious chef, even if they will remain an amateur chef for their entire life.  I purchased both of mine at ThermoWorks.
    • The first is an internal temperature Instant Read ThermaPen.  It is about $80 but I have had mine for about ten years.  It needs a new battery about every three years.
    • This one is less expensive, but I find that I use it more than the internal probe.  I usually use it for seeing if my skillet is up to heat, but it is also good to see if the blacktop will burn the paws of my dog.  It’s also a lot of fun to play with at night.  It is an Industrial Infrared Thermometer and is about $50.
    • If you can only buy one, buy the Infrared Thermometer.
    • If you ABSOLUTELY can’t afford to buy one, here is a way that you can test your meat reasonably well.  Use the finger test.  This wonderful photo is from WattaLyf.

finger-test


cow-breakdown

This graphic is from Food Beast

Click for an enlargement.

Notes about cuts of meat

  • Boneless Rib Eye-more fat, more flavor
  • Ribeye – more marbling and more flavor
  • Filet Mignon – very tender, but not as much flavor
  • Porterhouse-filet
  • Del Moneo – no filet
  • Tenderloin-most tender
  • Sirloin-good for grill
  • London Broil-top round
  • Flank Steak-marinate 24 hrs & grill – Fairly lean and needs fat
  • Brisket-first cut-slow cooker
  • Brisket-second cut-fat-hamburger
  • Top Round-good for oven roast @ 350
  • Bottom Round-pot roast-slow cooker
  • Skirt steak – outside chest toward ground – thougher
  • Hanger steak – behind skirt steak – much more tender

Here is another good chart.  Click to read the details.

cuts-of-beef

Pan Sauce for Chicken

INGREDIENTS

  • Aeromatics
    • Onion
    • Ginger
    • Garlic
  • Liquids
    • White wine
    • Orange juice
    • Water
    • Chicken Stock
  • Flavor Builders
    • A sprig of rosemary (removed after cooking)
    • A sprig of thyme (removed after cooking)
    • Cilantro
    • Capers
    • Parsley
  • Finish with Richness and Depth
    • Butter

STEP BY STEP

  1. After you finish cooking your chicken, add some minced shallots and grated garlic.
  2. After they have softened, add a splash of wine to deglaze the pan.
  3. As soon as deglazed, add some flavor builders.
  4. Once the smell of them is filling the room, add 2 TBL of beef stock and capers
  5. Let it come up to a boil, then add 2 TBL of butter and parsley to bring everything together.
  6. This entire process should not take more than 4 minutes.


Tips: Avocado

Purchasing Your Avocado

  • When selecting an avocado, if you are planning on eating it right away, get one from which the stem falls off easily, but is still somewhat green underneath.  If the underneath has turned brown they are overripe.  If the stem does not come off, it is good to sit on your counter for a few days until it ripens.
  • If you can only find an unripe avocado you can have it ripe by tomorrow if you place it in a bag with a banana and let is rest for 24 hours.  The gas produced by bananas ripen produce.  Because of this, don’t store bananas with your fruit if you don’t want them ripened.

Peeling, Slicing and Dicing Your Avocado

  • Halve the avocado. You may have seen people hack the seed with their knife. Be very careful if you do this, because it is very easy to get your finger too.
  • I prefer to slightly squeeze the avocado, and the seed will nearly pop out.
  • You can score the avocado right in the skin, then just scoop it out with a spoon. Here is a video by Expert Village.
  • If you are making a lot of guacamole, after you halve the avocado, press it through a bread drying rack that has metal struts going both directions creating a grid. Just press the avocado through this into a bowl.
  • You can also scrape an avocado against the side of a glass. Here is a video by Crazy Russian Hacker.

Misc Avocado Information

  • I am from Ohio. Back east avocados are called mangoes. Bell peppers are also called mangoes. Here in Arizona mangoes are called mangoes, avocados and called avocados and bell peppers are called bell peppers.


Canyon Ranch Guacamole – Copy Cat

CLICK HERE for Avocado Tips and Tricks.


1/2 cup julienned spinach
1/3 cup frozen peas
1 ounce lite tofu
2 tablespoons lemon juice
Pinch salt
Pinch cumin
Pinch cayenne
Pinch chili powder
Dash Tabasco
6 tablespoons mashed avocado
3 tablespoons peeled and minced tomato
2 tablespoons pico de gallo (see recipe)
1 tablespoon minced cilantro
3 tablespoons minced white onions
2 teaspoons chopped scallions

1. Steam spinach until wilted. Remove from heat and squeeze out excess water.
2. Briefly steam peas and rinse under cold water to retain green color.
3. In blender container, combine spinach, peas, tofu, lemon juice, seasonings, and avocado and process until smooth
4. Fold in remaining ingredients and mix well.

Chipotle’s House Spicy Guacamole – Copy Cat

CLICK HERE for Avocado Tips and Tricks.


Ingredients
1/4 tsp sea salt (to taste)
1 tsp garlic (more or less to taste)
1/4 CU finely diced red onion or Valida
2 seeded habeñero, jalapeno or Serrano peppers (see Variations)
3 limes (approx 2 TBS lime juice)
1/2 tsp salt
Mix and let set 10 minutes
2 ripe avacados (soft, but not squishy)
1/2 CU diced cilantro or parsley
1 few mint leaves
1 diced tomato
1/2 finely minced onion
1 Tomato
1/4 CU Parsley

Instructions
1. Crush avocados
2. Mix in all other ingredients

Variations
1.Substitute seeded jalapenos for heat, but not too hot
2. Add diced tomatoes (cherry is best from my viewpoint)
3. Best to meld for 30 minutes, but impressive to mix at the table.


Ribs: Hawaiian Beef Ribs

Hawaiian Beef Ribs

Recipe Posted by RDJ – Recipe du Jour
Simply the BEST daily recipe E-zine on the Web! Delicious recipes delivered daily via email. Recipes, columns, and nostalgia. Send a blank email to rdj-subscribe@topica.com

6 to 8 beef back ribs (6 to 7 in. each, 3 1/4 to 4 lb. total), cut apart
1/2 cup prepared teriyaki sauce
1 tablespoon Chinese rice wine or dry sherry
1 tablespoon prepared hoisin or char sui sauce
1 tablespoon prepared barbecue sauce or catsup
1/4 cup canned crushed pineapple
3/4 teaspoon hot chili flakes

Rinse beef ribs and pat dry. In a 1-gallon heavy plastic food bag or a deep bowl, mix teriyaki sauce, rice wine, hoisin sauce, barbecue sauce, pineapple, and hot chili flakes. Add ribs; seal bag and turn to coat meat well, or turn ribs in bowl to coat and cover airtight. Chill at least 1 hour or up to 24 hours.

If using a charcoal grill, mound and ignite 70 charcoal briquets on the fire grate, with vents open. When coals are dotted with ash, in about 15 minutes, push equal portions to opposite sides of grate. Add 5 briquets to each mound of coals.

If using a gas grill, turn heat to high, cover, and heat for 10 minutes. Adjust gas burners for indirect heat (on each side of grill–none down center); keep heat on high.

Set barbecue grill in place. Lay meat on grill, not directly over heat (to avoid flare-ups). Cover barbecue; open vents for charcoal. Cook, basting ribs occasionally with marinade the first 20 minutes and turning as needed for even browning, until meat is rare (red in center of thickest part; cut to test), 20 to 25 minutes total, or medium (pink in center of thickest part; cut to test), 30 to 35 minutes total. If meat is not as brown as you like, move over direct heat and turn frequently.

Transfer ribs to a platter or plates. Makes 4 servings.

Nutritional Information
Amount per serving
Calories: 576
Calories from fat: 66%
Protein: 35g
Fat: 42g
Saturated fat: 17g
Carbohydrate: 11g
Fiber: 0.2g
Sodium: 1582mg
Cholesterol: 121mg
_______________________________________

Recipe du Jour is strictly an opt-in service. We do not sell, lease, loan, or give our subscribers‚ addresses to anyone for any reason. Our features are intended as entertainment only.

@@@@@@@@@@@@@@@@@@@@@@@@@@@@@@@@@@@@@@@@@@@@@

Ribs: Smoked Ribs

How to Smoke Ribs; Perfect Pork Ribs

From TheSmokerKing.com
For a bunch of grilling recipes and tips, visit Aaron’s site.


Picture LogoYou can’t beat a rack of perfectly smoked barbecue pork ribs. Whether you like them dry or wet, the trick is time and temperature. When you cook barbecue you cook to a temperature more and worry about less time. I cook ribs until the thickest part is 170-180 degrees F.

Pork Ribs

Most of the ribs I smoke are dry, meaning no barbecue sauce is applied during the cooking process. I will usually have a sauce available for people who like barbecue sauce on their ribs, but I do not typically apply the sauce while I am cooking the ribs.

I do apply a mop when cooking the ribs to keep the ribs moist and add a little flavor. A great mop for ribs is to use 60% apple cider vinegar and 40% cooking oil. This type of mop can be applied with a small bottle sprayer found at your local grocery store.

To smoke a perfect rack of ribs, follow the simple process described below. You will have great results every time.

1. Choose a rack of ribs from your grocery store that is pink in color, and has not been frozen. I prefer St. Louis style ribs, which are pre-trimmed. Your local butcher may also be of assistance to you.

2. The night before you are going to smoke the ribs, remove the membrane off of the rack of ribs. The membrane is a thin, plastic like liner on the back side of the rack of ribs. If you leave the membrane on, the the ribs will not be as tender. To remove the membrane, use a sharp knife to separate the membrane from the ribs at the narrow end of the rack. When you have enough of the membrane separated, use your thumb and index finger to pull and separate the rest of the membrane from the ribs. I pull and cut with my knife at the same time to insure I remove all of the membrane. With a little practice, you will get the hang of it.

3. Apply a thin layer of mustard or olive oil to the ribs. This will help the rub stick to the ribs. I like to use mustard because it makes a great crust.

4. Apply a rub to the ribs. Rub recipes can be found on the left navigation menu.

5. Let the ribs sit in the refrigerator over night.

6. Remove the ribs from the refrigerator about 1 hour before you are going to smoke them. They will be closer to room temperature by cooking time.

7. Heat your smoker to 250 degrees F. I also use an oven thermometer, placed where the rack of ribs will lay, to insure that the temperature is 250 degrees at the cooking surface. Many thermometers built onto smokers will actually be hotter that the actual temperature at the level the ribs are smoking at.

I have found that 250 degrees F is the ideal temperature to smoke ribs at. I use a mixture of Kingsford charcoal and mesquite wood, but other types of wood may be used including hickory, apple, cherry, pecan, etc. It just depends on what flavor you are looking for. Using charcoal, and adding the wood will allow you to control how much smoke you are cooking with.

8. Smoke the ribs for about 5 hours, applying your mop about every 45 minutes. The thickest part of the rack of ribs should be about 170-180 degrees F if a constant temperature was maintained while smoking. During the last 30 minutes, I wrap the ribs in foil, apply my mop, and put them back on the smoker. This will make them very tender. Make sure your exhaust damper is wide open. You do not want to trap any of the smoke in the smoker. This can produce a very bitter taste.

And that is it. Enjoy your ribs.

If you have any questions, send an email to aaron@thesmokerking.com.

@@@@@@@@@@@@@@@@@@@@@@@@@@@@@@@@@@@@@@@@@@@@@

Ribs: Pork Ribs

INGREDIENTS

  • 2 racks baby back ribs

    DRY RUB
  • 1/2 C brown sugar
  • 2 TBL Grandpa's Thunder Powder or Arghhh Powder
  • 2 TBL salt
    – Mix together and set asideBRAISING LIQUID
    – Always contains an acid, salt and sugar
  • 1/4 CU white wine
  • 1 TBL white wine vinegar
  • 1 TBL Worcestershire Sauce
  • 1 TBL honey
  • 3 cloves garlic (smashed)
    – Mix together and then microwave 1 minute – Stir and set aside

STEP BY STEP

  1. Pat ribs until they are very dry
  2. Lay ribs on foil with the fat meaty side on top
  3. Wipe lightly with EVOO
  4. Coat liberally with Dry Rub
    – Wash your hands after this step
  5. Make a “boat” with the foil, then add braising liquid
  6. Close foil and cook at 200 degrees for 6 hours
  7. Increase heat to 350º and cook for 40 minutes
  8. After cooking, lay ribs on a pan
  9. Snip a hole in the foil to let liquid escape
  10. Collect liquid in sauce pan and heat slowly to thicken.
    reducing will make your glazing sauce (10-15 minutes)
  11. Open ribs and brush with glazing sauce
  12. Broil (uncovered) until it starts to caramelize – THIS WILL NOT TAKE LONG
  13. Cut into two-rib sections and toss in the left-over sauce

Ribs: Short Ribs

Barbecue Short Ribs

3 to 4 pounds beef short ribs

short-ribsUse BBQ sauce of your choice. (Not dry rub) add 1/2 C vinegar and 1/2 C sugar in a large saucepan and simmer until mixture thickens to a syrupy consistency, about 10 to 15 minutes. Add ribs, simmering for 20 minutes. Allow ribs to cool on a dish lined with aluminum foil. After 15 minutes, wrap ribs in foil and refrigerate overnight.
Simmer the remaining liquid in the saucepan, reducing until it becomes thick enough to coat the back of a spoon. Cool and refrigerate. Reserve this sauce to baste the ribs while grilling.
The following day, grill ribs 30 to 40 minutes turning once or twice, and basting every 10 to 15 minutes with the reserved sauce.

NOTE: Get your meat from a butcher, not the supermarket.

These are good for quesadillas too.  Refrigerate finished ribs overnight, then remove fat.  Chop the meat into pieces against the grain and sear in a pan.  Top tortilla with meat and Queso Oaxaca.  Serve with salsa and guacamole.

@@@@@@@@@@@@@@@@@@@@@@@@@@@@@@@@@@@@@@@@@@@@@

Super Basic Short Ribs

Get beefy short ribs and cut them apart if not already.

Bring ribs up to room temperature then salt and pepper and sear in hot Dutch oven . Set aside to go into Dutch oven later.

Sear large pieces of carrots and onions or other vegetables in the pan drippings.
Sear only, do not over cook so that they fall apart
Mince carrot, onion, celery
Put in Dutch oven with remaining hot pan drippings
Use additional EVOO if necessary
Add rosemary, bay, sliced peppers, whole cloves, and garlic after the initial sauté
In three minutes, add 2 cups red wine and 2 cups beef stock
Put the pieces back in the pot with the liquid
Cover with aluminum foil
Bake at 325° for 2 1/2 – 3 hours .
Alternate: 300º for 4 hours

Put back in root vegetables for the last 10 minutes of cooking

Remove meat and vegetables and set aside for serving

After the remaining liquid cools, strain it and allow to cool further until the fat separates.
Use 2 tablespoons butter and 3 tablespoons flour to create a room
Then put 1 Cup strained drippings back into pan and cook at low simmer until it starts to thicken
Keep adding liquid a ladle at a time and continue to whisk

Served atop cook polenta
Garnish with root vegetables, chopped parsley, and maybe pomegranate, raspberries or blueberries

You can use leftover meat for hash or shredded sandwiches

@@@@@@@@@@@@@@@@@@@@@@@@@@@@@@@@@@@@@@@@@@@@@

Ingredients:
¼ cu chili puree
¼ cu tomato juice
¼ cu orange juice
¼ cu brown sugar
1 tbl ground espresso
2 tbl oregano
1 tbl garlilc
1 tbl onion
1 tsp cinnamon
1 tsp cumin

Instructions:
Stir all over med heat. Simmer.
Special Steps:
Cook ribs in over w/sauce

@@@@@@@@@@@@@@@@@@@@@@@@@@@@@@@@@@@@@@@@@@@@@

Tips: Potluck Safety

Keeping Hot Food Hot

  • If you have a casserole, you can keep it hot by wrapping it in a couple of bath towels.  If it is something that might spill, use a towel that will not be ruined by a stain.
  • If you have a crock pot or hot plate that will need to be plugged in, it is YOUR responsibility to bring an extension cord, not your hosts.  A heads-up ahead of time would be considerate as well.

Keeping Cold Food Cold

  • You can create a double boiler cooler by putting ice in the bottom of a large baking pot, and then putting a steel dish on top of it.  It is even better if you can put a lid over top.
  • You can also simply place your item in a tray of ice.
  • Wrapping up your item in a towel with an ice pack works, almost as well as bringing your item in a cooler.
  • The benefit of the first two items is that they will stay cold even on the serving table.

Spoilage

  • This is the greatest fear of potluck attendees.  If you have something that used mayo, eggs or some other easily spoil-able ingredient, for God’s sake be sure to take adequate precautions.

Sharing

  • If you are a beer drinker, don’t bring a six-pack just for yourself – bring a case to share.
  • Bring enough food to share.  Don’t bring a half pint of potato salad and fill up your plate three times.

Food Choices

  • This is not the place to experiment.  Forget about your spicy chicken lips.  Stick with something that is a tried and true favorite.
  • People tend to bring meaty dishes to share.  Consider bringing a vegetable plate.
  • If you bring soup, don’t expect the host to have bowls and spoons.  Part of your contribution includes utensils that are probably not otherwise available.

Left Overs

  • It is a nice gesture to leave food behind, but it is actually not the norm.  Usually people will “help clear up” and take the food home with them.  Each situation can be evaluated on a case-by-case basis.  Here are three examples that happened to us:
    • Amy is on a diet, but LOVES to cook and bake.  She made cookies and a trifle and brought them to our potluck.  She left them behind so she would not eat them and ruin her diet.
    • Tim is a single guy who brought baked chicken and fried chicken.  Only half of it was eaten.  I asked him “Would it be OK to combine them into one box.”  This gave him the opportunity to say “Oh, you just keep them all.”  His reply was “That would make it much easier for me.  Thanks.”
    • Tina brought a 48 pack of misc chips.  She put it under the table saying that she would bring it out if it was needed.  She then ate and left early, taking the chips with her.  This was just tacky.

Social Etiquette

  • A potluck, by definition, is a party to which each guest brings something to share.  An entree, a salad, a desert, or some other part of the meal.  Condiments do not count as a contribution.
  • You can, however, ask the host if you should bring a dish to share, or it if would be more helpful to bring a couple stacks of paper plates and some cups.  You should, however, coordinate this substitution with the host.
  • If you are told that you don’t have to bring anything, this is technically a dinner party, not a potluck.  It is still common courtesy to bring something.  A potted plant, a bottle of wine, or a loaf of bread.
  • Hosts: Don’t ask that guests bring a pot to share, plus a couple of bottles of wine to share.  It is OK to ask people to bring whatever they want to drink, but don’t be stingy about it.
  • Rather than being the first in line, as the food starts to come out, ask your host if there is anything you can do to help.  You won’t starve to death if you don’t get up to the buffet table in the first fifteen minutes.
  • If the host asks you to bring something for which you are known, try your best to accommodate their request.  If you can’t, let them know ahead of time.
  • Do not criticize food that you feel is below par.  The person that prepared the dish could be sitting right next to you.
  • Don’t pig out just because you can.  This is a social dining experience, not preparation before a fast.
  • Don’t bring something that will require additional cooking time without informing the host of your requirements far ahead of time.  They may have alternate plans for their stove.
  • Wait for everyone to have firsts, before you go back for seconds.  Frequently the host will not even get a chance to eat.
  • After everyone has finished eating, ask if you can help clean up – or just start carrying some of the dishes into the kitchen, following the example of your host.
  • Host: Be sure to return all of the CLEANED dishes brought to your potluck.  Make a note somewhere of what belongs to whom so you can be sure to return them.
  • If you can’t follow these simple rules and behave, just offer a reasonable reason you cannot attend and stay home.
HTML Snippets Powered By : XYZScripts.com