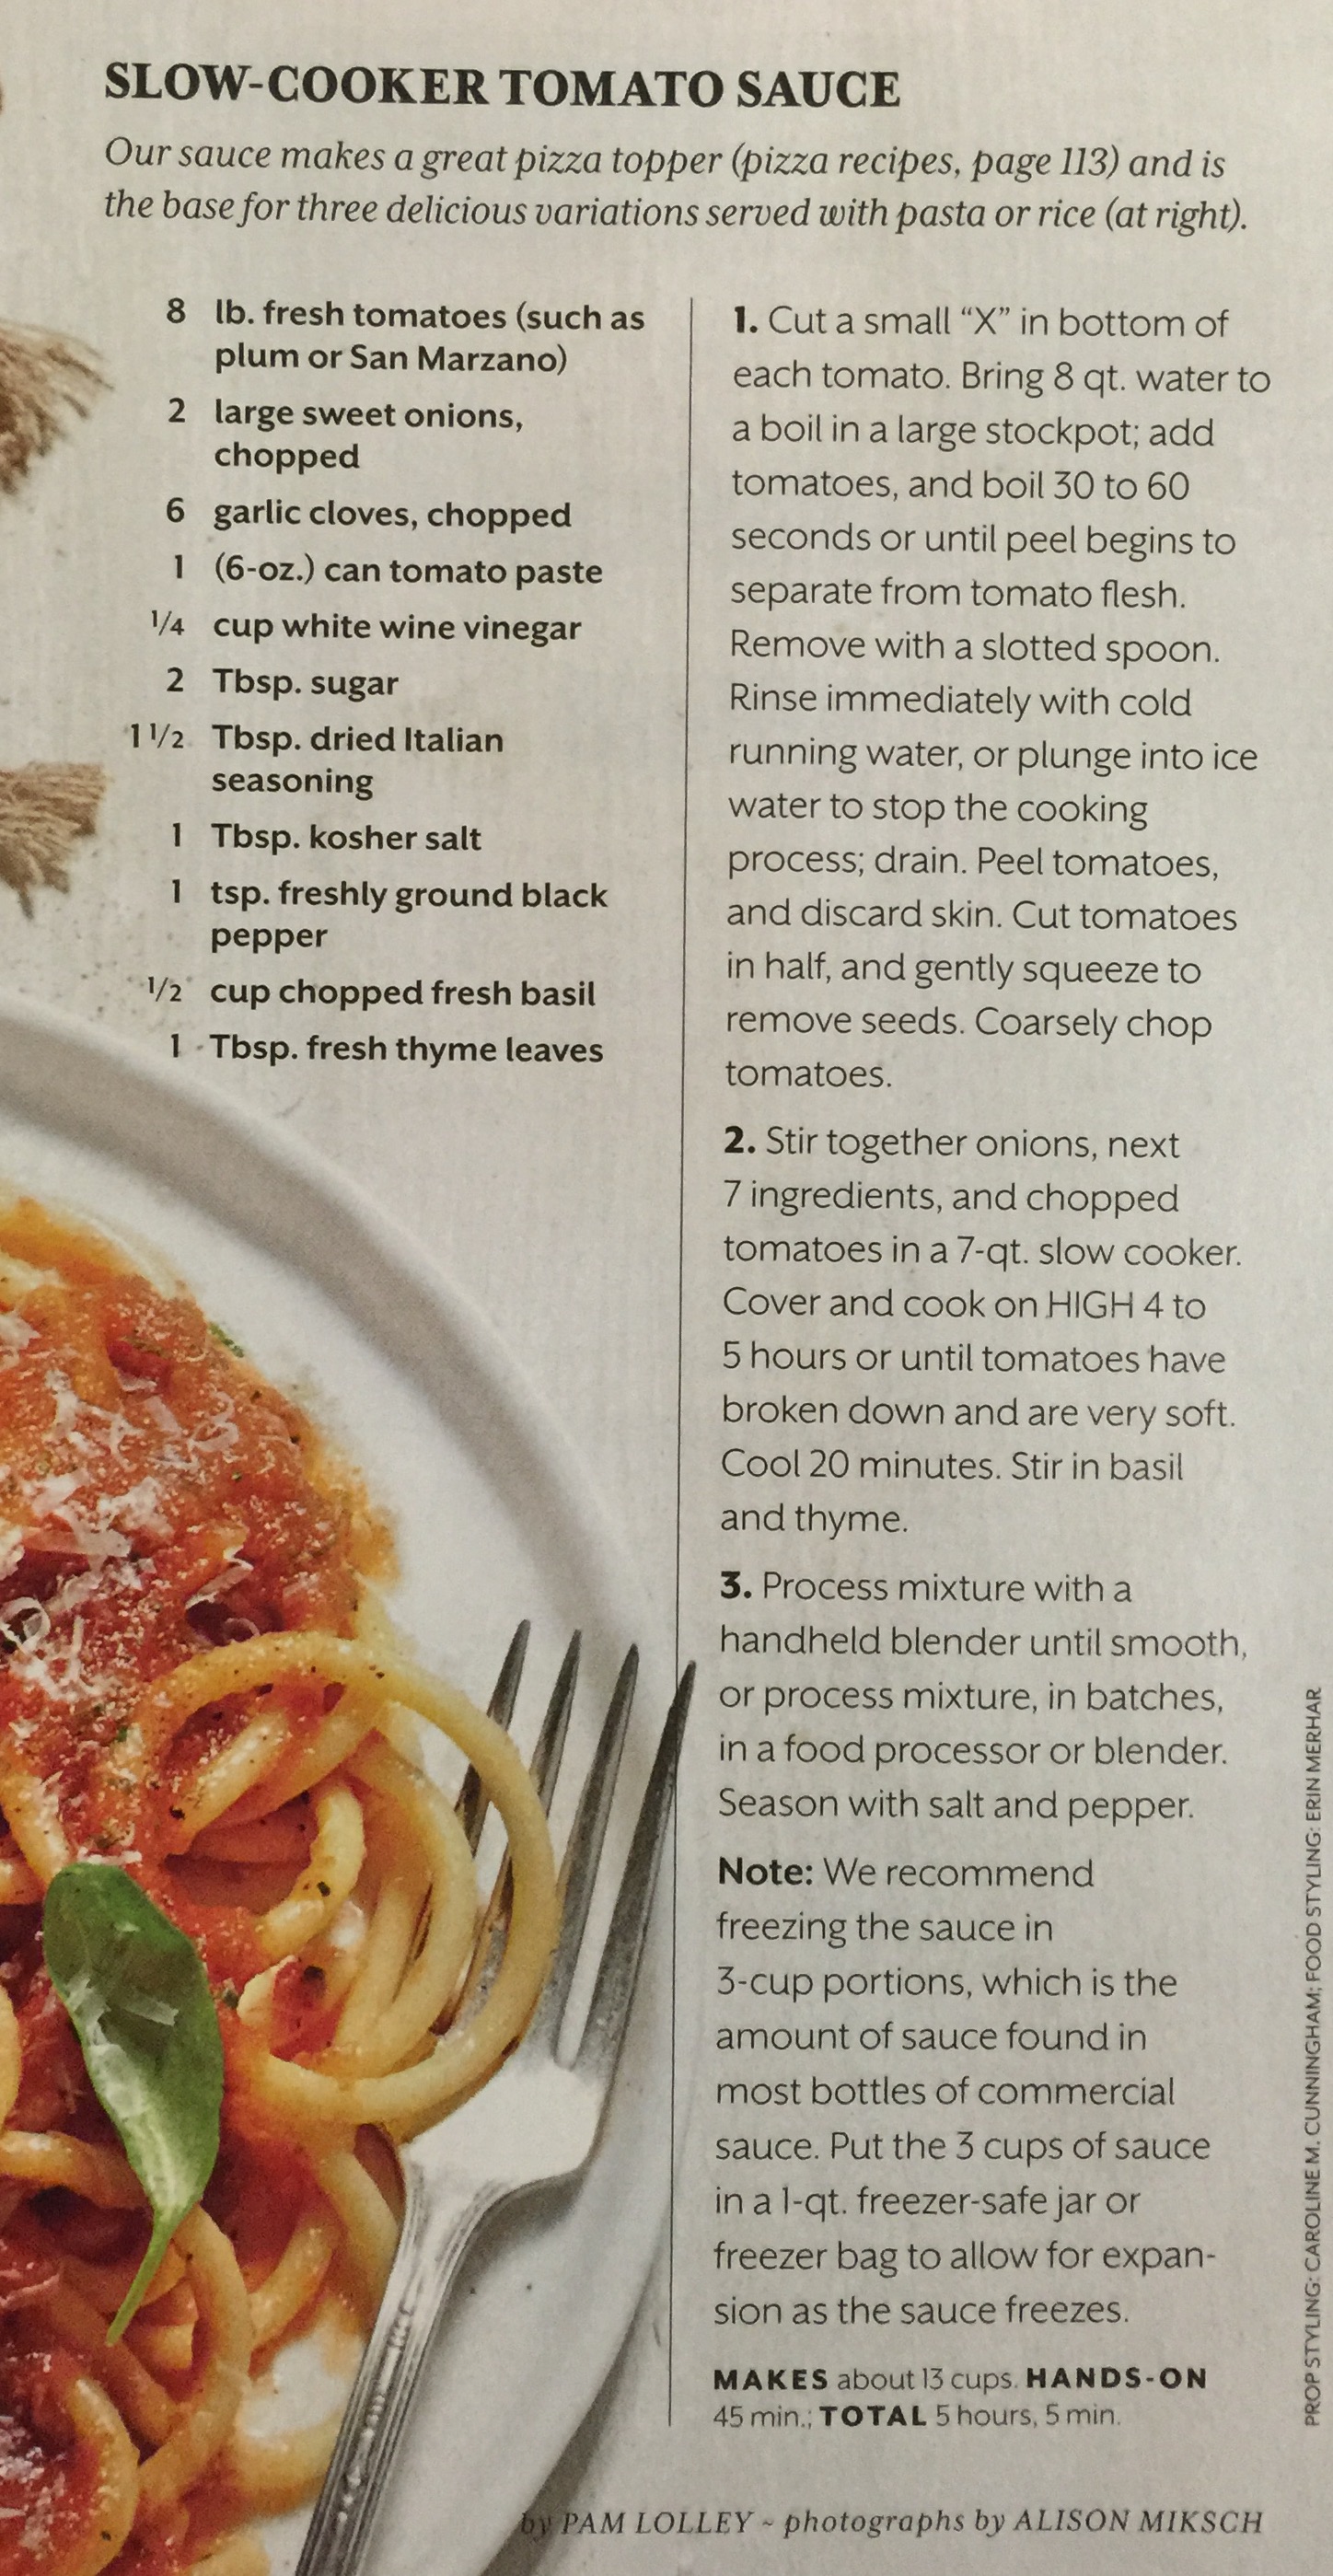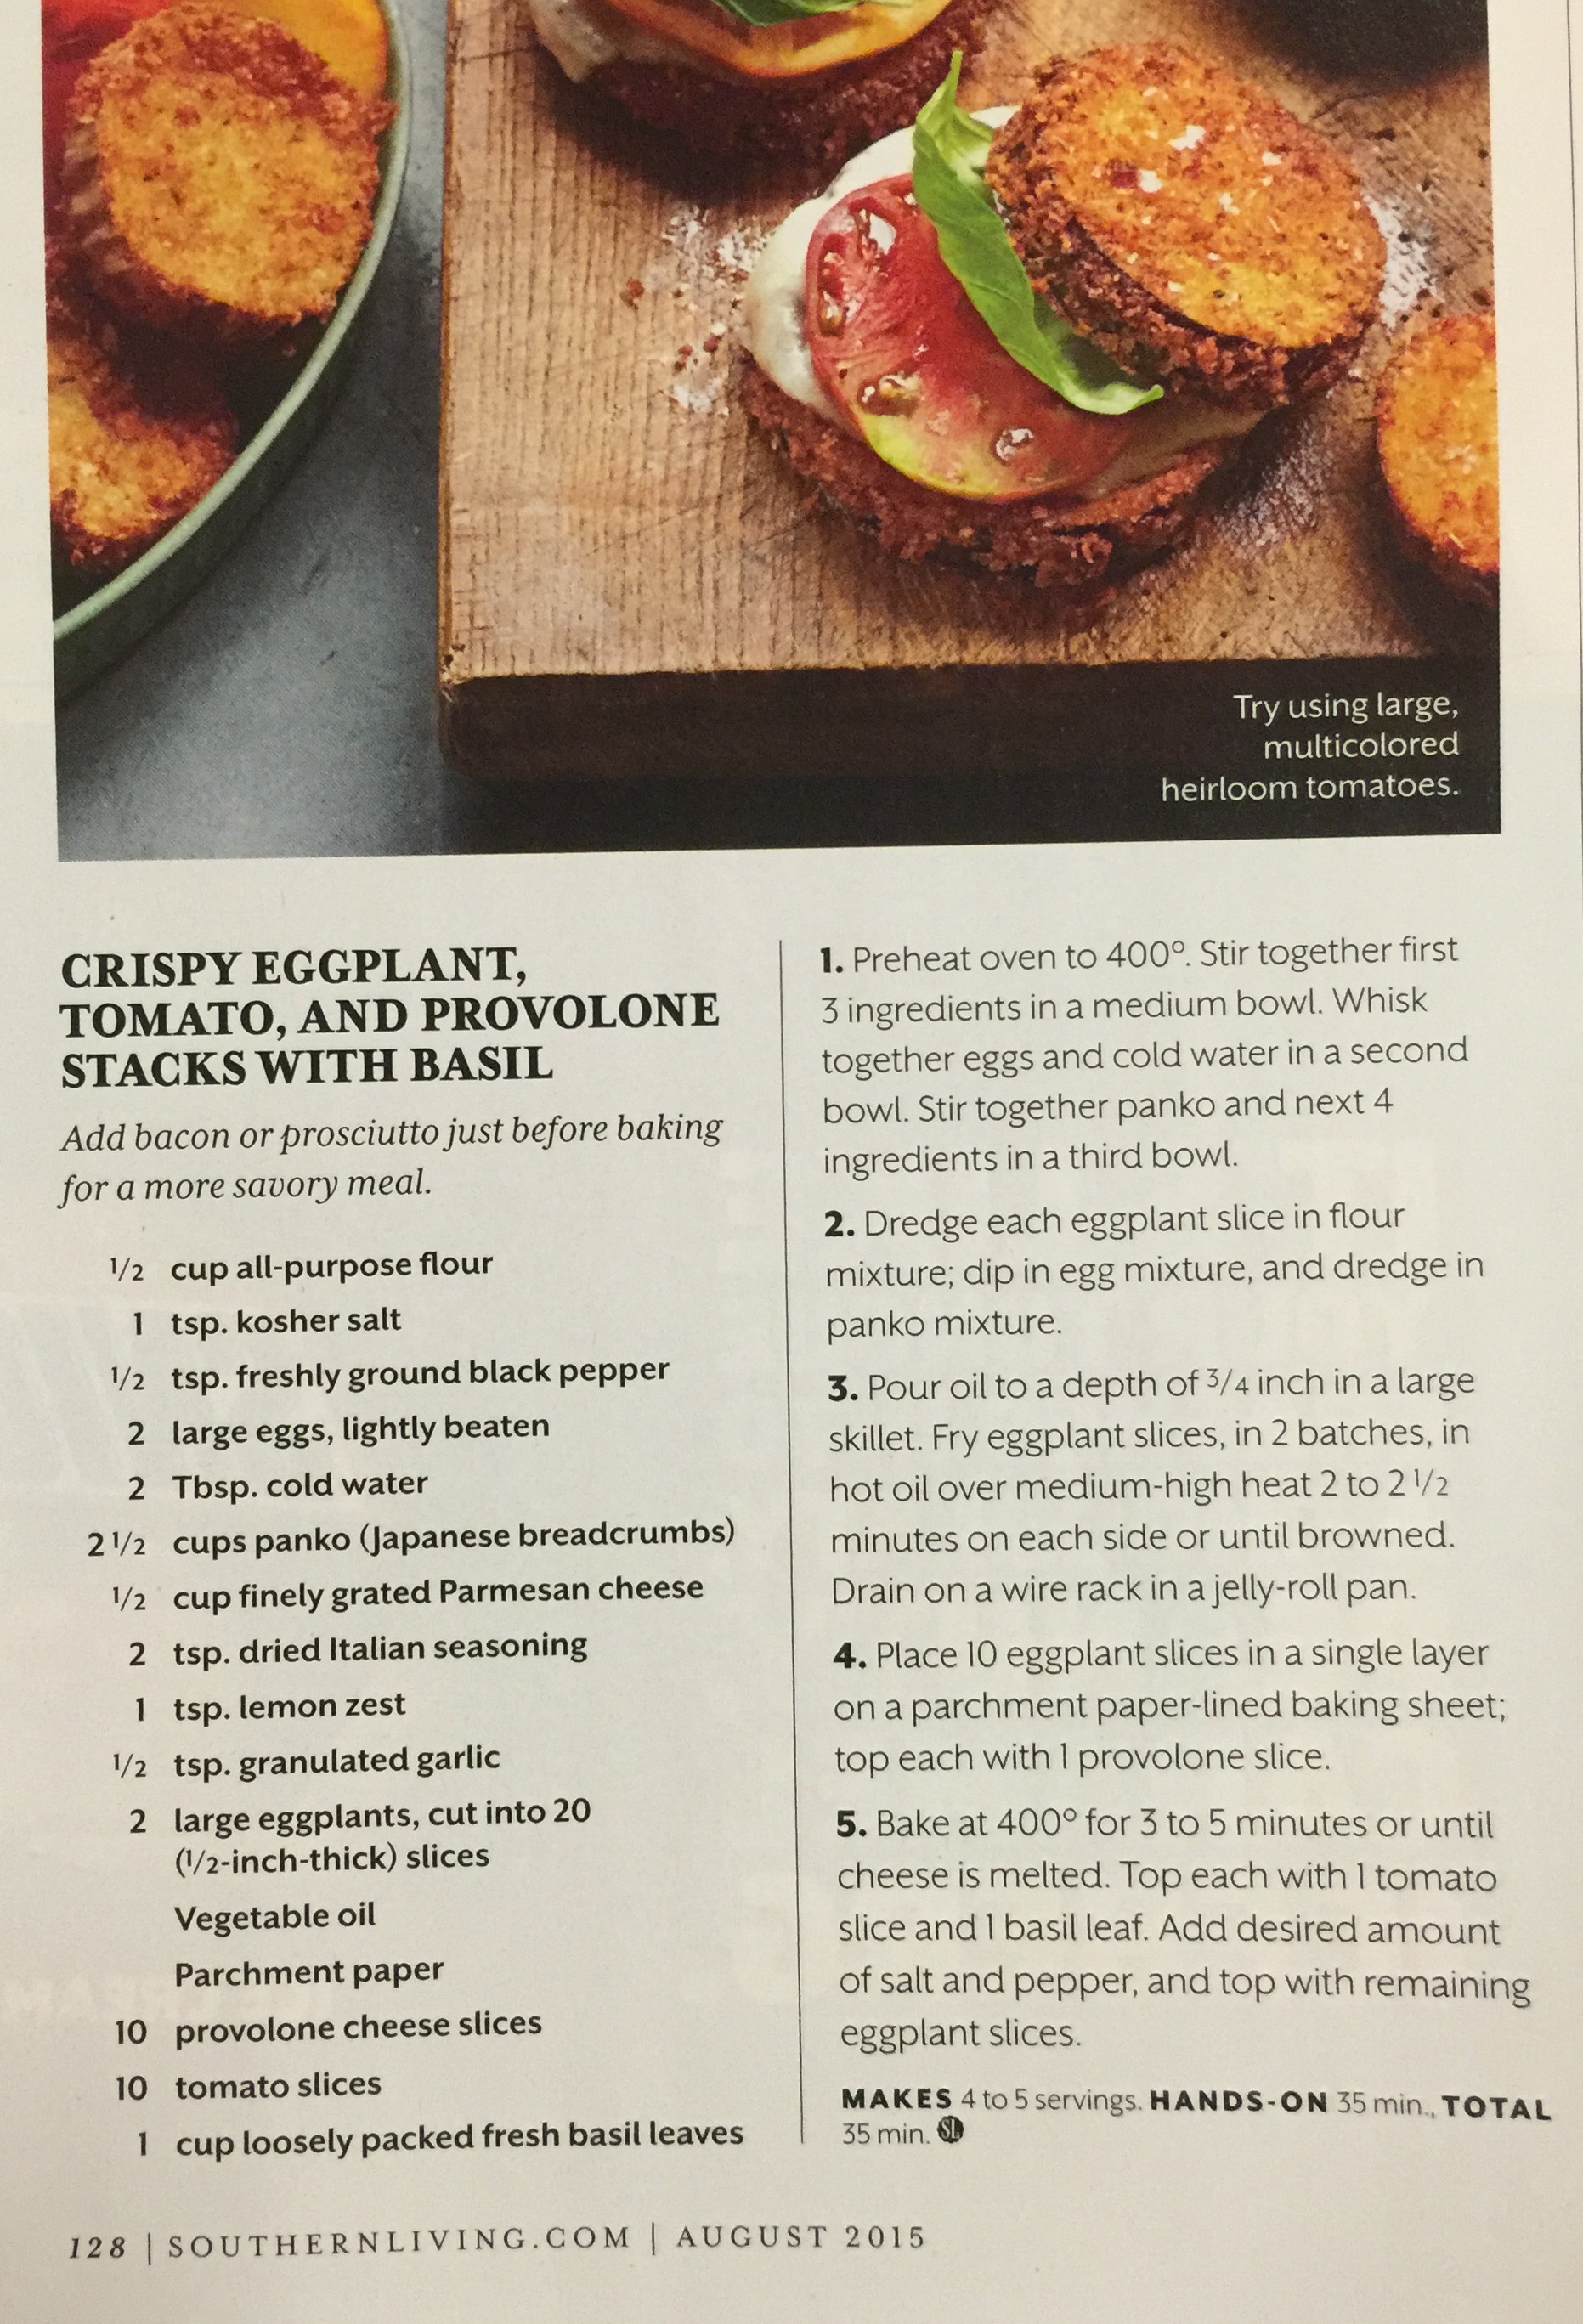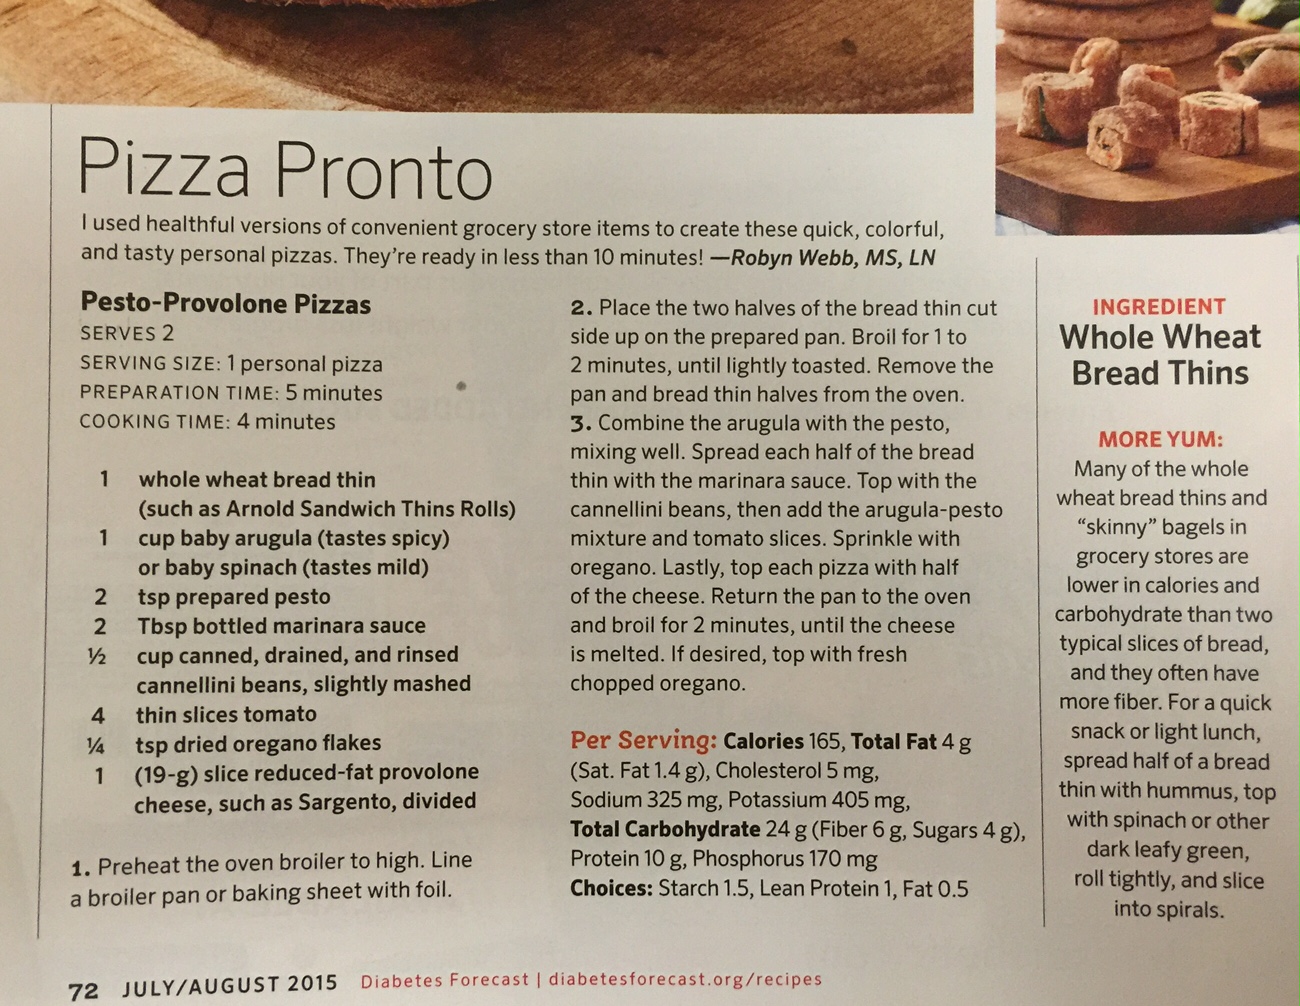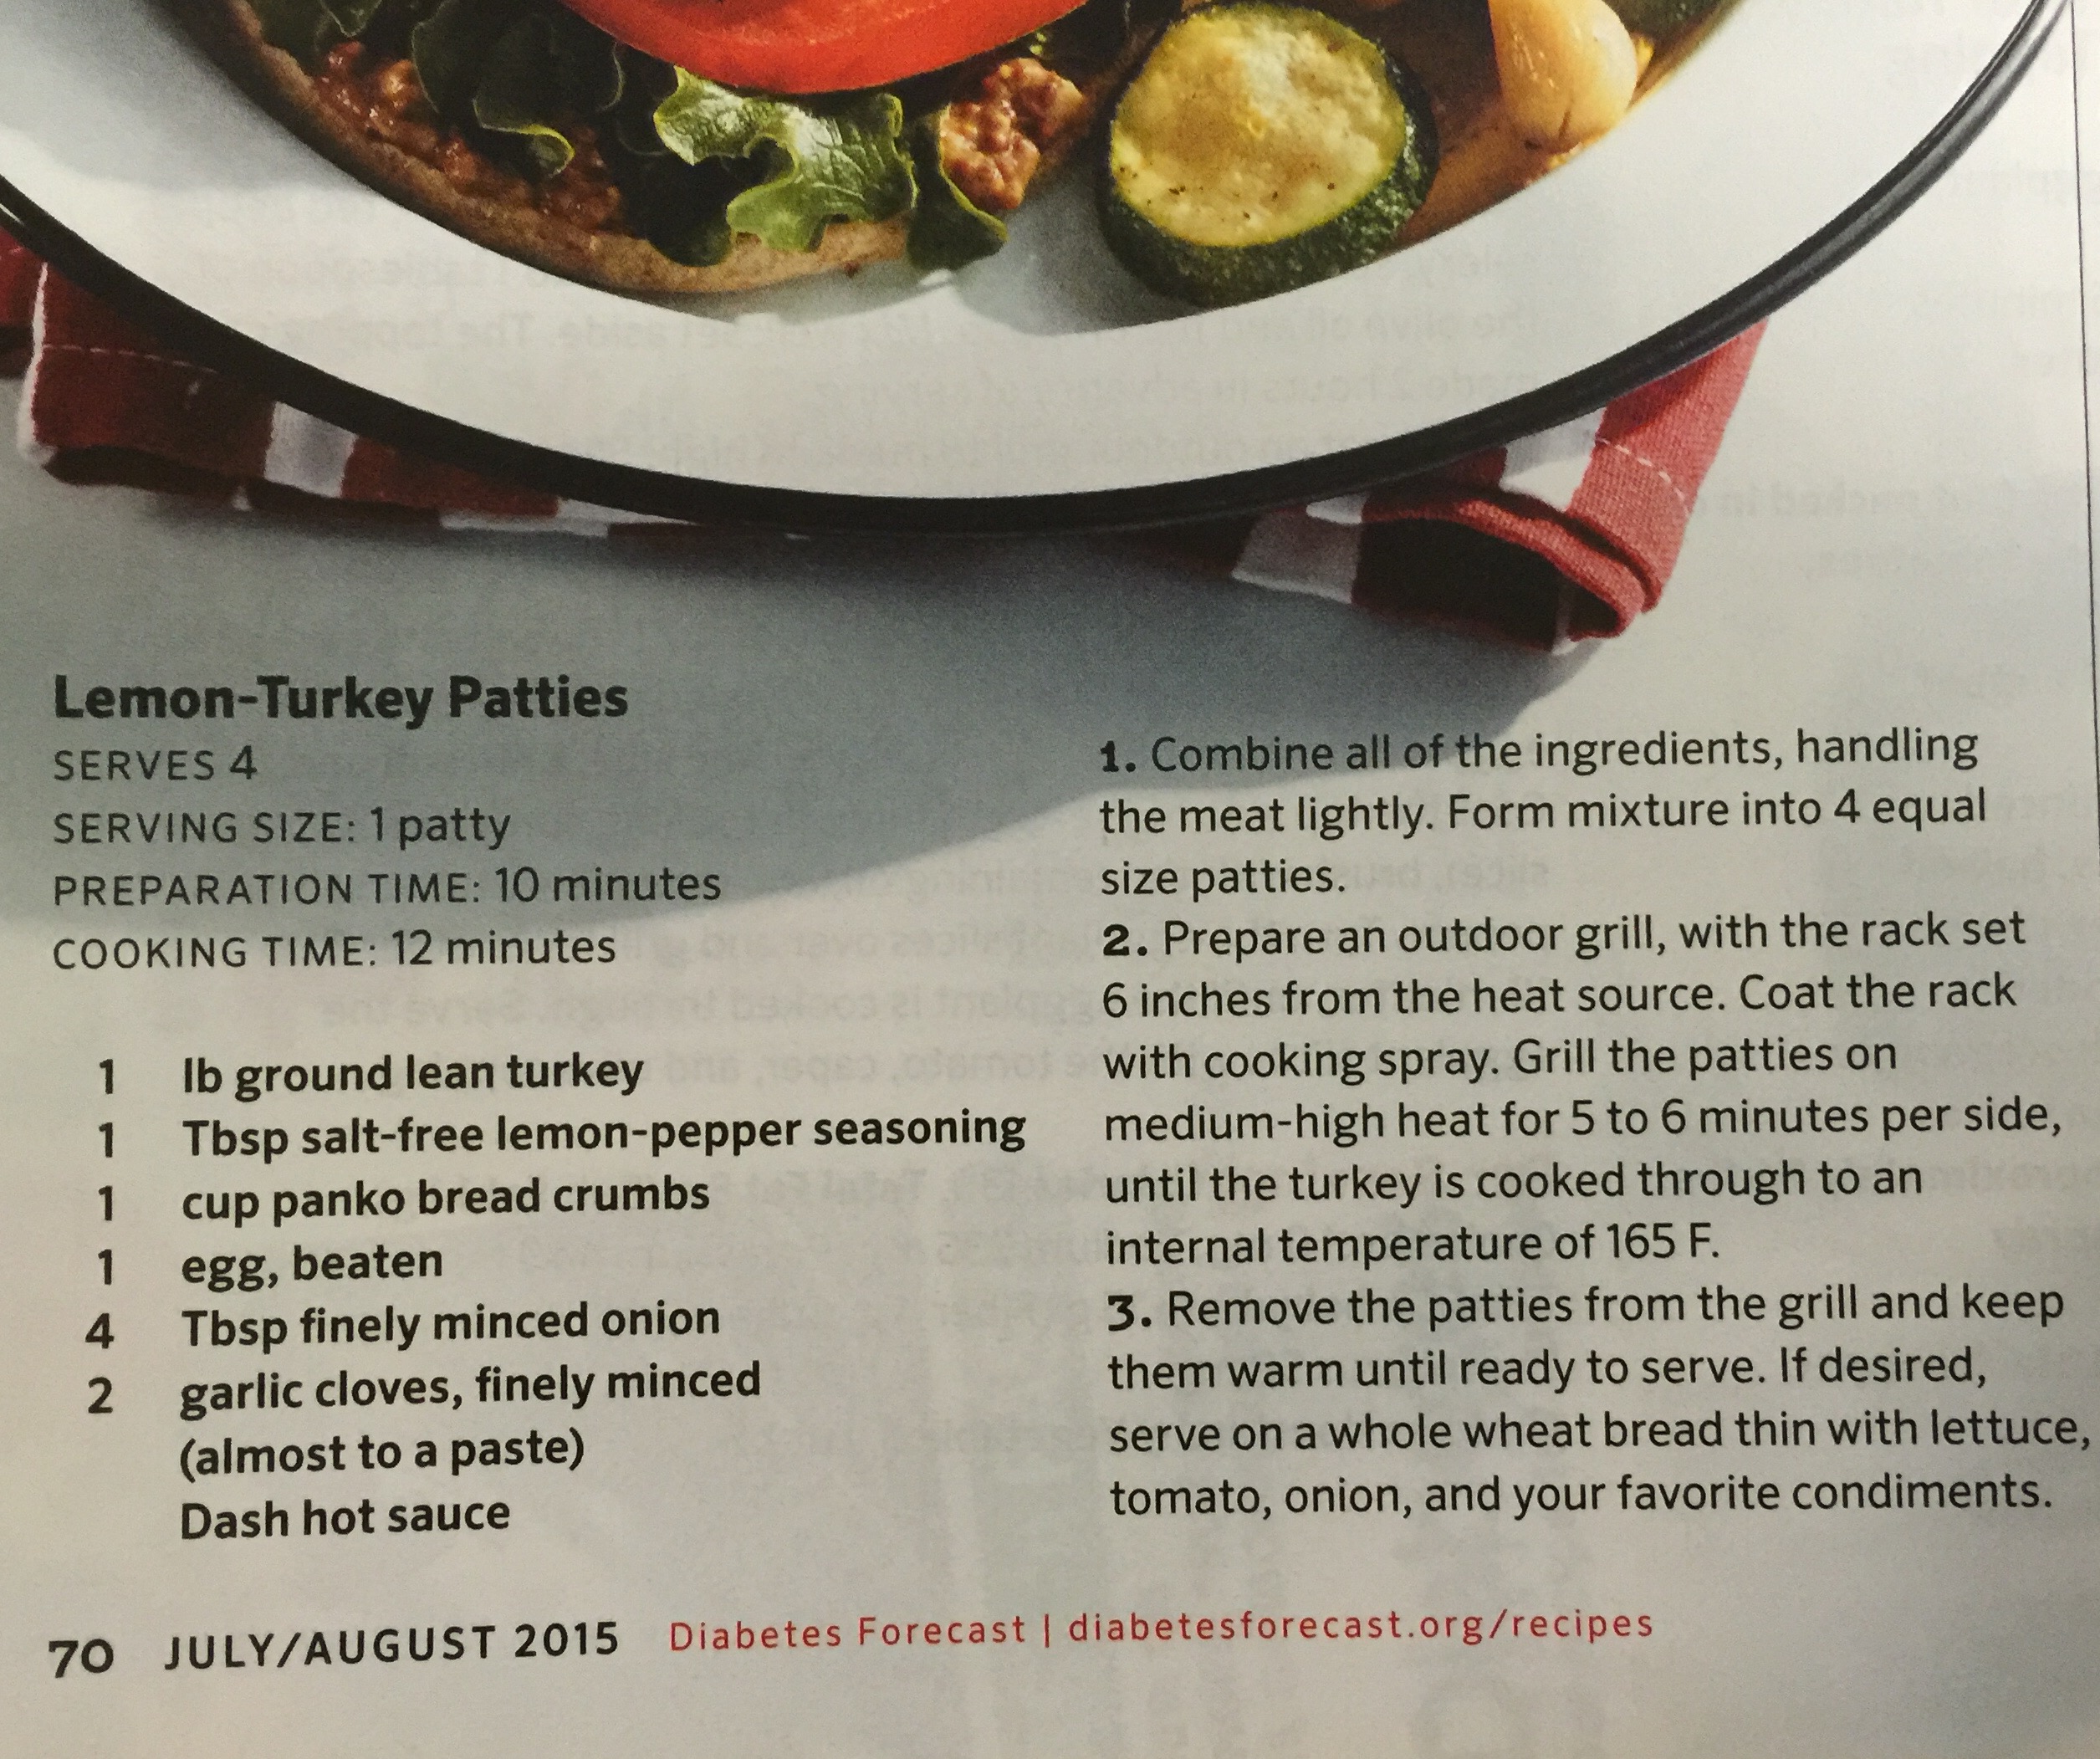
CLICK ANY PHOTO FOR AN ENLARGEMENT
Feel free to browse.
These recipes are for Grandpa and his family. This category includes recipes from magazines, TV shows, newspapers, and other sources where I don’t have permission to republish the recipes, but still feels they are recipes that he may want to cook for himself at a later time.
CLICK ANY PHOTO FOR AN ENLARGEMENT
CLICK TO ENLARGE IMAGES
Ideally use an electric mixer or Kitchen Aid with the whisk attachment.
Recipe in text shown below.
Here is a video by Top Secret Recipes to show you how they do it.
November 16, 2012 is the date of the demise of one of This Country’s Traditions: The Twinkie. I’ve pieced together several recipes, and I think that this is the best of all of them, which results in something close to the original.
(Update: The world is saved. In July 2013 they started making the Twinkie again.)
See multiple recipes on this page. Take your pick and see which one is right for you.
The Twinkie was invented in 1930 by the late James A. Dewar, then the Chicago-area regional manager of Continental Baking Company, the parent corporation behind the Hostess trademark. At the time, Continental made “Little Short Cake Fingers” only during the six-week strawberry season, and Dewar realized that the aluminum pans in which the cakes were baked sat idle the rest of the year. He came up with the idea of injecting the little cakes with a creamy filling to make them a year-round product and decided to charge a nickel for a package of two.
But Dewar couldn’t come up with a catchy name for the treat – that is, until he set out on a business trip to St. Louis. Along the road he saw a sign for Twinkle Toe Shoes, and the name Twinkies evolved. Sales took off, and Dewar reportedly ate two Twinkies every day for much of his life. He died in 1985.
The spongy treat has evolved into an American phenomenon, from which nearly everyone has slurped the creamy center. Today the Twinkie is Continental’s top Hostess-line seller, with the injection machines filling as many as 52,000 every hour.
You will need a spice bottle, approximately the size of a Twinkie, ten 12 x 14 -inch pieces of aluminum foil, a cake decorator or pastry bag, and a chopstick.
The Cake
Nonstick spray
4 egg whites, beaten until stiff
one 16-ounce box golden pound cake mix
2/3 cup water (160 ml)
The Cake – From Scratch
Creme Filling
2 teaspoons very hot water
1/4 teaspoon salt
2 cups marshmallow creme (one 7-ounce jar)
1/4 cup (57g) non-hydrogenated shortening or coconut oil (Crisco in a pinch)
1/4 cup (57g) margarine
1/2 cup powdered sugar
1/2 teaspoon vanilla (See Tidbits)
1. Combine the salt with the hot water in a small bowl and stir until salt is dissolved. Let this mixture cool.
2. Combine the marshmallow creme, shortening, powdered sugar, and vanilla in a medium bowl and mix well with an electric mixer on high speed until fluffy.
3. Add the salt solution to the filling mixture and combine.
Makes 1 1/2 cups.
1. Preheat oven to 325 degrees F.
2. Fold each piece of aluminum foil in half twice. Wrap the folded foil around the spice bottle to create a mold. Leave the top of the mold open for pouring in the batter. Make ten of these molds and arrange them on a cookie sheet or in a shallow pan. Grease the inside of each mold with a light coating of nonstick spray.
3. Disregard the directions on the box of cake mix. Instead, beat the egg whites until stiff. In a separate bowl combine cake mix with water, and beat until thoroughly blended (about 2 minutes). Fold egg whites into the cake batter and slowly combine until completely mixed.
4. Pour the batter into the molds, filling each one about 3/4 of an inch. Bake in the preheated oven for 30 minutes, or until the cake is golden brown and a toothpick stuck in the center comes out clean.
5. For the filling, combine the salt with the hot water in a small bowl and stir until salt is dissolved. Let this mixture cool.
6. Combine the marshmallow creme, shortening, powdered sugar, and vanilla in a medium bowl and mix well with an electric mixer on high speed until fluffy.
7. Add the salt solution to the filling mixture and combine.
8. When the cakes are done and cooled, use a skewer or chopstick to make three holes in the bottom of each one. Move the stick around inside of each cake to create space for the filling.
9. Using a cake decorator or pastry bag, inject each cake with filling through all three holes.
Makes 10.
Credits for Recipe Components:
www.TopSecretRecipes.com
www.instructables.com
Ingredients
Nonstick cooking spray or vegetable oil
1/2 cup cake flour
1/4 cup all-purpose flour
1 teaspoon baking powder
1/4 teaspoon salt
2 tablespoons milk, preferably whole
4 tablespoons unsalted butter
1/2 teaspoon vanilla extract
5 large eggs, at room temperature
3/4 cup granulated sugar
1/4 teaspoon cream of tarter
Seven-Minute Filling, er, Frosting
Directions
1. Preheat the oven to 350°F (175°C) and adjust the oven rack to the lower-middle position.
2. To make your shiny, single-use Twinkie molds, start with a piece of aluminum foil, preferably heavy-duty, that’s approximately 14 inches long. It should be just a little longer than it is wide. Fold the foil in half lengthwise, then fold it in half again to create a rectangle that’s about 6 inches long and 7 inches wide. Repeat to make a dozen rectangles.
3. Place 1 sheet of folded foil on your work surface, with the long side facing you. Place a standard-size plastic or glass spice jar on its side in the center of the foil, the jar’s long side also facing you. Bring the long sides of the foil up around the jar. The foil won’t reach all the way around, and that’s okay. Fold the foil in around both top and bottom ends of the spice jar, nice and tight. You’ll end up with a sort of trough situation. (Cookbook author Todd Wilbur has a video of the process here; if you’re impatient, fast forward to 1:10, where the action starts.) Repeat until you have 12 foil Twinkie molds. Spritz the molds with an obscenely generous amount of nonstick spray or use your fingertips to coat the molds with vegetable oil. Place the Twinkie molds on a baking sheet or in a roasting pan.
4. Whisk the flours, baking powder, and salt together in a bowl.
5. Heat the milk and butter in a small saucepan over low heat until the butter melts. Remove from the heat add the vanilla. Cover to keep warm.
6. Separate the eggs, placing the whites in the bowl of a standing mixer fitted with the whisk attachment (or, if using a hand mixer or whisk, a large mixing bowl) and reserving the yolks in another bowl. Beat the whites on high speed until foamy. Gradually add 6 tablespoons of the sugar and the cream of tartar and continue to beat until the whites reach soft, moist peaks.
7. Transfer the beaten egg whites to a large bowl and add the egg yolks to the standing mixer bowl—there’s no need to clean the bowl (or, if using a hand mixer or whisk, simply place the egg yolks in a separate large bowl). Beat the egg yolks with the remaining 6 tablespoons sugar on medium-high speed until the mixture is very thick and a pale lemon color, about 5 minutes. Add the beaten egg whites to the yolks, but do not mix.
8. Sprinkle the flour mixture over the egg whites and then mix everything on low speed for just 10 seconds (or, if using a hand mixer or whisk, until blended but not thoroughly combined). Remove the bowl from the mixer, make a well in one side of the batter, and pour the melted butter mixture into the bowl. Fold gently with a large rubber spatula until the batter shows no trace of flour and the whites and yolks are evenly mixed, about 8 strokes.
9. Immediately scrape the batter into the prepared molds, filling each with about 3/4 inch of batter. Bake until the cake tops are light brown and feel firm and spring back when touched, 13 to 15 minutes. Transfer the pan containing the molds to a wire rack and allow the cakes to cool in the molds.
10. Just before filling, remove each cake from the foil. Using the end of a chopstick, poke three holes in the bottom of each cake, just like in the bottom of real Twinkies. Wiggle the tip of the chopstick around quite a lot to make room for the filling. (Again, you can see this in action here, beginning at minute 3.)
11. Transfer the frosting to a pastry bag fit with a small tip (about 1/4 inch across). Pipe the frosting into the holes you created in the bottom of the cakes. As you fill each cake, hold it in your hand and press your palm gently around it so you can feel the cake expand, taking care not to overfill and crack the cake.
12. Unlike real Twinkies, these won’t last indefinitely. They’re best served still slightly warm.

My kitchen smells like a Hostess bakery. Those of us who grew up in a town that had a Hostess bakery will never forget that smell. Driving through that part of town was always pleasant, since the air smelled of Wonder bread, Twinkies, or whatever snack they happened to be baking that day.
And now it’s in my kitchen. Sweet, sugary Twinkie goodness. Even better than the original.
I’ve only eaten Twinkies a few times in my life. As a kid, I wasn’t allowed to eat very many “fake” foods. It seems to have worked out well because to this day I don’t have much desire to eat processed foods. Thanks mom!
I won’t say that these Twinkies are healthy, but they certainly are worth the rare indulgence. I made these as a surprise treat for my boyfriend. He loves Twinkies, but knows that I don’t really approve of the store bought variety. The verdict? Much better than store bought!

To get the light, spongy cake shell requires a few extra steps. First, beat the egg whites until they are very stiff.

After mixing the batter, fold the egg whites in gently. The volume of the batter will increase greatly. See all those bubbles? This batter is fluffy!

To get the authentic Twinkie shape, use this canoe pan. Or, if you prefer, use a cupcake pan. I couldn’t resist trying the canoe pan. The cakes came out looking exactly like Twinkies!

The fun part is filling the cakes. Hold them in the palm of your hand, stick the icing tip into the cake and squeeze! Not too much, or the cake may explode. When you’re done, they’ll look very professional.

Final score? Store bought Twinkies: 39 ingredients. Homemade Twinkies: 12 ingredients.
Vanilla Snack Cakes (Twinkies)
Adapted from King Arthur Flour
Yield: 24 cakes
Snack Cakes:
1 1/2 cups all-purpose flour
4 tablespoons corn starch
1 1/2 cups granulated sugar
1 tablespoon baking powder
1 teaspoon salt
1/2 cup canola oil
3/4 cup cold water
1 teaspoon Princess flavoring (or 1 teaspoon vanilla extract)
7 eggs, separated
Preheat the oven to 350°. Spray a canoe pan or muffin tins with cooking spray and set aside.
Using an electric mixer, beat the egg whites until they are very stiff. They should hold their shape when removed from the bowl. Set aside.
Combine the flour, corn starch, sugar, baking powder, and salt in a large bowl. Whisk together or beat on low speed for a minute, until combined. Add oil, water, Princess flavoring, and egg yolks. Beat on medium speed until smooth.
Using a rubber spatula, gently scoop 1/3 of the egg whites into the batter. Fold the egg whites in by slicing the spatula through the center of the bowl, gently scooping batter from the bottom and wrapping it over the top. Turn the bowl 1/4 turn and repeat until the egg whites are barely visible. Repeat this process with each remaining 1/3 of the egg whites.
Spoon the batter into the pan, filling the wells 2/3 full. Bake for 8-12 minutes, or until cakes are golden brown and just starting to pull away from the sides of the pan. Cakes will puff up when cooking, but will settle as they cool. Cool the cakes in the pan for 5 minutes, then gently remove them from the pan using a rubber spatula. Allow them to cool, flat side down, directly on the cooling rack.
Filling:
2 tablespoons all-purpose flour
1/2 cup milk (I used soy milk)
1/2 teaspoon vanilla extract
1/2 cup unsalted butter
1/2 cup granulated sugar
In a small saucepan, heat the flour and milk over medium heat, stirring constantly. When the mixture becomes a paste (about 5 minutes), remove from heat and allow to cool for 1 minute. Stir in the vanilla extract. Place a piece of plastic wrap directly onto the surface to prevent a skin from forming, and set aside to cool completely.
With an electric mixer, cream the butter and sugar until light and fluffy. Add the cooled milk mixture and beat for about 5 minutes, until smooth and creamy.
Use the pastry filler that comes with the pan (or a pastry bag with round tip) to fill the cakes. Place the tip about halfway into the cake and squeeze gently. Holding the cake in your palm while filling it will allow you to feel when it is full. Fill each cake 3 times to ensure that each bite contains cream filling!
Hostess Twinkie Sponge Cake. Photo by NorthwestGal
6 eggs
1 cup sugar
1 cup flour
1 teaspoon baking powder
1/4 salt
1/2 cup scalded milk
1 teaspoon vanilla extract or 1 teaspoon almond extract
Directions:
1 – Beat eggs til thick&lemon colored (about 5 minutes with an electric mixer on medium speed).
2 – Gradually add the sugar a few spoons at a time; beat another 3 minutes.
3 – Slowly add flour, baking powder, salt.
4 – Beat in milk in three equal portions till blended.
5 – Add Flavoring.
6 – Beat 2 minutes.
7 – Pour batter into greased & floured jelly roll pan.
8 – Bake in the center of a preheated oven at 350 degrees for 38-42 minute (or till toothpick inserted in center comes out clean.
9 – Cool on rack, 1 hour.
10 – Cut into finger shapes to resemble the original Twinkie cakes.
11 – Spread with filling and form into sandwiches.
12 – Wrap and refrigerate or freeze to use as needed.
13 – Keeps for up to 3 weeks refrigerated. Freezes almost indefinitely if wrapped well.
Read more at: http://www.food.com/recipe/hostess-twinkie-sponge-cake-356820?oc=linkback
2 cup all-purpose flour
3 tsp. baking powder
¼ tsp. salt
½ cup unsalted butter, softened
1 cup sugar
2 large eggs
1 tsp. vanilla extract
1 cup whole milk
Preheat your oven to 350 degrees F. Spray molds/pan with non-stick spray.
Sift together flour, baking powder and salt into a bowl and set aside.
In a large bowl, beat together butter and sugar at medium-high speed until pale and fluffy. Next, beat in the eggs one at a time, beating for 1 minute in between each addition. Reduce the mixer speed and add flour mixture alternating with the milk, beginning and ending with the flour mixture. Add the vanilla and mix until the batter just comes together. Over mixing with make your cake chewy. Makes 12 cakes.
Spray your Twinkie canoes and bake at 350 for 15 minutes, or until the cakes are just a light golden color and a tester inserted in the center of the cakes comes out clean. Remove from the oven and let cool.
Cream Filling
¼ cup shortening (I prefer Crisco brand)
¼ cup margarine
1 cup sifted powdered or 10x sugar
2 tsp. vanilla
Beat together the shortening and margarine until light and fluffy. Add the powdered sugar in a little at a time and beat on high until peaks form. Add vanilla and beat for one minute. Place in prepared icing tubes for piping into cakes.
To fill the cakes, insert the icing tip – preferably a large star tip – into three points along the flat-side of the cake, about 1/8 of an inch deep. Squeeze lightly until you see the filling begin to ooze out.
For more on food and for more recipes check out twinklevanwinkle.com.
Read more: BY CLICKING HERE.
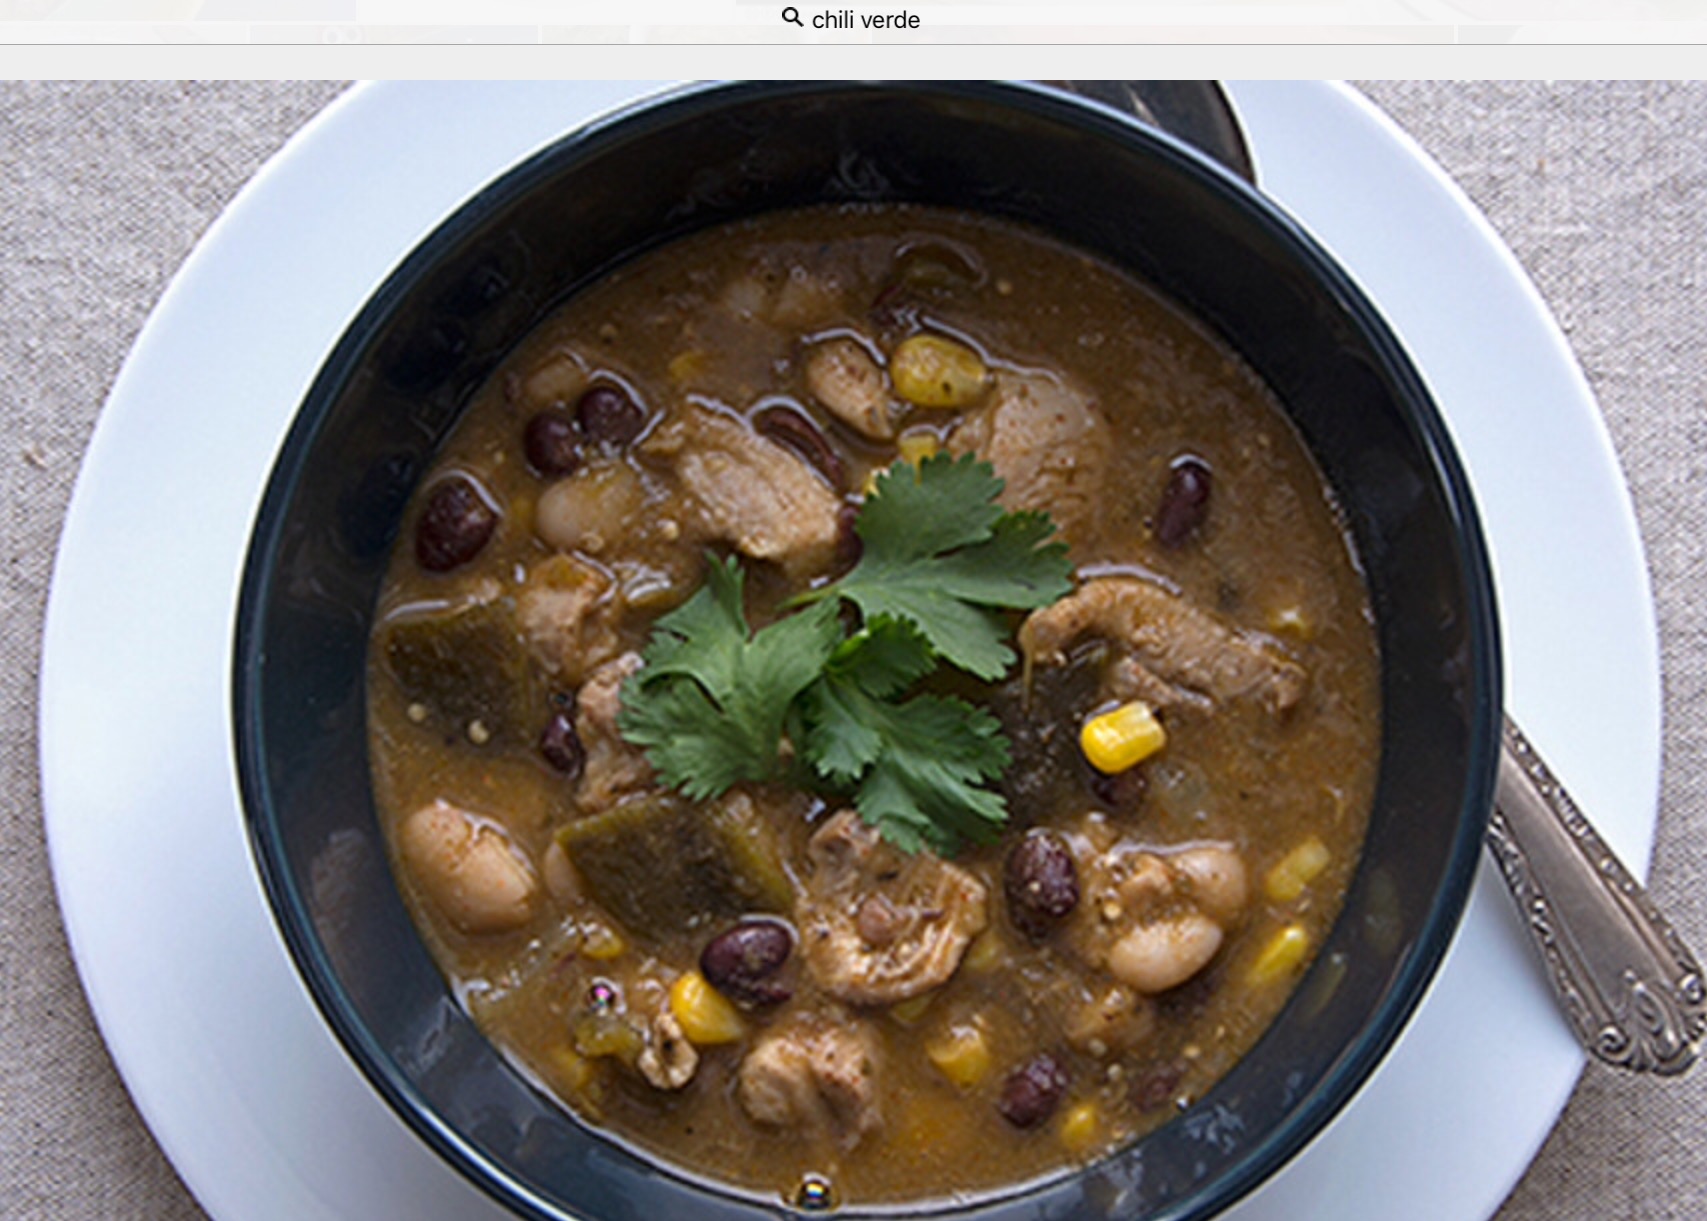 3 LB Pork Shoulder
– trim some (but not all) fat
2 LB Anaheim or Hatch chilies
3 Jalapeños
1 can diced tomato
1 can navy or pinto beans
1 can kidney beans
1 can whole corn
1 onion
1 head of garlic
1/4 C clour
4 C chicken broth
1 TBL cumin
Preheat oven to 500°
Coat pork in Grandpa's Thunder Powder or Arghhh Powder
Bake at 500° for 20 minutes
Heat 1/2 C water and 1 tsp salt
Reduce heat, add pork, cover, and simmer 20 minutes
Meanwhile blacken chilies, sweat 5 minutes in plastic covered glass bowl, and remove skin. DO NOT RINSE.
Drain pork, cut in 8 pieces, and brown newly exposed sides.
Chop your chilies, add 1 can diced tomato, 1 onion, 8 cloves smashed garlic, 1 TBL cumin, 1/4 C flour and 4 C chicken broth.
Cover and simmer 90 minutes at 280° in the oven.
Add 1 can each kidney beans, navy or pinto beans, whole kernel corn.
Let rest covered for 30 more minutes.
Cool until you can shred the meat.
Deseed jalapeños, mince and add to chile
Mix in 1 TBL lime juice.
Serve topped with sour cream (crema) and/or cilantro
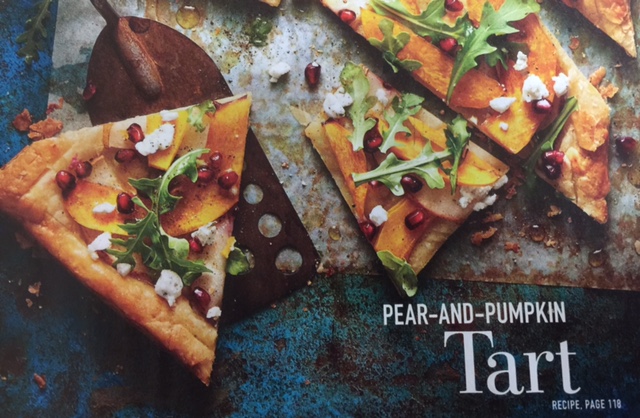
CLICK PHOTO FOR A CLEAR ENLARGEMENT
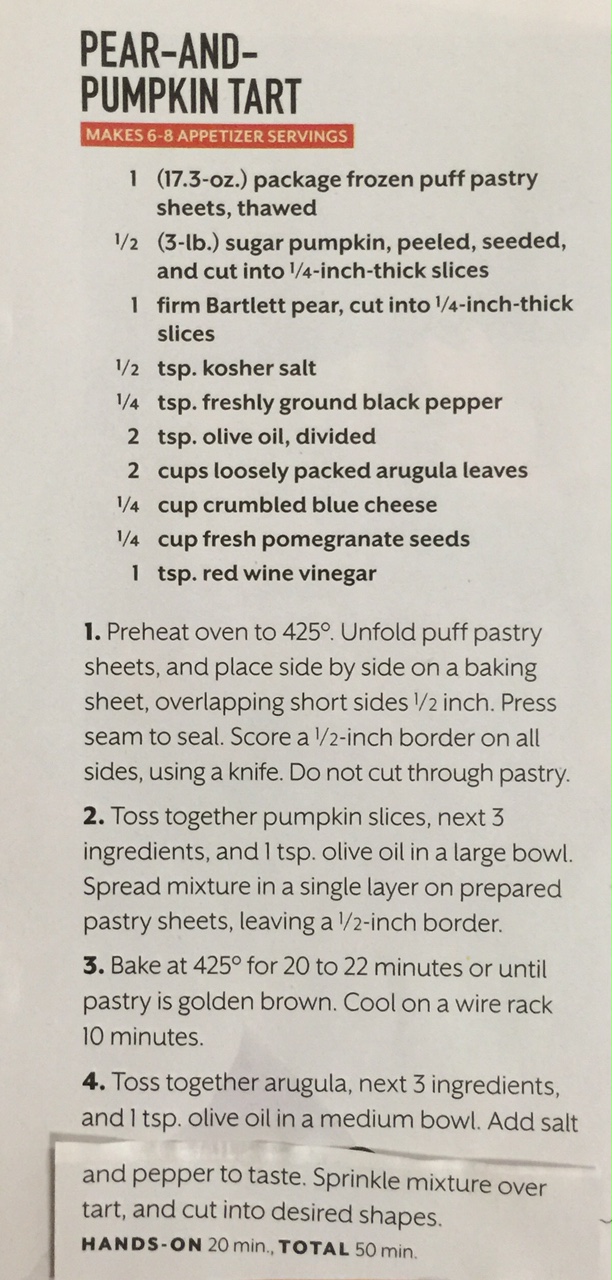
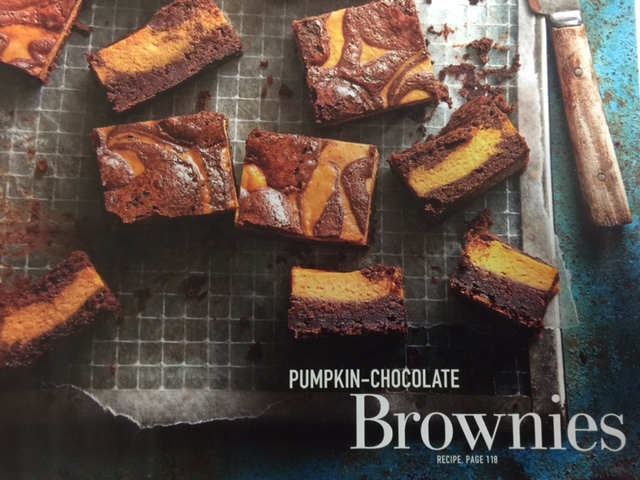
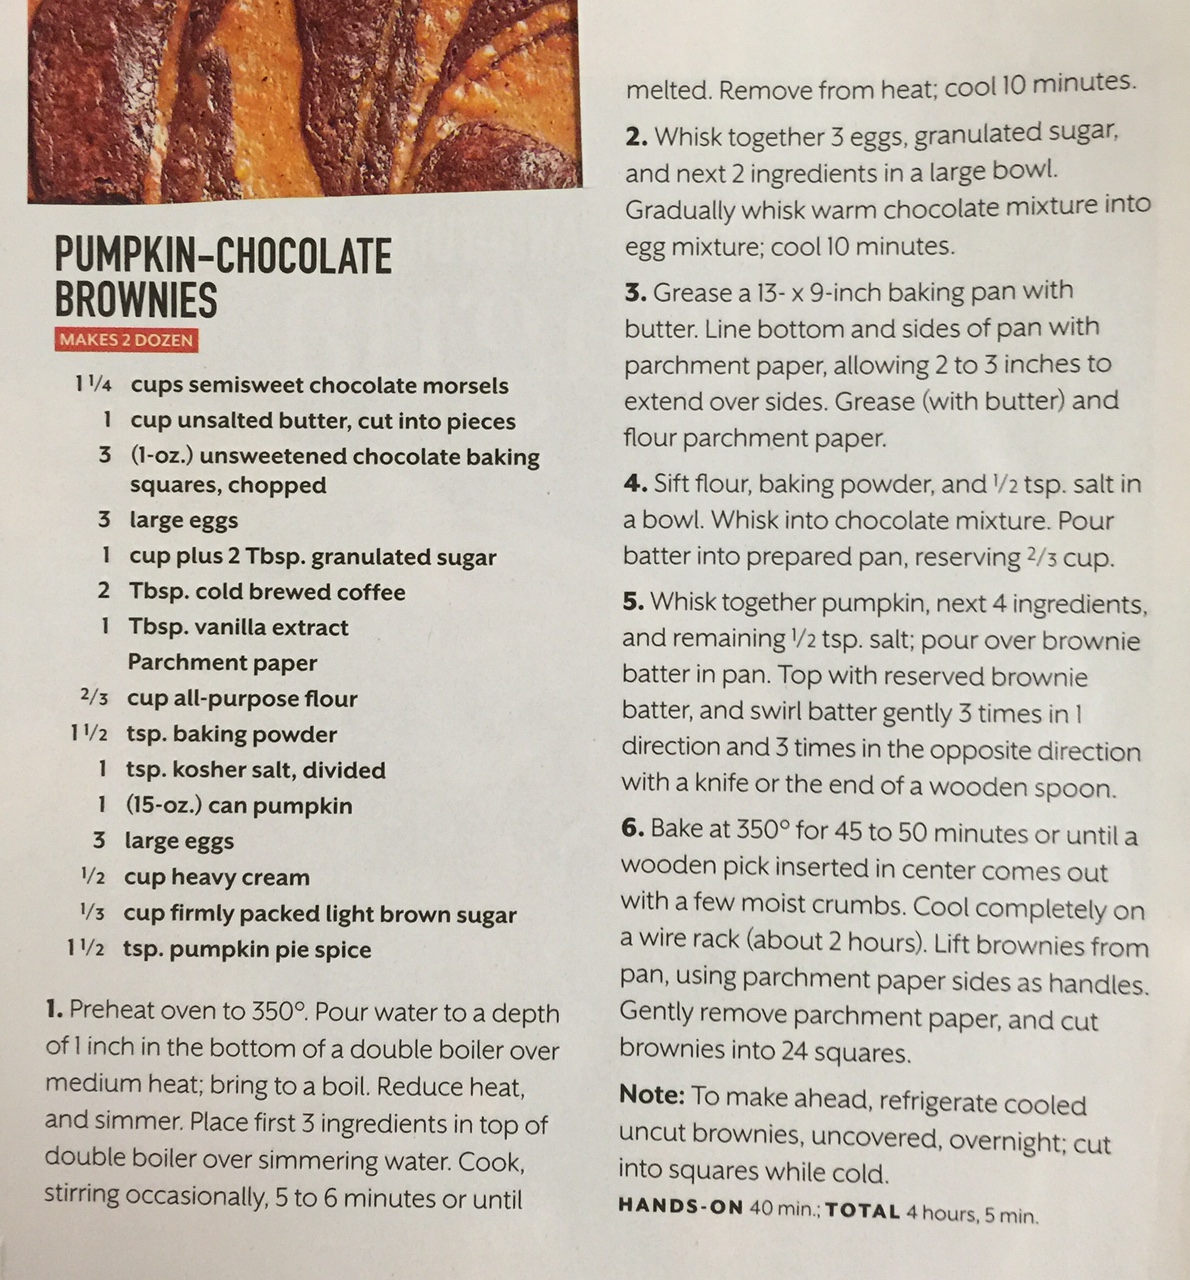
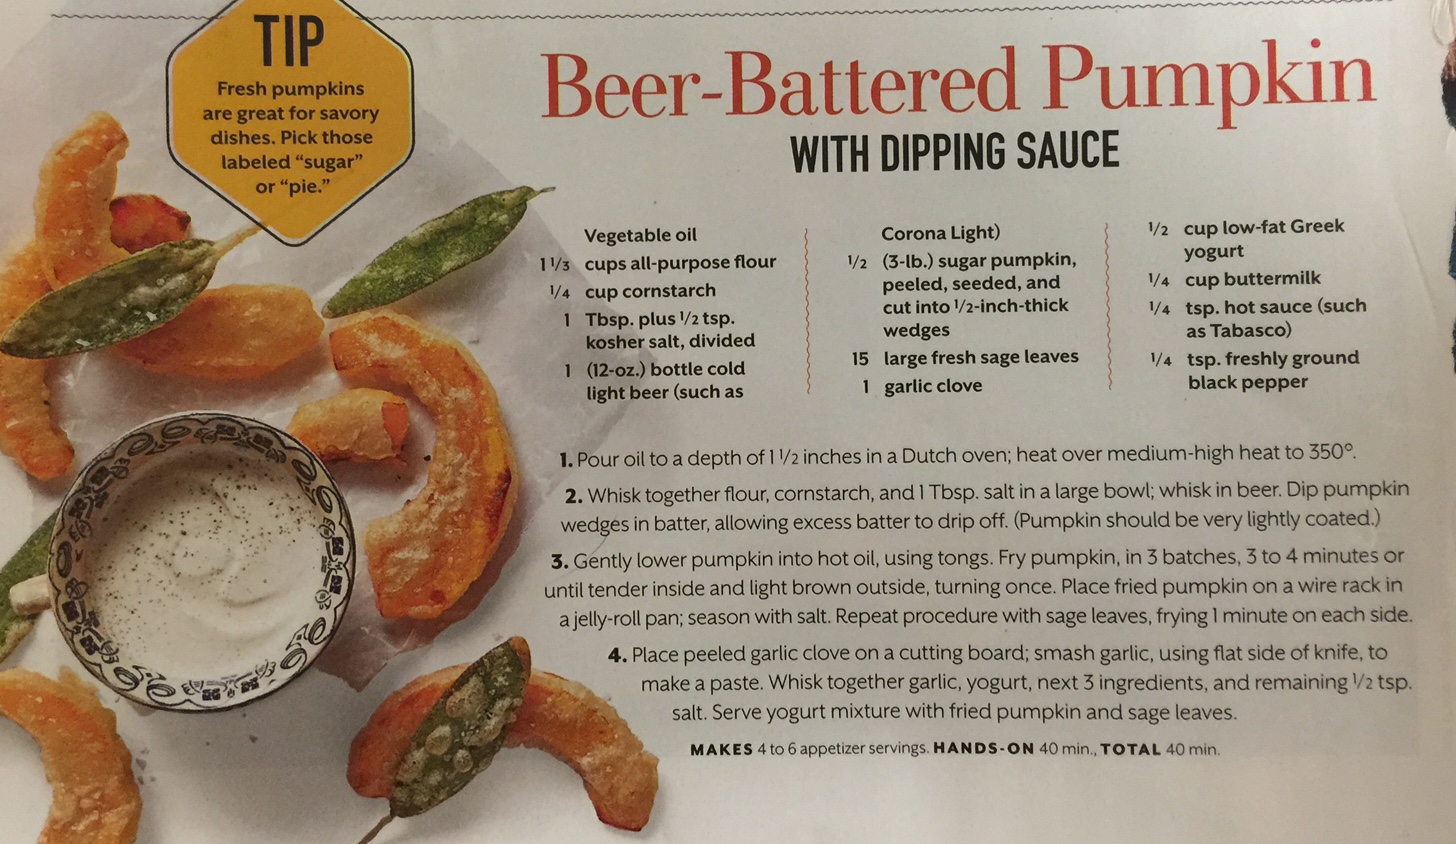
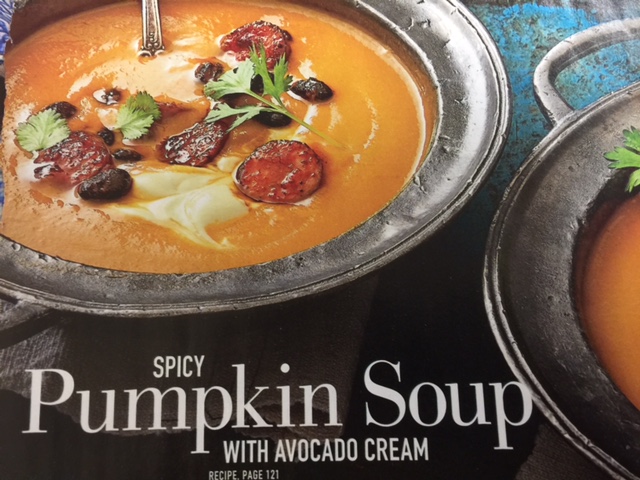
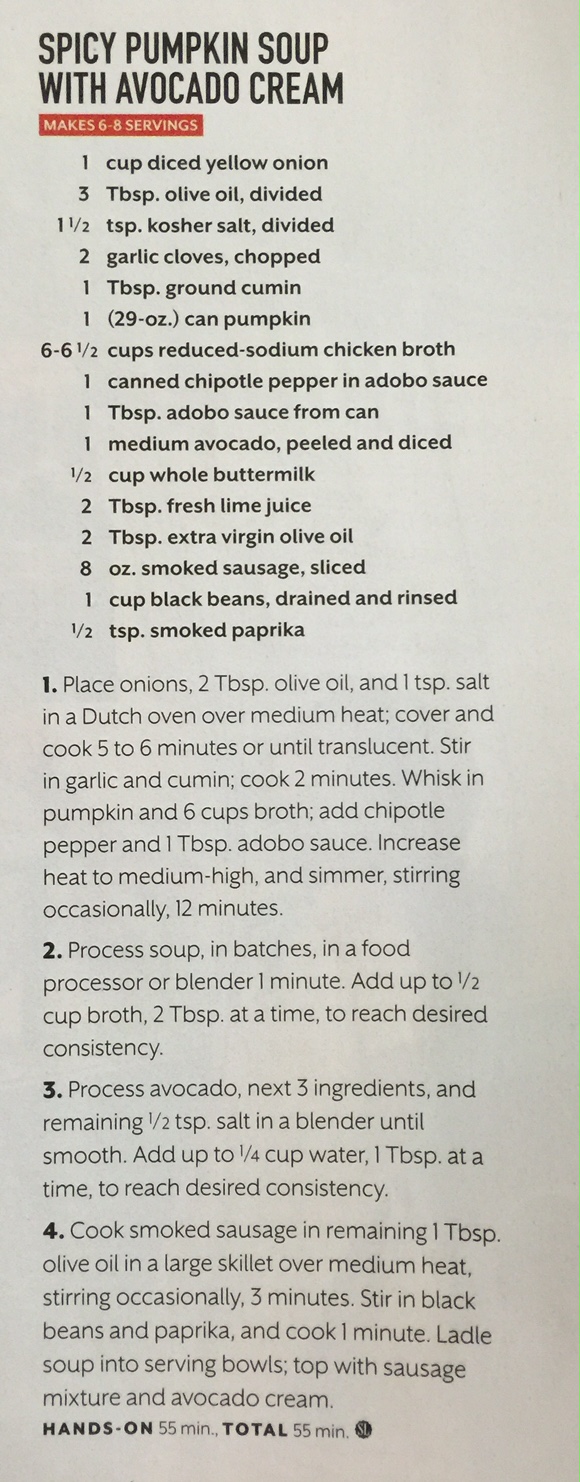
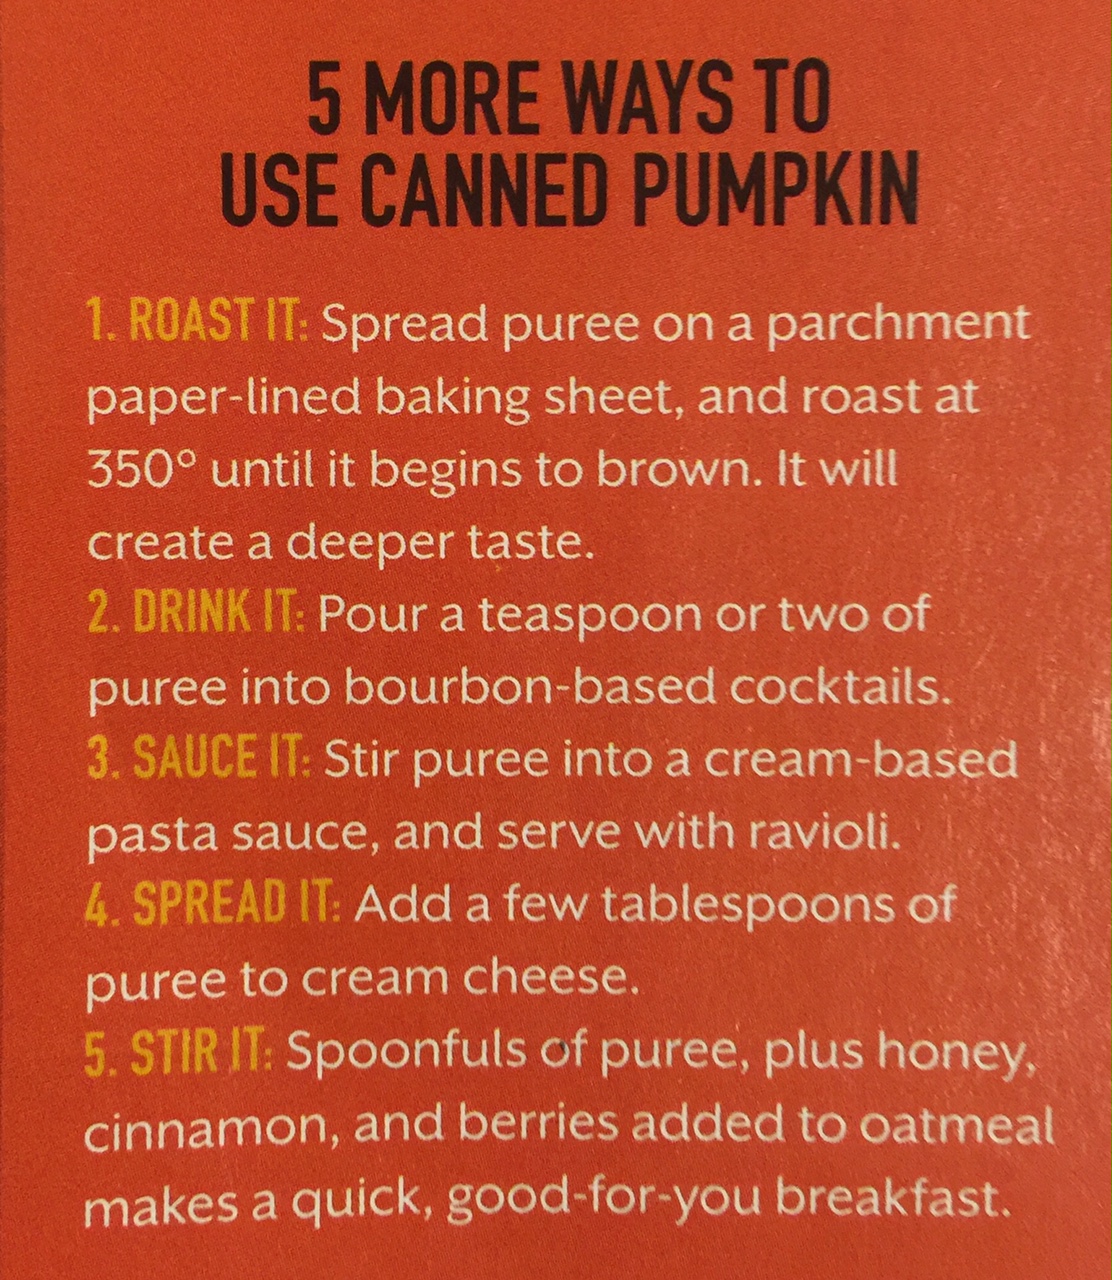
Welcome to Halloween. Here are helpful recipes and tips.
Grandma’s Double Serve Pumpkin Pie – Based on THIS RECIPE. See below.
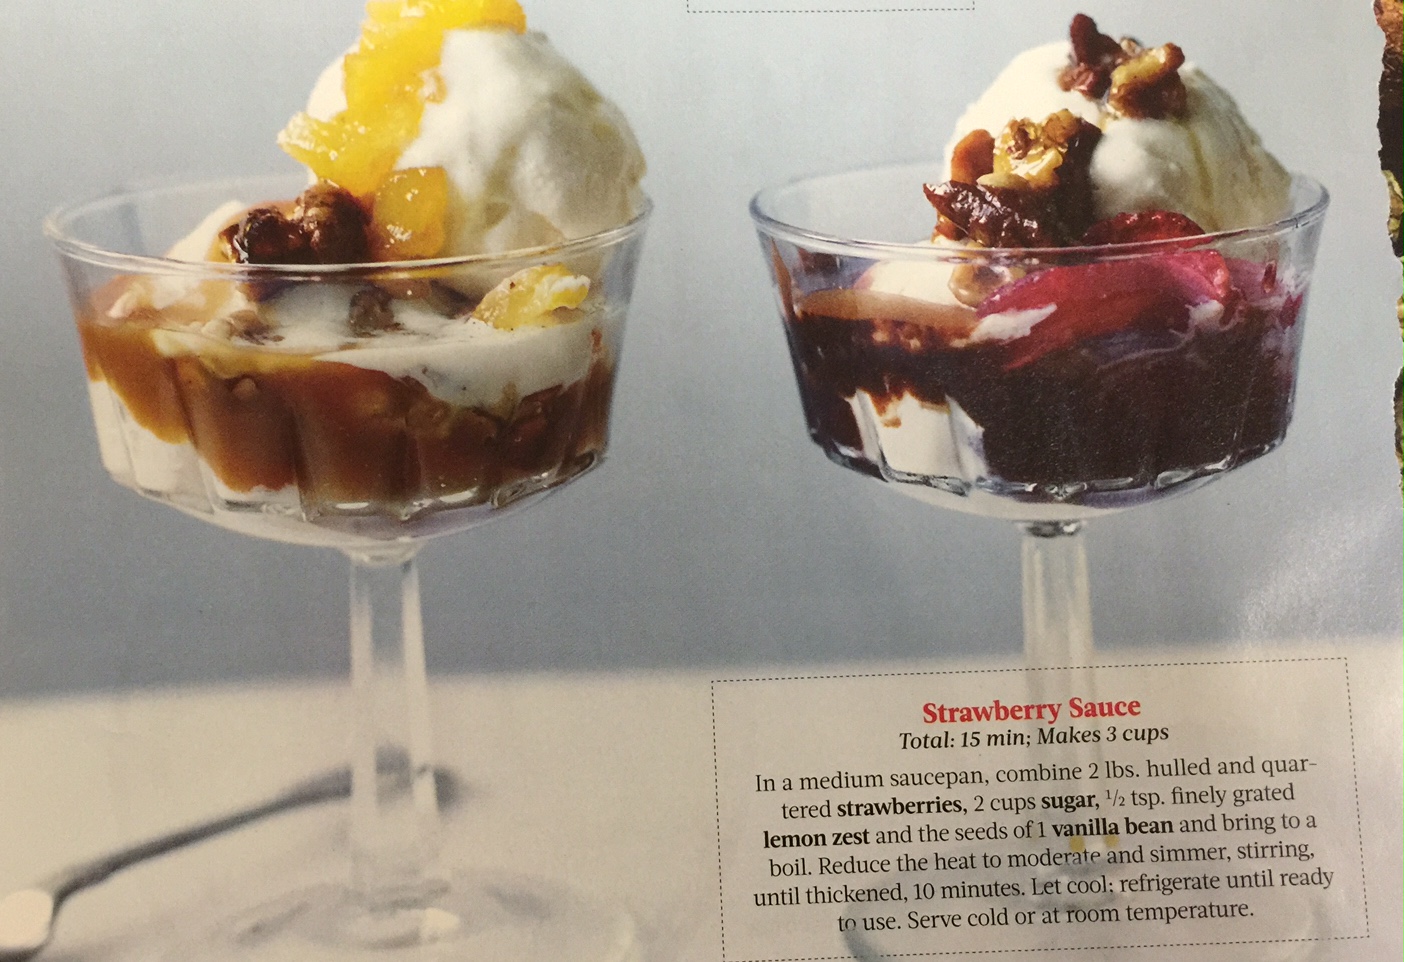
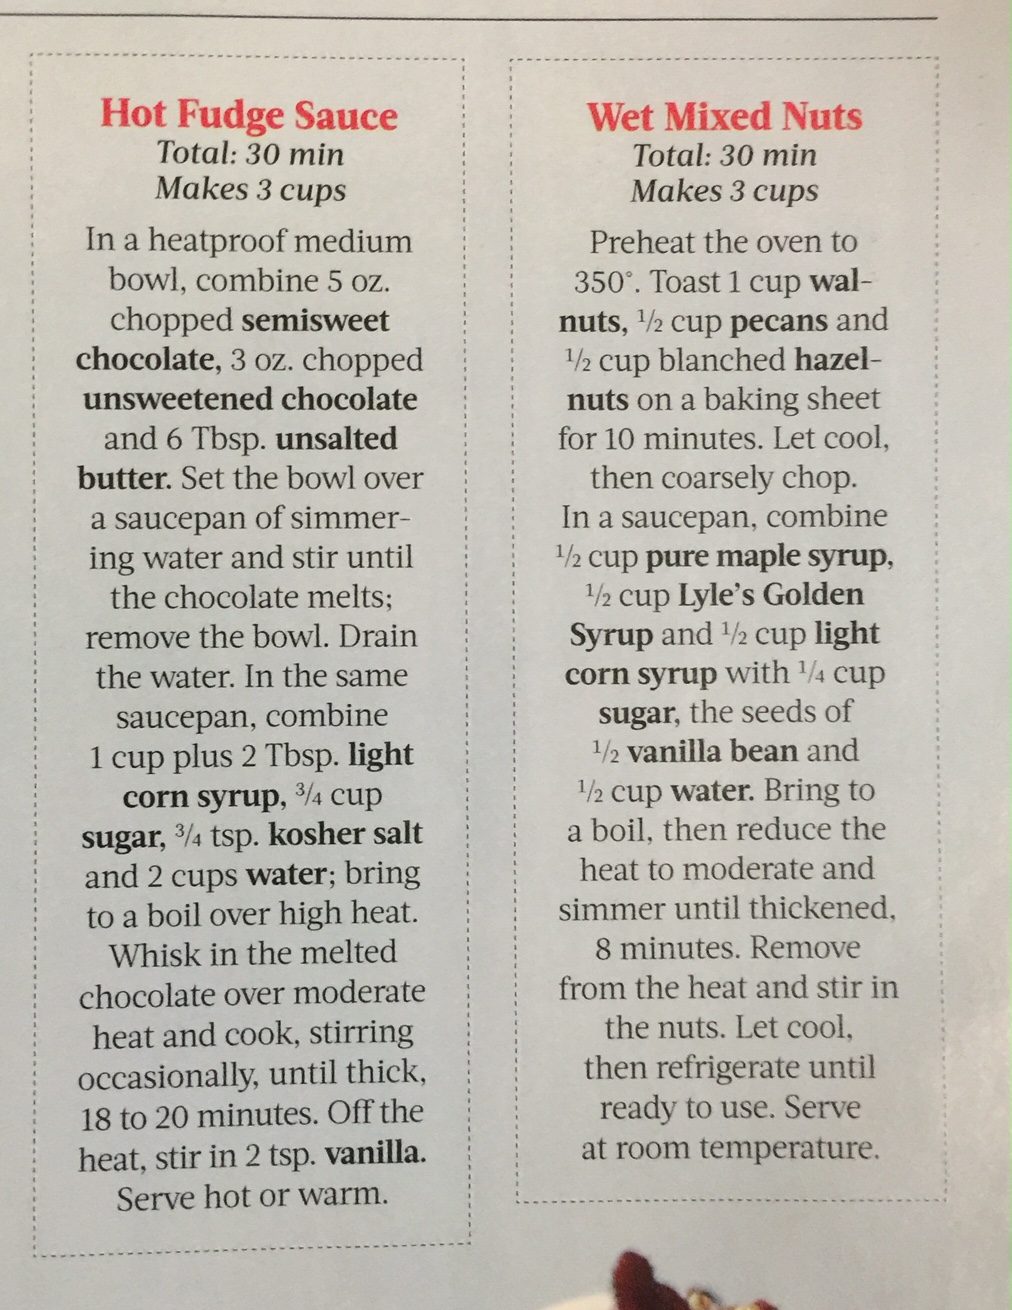
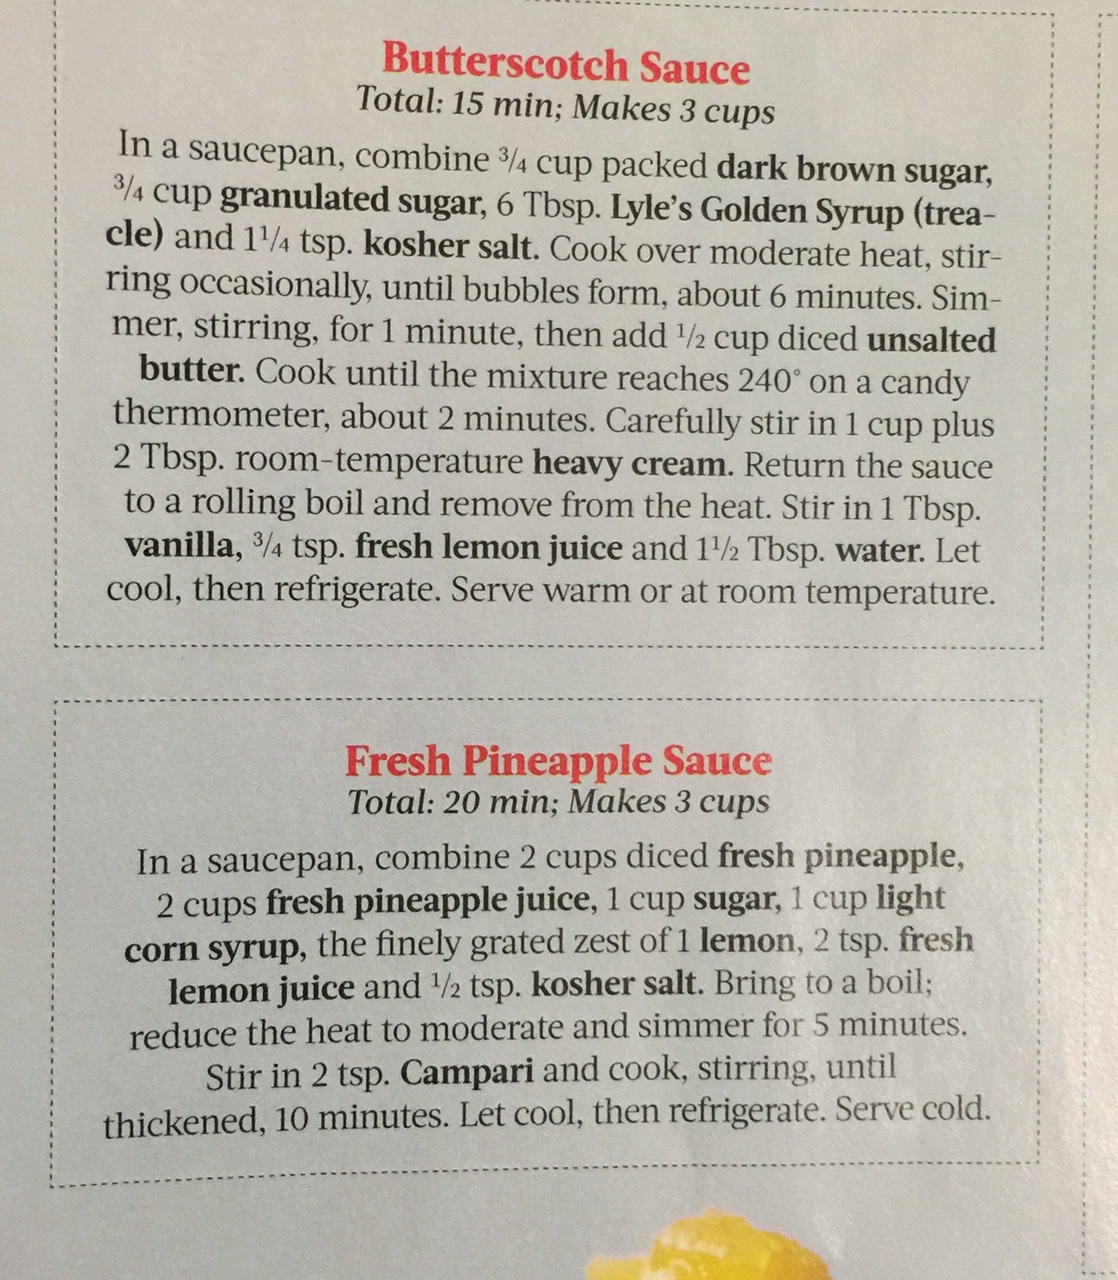
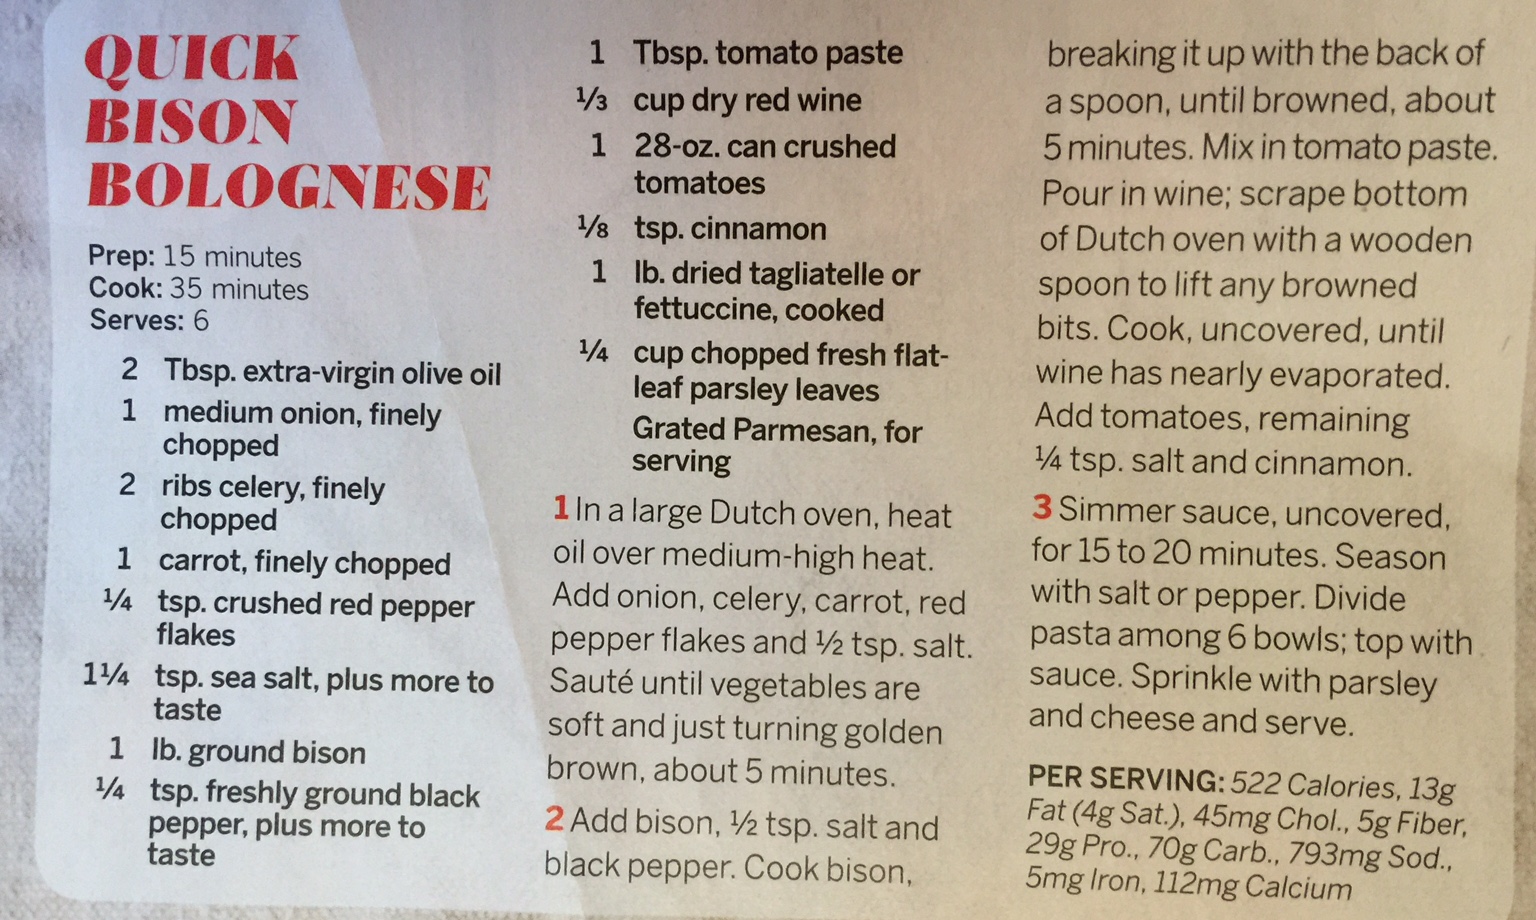
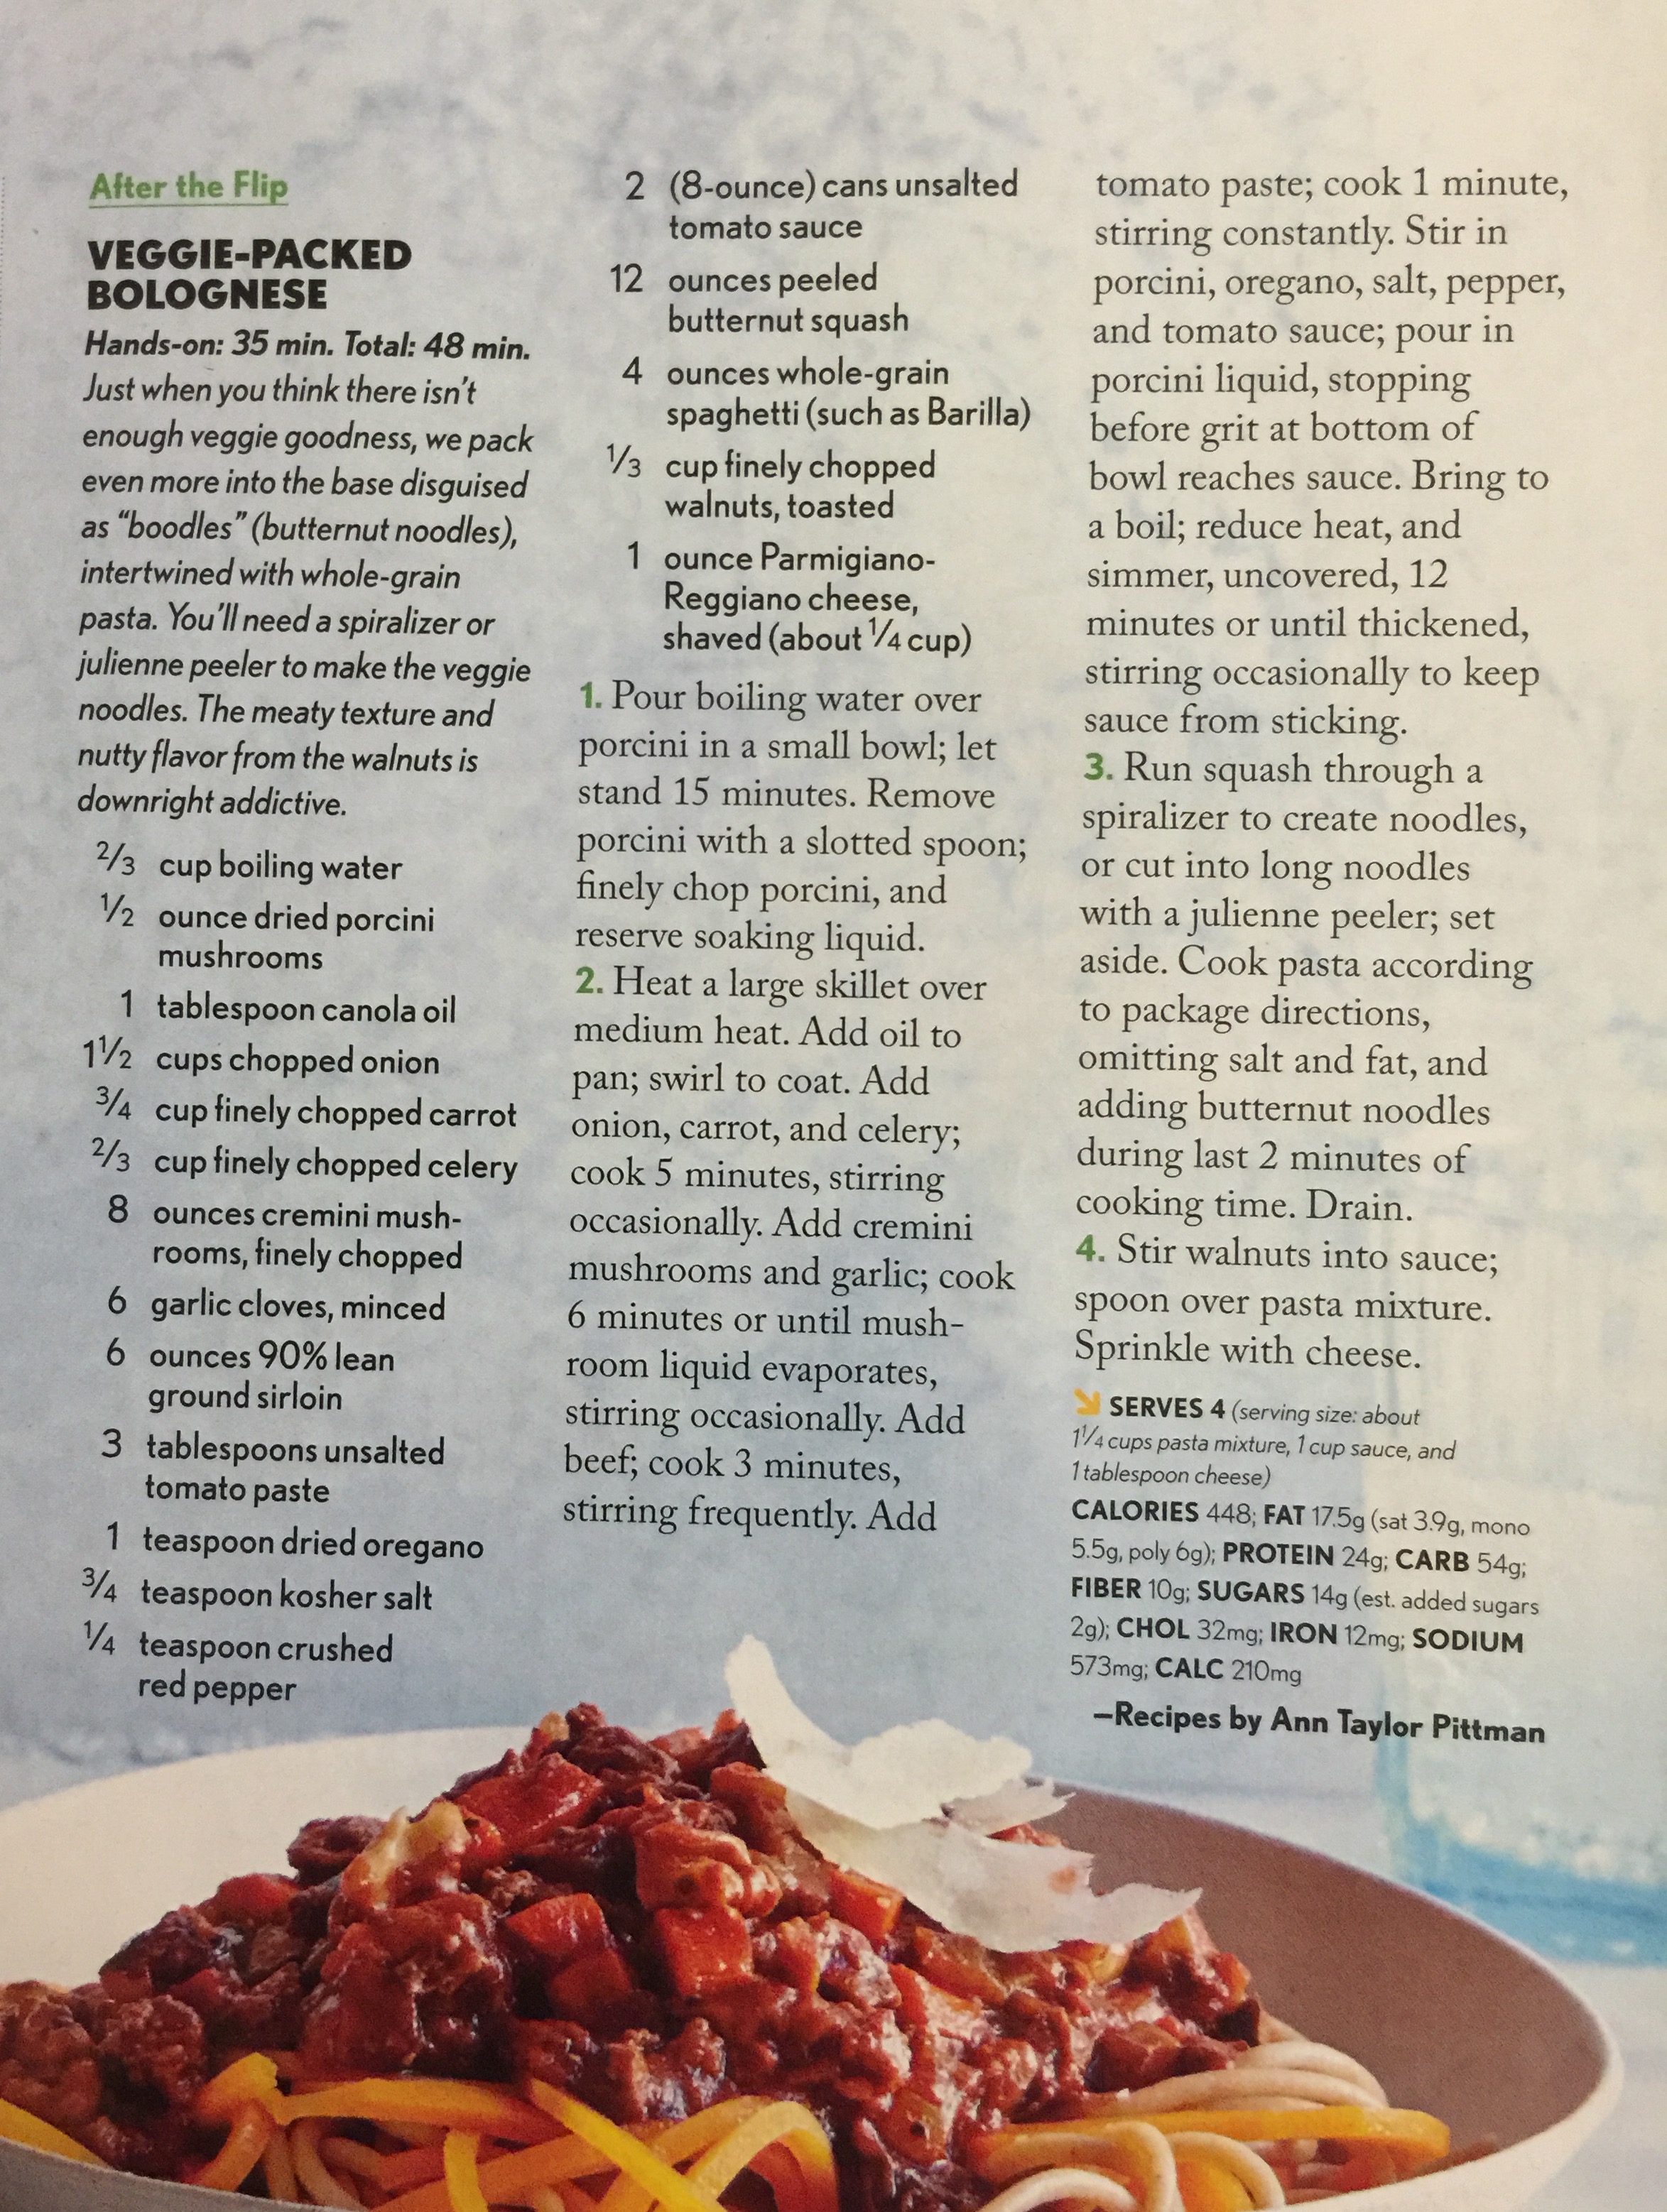
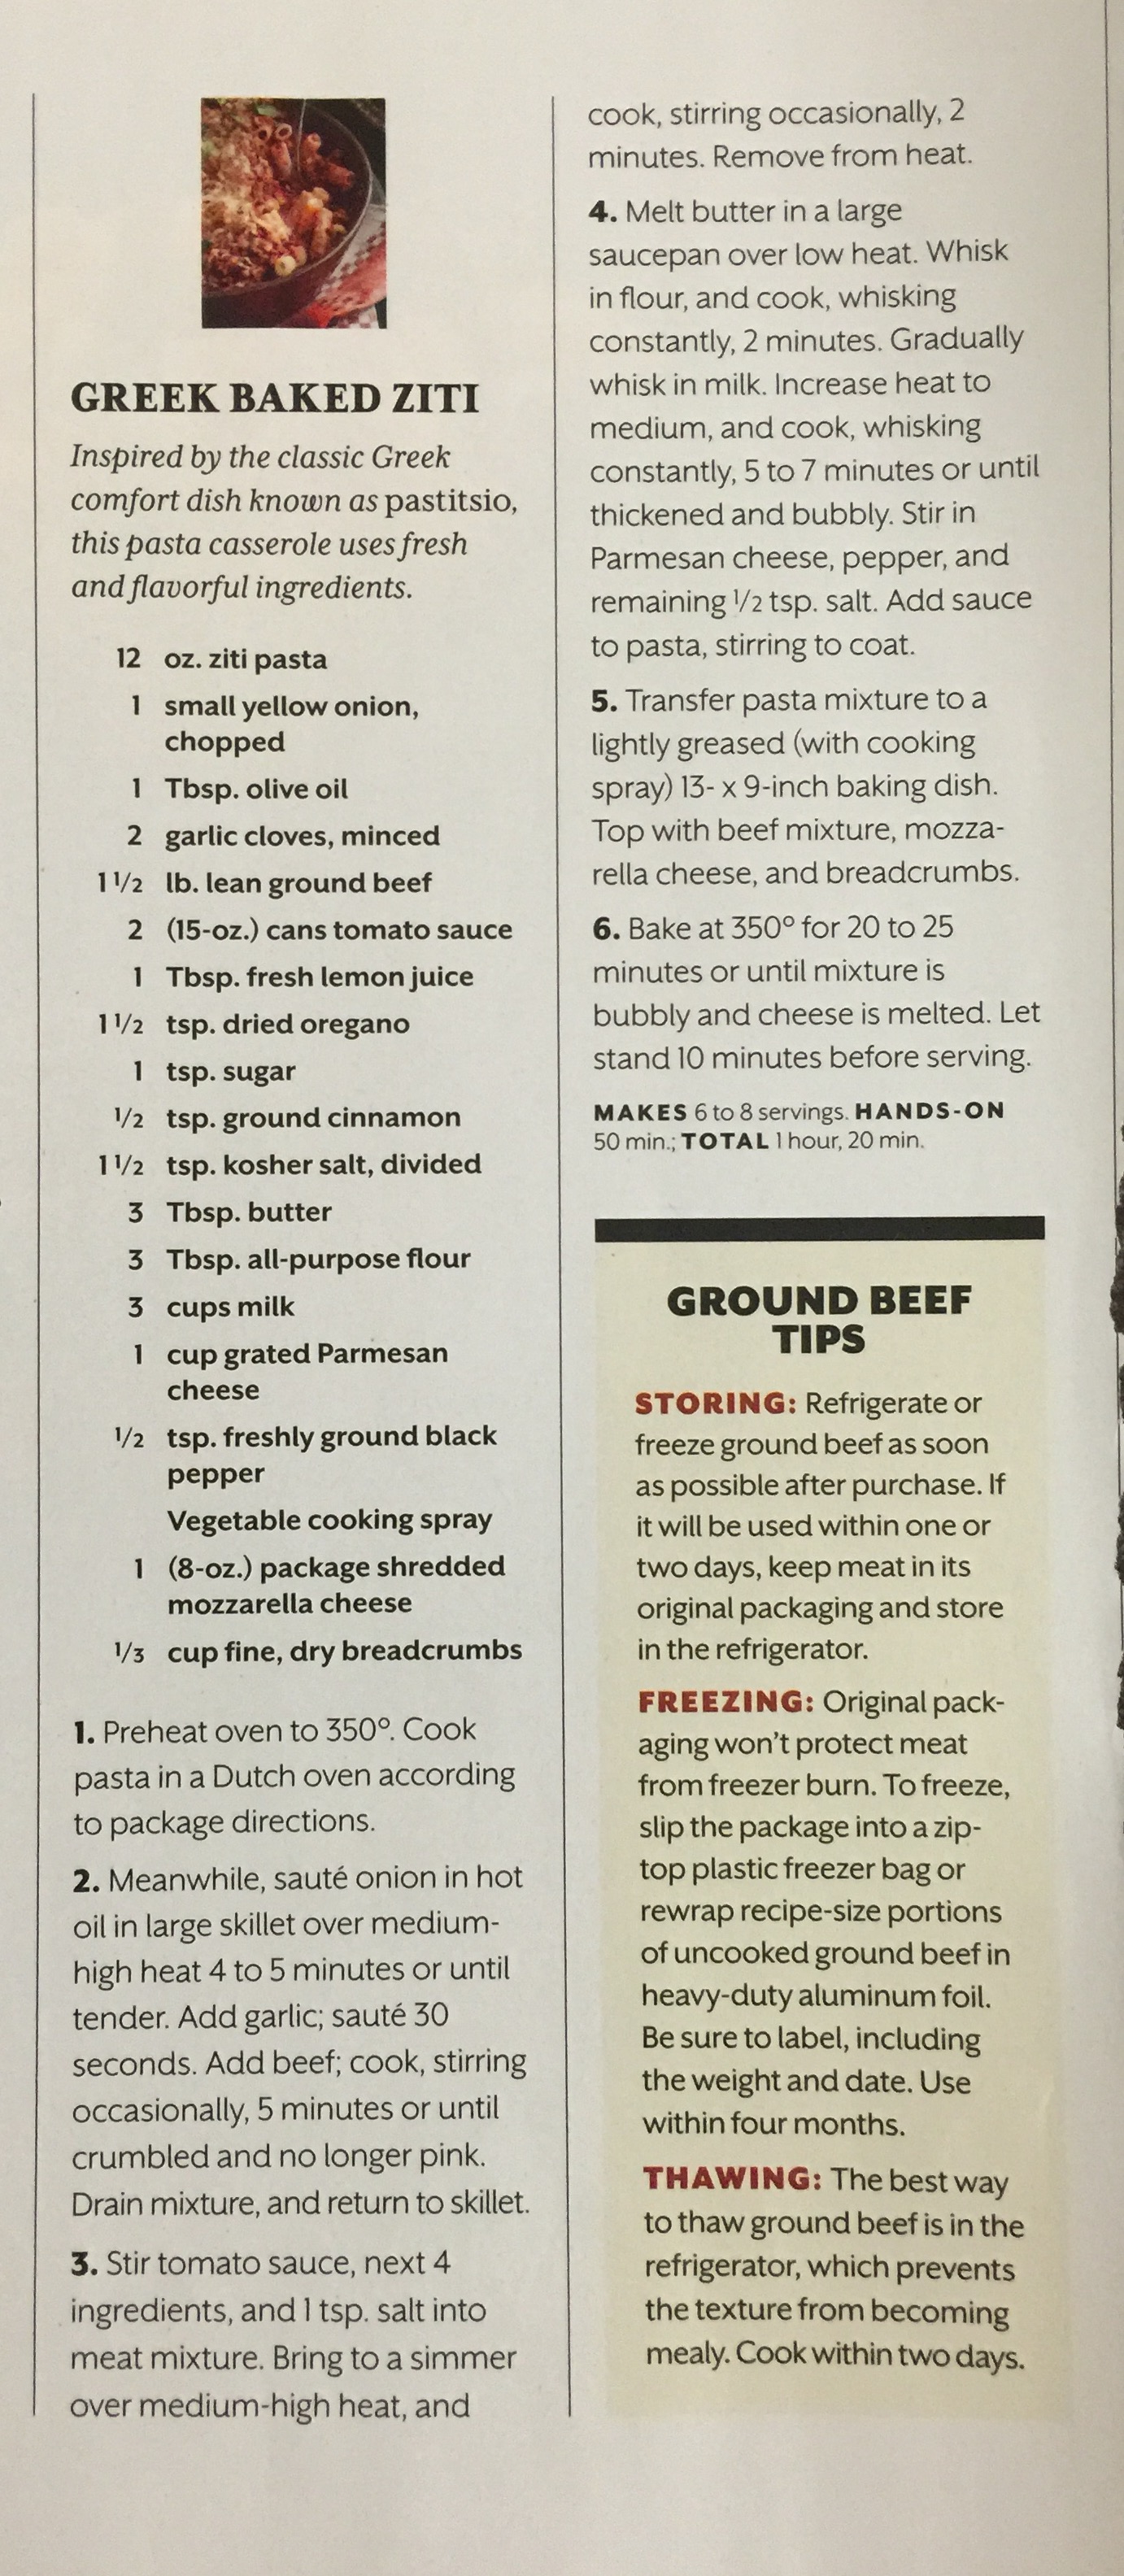
This recipe says to use bison, but I prefer half ground pork and half 80/20 ground beef.
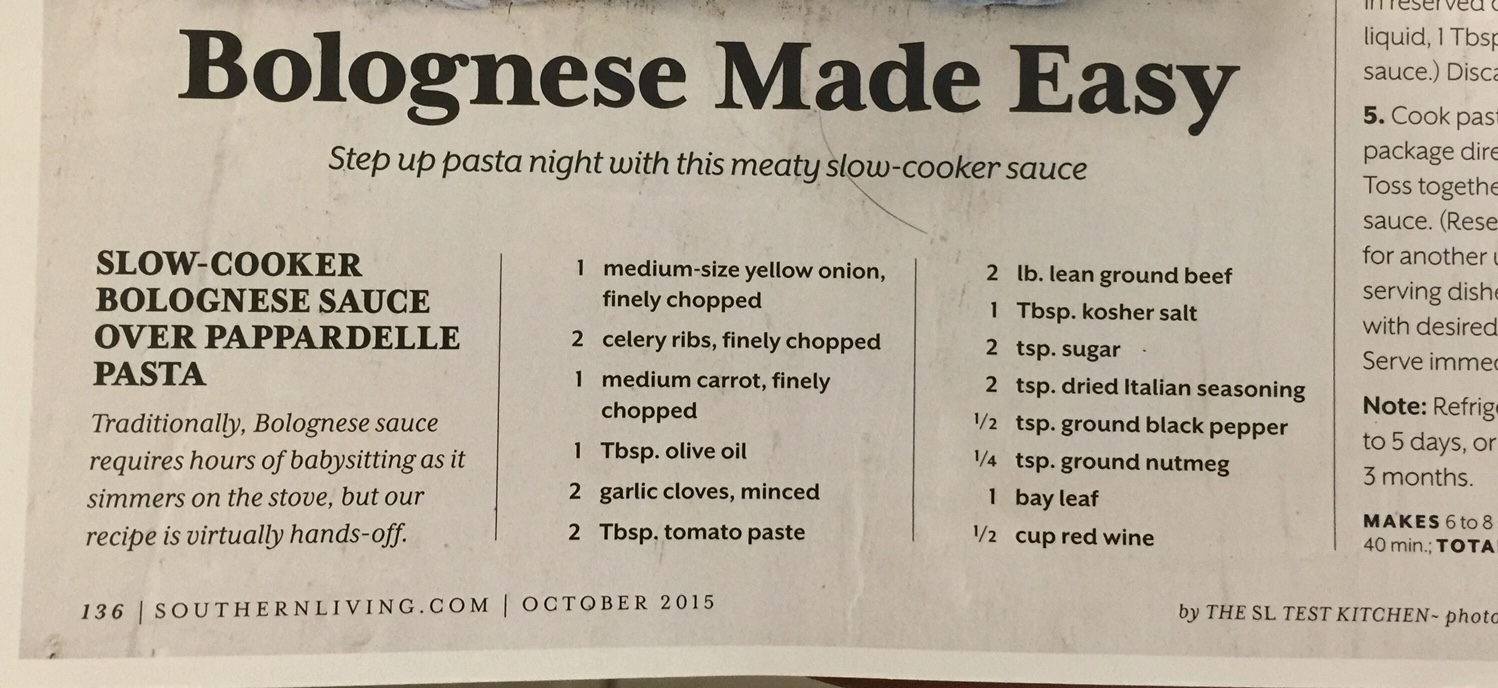
CLICK EITHER IMAGE FOR AN ENLARGEMENT
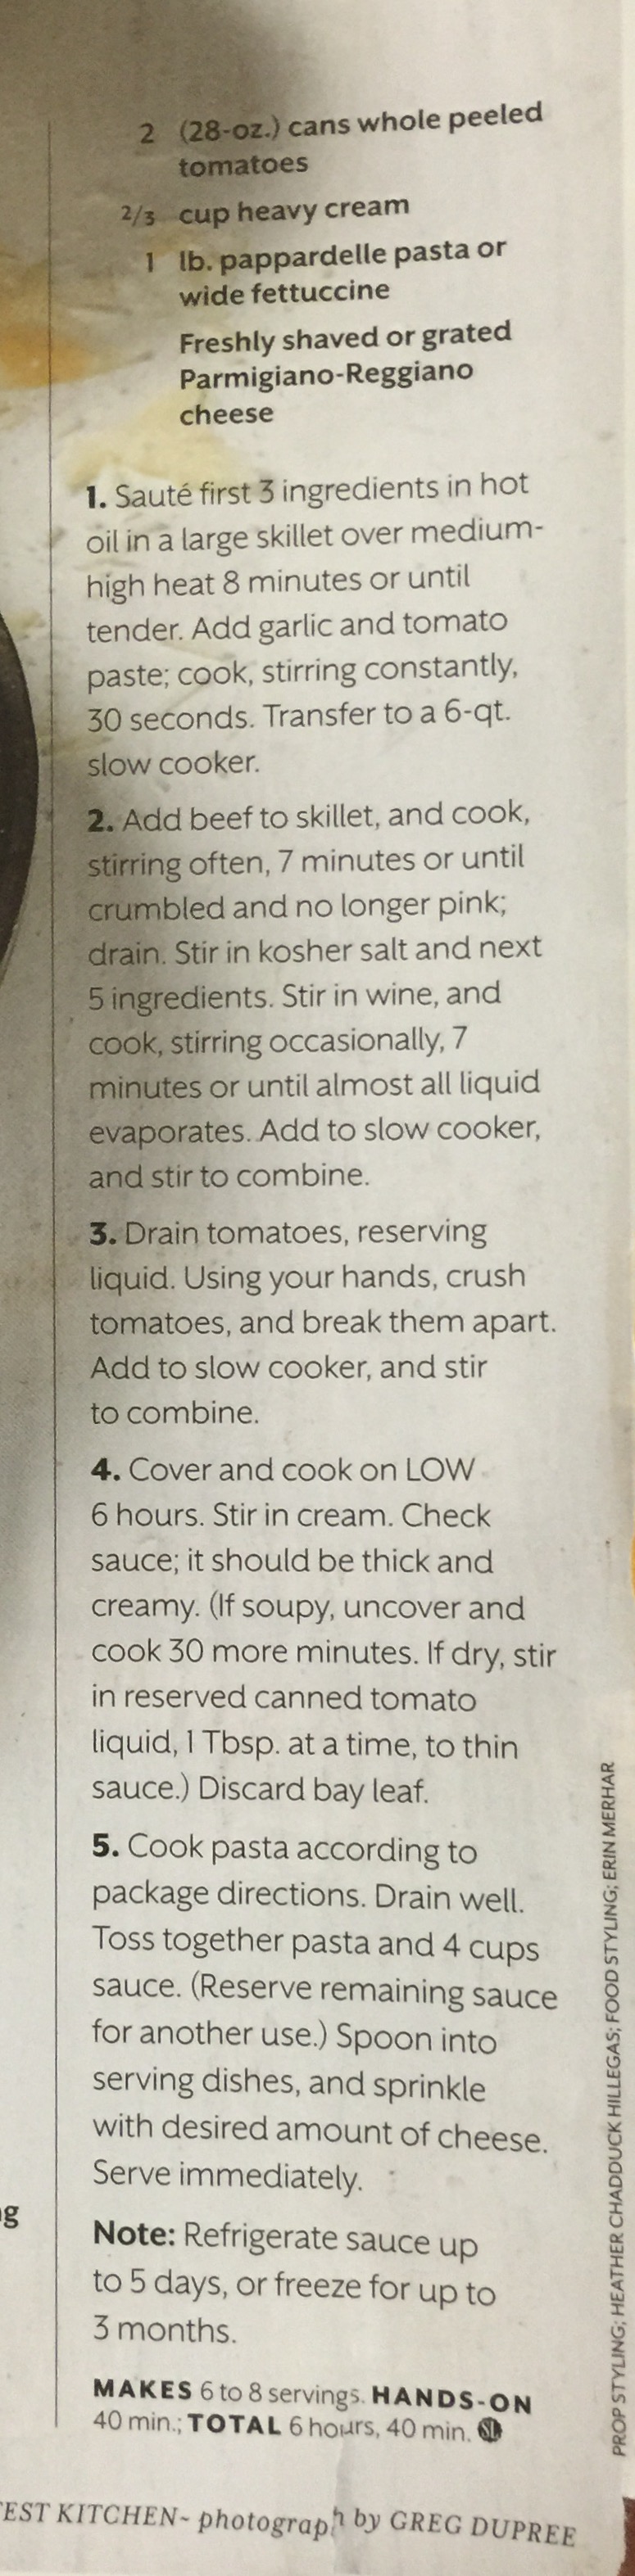
CLICK IMAGE FOR AN ENLARGED AND CLEARER IMAGE.
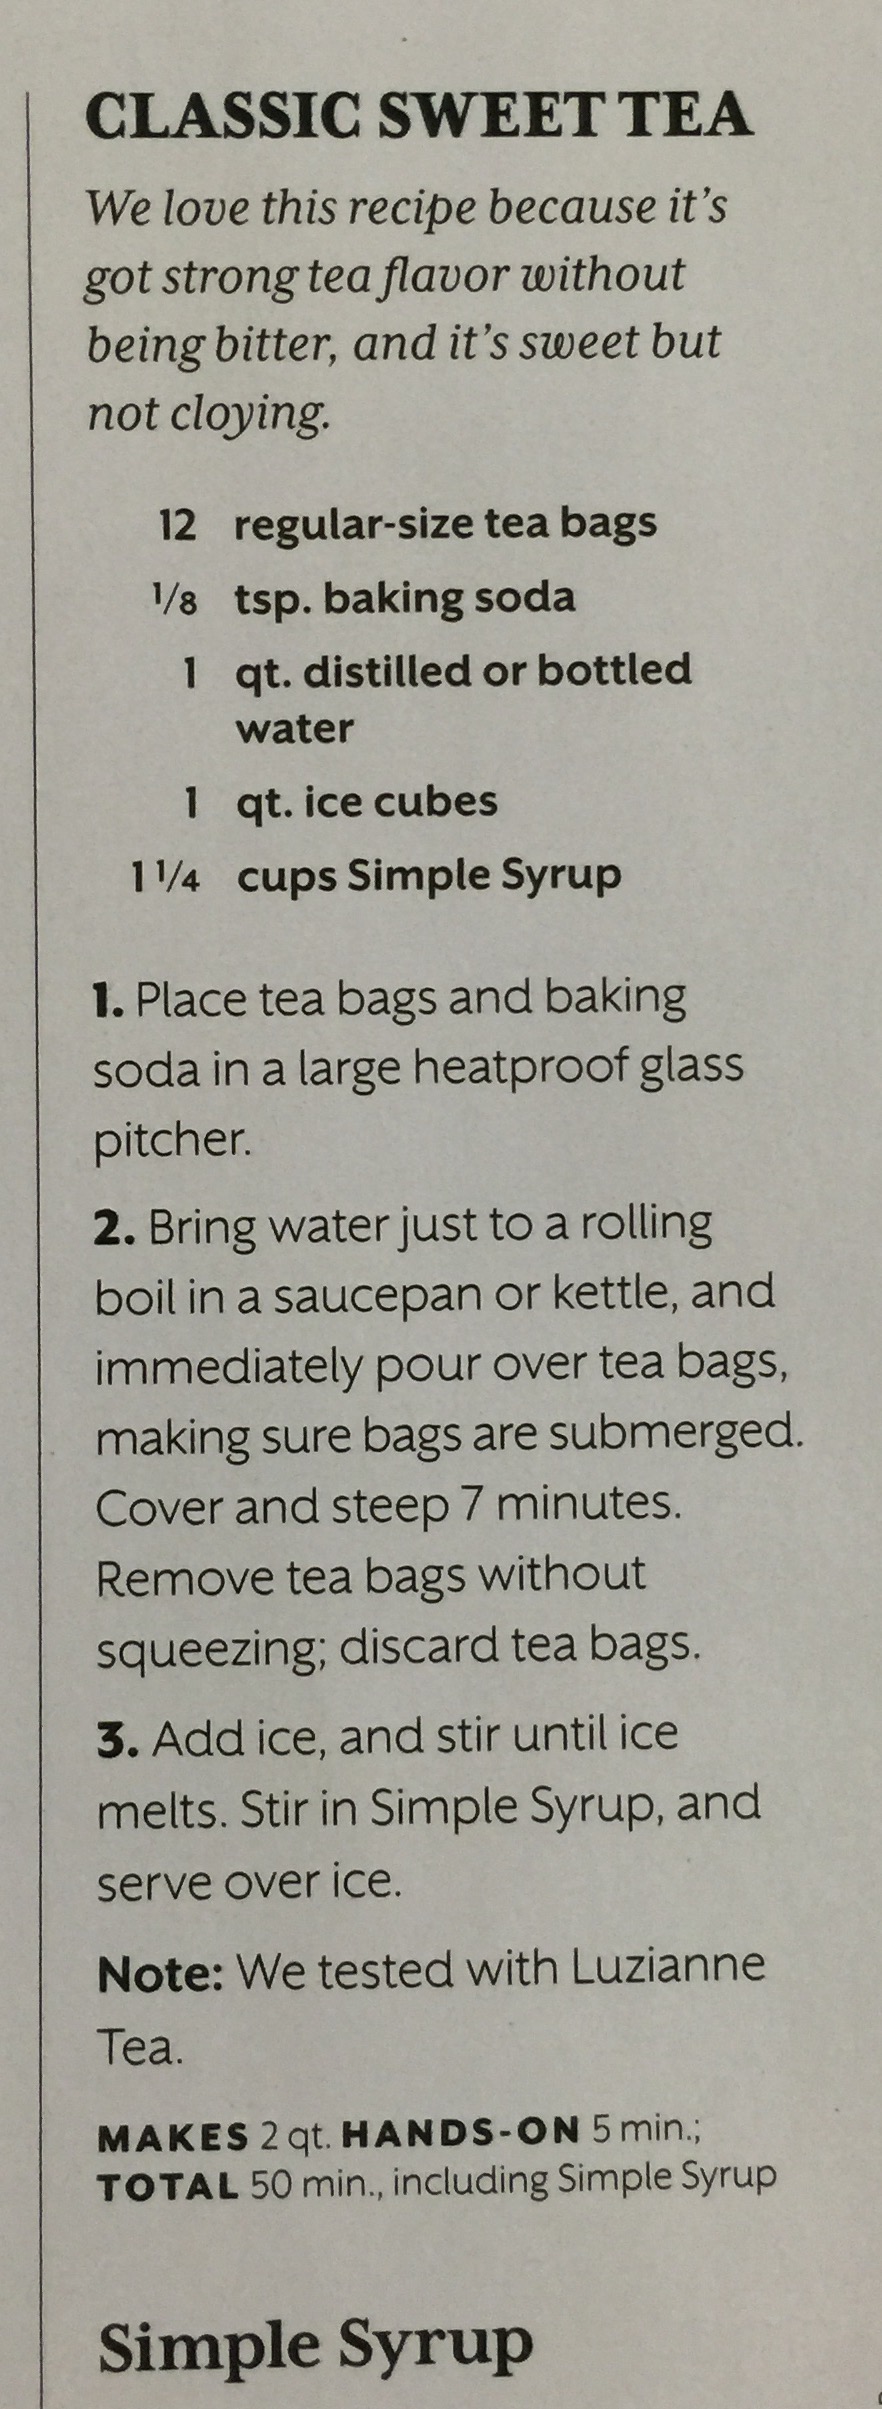
Simple Syrup
Rich Simple Syrup
Store in the fridge for 2-3 weeks
This is very easy to make, and works great for cocktails and sweet tea, because the sugar is already dissolved.