1 medium eggplant – Halved, Cooked face down 350 degrees for 40 minutes
– Let cool, then remove meat
10 cloves garlic – Oil, Wrap in foil, and cook with eggplant
1/4 C lemon juice
1/4 C Tahini
Salt and Pepper to taste
Cayenne pepper to taste
Process above in food processor
Mix in 1/2 parsley after processed
Top with Garnish
Parsley – 2 TBL minced
1/4 C Kalamata olives
1/4 C Feta cheese
Serve with bread or pita chips
Baba ghanouj
Eggplant is better if it is heavy for it’s size
Oven at 500° until it starts to char. 15 to 20 minutes
Put in a large bowl and cover with saran wrap
Leave in refrigerator until the next morning
Food process meat of eggplants.
Add tahini or peanut butter.
Add Greek yogurt.
I had a little bit of parsley and mint. So well and then puree.
Add lemons and garlic.
Pour lemon juice Andrews Esther to catch the seats.
Add olive oil.
Add one can chickpeas
These are tips and snippets pretty much just for me, so that I don’t forget some of the settings that work for me:
Whole artichokes – not halved – 12 minutes
Fagor stovetop unit
1 tbl evoo
3 lb misc chicken parts
Pieced
Sear in three batches in hot oil
Pour off most of hot grease
Add 1 C chopped onion till browned
Then bay, garlic and salt
Add 1 C water to deglaze
Add 1 gallon water
Add back chicken
Cover and put on medium high till pressurized
Turn to medium low and cook 1 hour
Quick release the strain into a bowl
Cool then skim off fat
Get recipes at www.FagorAmerica.com
For repair send to
Fagor America, Inc
Attn: Service Department
745 Gotham Parkway
Carlstadt NJ 07022 or 07072
This is the recipe we created in 2012. CLICK HERE for our recipe that we created in 2013.
This same process can be used for making Apple Butter
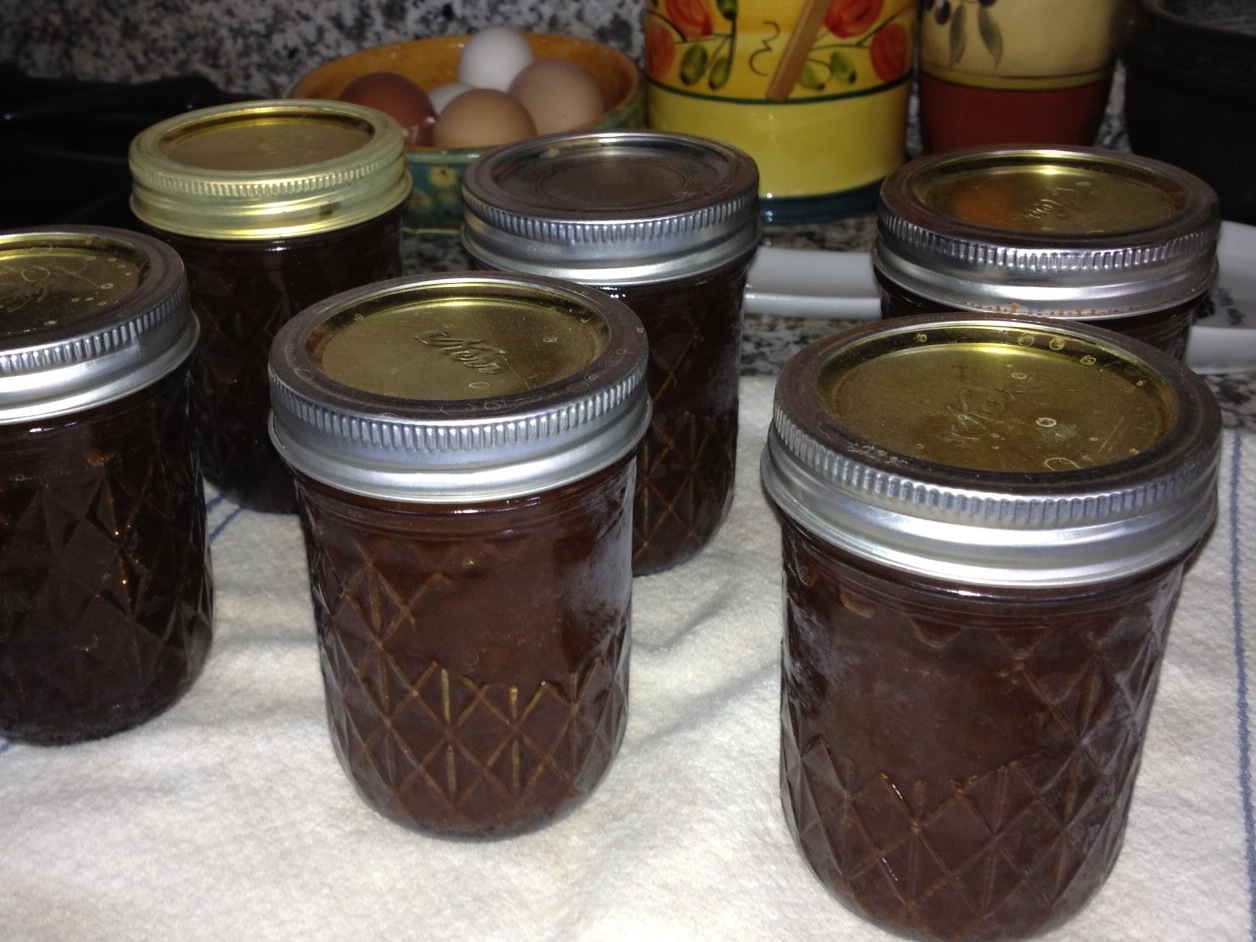
We made apricot butter, but you can make apple butter, pear butter, or whatever spread you want using the same recipe.
INGREDIENTS
1 cup fruit pulp
1/2 cup + 1 TBL sugar
1/4 cup water or fruit juice
Optional – Fruit Fresh or Spices
Zest and juice from one lemon
EITHER
1 teaspoon Fruit Fresh, or
1/2 tsp each cinnamon, cloves, and/or Ginger
STEP BY STEP
Multiply or decrease other items based on how much fruit pulp you have.
Do not try to process more than 8 cups of fruit pulp
Mix pulp, sugar, and water and heat over low heat until mixture starts to simmer
Raise temperature on stove, and bring mixture to boil stirring frequently
Continue gentle boiling until mixture thickens – stirring constantly
Note: this took us about 45 minutes. Unfortunately this can take as long as 60 minutes.
Mix in Fruit Fresh or spices plus the lemon
CANNING YOUR APRICOT BUTTER / APPLE BUTTER
Sterilize your jars, canning funnel and ladle in the hot water
Remove a jar and place near the pots. Drop a lid into the water.
Ladle your jars full just to where it touches the bottom of your canning funnel – about 1/2 inch from the top
Wipe the rim clean.
Remove the lid from the hot water bath and cover the jar of butter. Tighten very firmly, but do not bear down.
Repeat until all jars are filled.
Place jars in hot water bath, completely covering the top of the jar.
Bring the temperature of water to over 190°. Simmer at 190° or higher for 20 minutes. DO NOT bring up to a full boil.
Remove and wait for the happy little PING.
Butter can be stored in a cool dark place for about a year.
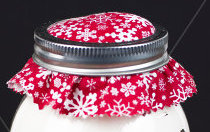
Just for pretty, after the cans cool you can remove the ring, put a piece of nice fabric over the top and put the ring back on.
This is really easy, but it does take some planning to allow for slow cooking times.
INGREDIENTS
4 pounds Pork shoulder or butt . Big chunks (2-3 inches)
1 TBL vegetable shortening in very hot pan
Brown all sides VERY well in VERY hot cast iron skillet
BRAISING LIQUID
1 White onion
6 garlic cloves
1 bottle Dark beer (Modelo)
1/2 cup lime juice
3 (5-inch) fresh marjoram sprigs
1 tablespoon coriander seeds
1 tsp each thyme, ground black pepper
1/2 tsp each ground chive and cumin
pinch of clove or 6 whole intact cloves
1 TBL salt
1/4 C sugar
1 orange . Zest and juice
1 bay leaves
STEP BY STEP
FIRST: Brown your meat
Sear in a very hot skillet until meat starts to blacken and the edges crisp up
Remove meat and set aside
Then combine braising liquid into the skillet
Add braising liquid to hot skillet that meat was browned in
Bring to a high simmer and cook about 15 minutes
Remove things like bay leaf, marjoram sprigs, etc
Put into blender – and pulse ( VENTED ) then pour back into the skillet
Add the meat back into the skillet
The meat should be just barely covered. If it is not, add some chicken stock or water.
Bring back to a light boil, then reduce heat, COVER and simmer in barely boiling liquid, skimming the surface and turning the pork pieces occasionally, until the meat is tender and just beginning to shred apart, about 3 hours. (You may need to adjust the heat to medium low to keep it at a simmer.) Alternately, use a slow cooker for 4 hours.
Remove the meat ans set aside
STRAIN the remaining liquid and discard the solids, returning the liquid to the pot
Increase the heat to medium high and cook until much of the remaining water evaporates and the liquid concentrates, and then add 1/2 stick of butter and 1 TBL flour
Stir until it thickens for gravy/juice for serving with your carnitas
Remove and let cool a bit, then shred
Serve the carnitas in tacos, burritos, or tostadas with your desired toppings.
You can also just serve the meat with potatoes using the gravy created in step 13
Corn tortillas . Warmed in hot skillet
Topped with sautéed onions, peppers, nopales
Also onion, tomato, cilantro, avocado, chives
For sliders put shredded pork in a skillet on high to sear again, and put on slider buns with desired toppings
Tomatillo Salsa
1 lb tomatillos . Husked, washed, raw
1/4 white onion
2 jalapeños
Lots of Cilantro
1 tsp salt
1 avocado
2 limes . Zest and juice
Blend
Chipotle Sauce
Tomatillos – peeled and seared whole
Garlic – peeled and seared whole
1/2 can chipotles
1 tsp salt
water just to allow blending
Tortilla
4 C Flour
Merest sprinkle of baking powder
2 tsp Salt
1 C Water
1/2 C Crisco Vegetable shortening
Mix . Ball . Set aside 5 minutes
Flatten on floured surface
Heat on dry cast iron skillet
Top w queso Oaxaca cheese and shredded meat
Fold over and brown on both sides
Serve with lettuce, pico de gallo, sour cream, cilantro, queso fresco, jalapeños,
Ω Two Small Portions (served as a side)
∆ Two Large Portions (served as a main dish, with fruit)
Ω 1 C Milk
– – – ∆ 2 C milk
Ω 2 TBL uncooked farina
– – – ∆ 1/4 C farina
Ω 2 TBL honey
– – – ∆ 1/4 C honey
Ω 1 large egg
– – – ∆ 2 large eggs
Ω 1/4 tsp vanilla extract
– – – ∆ 1/2 tsp vanilla
STEP BY STEP
Preheat milk in microwave Ω 30 seconds or ∆ 1 minute
Mix milk, farina, honey and salt to taste
In a small saucepan over moderate heat simmer milk mixture, stirring constantly, 3 minutes.
In a bowl beat egg lightly and stir in about one fourth milk mixture.
Stir egg mixture back into pot and cook, stirring, until pudding just begins to boil.
Remove from heat.
Stir in vanilla and divide between 2 bowls.
If serving hot, put fruit (banana, strawberries, mango, peaches, etc) in at the last minute and gently stir
If serving warm, cover surface of pudding with plastic wrap to prevent a skin from forming and chill 20 minutes, or until ready to serve. Serve fruit on the side.
If serving cold, cut fruit and stir together fruit, lime juice, and sugar and chill until ready to serve.
Actual Injera is made with teff, which is a flour common to Ethiopia. Read more about why teff is so amazing at the bottom of this page. This is Grandpa’s American adaptation of injera, the bread used as a utensil in Ethiopian dining.
INGREDIENTS
1 C spelt – Ideally use teff, next try half whole wheat and half AP flour DO THIS FIRST THING IN THE MORNING
1-1/2 cup water
a pinch of yeast
two pinches of sugar
a GLASS mixing bowl DO THIS IN THE LATE AFTERNOON OR EVENING
1 tsp peanut oil – optional canola oil
a pinch of salt
a VERY nonstick pan
STEP BY STEP
Put the flour in the bottom of a mixing bowl with sugar and dry yeast
Mix or sift together
Slowly add the water, stirring to avoid lumps.
Put the batter aside for 4-10 hours to ferment.
You will see your injera batter will start to bubble and acquire the slight tanginess for which it’s known.
Fold in the salt and the oil.
Heat a nonstick pan or lightly oiled cast-iron skillet until a water drop dances on the surface – about 350º
Make sure the surface of the pan is smooth, otherwise, your injera might fall apart when you try to remove it.
Coat the pan with a thin layer of batter. Injera should be thicker than a crêpe, but not as thick as a traditional pancake. It will rise slightly when it heats.
Cooking Injera
Cook until holes appear on the surface of the bread. DO NOT FLIP.
Once the surface is dry, remove the bread from the pan and let it cool.
Traditionally, fold twice with the cooked surface on the outside
Injera is made with teff, a tiny, round grain that flourishes in the highlands of Ethiopia.
While teff is very nutritious, it contains practically no gluten. This makes teff ill-suited for making raised bread, however injera still takes advantage of the special properties of yeast. A short period of fermentation gives it an airy, bubbly texture, and also a slightly sour taste.
Teff is extremely high in fiber, iron, and calcium.
Teff is the smallest grain in the world. It takes about 150 teff seeds to equal the weight of a kernel of wheat!
Many Ethiopians in America use square-shaped, electric, nonstick pans. These heat evenly and make it easy to remove the injera once it is cooked.
Injera is not only a kind of bread—it’s also an eating utensil.
In Ethiopia and Eritrea, this spongy, sour flatbread is used to scoop up meat and vegetable stews.
Injera frequently lines the tray on which the stews are served, soaking up their juices as the meal progresses. When this edible tablecloth is eaten, the meal is officially over.
Ethiopian and Eritrean immigrants have modified their recipes after moving to the United States or Europe, depending on what grains are available to them.
The injera you find in many East African restaurants in the United States includes both teff and wheat flours. Most injera made in Ethiopia and Eritrea, on the other hand, is made solely with teff.
Tip: Depending on where you live, teff flour can be difficult to come by. Try a well-stocked health food store.
If you have teff grain instead of flour, first grind it in a clean coffee grinder, or with a mortar and pestle.
If you’ve ever cooked pancakes, making injera might seem familiar. In both cases, tiny bubbles form on top as the batter cooks. Keeping an eye on these bubbles is a great way to see how close the pancake or injera is to being ready without peeking underneath.
These bubbles come from the carbon-dioxide produced by the leavener—usually baking powder or soda in the case of pancakes, “wild” yeast in the case of injera. Neither batter contains much gluten.
Because of the gluten, most pancake recipes tell you not to mix the batter too much: If you do, gluten will develop, making them too chewy. Teff, the grain used to make injera, contains very little gluten to begin with. In both cases, the result is the same: With no gummy substance to “blow up,” most of the carbon-dioxide from the leaveners rapidly escapes into the air, leaving the little popped bubbles that contribute to the distinctive textures of these breads.
Put 1 C distilled water into a soup pan and bring up to boil.
Reduce water in soup pan to active simmer and place a large metal mixing bowl onto the soup pan, creating a double boiler
– WARNING: Don’t heat the Hollandaise too quickly or let temperature of liquid rise above 175 degrees or eggs may congeal. It may also separate and once that happens there is no recovery. Your sauce will still taste the same, it will just not be as creamy looking. 160 degrees is ideal.
Alternate: to a double boiler
A double boiler helps guarantee success, but you can do this in a mixing bowl right on the stove top. Put in three yolks and three tabs of COL butter. Put on and take off of the heat – never letting it get really hot. When ribbons start to appear, take it off the heat and whisk in a splash of lemon.
https://www.grandpacooks.com/recipes/basic-hollandaise/
–
While this is technically a good recipe (more technically accurate than mine) I still prefer my recipe, but here it is for your reference.
https://www.grandpacooks.com/recipes/blender-hollandaise/
–
Here is an alternate recipe that does not require cooking. You are forewarned about the whole raw egg stuff.
The information below this section is from a third party. It is part of Grandpa's Personal Recipe box. Feel free to browse, but know that this information is from someone else.
–
A YouTube video from a Third Party, but a nice recipe. Also includes Oysters and Pumpkin Cheesecake.
https://www.grandpacooks.com/recipes/microwave-hollandaise/
–
This is actually a pretty good recipe. It is easier than a double boiler, but actually takes about as much time as real Hollandaise.
1 handful spinach leaves (roll leaves and cut thinly)
1/2 CU jicama or water chestnuts (cut thin)
2 mandarin oranges (peeled and sectioned)
10 almonds (coursely chopped)
2 tsp Corn Starch (optional)
1 TBL Soy Sauce (optional)
STEP BY STEP
Place large pot of water on burner on high, and cover
Combine green onion, celery, basil, barlic, lime, vinegar, sugar, carrot, spinach, jicama, and almonds.
Set mixture aside to rest
Heat oil in skillet and when hot, cook chicken strips
When strips are ABOUT done, add diced onion and garlic to the pan
Remove pan from heat and cover
Put noodles into boiling water and cover. Watch closely. When water starts to boil, reduce heat or it will boil over.
Cook about 8 minutes.
While noodles are cooking, drain liquid from step 2 into small cup.
Add Soy and Corn Starch ONLY IF you like a salty Asian taste. Mix well.
Taste a noodle. When done, drain noodles and return to the pan.
Add soy mixture (if you chose this option) and cook until thickened.
Split between two dinner plates.
Top with greens mixture
Place orange slices on top for garnish and taste.
HINTS:
A great way to section oranges is to hand-peel the orange, then slice them just shy of the white binding, discarding the binding eventually. What you end up with is a wonderfully edible orange slice with no toughness.
For garlic, once you’ve separated the cloves, crush it with the bottom of a coffee cup. The skin comes right off.
Sesame oil smokes more, but in my opinion tastes better. Canola and olive oil are also good choices.
Turkish Coffee is more of a process than a product.
INGREDIENTS
Authentic Turkish Coffee (or very finely ground coffee)
STEP BY STEP
Pour in cold water in the coffee pot.
– You should use one cup of cold water for each cup you are making and then add an extra half cup “for the pot”.
Add a level teaspoonful of the ground Turkish coffee per cup in the water while the water is cold and stir.
– The amount of coffee may be varied to taste, but do not forget, there will be a thick layer of coffee grounds left at the bottom of your cup for properly made Turkish coffee.
Heat the pot as slowly as you can. The slower the heat the better it is. Ideally allow 15 to 20 minutes to come to a near boil.
– Make sure you watch it to prevent overflowing when the coffee boils.
When the water boils pour some (not all) of the coffee equally between the cups, filling each cup about a quarter to a third of the way.
– This will make sure that everybody gets a fair share of the foam forming on top of the pot, without which coffee loses much of its taste.
Now is the time to add sugar into each cup if you wish.
Continue heating until coffee boils again (which will be very short now that it has already boiled). Then distribute the rest of the coffee between the cups.
Since there is no filtering of coffee at any time during this process, you should wait for a few minutes before drinking your delicious Turkish coffee while the coffee grounds settle at the bottom of the cup.
MORE INFO
Centuries ago, when people devoted more time to attend to the demands of their earthly pleasures and less time to the demands of business and corporate life, coffee making developed some rituals that exist in ‘lite’ versions in our days. In old times, connoisseurs expected their coffee to be heated slowly over charcoal embers for 15 to 20 minutes, the copper coffee pot being frequently taken away from the fire to prevent overheating.
A connoisseur can easily tell the difference between a properly made Turkish coffee and one prepared the way cheap restaurants would do, basically boiling the coffee quickly, degrading thus the taste and producing little if any froth that needs to cover the cup of coffee.
Although to this day there are still a few people who either do or at least know the days when coffee was heated on charcoal, for all practical purposes modern electric or gas stove tops became the heating equipment of choice. To make proper Turkish coffee you need Turkish coffee beans, a Turkish coffee pot (“cezve”), and Turkish coffee cups (“fincan”), and optionally, if you want to grind the beans, a Turkish coffee grinder (“kahve degirmeni”). Note that Turkish coffee requires extra fine ground coffee which some electrical grinders fail to produce.
If you have the freezer space, buy your turkey during Thanksgiving or Christmas when they are on sale.
Make sure they are wrapped well so they do not dry out or get freezer burn.
If it is a fresh turkey, piece it out and freeze the pieces. Use shrink wrap to preserve them for up to an entire year.
Cooking for a big crowd? Consider two smaller turkeys instead of one large one.
Buy a FRESH turkey without any added ingredients. Other great options are organic, kosher, heritage or premium-brand.
THAWING YOUR TURKEY
NEVER EVER EVER cut a frozen turkey with an electric knife.
Starting from completely frozen, figure about one day for every four pounds of meat
or
Put into sink in COLD water, breast side down, for 30 minutes per pound.
Keep water running at a trickle for THE ENTIRE TIME that it is thawing
or
Put into HOT water, breast side down, for 15 minutes per pound.
Keep water running at a trickle for THE ENTIRE TIME that it is thawing
Refill sink with hot water every half hour
For crisper skin, unwrap it during the last day and let it thaw uncovered the last 24 hours. Even better, use a dry rub during the last day. This will draw even more of the liquid out resulting in even crispier skin.
PLEASE NOTE: Only the first method is recommended by the FDA, but it has never worked for me. My refrigerator though, is set at 34º
I follow the first method, then move to the second until the internal temperature is about 35º and does not have ice crystals.
RAW TURKEY
Cross contamination is your biggest enemy. Wash your hands frequently.
After you have rinsed your turkey, wash your sink with soap, and wipe your counters off with bleach wipes.
Wash cutting boards with soap and water, then wipe with a bleach wipe.
COOKING YOUR TURKEY
Before cooking, let it rest on the counter for an hour so that the heat can come up to room temperature. This will result in a more evenly cooked bird.
The first time I cooked a turkey I had never heard of “a bag of giblets.” I cooked the turkey with the bag inside the body cavity. Remember to take this packet of meat out. You can cook these up and use the broth as the base for your gravy.
DO NOT throw out the pan drippings. They are pure gold. Use them for making gravy.
If you use one of those cheap aluminum roasting pans DO NOT us it alone, but rather place it on a heavy oven baking pan. Use a foil bed to hold it off the bottom of the pan.
Use an internal thermometer to make sure your oven thermometer is properly calibrated.
If you are cooking your turkey to be served with other things, and it finishes too soon, cover it with aluminum foil, then a thick bath towel.
If presentation is not an issue, piece your turkey out and cook the parts individually.
White meat to the front of the oven, and dark meat toward the back. The back gets hotter and will dry out the white meat.
For cooking a thawed frozen turkey, plan on 20 minutes per pound in a 350 degree F oven
plan on 10 to 15 minutes per pound if you are cooking a fresh turkey
A turkey will cook more evenly if you do not stuff it. Fry up the giblets and use the fond and broth to cook your stuffing in a pan using the drippings.
Instead, put some garlic, onions, carrots and celery into the body cavity.
Never trust the pop up timers that come already inserted into the turkey
If you get a late start cooking your turkey, cook it for the first 30 minutes at 425º and then reduce to 375º. Remove one hour from the overall cooking time.
For crispier skin, wipe the outside with olive oil and sprinkle with some herbs and spices
Once you get the turkey in the oven LEAVE THE DOOR CLOSED until the time is up. Resist the urge to peak
If it appears to be browning too quickly put a sheet of foil loosely over the top.
Likewise, if the fond on the bottom of the pan is dry and starts to burn, put 1/4 C of water in the bottom of your pan to save the drippings.
Use an insertable thermometer to check when the center of the breast meat hits a temperature of 165º, or the thigh for a temperature of about 170 degrees. Get one from Amazon.com
The intense heat forces the liquid to the center of the turkey, away from the skin. After cooking, cover with a foil and then a bath towel and let rest 20 minutes. This will allow the juices to redeploy and let the temperature continue to rise until it hits about 170 and 175, This is just about the time needed to make gravy.
GRILLING YOUR TURKEY
Use a Weber Grill that has a lid that closes completely
Put coals on each side of turkey (not directly under)
Put drip pan under turkey for catching the gravy drippings
DEEP FRYING YOUR TURKEY
This is quite the fad, but the benefits do not outweigh the risks. A nicely seasoned oven-cooked turkey can be just as flavorful as one cooked in a vat of grease that will burn you to the point of scarification in about five seconds.
If you insist on doing this
…take EXTREME precautions against spilling your container of hot grease
… dry your turkey off VERY well before putting it into the fryer
… make sure your turkey conveyance mechanism is tight, secure and sound
… keep all children and other activities away from the cooking area
… have a fire extinguisher immediately available
SERVING YOUR TURKEY
Tent foil over the turkey for 20 minutes before carving to allow moisture to redistribute into the meat. If you need more time to make stuffing, etc. you can keep it tented for about 45 minutes without losing too much heat.
View the below video by Martha Stewart Kitchens that shows, in excellent detail, how to carve your turkey.
Turkeys start to spoil after only two hours on the serving table. Have everything ready for refrigerating the left-overs and remove the bird and wrap it while dessert is being served. This is a task that can be delegated even before you start eating, so that you can focus on being a good host or hostess. Have them remove most of the meat from the bones and put into a baggie or foil. Put the carcass in a bag and put in the refrigerator intact so that your guest can return to the party. You can get the small pieces of meat off later. Save the bones in the freezer for making stock.