These recipes are for Grandpa and his family. This category includes recipes from magazines, TV shows, newspapers, and other sources where I don’t have permission to republish the recipes, but still feels they are recipes that he may want to cook for himself at a later time.
If you’re looking for the BEST Fudgy Chocolate Brownies Ever, then you’ve come to the right place!
This tried and true recipe uses cocoa
powder (instead of melted chocolate) to make double fudge cocoa brownies that are slightly chewy and fudgy at the edges of the pan, while the middle pieces are super fudgy.
These fudgy cocoa brownies have just the right amount of sweetness with deep, bittersweet chocolate flavor.
I’ve also included plenty of tips in this post to help you make the BEST fudgy chocolate brownies! These fudgy chocolate brownies are a hit no matter who or what occasion I bake them for. But it did take me a few tries to get it right.
I usually make brownies with melted chocolate (which is great, obviously), but I wanted brownies that were even fudgier with MORE chocolate (which is never a bad thing in my book). So I started experimenting with cocoa brownies, and after numerous attempts, I’ve perfected the recipe for these addictive fudgy chocolate brownies (or as I’d like to call them Double Fudge Cocoa Brownies).
• 30 minutes for extra gooey, fudgy pieces in the middle, and perfectly fudgy pieces at the edges of the pan.
• 35 minutes for perfectly fudgy pieces in the middle, and chewy-fudgy edges.
• 40 minutes for chewy-fudgy pieces in the middle, and chewy edges.
It helps to understand what each ingredient contributes to your chocolate brownie recipe, so that you can learn how to make the perfect fudgy chocolate brownie with cocoa powder!
The melted chocolate adds the fudginess to chocolate brownies. Or more specifically, it’s the cocoa butter and sugar in the chocolate that make chocolate brownies fudgy. However, since cocoa butter remains a solid at room temperature, the chocolate brownies tend to be a bit firm as well.So instead of melted chocolate, these are fudgy brownies made with cocoa powder. The cocoa powder also adds a deeper chocolate flavor to these brownies.
Another advantage of making cocoa brownies is that here you remove all the cocoa butter and replace it with regular butter instead. And since regular butter is soft at room temp., this makes the brownies extra fudgy. It’s important to use melted butter for this recipe.
Unmelted butter will make the brownies more cake-like than fudgy.But
by removing melted chocolate, you’re also removing a certain amount of sweetness (sugar) as well. So you must add extra sugar to compensate for that in this fudgy chocolate brownie recipe.What does the sugar do in a cocoa brownie recipe? And which sugar is better? White sugar or brown sugar?
The obvious purpose is to add sweetness. Cocoa powder is bitter, and the extra sugar will provide balance and make the chocolate brownie sweeter (instead of bitter, which obviously isn’t as desirable).
Sugar makes the brownies “softer”. This is because sugar acts as a tenderizer for baked recipes. For example, with regular vanilla cakes, recipes with extra sugar tend to have a softer crumb.
For this brownie recipe though, we are not really worried about getting “softer” brownies, as it doesn’t really provide an advantage as such. White sugar makes the chocolate brownies chewier.
Since white sugar is “dry” (with no molasses) it melts to create a chewier brownie. Brown sugar makes the brownies fudgy. The molasses in brown sugar melts to create a “wetter” batter that becomes fudgier when baked.So with all this in mind, I decided that it was important to include both kinds of sugar in this cocoa brownie recipe.
You can use ALL white sugar if you do want a chewier brownie, and use ALL brown sugar for a fudgier brownie recipe. However, be mindful of the baking times when you make those adjustments, as you could end up with slightly different results then.
Eggs play a big role in chocolate brownies as well. A brownie isn’t really a brownie without a nice, crackly top, am I right? Eggs + sugar is how you achieve that deliciously crackly brownie surface!
How do you get that nice, crackly brownie surface?
The eggs and sugar are beaten together until you have a pale, thick mix. This stage is crucial to create that beautiful brownie crust. The eggs are whisked with sugar to incorporate air which creates an almost meringue-like mix and THAT is what creates that crackly brownie crust we all love!
This also brings us to another reason why eggs are important in this fudgy chocolate brownie recipe. Egg whites help create the meringue-like crust, while the yolks help make the chocolate brownies fudgy.
The eggs whisked until pale and thickened. This step helps create that crackly brownie surface that we all love. Since I wanted extra fudgy brownies, I used 3 whole eggs plus 1 egg yolk. When I make these cocoa brownies using ONLY whole eggs, the edges of the brownies become more cake-like than fudgy. And if I removed 2 whole eggs and used 2 extra egg yolks, the brownies were fudgy, but the batter was too dry. So 3 whole eggs plus 1 egg yolk is the sweet spot.
To make these cocoa brownies EXTRA fudgy, I added chopped dark chocolate to the batter as well! You can substitute this (or add in addition to it) with chopped nuts, or other types of chocolate like white chocolate or milk chocolate, or even fruits like raspberries and strawberries, or even crushed Oreos!
More tips on how to make these PERFECT FUDGY COCOA BROWNIES Use melted, very warm butter. The butter melts both types of sugar during mixing which helps create that fudgy and chewy texture, and the meringue-like, crackly surface. Use both types of sugar for best results. That way you get the best of both worlds – chewy and fudgy brownies! Mix the butter, sugar and eggs together for 2 minutes. So that you have a pale, thick mix. NEVER over-mix the flour and cocoa powder.
You want to avoid using a hand-held mixer to fold in the dry ingredients. Whether you use a hand-held beater or spatula, you should mix the flour and cocoa powder ONLY until they are just mixed through. This way you avoid the gluten from developing, and end up with a deliciously fudgy brownie. Over-mixed brownie batter on the other hand, results in cakey brownies.
Before you go on a long vacation and risk your expensive food, test your cooler’s retention ability. Put an 8 or 10 bag of crushed ice into each cooler and close the lid.
Open the lid for no more than 15 seconds starting at two hours
Paper Towels – ATK Test
Recommended is two-ply Bounty
Wood Chips
Soak Hickory, Oak or Mesquite chips in water for 15 minutes
Wrap in heavy foil – about the size and thickness of a paperback book
Poke holes in the top
Put right on the coals or on the bottom rack
ATK Equipment Review – Skillets
Winner: Oxo Good Grips Nonstick 12 inch open fry pan – $40
A great idea for a Halloween party. – – – Just add 1 TBL activated charcoal for Black Muffins, or 1 TBL fine wood ash (untreated wood) for Gray Muffins
Candied Apples
Put 2 sugar into a heavy pot and add 1/4 C corn syrup. The Chef on TV added 3/4 C water, but this is really unnecessary. As long as a single teaspoon of water remains, the syrup will never get above 212º. You need to bring it up to 300º for caramelization to happen. The water is a shortcut to make the sugar melt, that actually makes the entire process take longer. Skip the water.
Option: For Black Apples, add 1 T activated charcoal when the temperature hits about 285º
Add all but 1/2 C of the flour and beat two minutes on medium
Add 6 TBL butter – one pad at a time until incorporated
Optionally add raisins
Add remainder of flour and stir till combined
Beat 6 minutes on high
Put into 9×12 greased cake pan
Flatten sponge with fingers
Cover and rise 1 hour
If necessary, push dough back into any corners or sides
Crumb Topping
18 TBL butter – melted and clarified
3/4 C white sugar
3/4 C brown sugar
2 tsp cinnamon
1 tsp salt
Dissolve all ingredients together to make “Butter Mixture”
4 C cake flour – sifted
Mix cake flour and butter mixture
Rest 10 minutes
Sprinkle crumbs by hand across top of sponge
Bake 350º for 35 minutes until toothpick comes out clean
Turn oven off and rest baked cake 3 hours in cooling oven
Optionally dust with confectioner sugar
North Carolina Lemon Pie
This sounded great, but I am not going to retype the entire episode here. CLICK HERE for Cooks Country recipe. If they take down the recipe USE THIS LINK.
Crepe / Blintz
Use my recipe for crepes. They should be UNDERDONE, and not browned.
For a blintz, make a large crepe using a 12″ pan
When ready to cook brush pan with butter
Heat to 350º
Add 1/3 C batter and tip to spread
Cook only to congeal. Try not to brown too much.
Ricotta Filling
Fill with mixture of 11 oz whole milk ricotta cheese
1/2 C confectioner sugar
2 TBL cream cheese
1/4 tsp salt
Cover and refrigerate 2-36 hours
Topping – Raspberry Sauce
10 oz raspberries
1/4 C granulated sugar
1/4 tsp salt
Heat 8-12 minutes
Serve hot over freshly cooked blintz
To Finish the Blintz
Put 2 TBL filling in the center of a cooled crepe
Form into a 2×4 strip or log
Fold bottom in, then sides, then roll to make a packet
OK to refrigerate these overnight for the next morning
Cook in 2 TBL fresh unsalted butter
Fry 6 at a time, leaving a bit of space between them
2 – 4 minutes per side at 350º till browned
If making more, wipe out pan and use new butter
Serve hot with topping
Optional simply use cream cheese with blended strawberry topping
It’s the most crucial element and can make or break your loaf. In India, the two most common types of flour are atta that is used to make chappatis and the all-purpose flour or maida which is mostly used in baking or seen in store-brought breads, cakes etc. I tried the recipes which asked me to use whole wheat flour but it didn’t work for a number of reasons which I’ll come back to later.
And so, I decided to go in for a basic white bread.
When it comes to picking the right flour, Chef Vinesh Johny, baker and owner of Lavonne, Bangalore says, “You need to find the kind that’s got gluten content of about 14%. Anything less than that and your bread won’t bake well or hold structure.” I checked most of the maida packets but couldn’t find the quantity of gluten, but from initial research I figure it’s somewhere around 10% and so I also brought a packet of gluten from Modern Bazaar.
Don’t get confused with trying to find bread flour because all-purpose flour will do the trick and I say this because I cruised through both Modern Bazaar and Le Marche trying to find it myself. I didn’t want to try a recipe and buy ingredients that I wouldn’t want to buy again and so I decided to stick with all-purpose flour.
Yeast: This is an investment you’ll have to make. Modern Bazaar has a few options, they’re all imported but some of them are reasonable priced. I bought a Tesco box which has around 20 sachets of dry yeast and costs around Rs.300.
Things you want to set aside: Warm water, honey, salt, baking soda, sugar, eggs, olive oil and butter, salter and unsalted.
Methodology
I picked three recipes based on ease, expertise and popularity. The first recipe was the one which is most popular on YouTube and shows up every time you type in ‘how to make bread’. The second, was a classic French bread recipe for which I didn’t need special ingredients and the last one was Vinesh’s recipe who’s an exceptional baker.
Recipe #1 BakeLikeAPro
‘Bake Like a Pro’ is a YouTube channel with over a lakh subscribers and it’s all for good reasons. From cakes to biscuits to pasta dough, the channel has catalogued over 150 recipe videos and each one explains how to make a recipe, step-by-step. Bake Like a Pro has an excellent recipe for white bread for which you need a few basic ingredients like flour, butter, salt, sugar, milk and water.
You can watch the video here:
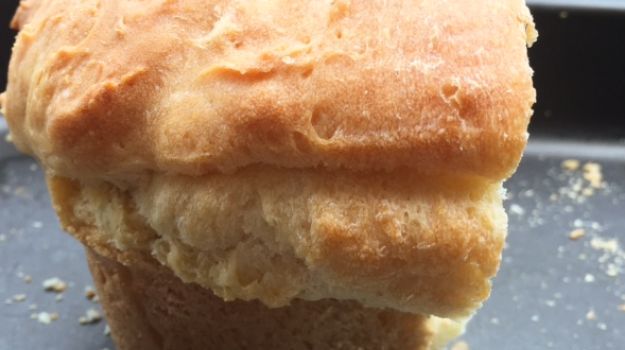
What works, what doesn’t:I had to try this recipe thrice to get it right but that was more my fault than the recipe’s. I couldn’t grasp how far the dough would rise and so I stuffed the baking tray with too much dough. But the one thing which was consistent every time I baked the bread was its taste. I’m not sure if it was the combination of milk and butter, but the loaf of bread had an extremely smooth and creamy taste.
After this recipe, I tried a number of other recipes and each and every one of them turned out to be a disaster which meant I needed to bring in an expert. I called up Chef Vinesh Johny (genius alert!) and here’s what he had to say: “Flour, yeast and water are the three basic ingredients you need to make bread. The rest of them are only for texture or flavour. Eggs and milk make it soft and creamy and sugar gives it a slightly sweet taste.”
Classic French bread recipes call for honey and are a tad sweet which is what makes this white bread different from the others. The ingredients you need for this recipe are water, honey, dry yeast, butter, maida and milk powder though I used milk instead.
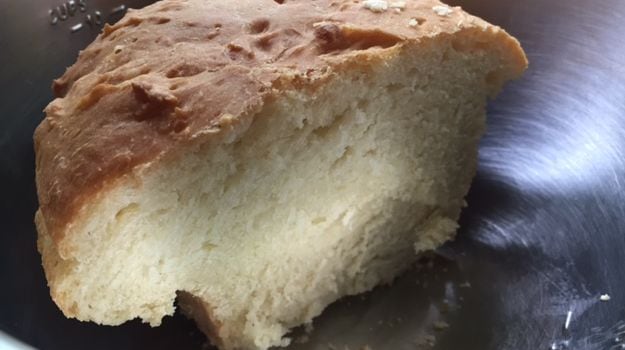
What works, what doesn’t: I used two teaspoons of milk instead of milk powder but I should have used the same quantity. The bread tasted delicious but it was crumbly which I think had more to do with the quality of flour I used. So for the next attempt, I plan on adding a pinch of gluten to this recipe. The bread also took much longer to rise, because of the humidity maybe, so I had to leave it for almost 2 hours.
It did taste different than all the other batch of breads I tried and I’d bake it again but it’s not something I’d use for a ham sandwich. It’s the kind you eat with jam or plain butter.
You need a few basic ingredients for this recipe but the technique is what really stands out. So before you start, be careful to read it thoroughly. You need the basics: flour, yeast, salt, sugar, eggs and water.
What works, what doesn’t: The one thing I seriously struggled with here was converting grams to tablespoons. I’m an amateur cook, at best, and so 9 grams sugar is not something I’ve come face to face with before. But this gorgeous convertor I found online came to my rescue (click here). And I’m guessing it’s fairly accurate, because my recipe turned out beautifully.
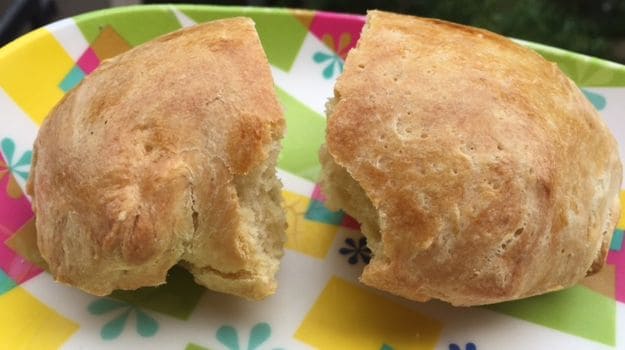
The other thing I altered in the recipe was the shape. I just separated the dough into three separate rounds to get smaller buns. Since I’ve never baked bread before, the one thing I was confused most about was how much time should the dough rest but Vinesh advised me to let it rest till it doubles in size and not worry too much about the number of hours mentioned in the recipe.
The Verdict
I loved all the three recipes I picked but if I had to pick one, and this is purely based on ease of execution, then it would be the first one by BakeLikeAPro. It’s ridiculously easy and needs no more than a few hours. Plus, the bread lasts for good three days so you don’t need to run to the store before breakfast. It also tastes really good with a bit of butter and jam, it’s got this undertone of sweet and salt which is great too. And just so you can try it at home, I’ve penned down the recipe:
5-6 cups flour
1/2 cup milk
3 Tbsp sugar
2 tsp salt
3Tbsp butter
2 packets of yeast (dry)
1 1/2 cups water
The only thing I added here is a pinch of gluten which you can if you like your bread a bit sturdy.
Method:
1. Heat the milk and add sugar, salt and butter. You can also you margarine if you want. Make sure the butter melts. If it hasn’t then microwave it a bit or over hot boiling water. You don’t want it boiling but it should be completely melt. Allow this mix to cool.
2. Heat up the water to about luke warm and add the yeast. Add a cup of flour and start stirring/mixing.
3. Add a second cup of flour and the butter mix you made in step 1. Stir again for a 9-10 minutes.
4. Add another cup of flour (3rd cup) and stir.
5. Add the next cup of flour and stir/knead for around 5-6 minutes. Add the 5th cup of flour and knead again. Keep kneading till it’s soft and doesn’t break but behaves more like clay. Add a bit more flour if required.
6. Pour some flour on your kitchen slab and start to knead the dough.
7. Oil a big pot. pan for the dough to go into. Cover with a towel and let it rise for around 35-40 minutes. Longer if it hasn’t risen.
8. Punch it down in the pot, take it out and knead it a little bit. Split it into two equal loaves.
9. Take two baking trays, oil them and put the dough in. The recipe asks for oil to be sprayed on top of the dough but i brushed some butter over them.
10. Cover them and let the dough rise for around an hour.
11. Preheat the oven to 220 degrees and bake till golden brown.
This WILL NOT be a large sandwich, but is closer to the small ones you might remember from family or Scouting camping trips if you lived through the 60s and 70s.