Gumbo (ATK)

Ingredients
1 lb. Shrimp or Chicken Stock
1 lb andouille sausage (alt. Kielbasa) (slice 1/l8” thick)
veg oil
all purpose flour
2 med diced onions
scallions
1 celery rib (diced thinly)
6-8 okra
6 cloves garlic (minced)
1 tsp thyme
1 tbl cayenne

Instructions
1. Peel shrimp and put shells in cook pot OR skin & bone chicken and put in cook pot.
2. Cook in 4 ½ cu water, simmer 20-30 min, strain add 1 (8oz) bottle clam juice and 3 ½ cu ice water.

Roux;
1. ½ cu veg oil, ½ cu flour, whisk to elimate lumps.
2. cook on medium heat until turns copper or mahogany (no smoke) about 20 min. stirring constantly.
3. When roux is brown, add to roux 2 med diced onions, 1 diced rib celery, 6-8 okra, 6 cloves minced garlic, thyme, cayenne.
4. Cook stirring frequently 10-15 min. Add stock 1 cup at a time. Bring to boil, skim foam off w/ spoon, simmer 30 min.
5. ½ hour later add 1 lb Andouille sausage and simmer 30 min.
6. Add 1 ½ meat (don’t over cook) add ½ cu parsley @ end and ½ cu scallions.

Guilt-Free Topping

Ingredients
1 CU plain lowfat yogurt
1 TBL sugar
1 tsp vanilla

Instructions
1. Mix all ingredients thoroughly
2. Chill at least 1/2 hour before using
3. Spread on top of strawberries, French toast, apple pie… almost anything
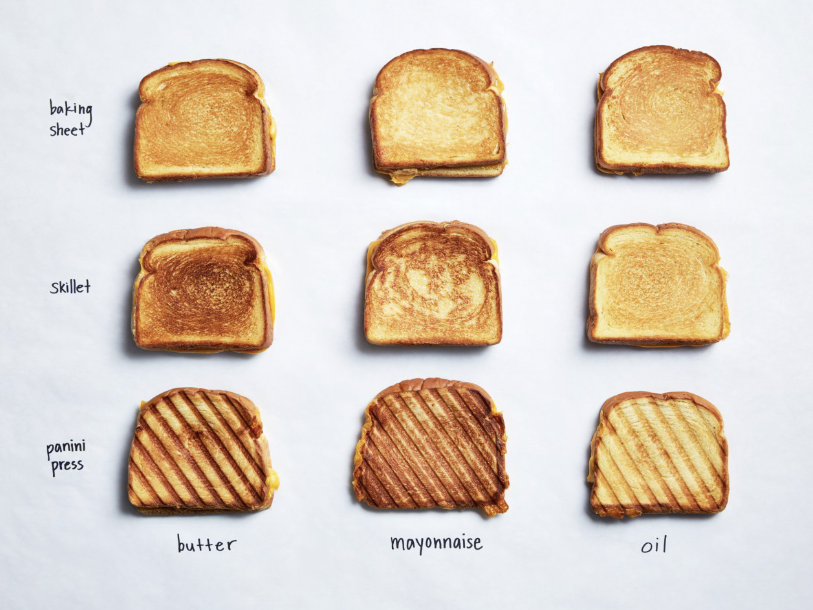
Grilled Cheese Sandwich

Recipe Ingredients

  • Your favorite bread – Rye or pumpernickel is a good choice
  • Slice of sharp yellow or white Cheddar or Swiss
    You can use processed cheese.  It keeps well because it is shelf-stable.
  • 2 TBL Miracle Whip or Mayo plus 1 TBL Dijon mustard – mixed
  • 2 TBL Butter – softened
  • 1/2 C Apple Cider or White vinegar
  • Optional
    • Thin slice of ham
    • Fresh Poblano pepper – blackened and skinned
    • Beefsteak or other slicing tomato
    • Red onion – paper thin slices

Step by Step

  1. Cut onion into paper-thin slices
  2. Marinate the onion in 1/2 C hot vinegar – set aside to cool
  3. Toast poblano over an open flame, with a blow torch, or under the electric oven broiler until it is blackened
  4. Put the pepper into a plastic bag to sweat for 10 minutes
  5. Use a paper towel to remove the skin – DO NOT RINSE
  6. Cut off top of pepper, slit open and remove seeds and vein
  7. Cut bread into thin slices.
  8. Apply desired mayo or mustard to the cooking side.
  9. Apply chipotle mayo to the inside.
  10. Put optional ham or onion or tomato on the bread.
  11. Put cheese onto the bread and place the other slice on top.
  12. Melt 2 TBL butter in a medium heat (not hot) skillet.
  13. Put sandwich into the skillet, spreading around so that butter coats the bottom slice.
  14. Get another tab of butter ready.
  15. Slip a spatula under the sandwich and hold it while the other tab of butter melts, flip it and place it on the pool of  butter.
  16. Spread it around on the butter.
  17. Put a lid, large mixing bowl or baking sheet over top to help the cheese melt.
  18. Cook about two more minutes
  19. Serve with sides of bread butter pickles, sweet gerkins, capers, etc.
  20. Cut the crust off, as sparingly as possible, then quarter the sandwiches and serve.

Alternatives

Chipotle Spread

  • 1/2 C miracle whip
  • 2 chipotle peppers
  • zest and juice from one lime
  • salt and pepper


Green Chili Lasagna

Ingredients
1/4 CU chorizo
1 CU ground beef

12 OZ picante sauce
1 can crushed tomatoes
1/2 CU cheap red wine
1 can green chilis
1/2 CU cheese
1/2 CU French Fried onion rings
3 CU canoli noodles

Instructions
Boil cannoli noodles for about 8 minutes.

1. Brown chorizo and beef in skillet
2. Add picante, tomatoes and wine
3. Cook to reduce
4. Add green chilis and cook 5 more minutes
5. Layer skillet ingredients, noodles and onion rings
6. Top with cheese and cook @ 350 degrees for 10 minutes

Green beans and Onion

Ingredients
1 small onion (sliced very thin)
1-2 CU julienned green beans

Instructions
1. Saute onion in 1 TBL olive oil
2. Cook green beans in salt water from cold to boil, then remove and strain
3. Toss both together
4. Plate and top with EVOO

Greek Salad – NOTES

Ingredients
½ cucumber (peel/deseed & chunk ½ moon)
½ tomato
strips green pepper
strips red onion
salt/pepper
black olive (calamata)
feta cheese
oregano
olive oil
red wine vinegar

Toss in dressing then arrange.

Title Greek Salad

Ingredients

Instructions Handwritten notes to this recipe are scanned in PDF document at

http://www.xml3.com/family/Recipes/Greek_fest.pdf

Title Greek Salad

Ingredients
Romaine lettuce
1 pt cherry tomatoes/halve
8 oz. Feta cheese
½ red onion-slice strips
lg cucumber (remove seeds)
Kalmata olives
Red wine vinegar
3 tbl olive oil
garlic
oregano (dried and crushed)

Instructions
1. Halve lettuce longwise, cut into 1” segments and float in water.
2. Mix tomatoes, red onion, cucumber and kalamata olives.
3. Mix with dressing

Special Steps Dressing; red wine vinegar, olive oil, garlic, oregano, shake injar to emulsify.,

Gravlox (“Grav Lox” = buried salmon)

From Cindy’s Recipe Card

Title of Recipe: Gravlox (“Grav Lox” = buried salmon)

Ingredients:
Salmon
2 tbl salt
3 tbl sugar
1 tbl white pepper
2 tbl honey
1 tbl whole-grain mustard
1 tbl reg. Mustard
1 tbp red wine vinegar

Instructions:
Sprinkle salt, sugar & white pepper mixture in bottom of pan, put salmon in pan, top w/ lots of mixture (be very liberal). Cover with dill sprigs. Baste/drizzle w/ cognac. Put weight on top. Let set 2 hours, then put in refrigerator. Flip & repeat daily for 5 days. Scrape off almost all topping, slice and discard, cut at extreme angle as thin as possible (cut off brown edges).

Sauce; 3 tbl of juice/liquid from Gravlox pan, 2 tbl honey, 1 tbl whole grain mustard, 1 tbl reg. Mustard, 1 tbl red wine vinegar. Slowly pour in 4 tbl veg. Oil, while whisking, will emulsify. Refrigerate, add 1 tbl chopped dill.

Special Steps:
Top w/lemon dill, radish sauce and serve with pumpernickel and chardonnay /or schnapps.

Basic Gravlox

Ingredients

  • Salmon – fresh – skin on
  • 2 TBL salt
  • 3 TBL sugar
  • 1 TBL white pepper
  • 1 TBL black peppercorns
  • 1 TBL corriander seed
  • 2 TBL honey
  • 1 TBL chopped fresh dill
  • 2 TBL ground mustard

Note:  You can tell if it is fresh because the pin bones WILL NOT pull out easily.  There will be just a bit of tug.  If they slide right out, the salmon is not quite fresh.

Step by Step

  1. Mix all dry ingredients
  2. Put salmon in pan, skin side down
  3. Top w/ lots of mixture (be very liberal)
  4. Flip skin side up, and top with more mixture
  5. Flip again, skin side down and top with more mixture – reserve about 2 TBL of the mixture
  6. Layer thickly with slices of lemon and orange
  7. Add last 2 TBL of dry ingredients over top of lemon and orange
  8. Cover and refrigerate for 24-36 hours
  9. Unbury salmon and place on sheet of plastic wrap
  10. Wrap tightly with plastic wrap
  11. Refrigerate about 3 more days
  12. Unwrap and rinse under running water
  13. Pat dry and wipe liberally with olive oil
  14. Wrap in plastic and refrigerate for another 2-3 days
  15. Unwrap and cut at extreme angle as thin as possible (cut off brown edges)
  16. Serve with sauce and crackers, or see other preparations below

Sauce

  1. 2 TBL each – honey, sour cream, minced onion
  2. 1 TBL each – whole grain mustard, regular mustard, red wine vinegar, capers
  3. Slowly pour in 1/4 C olive oil, while whisking, will emulsify.
  4. Add 1 TBL each – chopped dill, cives
  5. Refrigerate
  6. Serve with sauce and pumpernickel

Norwegian Gravlox

Ingredients

  • Raw salmon
  • Olive oil
  • Rock salt – fleurdesel
  • Lemon
  • pepper

Step by Step / Serving

  • Slice paper thin, lay out.
  • Eat with salt, pepper, oil, lemon , chervil

American Gravlox

Ingredients

  • 1 tablespoon cumin seeds
  • 2 tablespoons whole white peppercorns
  • 1/2 cup kosher salt
  • 1/2 cup granulated sugar
  • 1/4 cup brown sugar
  • 2 cups chopped dill
  • 2 cups chopped parsley
  • 1 teaspoon crushed red pepper
  • 1 tablespoon finely grated lemon zest
  • 3 tablespoons gin, Hendrick’s preferred
  • One 2-pound, center-cut, skin-on wild salmon fillet, pin bones removed
  • Bagels and cream cheese, blini or scrambled eggs, for serving

Step by Step

  1. In a spice grinder, combine the cumin seeds and white peppercorns and pulse until finely ground.
  2. Transfer to a medium bowl and add the salt, both sugars, dill, parsley, crushed red pepper, lemon zest and aquavit.
  3. Mix well.
  4. Place the salmon in a glass or ceramic dish, skin-side down.
  5. Spread the herb paste evenly over the fillet.
  6. Cover the dish tightly with plastic wrap and refrigerate until the fish feels firm and looks cured in the center, 2 to 3 days.
  7. The sides of the fillet will have the strongest flavor and driest texture.

Serving

  • Sliced gravlox
  • Sliced avocado
  • Toasted Noble Bread
  • Scallion cream cheese spread
  • Grainy mustard honey sauce
  • Boiled egg slices
  • Dill sprigs


Mexican Gravlox

Ingredients

  • Fresh Salmon
  • 1 TBL tequila over top
  • Mix handful of chopped cilantro
  • 2 TBL dark brown sugar
  • 2 TBL salt
  • 1 TBL black pepper
  • 1tsp chipotle or cayenne powder
  • 1tsp cumin
  • Grated lime zest

Step by Step

  1. Cover, flip and cover
  2. Cover in plastic and cover with heavy weight
  3. Ready in 3-6 days
  4. Serve on crackers or toast
  5. Top with Crema

Puff Pastry Gravlox

  1. Egg wash (yolk, water, salt) a sheet of room temperature puff pastry
  2. Cut into circles and place on baking tray
  3. Put a 1/4 lattice tray over top of circles, using a spacer so that all of puffs will be the same height
  4. Bake 325º for about 15 minutes
  5. Poke a hole in the center for filling
  6. Pipe mixture of sour cream, dill, salt and pepper onto baked circles
  7. Top with thinly sliced gravlox or roll into a rose
  8. Bake 400º for no more than 2 minutes
  9. Add a dab of sour cream onto the rose and garnish with salmon caviar or sturgeon caviar
  10. Top with the merest bit of dill
  11. Serve on a piece of slate (just to be pretty)

Grandma’s Fruit Pie

Instructions
Preheat oven to 375 degrees
1. Roll pie dough flat on floured surface
2. Roll to approx 11″ disk – use cover as template
3. Put into pie tin
4. Parchment paper over crust
5. Be sure to DOCK bottom of crust – not too many
6. Insert metal pie tin
8. Make rim “roll under” for crust – glass
9. Make decorative edge (See Additional Note)
10. Glaze edge
11. Prebake crust 375 degrees 10 minutes

12. Carefully pour in filling
13. Bake pie for 45 minutes
14. OPTIONAL: Top with pralines or toasted pecans
15. Cool at least 5 minutes before cutting

Use commercial pie crust or MAKE YOUR OWN

This recipe can be used with any fruit; cherry, rhubarb, strawberry rhubarb, strawberry, blueberry, etc.

PUMPKIN PIE FILLING

For pumpkin pies; instead of buying a can of pumpkin puree, try making your own.

COOK PUMPKIN PUREE

Notes DECORATIVE EDGE
Cut narrow triangles with leftover pie crust trimmings
Roll to create little curls, then chill
Apply to edge with egg wash (egg and water)
Refrigerate shell 1 hour before putting in filling

Cut pumpkin in half – remove seeds – cut into 1-2 inch pieces
Cook at 350 degrees for 1 hour
Mash roughly with potato masher
Drain overnight in cheescloth strainer in refrigerator or pie will be very watery

FILLING
2 CU pumpkin puree
1/4 CU dk brown sugar
1 tsp cinnamon
1/2 tsp nutmeg
1/4 tsp clove
1/4 tsp ginger
1/4 tsp salt
1 CU heavy cream

Graham Cracker Crust

Ingredients

  • 1.5 cups graham crackers (20 rolled fine)
  • 1/4 C almond meal (or corn meal)
  • 1 egg white
  • ¼ cup sugar
  • ¼ cup softened butter (do not melt)

Step by Step

  1. Preheat oven to 400 degrees
  2. Thoroughly blend dry ingredient
  3. Add softened butter or margarine.
  4. Combine wet and dry ingredients mixing quickly to moisten
  5. Press firmly into an even layer against bottom and sides of a 9 inch pie plate.
  6. Bake empty crust at 375° for 8-10 minutes.
  7. Cool before filling with your favorite pudding which you have prepared according to package directions.

Hot Sour Soup

Ingredients
1 CU chicken stock or broth
1 stalk chopped green onion (chives)
2 cloves garlic – finely chopped
1 egg raw – stir into broth
2 TBL mushrooms
2 TBL shredded meat
2 TBL corn starch (dissolved in 1/4 CU water)
1 TBL grated ginger
1 TBL cayenne pepper (or 1 packet red peppers)
1 TBL soy sauce
1 TBL sesame oil
1 TBL rice vinegar
1 TBL fresh water chestnuts (optional)
1 tsp Tabasco
1 tsp red wine

Instructions
1. Saute dry ingredients in the oil for two minutes
2. Add remaining ingredients (except cornstarch and egg)
3. Bring to a boil
3. Cook ten minutes
4. Stir beaten egg lightly into the soup
5. Add cornstarch and stir until it thickens


Here is another recipe. Click for an enlargement.


2015-12-09 16.08.38

Hong Kong Steak Salad

(J) Julienne

Ingredients
New York or Sirloin strip steak
½ head Chinese cabbage
½ head romaine
2 tbl baby lima beans
2 tbl red bell (J)
2 tbl carrots (J)
1 cu jicima (J)
½ cu shitake
½ cu bean sprouts
1 cu fried egg noodles
8 oz. Koun chun diluted red vinegar
soy oyster sauce
fresh chopped ginger (skinned)
kikoman soy
cooking wine
mitshu
chicken stock
2 tbl sugar
2 tbl lemon juice
2 oz. Scallions

Instructions
1. Salad- ½ head Chinese cabbage, ½ head romaine, 2 tbl lima beans(baby), 2 tbl red bell (J), 2 tbl carrots (J),
1 cu jicima (J), ½ cu shitake, ½ cu bean sprouts, 1 cu fried egg noodles.
2. Mix w/ desired amount of dressing and toss.
3. Steak-very hot wok & oil, cook strips of steak with wok sauce. Wok sauce-kikoman soy, mitshu, cooking wine, soy oyster sauce, chicken stock. Top salad with steak strips.

Dressing
1. 8 oz. Koun chung diluted red vinegar, 4 oz. Kikoman soy,1 tbl fresh chopped ginger (skinned), 2 tbl sugar, 2 tbl lemon juice, 2 oz scallions.

Homemade Store-bought Salsa

Ingredients

  • 1 CU Pace (or other) salsa
  • 1 CU Fire-roasted tomato salsa
  • 1 TBL Tabasco sauce
  • 1 TBL Cayenne pepper sauce
  • (Frank’s Red Hot or Hot Wing sauce)
  • 1 TBL Sriracha sauce
  • OPTIONAL: 1 finely diced roma tomato
  • OPTIONAL: 1 jalapeño or serrano pepper – deseeded
  • OPTIONAL: 1/2 bunch finely chopped cilantro

Step by Step
1. Mix all together, and that’s it!
Better if mixed and allowed to sit overnight.

Notes This is as easy as it gets to make what easily passes for salsa made from scratch. It’s a bit on the warm side, so if you wish, eliminate the Tabasco.

The Optional Ingredients add a great fresh taste to the salsa, but are not necessary.

Home Packed TV Dinners

Ingredients
Meat
Starch
Vegetable

Instructions
1. Cut potatoes, squash, etc into bite-sized pieces and toss in oil
2. Put tab of butter on vegetables (peas, beans, onion, etc)
3. Put in metal or pressed aluminum bowl – the kind you get from restaurants.
4. Cover with foil, then bag for freezer

To cook

1. Cook on lowest heat (covered) 1 hour
2. After 1 hour, turn up heat to about 250 C
3. in ten minutes, remove foil and baste meat and toss vegetables
4. Cook uncovered 10 minutes more

Hoisin Sauce

Ingredients
Amount Measure Ingredient — Preparation Method
——– ———— ——————————–
4 tb Soy sauce,(dark/light/usual)
2 tb Peanut butter/black bean pas
1 tb Honey/molasses
2 ts White vinegar
1/8 ts Garlic powder
2 ts Sesame seed oil
20 dr Chinese-style hot sauce
1/8 ts Pepper

Instructions *Simply mix together. At first it does not appear like it will mix but keep at it just a bit longer and you have Hoisin.

Letting it rest does not appear to improve the taste noticeably.

Fish Sauce
Hoisin Sauce
Oyster Sauce
Mirin is rice wine sweetened with a large amount of sugar
Soy sauce is naturally fermented and aged up to two years.

Variations *EXPERIMENT! Now you have control of the taste. Lighter for chicken and pork, stronger for beef and game. Sweeter for Dim Sum.

*The commercial recipe is presumably the black bean paste. I presume they are the same as Mexican/Spanish black beans.

*Different types of soy, molasses, some of the oil being hot pepper oil,other styles of pepper sauce. All kinds of variations. However, with light soy and honey, the taste of peanut dominates.

Notes
*The original without the variations stolen by Matt Giwer from AP Recipes credited to Dee Wang who advised peanut butter.

Hobo Dog Biscuits

    1. First, make your broth.  Bones only – no onion, no garlic, no salt – these three ingredients are toxic to dogs.
    2. If you are making broth from leftover turkey, put the heart, liver and lungs into the pot to cook along with the broth.
    3. Set your strained broth aside (no organs) to cool – you don’t need as much as you might think.
    4. Run cooked meat scraps in a food processor – chop very fine
    5. Chop other leftovers (as long as they don’t have onion, garlic or salt)
    6. Add yogurt, milk, cottage cheese, and so forth
    7. Add spent remainder from juicer meals, and vegetables starting to go bad- you get the idea
    8. When you are ready to cook put the following into your KitchenAid (or mixing bowl)
      1. Five cups of AP flour
      2. One cup whole wheat flour
      3. Pulverized ingredients (body organs, food scraps, etc)
    9. Mix all ingredients together
      Add 1 C of your broth and mix to incorporate
    10. Add more broth 1/2 cup at a time, until your batter has the consistency of cookie dough.
    11. Save left-over broth for your own soups, spaghetti sauces, etc.
    12. Cover cookie sheet with greased waxed paper or parchment paper.
    13. Roll dough out thickly on a cookie sheet
    14. Cover the food with another sheet of GREASED waxed paper
    15. Use a second baking sheet to press the mixture flat
    16. For TRAINING TREATS:  Score the dough into sticks about 1/4 inch wide and 1/2  inch long making them easier to break apart after baking
    17. For HEALTHY DENTAL TREATS:  Score the dough into sticks about 1/2 inch wide and 1 – 2  inches long making them easier to break apart after baking
    18. Cook at 300 degrees for 60 minutes
    19. Take out of oven, let cool, break apart and put back on cookie sheet upside down.
    20. For TRAINING TREATS:  Cook another 30 minutes at 300 degrees
    21. For DENTAL TREATS:  Cook another 60 minutes at 300 degrees

Keep in mind: the following foods are TOXIC to dogs.  For a complete list, visit THE ASPCA WEBSITE.

These foods are bad for dogs:  Grapes and raisins, onion, chives and garlic, avocado, citrus, raisins, wine, salt, chocolate, aspirin, all nuts except peanut and peanut butter (however peanut butter with Xylitol is toxic) plus any dough made with yeast (including pizza crust).

Cheapskates Guide to Dog Health

DISCLAIMER

This post was set to private for my own personal use, but it is good information if used carefully.  I am not a doctor.  I am not a vet.  I am a cheap bastard with a strong background in chemistry.  This is for my use alone.  Please read carefully, and proceed at your own risk.

Fleas and Ticks

  • Frontline Plus is used for Flea and Tick Treatment.  A few drops are put between the shoulders on the back of your dog.
    • It contains Fibronil which kills adult fleas and ticks.
    • It contains (S) Methoprene which attacks flea eggs
    • There is a separate product for cats.  DO NOT use this recipe for cats.
    • Reapply every 30 days whenever your pet visits an area where fleas and ticks are a possibility.
    • After treating, do not touch the treatment area with your hands for 48 hours.  Also, during this time, do not bathe the dog, or let them go into the water.
    • Tick control can alternately be done with 5% pyrethin or 8% carbyl dusting solution
    • Use only in high-tick and flea season.  Give your pet a break so they can cleanse their body of the buildup of chemicals and avoid toxicity.

FIBRONIL:   You can use this link to visit Amazon.  PLEASE NOTE that the same Topical Product for larger dogs is the same price as for smaller dogs – and it has half or less of the product.  If AND ONLY IF you are good with chemistry, consider buying the larger dog product and mixing with a bit of canola oil to help preserve it.  Store it in the fridge, and use it the following month.  Don’t store for over a month, or it may lose effectiveness.

(S) Methoprene:   Here is another Amazon Link.  Note before you buy that some products will have BOTH Fibronil and Methoprene contained in them for “one treatment” options.  Read ingredients carefully.

Tapeworm and Heartworm

  • 30 mg Pyrantel Pamoate (Ivermectin) is used internally to control Tapeworm, Roundworm, Hookworm in a 75 pound dog.  Optionally, take with 30 mg Praziquantel.  Do not give to puppies under 4 months.  Give whenever worms are present in fecal matter, but not more frequently than once a month; or monthly as a preventative.

This is a great review left by a customer on Amazon about flea and tick infestations.

So I’m going to leave a detailed review in hopes I can really help some people out there who are looking to find flea relief without wasting money on high dollar pet flea topical or pill products monthly just to find they dont seem to be working out too great. Due to prices…alot of people don’t seem to consistently use flea products until they start noticing a flea problem. Which is understandable… But by this time…it may already be too late to be able to rely on a pet flea product alone to fix your problem. Which is usually why you wonder “why does my pets flea medicine not seem to be working?!”

First of all….this Product Actually works as it should …but you most likely won’t notice good results unless your home and yard is treated as well, which is something some people don’t tend to realize . Some people just think you give your pet its medicine and everythings good to go and that all fleas disappear. But nope.
This even goes for the most high dollar flea pet application out there. It doesn’t matter what you buy.

Lets start by saying we must Remember…this is not a magic liquid that turns your dogs fur into bug zappers. this won’t keep a flea from hopping on. Sadly..there is no flea medicine that just keeps fleas away the same way bug spray will keep a mosquito away from us humans, but if a flea hops aboard Your pet…the flea will only die as long as it comes in contact physically or by blood ingestion of a lethal amount of the insecticide within the medicine…but won’t just die instantly. It can take several hours or up to 2 days or possibly even longer for the flea to finally kick the bucket, and meanwhile, it’s possible they can still end up laying eggs before they die.

So This is mainly just a preventative measure to prevent a flea infestation if your pet, home, and yard has no current flea problems but somehow your pet comes into contact with a stray hitch hiker Joe Flea….say from a stray cat or dog swinging through the neighborhood , etc.

Now…  the insecticide within the medicine itself basically only kills an adult flea. It won’t usually kill a flea egg. But the insect growth regulator, that’s also within the medicine, is capable of penetrating the egg and doing damage, but it’s not a 100% guarantee all the time. Eggs can still tough it out and end up hatching, but luckily if the egg survives….the larvae that hatches from the egg won’t stand a chance with the growth regulator and never be able to mature.  That’s if it comes into contact with the growth regulator. Flea eggs don’t attach themselves to pets hair like a lice egg on a human will. Once a flea lays them…the eggs can fall off your pet into the yard or into your carpet or down into couch cushions or small cracks in hardwood flooring…. just about anywhere. The egg may have not even stayed on your pet long enough to get enough contact with the medicine to even try to damage it. Which is why it is important to treat the home and yard as well.

Insecticides alone usually don’t do anything to flea eggs, so for inside the home (besides vacuuming thoroughly daily and washing all bedding and whatnot)  use a safe indoor insecticide mixed with a insect growth regulator around the home anywhere you can possible. This will hopefully target any eggs or larvae and prevent them from ever getting into adulthood along with killing any adult fleas that may be running rampant .
Now lets say you haven’t started treatments yet… and you already have larvae that have matured into the next stage of life (when it turns into the pupae stage… which is when it forms its cocoon before hatching into a jumping adult flea) … insecticides nor insect growth regulators will do damage because they can’t penetrate the cocoon of the pupae.  Once they get to the pupae stage… basically you have a biting, egg laying adult flea on its way to hatch and there is nothing you can do. Which is why even after doing treatments in the past you may have noticed a couple days later it seemed as though a million fleas came back.

This leads to me say that if you already have fleas and you don’t treat your yard or home…this product will not likely show results on its own in any reasonable manner.

Also, fleas need to have a blood meal in order to lay eggs… but it doesn’t have to be the blood of an animal. They can bite us humans as well. If your pet is treated…. great… but it doesn’t mean any fleas roaming rampant inside your house will encounter your dog first. Of course some will…but others may encounter you first…..and then lay eggs, and of course we don’t wear flea collars or flea medicine, so unless this same flea does happen to encounter your dog or come in contact with treated areas inside your home to get a lethal dose and die before laying its eggs….the next thing you know you got a happy flea who avoided death plus a bunch of babies along the way unless treatments destroy any eggs or larvae before they can mature. So the cycle can become hard to break if you don’t properly treat and clean your home to rid of them.

As far as treating the yard ….in my opinion ….its the biggest thing. Because fleas thrive off of warmth and humidity. But as far as treatment. Use liquid. And obviously this means you have to use a sprayer. But you need a good one that can really saturate through the grass and down to the dirt. Them little small sprayers that people use for weed killing products and whatnot won’t do you much good.

For yard treatment…don’t use bug killing granules that say they kill fleas. They will. But only the adult fleas and do nothing for the other flea lifestyles, so they do no good for fleas. Also, liquid flea branded yard sprays….don’t waste your money. They are garbage. I use Bifen XTS Insecticide. And mix it with Tekko Pro…which is the IGR (insect growth regulator).

Make sure you are consistent with initial treatments. You can do 2 or 3 once a week back to back treatments of this at first to really fight back and then just maintain it routinely once a month and you should find yourself flea free in the yard.. The products I use are a bit more expensive. But its for a reason.

Once you get your yard and home under wraps … then this topical product you apply to your pet will do its job and keep hitch hiker Joe Flea from re infesting your property or your home. And it will save you money compared to buying the high dollar topicals or pills the vet wants to overcharge for.

Hopefully any info I’ve given can be helpful to anyone interested in buying this looking for flea relief that lasts.


You purchased an entire syringe, but that is for a horse. DO NOT give the entire syringe. to your pet.  Please read carefully or you could overdose your dog, which will kill it.

    • The tube contains just over 6 grams.  This is 6,080 mg (milligrams)  (or 6 million micrograms).  This is for a horse that weighs approximately 1,250 pounds (or 570 KG)
    • The dosage is approximately 0.01 mg per KG.  (10 mcg per KG)
      • 100 pounds = 45 KG = 450 mcg = .5 milligrams
    • The “high” recommended dosage for heartworm prevention for a 50 KG (110 pound dog) is 0.5 grams monthly which gives us 12 doses per tube
    • For a 50 pound dog, it would be 24 doses per tube
    • Most of us have smaller dogs, so let’s do our calculations with a 20 pound dog, which gives 60 doses per tube.  We will go with dividing the tube contents by 64.  The reason for this will appear later.

FRONTLINE INFO – Product per dog weight

      • 10 pound – 5 kg – 0.05 mg = 50 mcg (128 potential doses)
      • 20 pound – 10 kg – 0.10 mg  = 100 mcg (64 potential doses)
      • 25 pound – 12 kg – 0.12 mg = 120 mcg (48 potential doses)
      • 50 pound – 23 kg – 0.25 mg = 250 mcg (24 potential doses)
      • 75 pound – 34 kg – 0.30 mg = 300 mcg (20 potential doses)
      • 100 pound – 45 kg – 0.5 mg = 500 mcg (16 potential doses)
      • 125 pound – 57 kg – 0.6 mg = 600 mcg (12 potential doses)
      • 150 pound – 70 kg – 0.7 mg = 700 mcg (8 potential doses)
      • 1,250 pound – 570 kg – 6.08 gm = 6,000 mg = 6,000,000 mcg
      • REFER TO DOGS BY WEIGHT ABOVE

There…

You might have used this on your dog for many years, and they may never have had heart worm, but then again, they were probably never been hit by a car, or died in a parachuting accident. If you decide to do this, use at your own risk. CHEMICALLY it is fine, but as I said before…  PROCEED AT YOUR OWN RISK.

Peak pest season is June, July, Aug, Sept, Oct, Nov. Based on the article below, consider using protective flea and heart worm measures during that period of high heat and high humidity.  DISCONTINUE IT outside of those months.

Information from:  http://www.vetinfo.com/side-effects-fipronil-frontline-dogs.html

Concerns about Ivermectin

Ivermectin is a medication used to treat parasite infections in animals. It works by interfering with the nervous system of parasites to ultimately paralyze and kill them. Ivermectin is a dewormer used to treat many types of intestinal, lung, and external parasites. It can also be used in heartworm-prevention medications for dogs. Ivermectin comes in several formulations, including injectables, oral solutions, pastes, topicals, pour-ons, chewable tablets, pills, and more.

While ivermectin is prescribed for dogs, toxicity can occur when dogs ingest more ivermectin than they should. This can occur if a dog is administered a dosage that is intended for larger animals, such as horses, or if a dosage for a greater weight/size of dog is inadvertently administered to a smaller dog. In these cases, the excessive ivermectin from overdose begins to interfere with the dog’s own nervous system and can cause life-threatening symptoms, such as seizures and coma, and can even lead to death.

IT IS BETTER TO ERR ON THE SIDE OF CAUTION, GIVING TOO LITTLE, RATHER THAN TOO MUCH.  If it is administered on a once-a-month basis, the smaller treatment will do its job.

USE LINK ABOVE TO CLOSE THIS TEXT.


Concerns About Fipronil

While the typical side effect to Frontline is skin reactions, its active ingredient, fipronil, lists other potential concerns when used on canines.

  • Skin problems – As stated earlier, fipronil can cause irritation to your dog’s skin. This irritation can go beyond simple itching as the scratching can cause ulceration and open sores.
  • Nervous system damage – Fipronil is a neurotoxin, causing damage to the fleas’ nervous system. It can have the same effect on your dog, causing symptoms such as convulsions, body twitches, loss of appetite, unsteady gait and other effects.
  • Carcinogen – Fipronil has been shown to cause thyroid cancer in dogs. Because of its carcinogenic qualities, it is important for the person applying the Frontline product to thoroughly wash their hands with soap and warm water to adequately remove the product from their skin.
  • Organ damage – Autopsies have shown an accumulation of fipronil in canine livers and kidneys, causing an increase in organ weight. Fipronil has also been shown to alter the levels of hormone secreted by the thyroid gland.
  • Infertility – Fipronil has also been shown to have an effect on a dog’s fertility. Its use has led to smaller litter size, difficulty in conception, decreased litter weights and increase in litter deaths.

USE LINK ABOVE TO CLOSE THIS TEXT.


While Frontline products have had successful use in the control of flea populations, there have been negative results seen when dogs have been maintained for extended periods on the products. The fipronil builds up in your dog’s body, giving it the chance to cause problems. If Frontline is your choice for flea control, consider taking a 3 to 6 month break during low flea infestation periods (December through May) to allow your dog’s body to rid itself of any toxic build up that may have occurred. This will help to avoid the potential of any problems arising from the fipronil.

(Heartgaard – Heart gaard – Heart Guard – Heart Gard)

DIVIDING UP THE TUBE OF IVERMECTIN

Grandpa’s musings only… not medical or veterinary advice, nor something that I intend to do… Technically it’s illegal to do this, so I would never . . .

Read the text about Ivermectin Toxicity in dogs before proceeding.

InverCare for horses is 1.87 % Invermectin paste. The box says that it is good for treatment of horses up to 1,500 pounds. I have a dilution table showing how you MIGHT divvy up the tube.   Use the dropdown instructions that match the approximate weight of your dog

HORSE DOG
Whole tube is for a horse
1,500 pounds – already infected
Use 1/4 of the tube and throw the rest in the trash.  Then mix it with peanut butter
Heaven help you if your dog is as big as a horse.  I am including instructions for 150 pounds, 100 pounds, 65 pounds, 50, 25, and 10 pound dogs.

PLEASE NOTE:   Make damn sure your peanut butter does not contain xylitol, which is EXTREMELY TOXIC to dogs.

      • 10 pound – 5 kg – 0.05 mg = 50 mcg (128 potential doses)
      • 20 pound – 10 kg – 0.10 mg  = 100 mcg (64 potential doses)
      • 25 pound – 12 kg – 0.12 mg = 120 mcg (48 potential doses)
      • 50 pound – 23 kg – 0.25 mg = 250 mcg (24 potential doses)
      • 75 pound – 34 kg – 0.30 mg = 300 mcg (20 potential doses)
      • 100 pound – 45 kg – 0.5 mg = 500 mcg (16 potential doses)
      • 125 pound – 57 kg – 0.6 mg = 600 mcg (12 potential doses)
      • 150 pound – 70 kg – 0.7 mg = 700 mcg (8 potential doses)
      • 1,250 pound – 570 kg – 6.08 gm = 6,000 mg = 6,000,000 mcg
      • REFER TO DOGS BY WEIGHT ABOVE

We will end up discarding some of the Ivermectin, because the medicine has a shelf life of two years. Refrigerate it between seasons.  After two years, you will want to discard the medicine, and buy more.   Enough is enough. How much of a cheapskate are you?!?

When you are done, you will give your dog one dose at the beginning of each month starting in June, and ending in November.  DO NOT give any medicine in December through May.  Resume again in June.

      • You will need 8 doses out of the tube
      • Put the tube out onto parchment paper and mix with an equal (or more) amount of peanut butter – One Dose
      • Scrape into a long tube or or snake or stream – whatever you want to call it.
      • Cut the resulting stream of Ivermectin in half – Two Doses
      • Cut both halves in half again – Four Doses
      • Cut each of the four snakes in half again – Eight Doses
      • Wrap each separate dose in waxed paper, and store in the refrigerator in an airtight container.

USE LINK ABOVE TO CLOSE THIS TEXT.

      • You will need 16 doses out of the tube
      • Put the tube out onto parchment paper and mix with an equal (or more) amount of peanut butter – One Dose
      • Scrape into a long tube or or snake or stream – whatever you want to call it.
      • Cut the resulting stream of Ivermectin in half – Two Doses
      • Cut both halves in half again – Four Doses
      • Cut each of the four snakes in half again – Eight Doses
      • Cut each of the eight snakes in half again – Sixteen Doses
      • Wrap each separate dose in waxed paper, and store in the refrigerator in an airtight container.
      • DO NOT USE FOR MORE THAN TWO YEARS

USE LINK ABOVE TO CLOSE THIS TEXT.

        • You will get 24 doses out of the tube, however, since the shelf life is only 2 years or so (we can squeak by to three years if if you really need to) and you only give it for six consecutive months, we will end up discarding some of the Ivermectin.  You only need 18 doses over a three year period.
          • Put the tube out onto parchment paper and mix with an equal (or more) amount of peanut butter – One Dose – The reason we mix it with PB first is to make it more precise to divide.
          • Scrape into a long tube or or snake or stream – whatever you want to call it.
          • Cut the resulting stream of Ivermectin in half – Two Snakes
          • Cut both halves in half again – Four Snakes
            • Discard one of your Four Snakes – Three Snakes remining
          • Cut each of the remaining three snakes in half again – Six Snakes
          • Cut each of the six snakes in THREE SEGMENTS – Eighteen Snakes
          • Wrap each separate dose in waxed paper, and store in the refrigerator in an airtight container.

USE LINK ABOVE TO CLOSE THIS TEXT.

      • Put the entire tube out onto parchment paper and cut the snake in half. (2 Snakes)
      • Discard one of the snakes or pass them it to another dog owner with a link to this web page – better yet, mix it for them.
        • You now have one Snakes again, which is 24 doses
      • Combine your remaining snake with an equal (or more) amount of peanut butter – This is enough for 24 doses.  We will only need 18 to treat for three years, so we will be discarding another snake soon.
      • Scrape into a long tube or or Snakes or stream – whatever you want to call it.
        • Cut the resulting Snakes of Ivermectin / PB in half – Two Snakes of 12 doses each
      • Cut both halves in half again – Four Snakes of six doses each
        • Discard one of the Snakes
        • You will now have three Snakes with a total of 18 doses – 6 doses per Snake
      • Cut each snake in half again – 3 doses per Snake
      • Cut remaining snakes in thirds – 18 doses total
      • Wrap each separate dose in waxed paper, and store in the refrigerator in an airtight container.

USE LINK ABOVE TO CLOSE THIS TEXT.

  • If you have a little yapper dog, you will get 128 doses out of the tube, however, since the shelf life is only 2 years or so and you only give it for six consecutive months, we will end up discarding most of the Ivermectin.  You only need 12 doses.  Alternately, you can give it to friends on April 27, which is National Little Pampered Dog Day.  Yes really!
    • Put the entire tube out onto parchment paper and cut the snake in half.
    • Cut both snakes in half again. You now have four snakes.
    • Cut them in half again.  You now have eight snakes.  Each snake contains 16 doses, so either discard SEVEN of the snakes or pass them on to other dog owner with a link to this web page.
    • This leaves you with one snake that is good for 16 doses.   Mix your remaining snake with twice as much peanut butter – One Snake
    • We are going to vary a bit from the percentages because little dogs are more fragile.  Let’s target for 18 doses.
    • Cut your snake in thirds.
    • You will now have three Snakes with a total of 18 doses – 6 doses per Snake
    • Cut each snake in half again – 3 doses per Snake
    • Cut remaining snakes in thirds – 18 doses total
    • Wrap each separate dose in waxed paper, and store in the refrigerator in an airtight container.

You might be better off buying Heart Guard at the pet store, unless you like chemistry.

USE LINK ABOVE TO CLOSE THIS TEXT.

If you are really good at Chemistry, this might be something you can try.  If you pretty much majored in gym and bong usage, you might want to skip this process.  An easy mistake could kill your dog.

Best of luck!

USE LINK ABOVE TO CLOSE THIS TEXT.

Hash Browns (Hashed Browns)

hash-brownsAccording to Google Hash Browns is correct.  I’ve heard it both ways.  People will also refer to Latkes (which is the Jewish term) and Rostis (which is the German term).  They are cooked SLIGHTLY differently, so I will include a recipe for both of them at this site.  This recipe is for the kind of Hash Browns that you would get if you were to go out to some Mom and Pop diner here in the United States.

INGREDIENTS

  • 3 small Yukon Gold potatoes (or two large Russets)
  • 1 small onion
  • Corned beef
  • 1 egg
  • 1 TBL Olive oil
  • 1 TBL salted butter
  • 1 tsp salt

STEP BY STEP

NOTE: For Home Fries, dice the potatoes into cubes the desired size and prepare pretty much the same way.  Toss every 5 minutes or so, and increase cooking time so that they are well browned on most sides.

  1. Wash potatoes well, and pat dry
  2. If you prefer peeled potato hash browns, cut nice big chunks of the skin for cooking on another day as potato skins.  Store them in the fridge in a jar of salted water.
  3. Cut potato meat into thin slices, then cut slices into short strips. 
    Alternately you can grate them.
  4. Mix with grated or diced onion
  5. Mix with shredded corned beef
  6. Add 1 beaten egg
  7. Use salad spinner or a tea towel to dry them as much as possible
  8. Toss in 1 TBL Olive oil and place in large cast iron skillet over medium heat
    – These will cook for about 5-8 minutes.
    Flip when potatoes start to brown at the edges of the pan.
    You can slide onto a plate, then invert the plate for safe flipping
  9. Set the burner to low, then cook for another 5 minutes
  10. They are ready to serve when the second side has browned.
    HERE IS AN OPTION YOU MAY TRY.
  11. Peel onion and chop into small slivers
  12. In small pan, saute onion in 1 TBL olive oil
  13. When translucent, remove from heat and set aside
  14. After potatoes have browned, combine all into a large mixing bowl and toss together with sauteed onion and salt
    READY FOR ANOTHER OPTION?
  15. Put loosely into a preheated (oiled) waffle iron for 10-12 minutes.  DO NOT add too much cheese, or you will have a gooey mess.  Top the cheese with more potatoes to minimize cheese contact.

NOTES

    • If you toss them too frequently the gluten develops and the hashed browns become tough and chewy, rather than crisp.
    • Don’t overcrowd skillet of they will be soggy, rather than crisp. You need space for the steam to escape.

VARIATIONS

  • When hashed browns are almost done, create a hollow, and carefully crack two
    eggs into the hollows. Reduce heat to simmer, cover and allow eggs to soft
    boil for 5-10 minutes.
  • Add one diced sour apple at Step 7. You can also add bell peppers or diced
    chives at Step 7. Another option is to add finely diced corned beef or sausage
    to make hash.
  • I prefer to dump the partially cooked potatoes into a large mixing bowl and toss there, rather than in the skillet. After tossing, return them to the hot skillet.

Harvard Beets

INGREDIENTS – For a full can, just double ingredients

  • 1-2 CU beets (cooked, cubed or sliced) or 1/2 of a16 oz can
  • 1/4 C of the beet water (usually salt, sugar and vinegar)
  • 1/4 CU sugar
  • 1/4 CU red wine or white vinegar
  • 1 TBL cornstarch
  • 1-2 tsp butter
  • salt to taste

STEP BY STEP

  1. Drain 1/4 C beet liquid into a medium saucepan
    Set the beets aside in a bowl until the end
  2. Add all other ingredients to the saucepan
  3. Bring to a boil over medium-high heat
  4. Reduce heat and simmer 2 min or until thickened
  5. Add beets to saucepan and gently fold in until heated


Comeback Sauce

This was originally posted by AllCopyCatRecipes.com so I will keep their title, although I have modified the ingredients a bit to make what I feel is a tangier dip that has a bit of a kick on the back of the throat.

This can be a dip for vegetables and chips, a salad dressing, a sauce for seafood or a sandwich spread.

Here’s my version that makes a pint jar full.

1 cup Miracle Whip Salad Dressing
1/4  cup Heinz ketchup (or a very THICK ketchup)
1/4 cup Grandpa’s chili sauce  ( SEE RECIPE THIS SITE )
1 heaping teaspoon Dijon mustard
1 teaspoon onion powder
1/2 teaspoon garlic powder
1 tsp cumin
1 TBL Worcestershire sauce
1 TBL white vinegar
1 teaspoon ground black pepper
1/4 teaspoon Tabasco sauce
1/4 cup light olive oil
juice of one lemon

Mix all ingredients well and store in refrigerator overnight so that flavors can meld.

HTML Snippets Powered By : XYZScripts.com