PREPARATION
Get large pot of water to boiling
Look for cross line on back
Pierce quickly with a butcher knife
Down and through to front
Straight into heavily salted boiling water for 2 minutes
SHELLING
Snap off the claws
Break tail at proximal joint . Twist
Press tail shell to crack to release meat till tail pulls free
Claws: snap off knuckle then pull or roll
Keep claws intact
Open up knuckles
. 8 legs- Start at thin end and r.o.l.l out meat
Gently score tail to lay flat
Lay out body, claws, and knuckles
Lay out legs
Sculpt head to lay in place
Brush with EVOO
Category: Grandpa’s Use Only
These recipes are for Grandpa and his family. This category includes recipes from magazines, TV shows, newspapers, and other sources where I don’t have permission to republish the recipes, but still feels they are recipes that he may want to cook for himself at a later time.
Salmon Burger
Ingredients
- 1 lb salmon – cut into 1/4 inch cubes
- 1 egg – beaten
- 2 tsp lemon juice
- 1/2 C crushed Ritz crackers
- 1 tsp Grandpa's Thunder Powder or Arghhh Powder
- Dash of Choloula
Step by Step
- Mix above ingredients
- Form patties from chopped salmon mixture
- Refrigerate 4 hours
- Sauté 2-3 minutes each side
Grinding your own Grits
Credits and Disclaimers
- The following procedure has been lifted entirely from www.food-skills-for-self-sufficiency.com
- This is an incredible site for practical real-world skills, rules and tools for self-sufficiency.
- Please use the above link to visit their site for many more things that you never even realized you needed to know how to do.
Making Cornmeal and Grits

Making cornmeal and grits is a lot easier than you might think. If you have access to, or grow your own dent corn (also known as field corn) or flint corn (Indian corn), you have the ingredients to make your own meal and grits.
Home ground cornmeal makes some of the best tasting cornbread you’ll ever find. And grits? well…grits are one of those things that you either love or you hate them. I’ve never met anyone who is undecided about grits. Personally I love them, and grinding your own, makes them all the better.
In my opinion, Indian (flint) corn makes better tasting and better textured cornmeal and grits, but if you have field (dent) corn available, it will do just fine. Many people think Indian Corn is purely ornamental, but nothing could be further from the truth.
We grow a row or two in our garden every summer especially for grinding into meal and grits. The corn in the pictures on this page is a dent variety called “Earth Tones”…very pretty to look at, but also very tasty. If you can spare a row in your corn patch for it, why not try growing a little of your own flint or dent corn and grind your own meal.
The Mill
The most important piece of equipment you will need for making cornmeal and grits is a grain mill. You can find lots of different kinds of grain mills from simple hand cranked models, all the way up to big electric powered models. Mills can cost a little as around $25.00 to several hundred dollars. They all get the job done, it’s simply a matter of how much grinding you’re planning to do, and how much you are willing to spend.
My mill is a hand cranked model that I have converted with an old washing machine motor and pulleys. If I have a little bit to grind, I’ll attach the hand crank do it by hand. If I have a lot to grind, I’ll hook up the pulleys and belts and let it run in automatic.
You can also mill your own flour if you can get your hands on Hard Red Wheat.
Preparing the Corn

If you grow your own dent or flint corn, don’t pick it until the stalks and shucks are almost completely dry. If the shucks still have a little bit of green left at the base of the ear, you’re ready to pick. Click here to learn more about growing your own corn.
Pull back the shucks, but don’t break them off. You will have to hang the corn in a cool dry place for at least a couple of weeks after you pick it. This allows the corn to finish drying. I’ll pick mine in early October and let it hang until I have some time off at Thanksgiving.
Use twine or light rope to tie 5 to 6 ears together in a bundle and hang them up 5 to 6 bundles in a string. Remember not all ears will be perfectly shaped, some will be short, and some may not have fully developed, but you should be able to collect some grain from every ear.

Once your corn is dry enough to use, you have to shell the corn from the cobs. You’ll want to shell into a large pan or bucket. You can shell the corn by hand (which is what I do), or you can find hand shellers, or even hand cranked antique shellers at auctions or antique stores. For the small amount that I grow, I can’t justify buying a sheller, so I just shell it by hand.
After the corn has been shelled, you will have to winnow the chaff away from the kernels. The easiest way that I have found to accomplish this is by pouring the corn from one container into another – back and forth several times. Wait to do this outside on a windy day.


The wind will carry the chaff away, leaving the clean grain ready for making cornmeal and grits. Fortunately here in Southern Indiana, nearly any fall day that is fit to be outdoors, is also windy.
Grinding and Screening
In addition to a grain mill, if you want to make grits, you will need three bowls and a couple of screen type strainers. One of the strainers has to have 1/16 inch screen and the other 1/32 inch screen. This will allow you to screen away the larger pieces and re-grind them, as well as separate the grits size pieces from the meal sized pieces.


My number one assistant…
helping grind cornmeal for a class project.
If you are going to use a hand cranked mill like we’re demonstrating here, it’s best to accomplish the task in 3-4 passes. Set the mill very coarse on the first pass. All you really want to do is crack the corn.
On the second pass, you want to set the mill plates tighter so you’re generating roughly 1/8 inch pieces.
The 3rd pass will be finer still and ready to screen with the 1/16 inch screen strainer. Put 1-2 cups of meal in the strainer at a time. Shake the strainer side to side until meal stops coming through. Anything that doesn’t pass through the strainer will have to go back through the mill again at the same setting. This may take 2-3 cycles, but each pass will leave less big pieces in the screen.


Once the meal has all passed through the 1/16 screen, you then have to separate the meal from the grits by using the 1/32 inch screen strainer. Everything that shakes through the strainer will be cornmeal, and everything that remains in the screen will be your grits. In my experience, you will wind up with about a 50/50 split between cornmeal and girts.
Unless you like coarse cornmeal, it will have to go through the mill one last time at a finer setting to produce the correct consistency. Home ground cornmeal should have roughly the same consistency as what you would buy in the store.

If you’re only interested in making cornmeal and not grits, then you don’t have to go through the screening process. Just process all of the meal through a 4th time to get the fine consistency for cornmeal.

Storing the Finished Product
Proper storage of cornmeal, grits or flour should accomplish two things. First it keeps insect pests from getting in. Second it should slow the natural oils in the grains from becoming rancid and spoiling it. Both allowing you a longer period of use.
Many people store bulk flour and cornmeal in their freezer to keep it fresh. Home ground cornmeal and grits definitely can be stored in in your freezer, but in my opinion, they take up way too much space.
I prefer to store it in quart or half gallon canning jars, using my vacuum sealer to draw out excess air. My Food Saver vacuum sealer came with a jar attachment that I thought I’d never use when we got it, but… We have used it for storing home grown cornmeal, grits, and popcorn with very good success. It will even will draw enough vacuum that the jar lid will seal – you can actually hear the lid “plink” when it draws down. When you open it later, you have to break the seal. Another good point is that you can re-seal jars after you open them using this method.
I can keep my “canned” dry goods on the shelf in my pantry, and leave the freezer for other things.
Cooking Grits
For those of you who may not know about making grits, here’s how it’s done. I spent 12 years living in South Louisiana and Southwest Mississippi as a teenager and young adult, so I learned how to fix grits…y’all. Cooking grits is super easy, but if you get it wrong they won’t be fit to eat. These definitely aren’t instant grits, so they will take a bit more time to cook, but the flavor and texture will be much better and worth the wait.
1 – Bring 4 cups of water to a boil in a saucepan, and stir in 1 cup of grits.
2 – Return to a boil and then simmer on low heat covered 30-40 minutes. Only remove lid once (at about the halfway point) to stir.
3 – When your grits are done, stir in salt, black pepper and a generous amount of butter to taste.
4 – Some folks like to add crumbled bacon or finely diced ham into their grits.
5 – Enjoy!
Learning the skill of making cornmeal, grits, and flour can be a very rewarding experience. I have found that the flavor and texture is better than store bought meal and grits – maybe it’s all in my head, or maybe not. I do know that growing and grinding your own cornmeal, grits and flour costs less than buying it. I also know that every skill of this type that you learn, even if you only do it once – brings you one step closer to a self sufficient lifestyle.
Jesco Lifetime Guarantee
We were preparing for a party, when I found a note that I had written to myself over a year ago. It stated that I had sent in a knife for replacement, but I realized that the knife had never arrived. I thought perhaps I had not mailed it in, or it got lost in the mail, but I looked back and found the check we had written, and on the back evidence that you had cashed it.
The knife in question is your “cut nails then cut a tomato” knife with the two points on the end.
The quality of the knife was outstanding. I actually used it for yard work, cutting small branches, then brought it in and used it to slice paper thin tomatoes. It really does what you claim. I absolutely loved it.
I had forgotten about the guarantee, and bought an entire set, with which I am very happy, but then I saw that the first knife was actually guaranteed. I sent it in with high hopes, but the replacement knife never arrived. I would still like the replacement knife promised to me.
I am enclosing bank images of the checks; Front and back. The check had actually been cashed. Please send a replacement knife to Robert Andrews, 903 W Glendale Ave, Unit 3, Phoenix, AZ 85021
So far I have not been able to contact Jesco. My eMails have come back as undeliverable. More info to come as I have it.
Asian Dumplings
These are not the dumplings that are most commonly served in tomato soup here in the US. These are kind of like miniature sealed burritos or calzones… although that comparison is made VERY loosely. They are commonly called Pot Stickers.
There are too many dumplings to list here, so I have taken the liberty of including a post from Culinary One which is a great reference site. Only slight modifications have been made, although links have been removed. If you want to explore this page in more detail, complete with photos, use the link in this paragraph.
21 Different Types of Dumplings
Every country on earth has its own glorious regional cuisines that have developed over centuries, if not millennia, and when you travel, you have the opportunity to try all the different morsels of delight that each has to offer. One type of food that seems to be ubiquitous is the stuffed pocket, or dumpling: it’s a comfort food that can be made with either the simplest, or fanciest ingredients, and every culture has its own style and flavour for you to experience.
1. Banh bot loc
These delicious Vietnamese dumplings are made with tapioca flour, and filled with a mixture of shrimp and pork that’s been seasoned with fish sauce and green onion, and then the dumplings are cooked in banana leaves. The tapioca wrapper becomes translucent, and has a unique chewy texture that contrasts beautifully with the savoury filling.
2. Buuz
Mongolian steamed dumplings, these are most often filled with mutton, onion, and garlic. The flour used for the dough can be either wheat, or a mixture of wheat, barley, and buckwheat.
3. Daifuku
Made with glutinous rice flour, daifuku are dessert dumplings with sweet fillings such as red (adzuki) bean paste, lotus seed paste, sweetened plum, and pureed chestnuts. The flour can be tinted with green tea, and can also have sesame seeds added to it for texture.
4. Empanadas
Common foods not only in South and Central America, but also in Spain and Portugal (from whence they originated), these can be filled with anything you can imagine: Argentine empanadas are filled with a mixture of ground beef, olives, onions, and raisins, while in Portugal, you may find them filled with sardines or pork loin. Vegetarian versions are common as well.
5. Gyoza
Made with very thin wrappers and usually filled with a mixture of finely-chopped pork and vegetables, these fried Japanese dumplings are staples at just about any restaurant you visit. They’re also ridiculously easy to make at home, and can be stuffed with your filling of choice.
6. Ha Gao (or Har Gow)
Chinese shrimp and pea shoot dumplings wrapped in rice paper: the wrapper goes translucent when steamed, making these morsels into tiny bite-sized jewels. The flavours within complement each other gorgeously.
7. Khinkali
If you think you’d enjoy a mixture of pork, beef, cilantro, chili pepper, and fenugreek, you’d likely love these Georgian dumplings. Some people make them with caraway seeds instead of Fenugreek, but both add a very subtle bitter note to the filling.
8. Kreplach
An Eastern European Ashkenazi Jewish specialty, kreplach are filled with a mixture of minced meat and mashed potato, and are usually served in soup.
9. Kroppkaka (Plural: Kroppkakor)
Don’t let the name put you off: these Swedish stuffed dumplings filled with smoked pork, onions, and cracked pepper, and can be served with either cream, or lingonberry jam.
10. Mandu
These Korean dumplings can be made with store-bought gyoza wrappers, and are most often filled with minced kimchi, or kimchi and tofu. These base fillings are mixed with bean sprouts, shredded carrots, garlic, leeks, and green onion, and seasoned with ginger, garlic, and brown sugar. These are then either steamed, fried in sesame oil, or boiled in soups.
11. Manti
A different kind of Turkish delight altogether, these are filled with a mixture of minced lamb, onion, pine nuts, and garlic, doused liberally with smoked paprika, and served with yoghurt.
12. Maultaschen
Literally translated as “a sack for your maw”, these large Schwabian dumplings are filled with spiced meat, spinach, breadcrumbs, and herbs. They can either be pan-fried with onions, or simmered in a broth.
13. Momo
Popular in both Tibet and Nepal, the Nepalese momo has more vegetables than its Tibetan cousin. Most commonly made with ground buffalo or yak meat, you can substitute beef or pork if those aren’t readily available. Vegetarian versions can be made with cabbage, onions, and herbs. Mixed with spices and fresh herbs, the filling is stuffed into flour wrappers, pleated, and then the dumplings are steamed.
14. Pasties
Hailing from Cornwall, these are large dough pockets stuffed with chopped beef, potatoes, carrots or parsnips, and peas, and then baked until golden brown. They were traditionally made as lunch for miners, and one corner may have been created as a “dessert”, with the filling at that end consisting of jam, or cream cheese and fruit.
15. Pelmeni
Like a cross between an Italian tortellini and Turkish manti, these are little folded and wrapped savoury dumplings that are easily recognized by the thickness of the dough. They can be filled with meat (goat, mutton, poultry), mushrooms, vegetables, or cheeses, but never have sweet fillings. These are boiled, and then served with melted butter, sour cream, and chopped green onion or chives.
16. Pierogi
Known as varenyky in Ukranian cuisine, Pierogis are made of wheat dough, and filled with a variety of stuffings such as mashed potato with onion and cheese; sauerkraut; wild mushrooms and buckwheat; spiced ground beef; even sweet fillings like blueberries, gooseberries, or plums.
17. Ravioli
Anyone who’s a lover of Italian cuisine will be well-acquainted with these pillows of glee. Dough squares are filled with anything from ground meat or cheese to squash, nuts, herbs, and even fruit, sealed well, and then boiled. They can be served with any kind of sauce, or even lightly pan-fried and topped with browned butter.
18. Samosa
These Indian delicacies are usually stuffed with a mixture of spicy potatoes, onions, and peas, and can be either baked or fried. They go wonderfully with tamarind or mango chutney, or any other sweet/sour dipping sauce.
19. Svestkove knedily
Sweet and adorable, these Czech dumplings are as delicious as they are simple to make. A small, whole fruit (like a plum or apricot) is wrapped in a dough made of flour, egg, milk, and butter, and then dropped into a pot of boiling water. They’re considered “done” once they’ve risen to the surface and bobbed around for a couple of minutes, and are then immediately rolled in a mixture of melted butter, sugar, and cinnamon.
20. Uszka
Translated as “little ears”, these tiny Polish dumplings are usually filled with assorted wild mushrooms and onion, or minced meat. They can be boiled and served with melted butter and chives, or in borscht-style beet soup.
21. Xiao Long Bao
If you’ve never tried these steamed “soup dumplings”, you must. The filling is made of seasoned ground pork, but the magic of these little beauties is the gelatin: cubes of gelatinized chicken or pork broth are mixed in with the rest of the filling, so that when the dumpling is sealed and steamed, the gelatin melts and creates a “soup” inside.

Semifreddo
Ice cream without an ice cream maker.
Translates as “Semi Frozen”
INGREDIENTS
- 1/2 C sugar
- 3 whole eggs
- Hot water bath
- 1/2 C whipped cream
STEP BY STEP
- Cream together sugar and eggs
- Heat over hot water bath in double boiler
- It will turn color and increase in size
- Whip cold cream until it thickens
- Fold together whipped cream and eggs
- Crumble in crushed amaretti cookies ( or vanilla wafers )
- Pour into plastic lined mold
- Tap out air bubbles, then freeze overnight
Amaretti cookies
- Almond paste, sugar and egg whites
Simple Crostini
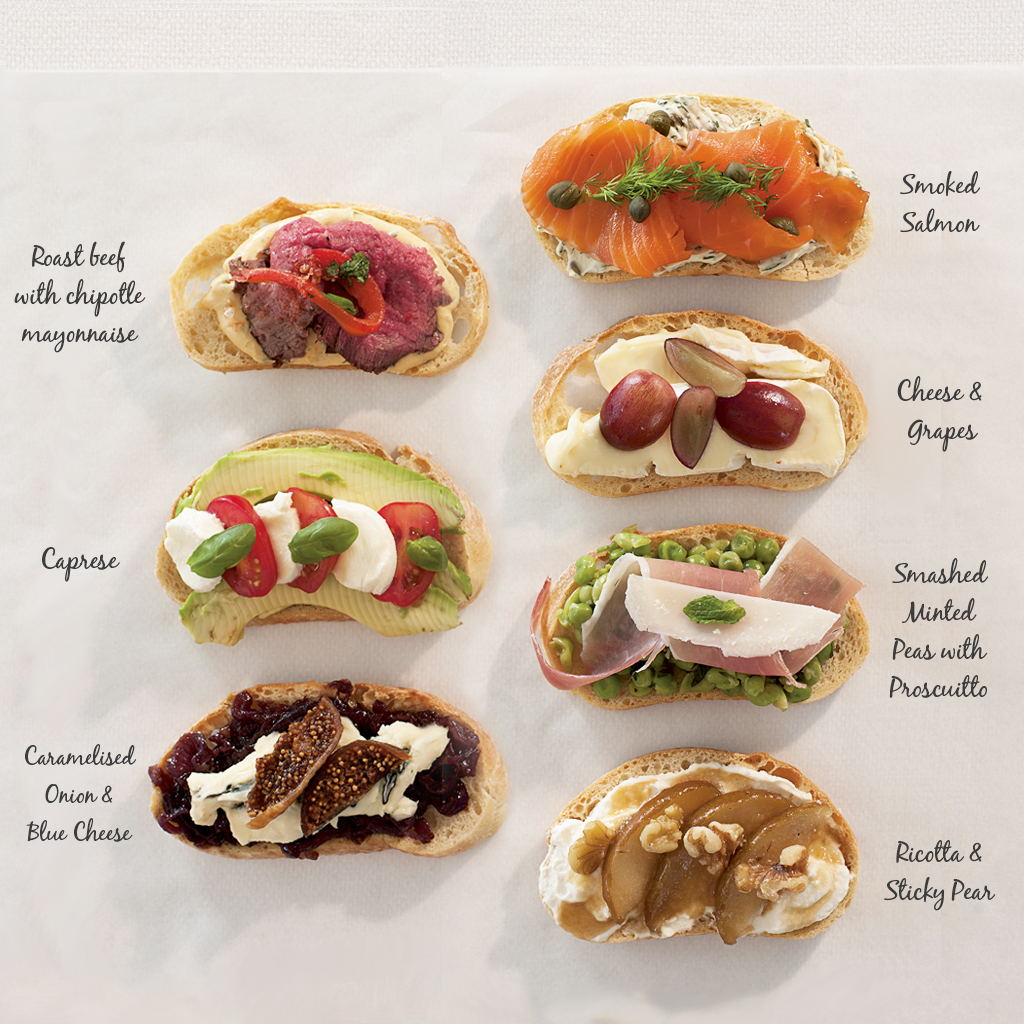
INGREDIENTS
- Baguette, bagel, or French bread
- Cloves of garlic
- EVOO
- Very ripe tomato
See optional ingredients below.
STEP BY STEP
- Cut your bread into 1/4 – 1/2 inch slices on the bias (at an angle)
- Toast for 4 minutes in a toaster oven
- Rub with Garlic
- Rub with Tomato
- Drizzle with EVOO
OTHER TOPPINGS
The toppings are virtually unlimited. Don’t be afraid to use your imagination. Here is some guidance.
- Put a thin slice of aged ham on top
- Sun-dried tomato with a piece of cheese and a basil leaf
- Oiled and cooked red pepper
- Cream cheese and salmon
- Salmon roe
- Black olives
- Radishes
- Pickled onion
- Avocado puree
- Hard-boiled egg medallion with a dollop of mustard
- Blueberries and raspberries
- Olive Tapenade: black, green, Kalamata, anchovy, salt, lime, capers, basil, garlic, and sundried tomato
Easy Pasta Salad
Ingredients
- Some sort of fancy pasta – twirls, ears, whatever…
- One egg (separated)
This means the yolk in one small bowl, and the yolk in another - 1 TBL red vinegar
- 1 TBL honey
- 1 TBL mayo
- 1 TBL EVOO
- 2 basil leaves
- 1 clove of garlic – crushed
- Salt and pepper to taste
- Optional: Black olives, feta cheese, cucumber, shredded cheddar, chives, parsley, cilantro
Step by Step
- Cook the pasta till soft
- Mix red vinegar, one egg yolk, honey, mayo and EVOO
- Add in garlic, salt, basil and pepper
- Toss everything together in a big mixing bowl.
- Add optional chopped black olives, feta, cucumber and shredded cheddar
- Top with tarragon, chives, cilantro or parsley
Toasted Mango Oat Desert Bar
- Mix flour, butter, sugar and salt.
- Baked at 350º for ten minutes
- Mix eggs, sugar, lemon peel and juice
- Add canned mango puree
- Mix with flour until you have a loose batter
- Pour over top of your baked bottom crust and spread
- Bake 325º for 25 minutes
- Sprinkle 1/4 C oats (or granola) over the top and press down
- Refrigerate before cutting
Tomato Sauce from Scratch
- Bring a pot of water to a boil. Have ready a large bowl of iced water. Plunge whole tomatoes in boiling water until skin starts to peel, 1 minute. …
- In a large pot or Dutch oven over medium heat, cook onion, bell pepper, carrot and garlic in oil and butter until onion starts to soften, 5 minutes. Pour in pureed tomatoes.
How To Make Basic Tomato Sauce with Fresh Tomatoes
Makes about 8 pints
What You Need
Ingredients
15 pounds ripe tomatoes
1/4 to 1/2 cup lemon juice or red wine vinegar
2 teaspoons salt (optional)
Optional ingredients: grated carrot, chopped onion, minced garlic
Equipment
6 1/2-quart or larger Dutch oven or stockpot
Mixing bowls
Slotted spoon
Knife and cutting board
Food processor or blender
Jars for canning or containers for freezing
Instructions
- Boil a pot of water and prep the ice bath: Bring a large Dutch oven or stockpot of water to a boil over high heat. Fill a mixing bowl with ice and water and set this next to the stove.
- Prepare the tomatoes for blanching: Core out the stems from the tomatoes and slice a shallow “X” in the bottom of each fruit.
- Blanch the tomatoes to peel them: Working in batches, drop several tomatoes into the boiling water. Cook until you see the skin starting to wrinkle and split, 45 to 60 seconds, then lift the tomatoes out with the slotted spoon and plunge them into the ice water. Continue with the rest of the tomatoes, transferring the cooled tomatoes from the ice water to another mixing bowl as they cool.
- Strip the peels from the tomatoes: When finished blanching, use your hands or a paring knife to strip the skins from the tomatoes. Discard the water used to boil the tomatoes.
- Roughly chop the tomatoes: Working in batches, pulse the tomatoes in the food processor. Pulse a few times for chunkier sauce, or process until smooth for a pureed sauce. Transfer each batch into the Dutch oven or stockpot. Alternatively, chop the tomatoes by hand. Process through a food mill for a smoother sauce. For a very chunky sauce, skip this step entirely and let the tomatoes break down into large pieces as they cook.
- Simmer the tomatoes: Bring the tomato sauce to a simmer over medium heat. Continue simmering for 30 to 90 minutes, stirring occasionally, until the sauce reaches the taste and consistency you like.
- Stir in the lemon juice and salt: When finished cooking, stir in the lemon juice or vinegar and salt. A quarter-cup is necessary to ensure a safe level of acidity for canning. Add more lemon juice or vinegar to taste.
- Preserving option 1 — freeze your sauce: Let the sauce cool, then transfer it into freezer containers or freezer bags. Sauce can be kept frozen for at least 3 months before starting to develop freezer burn or off-flavors.
- Preserving option 2 — can your sauce: Transfer the hot sauce into sterilized canning jars. Top with new, sterilized lids, and screw on the rings until finger tight. Process in a pot of boiling water for 30 minutes. Let cool completely on the counter — if any lids do not seal completely (the lids will invert and form a vacuum seal), refrigerate that sauce and use it within a week or freeze it for up to 3 months. Canned tomato sauce can be stored in the pantry for at least a year.→ For a more detailed description of the canning process, read this tutorial: A Visual Tour of Hot Water Bath Canning
Then they’re boiled for about 10 minutes, just long enough to soften the pulp. It’s a quick enough cooking time that the fresh tomato flavor isn’t lost, but long enough that the pulp will pass* through a food mill or vegetable strainer.
In fact, in Italian this watery, fresh tomato purée is called a passata (“passed”).
According to Harold McGee in On Food and Cooking, this quick-boil method allows pectins to thicken the sauce much more effectively, requiring less overall sauce reduction (and therefore a fresher-tasting sauce!).
This does require having either a food mill or some other type of mechanical strainer, but for large quantities of sauce, it’s a minimal investment that will save a lot of time. Plus, it’s one of the easiest ways to remove seeds and skins while keeping all the good stuff in the sauce.
Once we have our tomato purée, the next question is what to do with it.
Cooking the Sauce: The Quick and the Red
One of the goals I outlined above for fresh-tomato sauce is that it should retain some of that fresh-tomato flavor. So I knew I wanted some of my tomato purée to be cooked minimally. But one of the things my initial test batches made me think about is how damned delicious long-cooked tomatoes are. You see, when I was cooking down my beefsteak tomato purée, I had to cook it a long, long time to get rid of all of its excess water, and by the time it was done, it was sooooo delicious: dark red, intensely sweet, and oh-so rich. I just kept going back to it with a spoon.
To get that flavor into my sauce, I consulted several cookbooks, and settled on the idea of turning a portion of the purée into a tomato-paste like extract in the oven, called estratto in Italian. It’s a technique described well by Paul Bertolli in his fantastic Cooking By Hand, and Rosetta Costantino in My Calabria, and while it’s traditionally done in the Southern Italian sun, a low oven is the easy alternative.
Because so much evaporation is required to reach the concentrated stage I was going for here, I used only paste tomatoes for this portion of the recipe—I’d rather let the small portion of beefsteaks in the batch contribute their water elsewhere than have to cook it all off here. Overall, a little less than half of my tomatoes went towards this component (10 pounds out of 25).
The method is simple: pour the purée into rimmed baking sheets or baking dishes (basically anything wide that will maximize surface area and therefore evaporation) and set them in a low oven, stirring from time to time, especially as it begins to thicken, until a rich, sweet extract is formed. Don’t even think of taking a shortcut with store-bought tomato paste here: This stuff is way more flavorful than any canned tomato paste I’ve ever tried.
The low-and-slow reduction allows the tomato sugars to caramelize, creating an intensely sweet, concentrated flavor base for the sauce.
Just one tip: Keep an eye on these and stir them frequently. I learned the hard way that the thin layer of tomato paste can burn quickly, even at low oven temperatures, if it’s left unattended for too long.
With most of my remaining tomato purée, about 15 pounds of mixed tomatoes, I used a more classic stovetop method, cooking it down for about 45 minutes to a sauce-like consistency. But before I did that, I set about a quart of the fresh tomato purée aside, thinking I would add it back in at the end for a blast of fresh-tomato flavor. I had gotten the idea while thinking about the common practice of adding a splash of high-quality uncooked olive oil at the end of cooking to get its great taste into the dish. I figured, if it works for olive oil, why shouldn’t it work for tomatoes?
What that meant was I ended up with three sauce components: my rich, delicious tomato paste; my basic cooked sauce; and then my very fresh-tasting tomato purée.
Here they are side-by-side, and the color alone speaks volumes about how each is different. In terms of absolute quantities, I had only about a quart’s worth of both the concentrated paste and the fresh purée; the regular sauce seen in the middle here produced about a gallon, and is the backbone of the sauce. The idea is to enrich the bulk of the sauce with the deep, sweet, caramelized notes of the paste, and then finish it with the bright, fresh flavor of the barely-cooked purée, to create layers and layers of flavor that hit every note.
Correcting the Bulk Sauce
So, now that I’ve explained my three-pronged approach to the sauce, we’re basically done, right? Nope!
Just because I have my amazing tomato paste and my fresh-and-fruity purée doesn’t mean I’m just going to accept that the bulk of the sauce is going to taste merely good, especially if there’s anything I can do about it.
The first trick is one we’ve all seen a million times: toss in some basil. It’s no accident that basil is usually included in canned tomatoes: Canning require intense heat and cooking, which kills any trace of fresh tomato flavor. A few sprigs of basil help add a little freshness back in. I added some basil to a portion of my bulk sauce while it was still warm and let it steep.
It worked, adding a fragrant, floral, anise-y scent to the sauce that is totally wonderful. At the very least, it’s worth steeping the basil in the sauce.
Some folks, though, also add some tomato leaves to their sauce. Writes McGee, “tomato leaves have a fresh-tomato aroma thanks to their leaf enzymes and prominent aromatic oil glands.”
I tried it out, and, aside from putting way too much in my sauce, found that it does indeed add a grassy green flavor that can help offset whatever fresh notes are lost from cooking the tomato. The only hard part for most of us is getting our hands on tomato-plant cuttings. If you can’t, rest assured the basil does more than enough on its own—honestly, if I had to choose between the two, I’d take the basil. But if you can do both, each will help in its own way.
The Question of Aromatics
One other major concern for the bulk sauce is whether to add aromatics like onion and garlic, and if so, how to do it. Some recipes call for cooking the aromatics first until soft and sweet (but not browned), while others have the aromatics dumped in raw and simmered in the sauce as it cooks.
I tried it three ways*: with raw aromatics, sautéed aromatics, and none at all. In my tests I just used onion and garlic, which are the most common, though you can opt to also include others like carrot and celery—each will alter the flavor of the sauce somewhat, and whether or not you include them is a matter of personal preference.
*Actually four ways, I also did a batch with crushed red pepper, and loved the subtle warm heat it adds to the sauce.
Raw onion and garlic produced a cleaner-tasting sauce with fresh vegetable notes, but the overall flavor and texture was less integrated. To avoid the texture issue, you can use Marcella Hazan’s method of submerging raw onion halves in the simmering sauce and then fishing them out whole.
When blind-tasting these two sauces on spaghetti, more of my colleagues preferred the sautéed aromatics to the raw ones, but opinion wasn’t unanimous.
My third batch, without any aromatics, was also delicious, and in some ways I preferred its pure tomato flavor, which goes to show that if the sauce is good enough, you really don’t need to enhance it much. On that note, I also preferred my sauce without cheese, which shocked me, because I always put cheese on my pasta with tomato sauce, but this sauce really is that good—too much other stuff just gets in the way.
There are many, many ways to make very good tomato sauce, but if you’re going to take the time to prepare it using fresh tomatoes, the key to creating a balanced, rich, and layered sauce that tastes both fresh yet also deep and complex is to think of it as a blender’s art: make tomato purée and divide it into parts, then slow-cook one portion of it into a thick, sweet, caramelized paste; cook another portion into the bulk of the sauce, flavored with basil, possibly tomato leaves, and aromatics; and save a small portion of the barely-cooked purée to add at the end for a bright, fresh note, similar to how we often finish dishes with a drizzle of uncooked olive oil.
Exactly how you use the sauce will determine final steps: On pasta, for instance, you can finish the pasta in a pan with the sauce and some of the pasta-cooking water, adding a little raw olive oil, pat of butter, or splash of cream at the end, depending on the final flavor you want.
It may be a little fussy, but it’s also the first tomato sauce I’ve made that I haven’t wanted to top with cheese. And really, I don’t even really need the pasta. Just give me a spoon.
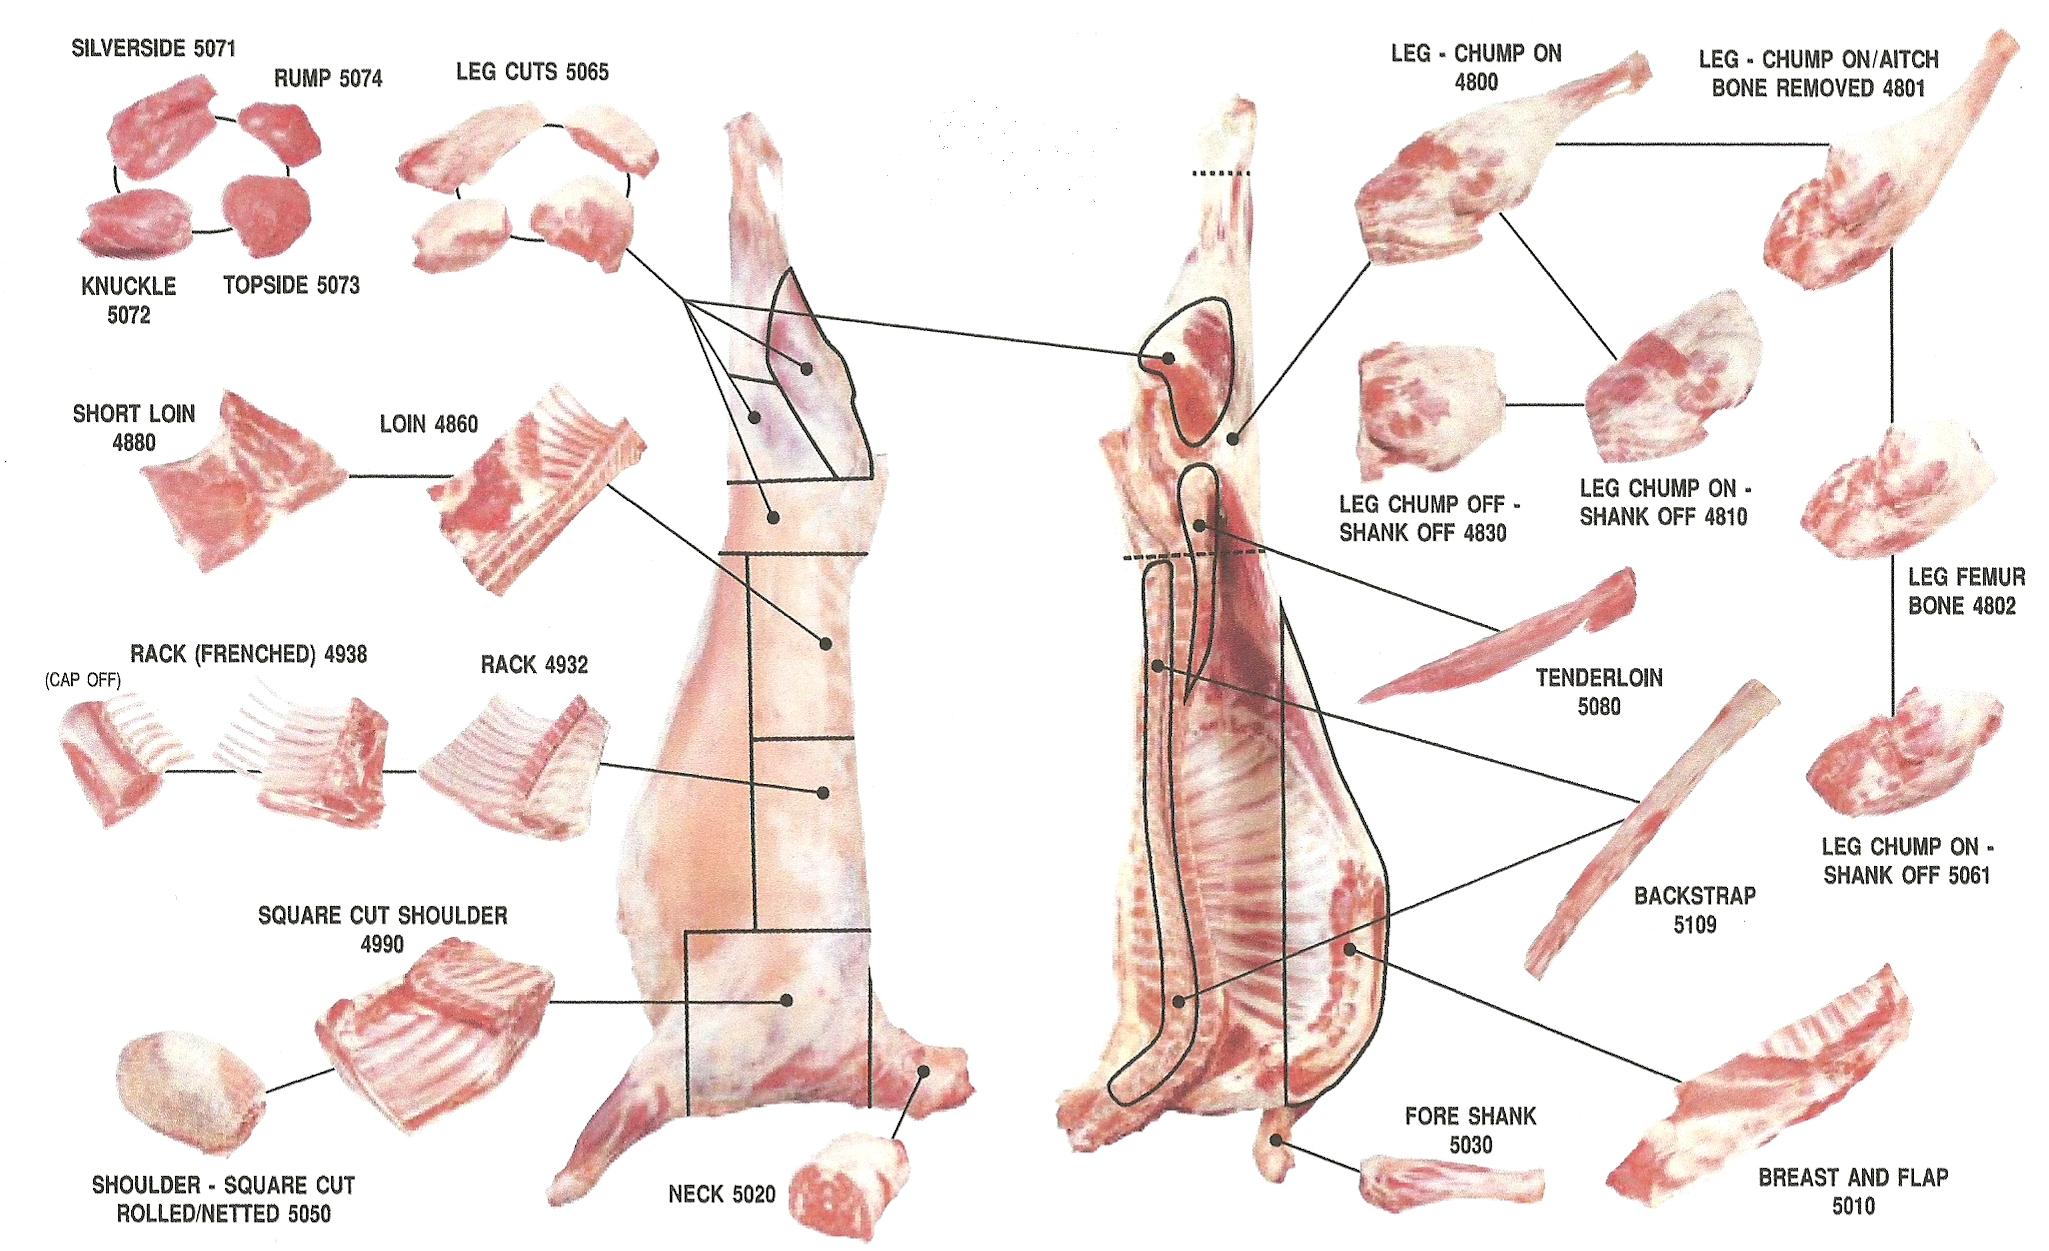
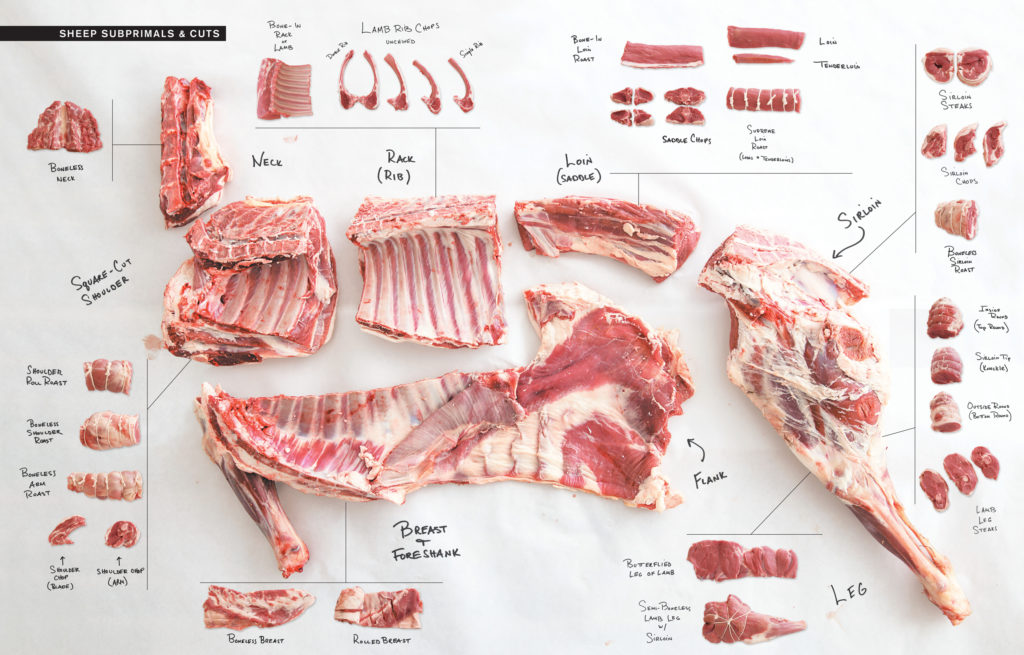
Lamb – Disection
Chicken Parts – Disection
CLICK HERE for cuts from other animals
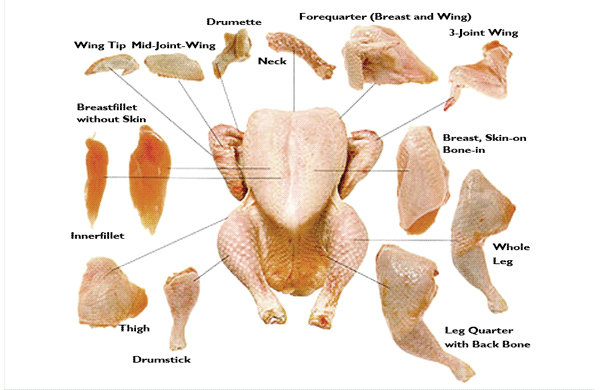
Chicken needs to cook longer and should be at the back of the oven when baking. Internal temp should reach 175º
Breast cooks for a shorter period of time, and in the front of the oven, or it will become dry. Internal temp should reach 160º
Together they will cook approximately 1.5 hours at 250º
Flank Steak
Other terms for Flank Steak are skirt steaks, beef bottom round roast, bottom sirloin-flat muscle/flat meat.
NOTE: Inside skirt is wider (about 5 inches) and is best for shredding. Outside skirt is narrower (about 3 inches) and is best for grilling.
INGREDIENTS
- 2-3 lbs – Cut with the train into two inch strips, then against the grain into 1/4 inch pieces
- Toss with 1/8 tsp baking soda and 1 TBL water – let rest 5 minutes
STEP BY STEP
Marinate the night before in the fridge using a plastic bag with mix outlined below.
LET WARM FOR 30 MINUTES on the plate before grilling or juices will let loose
1. Grill on very hot, preheated grill.
– Keep left side HOT and right side cooler. Scrape hot grill grate.
2. Sear on hot side 4 min, flip and cook other side 4 minutes.
3. Done when internal temp is 125º for medium rare.
– Move to cooler side.
110º is rare
135º is medium
140º is well done. Don’t do it, just don’t do it.
Cover in foil, let juices redistribute themselves. Lemon juice over top.
Slice on the diagonal with a bias AGAINST the grain AFTER it has rested at least 5 minutes (preferably ten)
OVERNIGHT MARINATE
- 1/3 cu olive oil
- 1/3 cu soy
- 1 tbl rosemary
- 1 tbl thyme
- 1 tbl tomato paste
- 1 tbl brown sugar
- 3 cloves garlic
- 1 tsp black pepper
Pineapple juice
Garlic
Dijon Mustard
Paprika
Shallot
Overnight Marinate – Use ingredients to taste
ALT MARINATE
Yakisoba Sauce -Copy Cat Recipe
Swiss Meringue Buttercreme
INGREDIENTS
- 5 large egg whites
- 1 C granulated sugar
- 4 sticks salted butter – room temperature
- 1-1/2 tsp vanilla
STEP BY STEP
- Combine egg whites, sugar, and salt in the heatproof bowl of a standing mixer set over a pan of simmering water.
- Whisk constantly by hand until mixture is warm to the touch and sugar has dissolved (the mixture should feel completely smooth when rubbed between your fingertips).
- Attach the bowl to the mixer fitted with the whisk attachment.
- Starting on low and gradually increasing to medium-high speed, whisk until stiff (but not dry) peaks form.
- Continue mixing until the mixture is fluffy and glossy, and completely cool (test by touching the bottom of the bowl), about 10 minutes.
- With mixer on medium-low speed, add the butter a few tablespoons at a time, mixing well after each addition.
- Once all butter has been added, whisk in vanilla. Switch to the paddle attachment, and continue beating on low speed until all air bubbles are eliminated, about 2 minutes.
- Scrape down sides of bowl with a flexible spatula, and continue beating until the frosting is completely smooth.
- Keep buttercream at room temperature if using the same day.
(Optional) - To tint buttercream (or royal icing), reserve some for toning down the color, if necessary.
- Add gel-paste food color, a drop at a time (or use the toothpick or skewer to add food color a dab at a time) to the remaining buttercream.
- You can use a single shade of food color or experiment by mixing two or more.
- Blend after each addition with the mixer (use a paddle attachment) or a flexible spatula, until desired shade is achieved.
- Avoid adding too much food color too soon, as the hue will intensify with continued stirring; if necessary, you can tone down the shade by mixing in some reserved untinted buttercream.
Swiss Meringue Buttercreme Filled Cupcakes
Makes about 24
INGREDIENTS for BATTER
- 1-1/2 C AP flour
- 1 tsp baking powder
- 2 sticks of butter
- 1-3/4 C granulated sugar
- 1 egg
- 2 tsp vanilla
- 1-1/4 C whole milk
STEP BY STEP
- Preheat oven to 350º
- Sift together flour and baking powder and set aside
- Cream together butter and sugar using Kitchen Aid
- Add egg and vanilla and stir to incorporate
- Alternate 1/3 milk and 1/3 flour mixture until all combined
- Fill cupcake papers with 1/2 C scoop each of batter
- Bake for 20 minutes at 350º
INGREDIENTS and STEP BY STEP for FILLING
- 8 egg yolks
- 1 C granulated sugar
- 10 TBL butter
- 1/4 tsp salt
- 2/3 C frozen puree of passion fruit
- Mix it all together
- Simmer to thicken
- Set aside to cool
NOTE: Buy wrinkly passion fruits, not plump ones ( which are not yet ripe )
- Use apple corer to remove center of cooked / cooled cupcakes
- Pipe passion fruit into the hole
Top with Swiss Meringue Buttercreme using a star piping bag
Rhubarb Pie
INGREDIENTS
- 1 C chopped rhubarb
- 1 C chopped strawberries or peeled apples
- 1 TBL lemon juice
- TOSS FRUIT
- 1 egg
- 1/4 C white sugar
- 1/2 tsp salt
- 1 tsp apple pie spice
- 1 TBL cornstarch
- 3 TBL all-purpose flour
- MIX DRY INGREDIENTS
- 2 TBL butter – very cold
- CUT BUTTER INTO DRY
- Mix all together and drizzle in 1/4 C buttermilk
- Puff pastry for the crusts
STEP BY STEP
- Preheat oven to 450 degrees F.
- Combine dry ingredients
- Sprinkle 1/4 C of it over pastry in pie plate
- Cut fruit into 1/2 inch pieces
- Heap fruit over this mixture.
- Sprinkle with remaining sugar and flour.
- Cover with top crust.
- Place pie on lowest rack in oven.
- Bake for 15 minutes on high heat.
- Reduce oven temperature to 325 degrees F (170 degrees C), and continue baking for 40 more minutes.
- Serve warm or cold.
Frozen OJ Concentrate
- Lasts about two years in the freezer
- 1/2 the price of chilled juices
- 1/5 the price of squeezing your own
- Manufacturing process has improved greatly
- Minute Maid is one of the best rated
- Tropicana was second favorite
Cinnamon Bun – ATK
- Rapid Rise Yeast – 4 tsp
- 1/4 C milk – Heat to 110º plus 1 tsp sugar
- 5 minutes to rise
MIX - 2 3/4 C AP flour
- 2.5 tsp baking powder
- 3/4 tsp salt
- 5 tsp sugar
ADD YEAST - 2 tbl melted butter
- 1 C milk – room temp
- Mix briefly
dump on countertop - Create gluten, but don’t overwork
- Roll out to about 9×12
- Brush with 2 TBL butter – NOT 1 inch on edge though
- Sprinkle on filling – not past edge
- Press on
- Bench scraper to losten, and then roll
- Pinch seam together
- Use cake pan – spray and parchment and spray
- Cut in half, half, half
- Put in pan
- Brush tops with butter
- Cover with plastic for 30 minutes
- Bake 350º for about 23 minutes
- Losen edge, let rest 5 minutes
- Turn out, and invert onto cooling rack
GLAZE
- 3 oz Cream cheese
- 2 TBL butter
- 2 TBL milk
- salt
- vanilla extract
- Whisk till smooth
- Add 1 C confectioner sugar
- Pour and spread glaze over top
Filling
- 3/4 C Brown sugar
- 1/4 C gran sgar
- 1 tbl cinnamon
- 1/8 tsp salt
- 2 TBL melted butter
- 1 tsp vanilla
Make your own Baking Powder
The difference between Baking Soda and Baking Powder is that baking soda requires an acid such as lemon to activate. Baking powder uses a dried acid, than when mixed with water will activate.
Here is an easy way to make your own.
Baking Soda is alkaline – Potassium Bicarbonate. It requires an acid to activate and create bubbles
vinegar, lemon, butter milk or sour milk
CO2 gasses are produced
Yeast: A live product of beer fermentation. Cinnamon rolls, etc to rise breads
Cake yeast: dried yeast with corn meal
Compressed yeast cakes – only last a few days
1820 baking soda – pearl ash
1850 – Calcium Bicarbonate is better and replaced potassium bicarb
1865 – Baking soda plus corn starch plus a dried acid such as cream of tartar
Generic kuken dough recipe from germany
Baking powder will combine slowly on the shelf, leaving you with inactive baking powder in about 6 months.
To make your own baking powder
- Use 1 TBL baking soda and 2 TBL cream of tartar
- Measures spoon for spoon just as baking powder
- Use within 1 month of making it
Cheddar Cheese Bowl
- Bake shredded cheese on parchment paper in about a six inch circle
- Bake 8 minutes at 400º
- Suspend mixing spoon across two cans
- Drape the cheese over the spoon handle
- Let it cool
- Add tomato, meat, lettuce, jalapeños, and sour cream
The similar technique can be used to make mini taco salad bowls