Candied Orange Peel

This is Anthropic’s version of this recipe:

CANDIED ORANGE PEELS
Tender, glossy strips of orange peel simmered in syrup and rolled in sugar.

Serves 4

INGREDIENTS
– 4 large oranges, preferably organic or unwaxed
– 2 cups granulated sugar (for syrup)
– 1 cup water (for syrup)
– 0.75 cups granulated sugar (for coating)
– 1 tablespoon light corn syrup (optional, prevents crystallizing)

STEPS

1. Peel the oranges
Scrub 4 large oranges, preferably organic or unwaxed. Score each peel
into quarters from top to bottom and pull the peel off in large pieces.
Slice into strips about 1/4 inch wide. Leave most of the white pith on;
the blanching removes the bitterness.

2. Blanch three times (1 min each)
Put the strips in a saucepan, cover with cold water and bring to a boil.
Boil 1 minute, then drain. Repeat with fresh cold water two more times,
three blanchings in all.

3. Make the syrup
In the same pan, combine 2 cups granulated sugar (for syrup), 1 cup water
(for syrup) and 1 tablespoon light corn syrup (optional, prevents
crystallizing). Bring to a simmer, stirring until the sugar dissolves.

4. Simmer the peels (about 50 min)
Add the blanched strips to the syrup. Simmer gently, without stirring
hard, until the peels turn translucent and the syrup thickens, about
45 minutes to 1 hour.

5. Drain (30 min)
Lift out the strips with a slotted spoon or fork and lay them on a wire
rack set over a sheet pan. Let them drip and cool for 30 minutes. Save
the leftover syrup; it’s great in tea or cocktails.

6. Coat in sugar
Toss the strips in 0.75 cups granulated sugar (for coating) until well
coated.

7. Dry (12 to 24 hours)
Spread the sugared strips back on the rack and let them dry at room
temperature until no longer sticky, 12 to 24 hours.

NOTES
Store in an airtight container at room temperature for up to 2 weeks, or
refrigerate for up to a month. For a treat, dip one end of each strip in
melted dark chocolate. The same method works for grapefruit, lemon or
lime peels.

Overnight Oats

Easy, and healthier than cooked oats.

This easy breakfast can be adjusted with fruit and protein of your preference. Simply combine old fashioned oats, Greek yogurt and milk in an airtight jar overnight. By morning, the oats will have absorbed the liquid and you can top them with fruit, chia seeds, nuts, granola, peanut butter – or whatever you like. The possibilities are endless!

Created by: Crystal Owens, A Pumpkin & A Princess

Prep: 5 minutesCook: 8 hoursTotal: 8 hours 5 minutes

Ingredients

    • 1⁄3 cup old fashioned oats (not instant)
    • 1⁄3 cup Greek yogurt (vanilla or plain)
    • 1⁄2 cup milk
    • Bananas, sliced (optional topping)
    • Granola (optional topping)
    • Honey (optional topping)

Directions

    • Combine oats, yogurt and milk in a small mason jar or sealed container. Refrigerate overnight.
    • Top with banana slices, granola and a drizzle of honey for sweetness. Store leftovers in the refrigerator.

MORE INFO

How To Make Overnight Oats

INGREDIENTS

  • Oats: I call for readily available rolled/old-fashioned oats for this recipe. They’re the best choice for optimal texture here. Quick oats are already broken down and will turn out much soggier—not ideal for your breakfast! On the contrary, steel-cut oats take much longer to soften, and even overnight won’t break them down enough to enjoyably eat. Reserve your steel-cut oats for cooking in your Instant Pot instead.
  • Chia Seeds: Chia seeds are mild and nutty and complement lots of dishes, whether they’re savory or sweet. When you soak chia seeds in liquid, they become gelatinous, which helps hold your overnight oats together without ever having to cook them. Additionally, chia seeds add nutrients and protein to your oats. Win-win!
  • Cinnamon: Use more than I call for or omit it completely if you don’t have any on hand. But in my opinion, cinnamon’s sweet and smoky notes are perfect for these overnight oats.
  • Milk: Use any type of milk you like, from 2% to non-dairy! I use oat milk most often, just to keep on theme. If you do go non-dairy, try to find an option that is made of as few ingredients as possible (for example, just oats and water with no added oil or gums), so it doesn’t interfere with the texture of your overnight oats.
  • Yogurt: After testing with and without yogurt, I really preferred how the yogurt thickened the oats. Greek yogurt is my preference (can’t say no to the added protein), but regular yogurt can be used as well. Feel free to sub for non-dairy yogurt or leave it out entirely to keep your oats dairy-free.
  • Honey: To balance it all out, a touch of sweetness completes the meal. I highly suggest including this to make breakfast seem like a treat.
  • Toppings: This is the fun part! Once you’ve got your base down, you can feel free to add additional toppings and mix-ins. Some of my favorite toppings include peanut butter and raspberry jam for a PB&J vibe, classic banana and walnuts (à la banana bread), or even a little espresso powder stirred in for an extra pick-me-up, but get creative! Here are some guidelines:

STEP-BY-STEP INSTRUCTIONS

Overnight oats really couldn’t be easier to make, and take a few simple steps. First, combine the dry ingredients: oats, chia seeds, cinnamon, and salt.

Then add the liquids. I call for milk, honey, and yogurt for the perfect combo of creamy and sweet.

Mix it all together, spoon into jars, bowls, containers, whatever’s convenient, then cover and refrigerate until you’re ready to enjoy for breakfast!

And have fun with the toppings!

The full list of ingredients and instructions can be found in the recipe below.

Recipe Tips

  • Find the perfect ratio. My ideal overnight oats ratio is 1:1 of oats to milk, then half the amount of yogurt. So in this recipe, I use 1 cup of oats, 1 cup of milk, and then 1/2 cup of plain Greek yogurt. This gives me the perfect Goldilocks consistency I’m looking for: not too thick, and not too thin. Once you’ve got the ratio down, the possibilities are endless when it comes to getting creative with your milk, mix-ins, and toppings.
  • Have fun with the seasonings. Cold foods like overnight oats need a little added oomph, so the honey and pinch of salt go a long way here. You can feel free to swap the sweetener for something else, but don’t skip them!
  • Save the mix-ins for the morning. Anything that you want for crunch or texture—like fresh fruit or nuts—should be added to your overnight oats in the morning. Pull your oats from the fridge, give ’em a good stir, then go to town with your toppings.

Overnight Oats Variations

  • Blended Overnight Oats: If you love overnight oats but are looking for a slightly different texture, then you need to try this blended version. The result is a thick, almost pudding-like texture, and I’m obsessed.
  • PB&J Overnight Oats: The combination of peanut butter and jelly is one of the most nostalgic flavor combos, and it works especially well in these oats.
  • Mango Overnight Oats: Not only does mango add a tropical, sweet bite to these oats, but there’s a secret ingredient that makes them oh so creamy.

Storage

Oats—without toppings—will keep in the fridge for around 5 days, making this a perfect make-ahead breakfast you can store in the fridge all week, then grab when you need it! Batch it ahead of time and add your toppings when you’re ready to enjoy.

another recipe

Ingredients

  • 1 cup old-fashioned oats
  • 2 tsp. chia seeds
  • 1/4 tsp. ground cinnamon
  • Pinch of kosher salt
  • 1 cup dairy or non-dairy milk
  • 1/2 cup plain Greek yogurt
  • 1 Tbsp. honey
  • Peanut butter, jam, chopped walnuts, fresh fruit, and/or cacao nibs, for topping (optional)

Directions

  1. In a medium bowl or large glass container, combine oats, chia seeds, cinnamon, and salt. Add milk, yogurt, and honey and stir to combine. Cover and refrigerate overnight.
  2. When ready to serve, stir oats and top with desired toppings.
  3. Make Ahead: Oats (without toppings) can be made 5 days ahead. Keep refrigerated.

Flavor Bombs that Every Kitchen Should Have

  • Soy Sauce
  • Hot Sauce
  • Mustard
  • Chili Crisp
  • Pomegranate Syrup (Pomegranate Molasses)
  • Tamarind
  • Fish Sauce
  • Toasted Sesame Oil
  • Sambal Oelek or Chile Garlic Sauce
  • Good Vinegar (apple cider, balsamic, wine, sherry, rice)
  • Citrus Juice and Zest
  • Spice and Herb Blends (garam masala, harissa, za’atar, khmeli suneli)
  • Worcestershire Sauce
  • Homemade Condiments (make-your-own, no specific recipe given — just points to the cookbook This Will Make It Taste Good by Vivian Howard)

READ FULL ARTICLE HERE

No Refrigeration Needed

19 Items Professional Chefs Never Refrigerate

1. Ketchup

Ketchup is something I’m always surprised to see in the fridge. Who wants cold ketchup on their hot fries or burger? Its acidity level is high enough to prevent microbial growth, and its sugar content is also a preservative. Just keep it out of direct sunlight, and it should be fine.

2. Potatoes

Many fruits and vegetables benefit from being stored in the fridge, but spuds are an exception. In refrigeration, they convert some of their starches to sugars (a natural antifreeze), which messes with their flavor and texture. They need a couple of weeks after coming out of refrigeration before the sugars revert to starches, which drove me crazy when I was preparing hand-cut fries at my restaurants. Chilled potatoes brown too quickly, making the fries darker than desired.

3. Mayonnaise

This one may surprise you if you grew up on stories of people getting sick at picnics from foods containing mayonnaise, but it’s true. Store-bought mayonnaise is acidic enough to keep safely at room temperature. Don’t believe me? According to Hellmann’s (aka Best Foods), the top-selling mayonnaise company in the U.S., its product can be stored at room temperature for up to a month after opening, or two months in the refrigerator.

The problem is actually the foods you mix with the mayo. I buy mine in the big jar and use it to refill a squeeze bottle. I only ever reach into the jar with scrupulously clean utensils, so food never comes in contact with it.
Related:

Important note: This only applies to commercial mayonnaise. Your homemade mayonnaise is extremely perishable and requires proper refrigeration.

4. Mustard

Mustard, like ketchup, is a condiment with more than enough acidity to keep it food safe. This applies to plain old yellow “ballpark” mustard, the hot English style, Dijon mustard, or grainy deli-style mustard … whatever you’ve got, in other words.

5. Soy Sauce

I always have a bottle of soy sauce sitting on a shelf near my kitchen work area, and it never goes into the fridge. Its high salt content keeps it food safe, and I use it frequently enough that it never goes bad. (Soy sauce adds a great umami kick to anything you cook.) The same goes for my bottle of Worcestershire sauce that sits beside it.

6. Tomatoes

There are a lot of fruits that only ripen properly at room temperature, and tomatoes are one of them. (We eat them as a vegetable, but they’re technically fruit.) If you refrigerate tomatoes before they’re adequately ripened, their flavor is stunted and their texture suffers. You can refrigerate them once they’re fully ripe to prolong their freshness, but they’ll taste better if you let them come to room temperature before you eat them.

7. Hot Sauce

Hot sauce is another food that’s acidic enough to store sans refrigeration. It’ll last for months at room temperature, and its flavors will remain full and bold. After about six months, though, the hot sauce will finally begin to lose its potency. If you only bring out that bottle of Tabasco a couple of times a year for bloody marys, it’s probably best to refrigerate it.

8. Avocados

Scroll up a few lines to the section about tomatoes — that applies to avocados as well. They simply won’t ripen in the refrigerator, full stop. So leave them on the counter until they’re ripe, and then use them quickly. If you have more than you’ll use in a day or so, at that point, it’s OK to refrigerate the rest to keep them from progressing to the “eww, ick” stage.
Related:

9. Fresh Basil

Most fresh herbs will keep for a long time when stored in the fridge, but basil is an exception. Simply put it in a glass of water and place it on the countertop. (Trust me on this — I grow basil in my garden every year.) That’s why good supermarkets leave the herb out, often near the tomatoes, rather than put it in a refrigerated case.

10. Stone Fruit

Stone fruits, such as peaches, plums, and nectarines, fall into the same camp as avocados and tomatoes because they’ll never fully ripen if you pop them in the fridge. Instead, they’ll develop a mealy texture, which is not what you want at all. As with tomatoes and avocados, though, if you’ve cut into one and won’t finish it, it’s OK to refrigerate the remainder to prevent it from spoiling.

11. Nuts

I’ve personally gone both ways on this, because keeping nuts refrigerated does stop their natural oils from going rancid. Cooler temperatures mess with their flavor and texture, though, so I’ve gone back to buying only what I’ll use in a reasonable time frame and storing them in my pantry. An exception is the pine nuts I use to make pesto, which I buy in bulk and keep vacuum-sealed in my freezer between summers.

12. Chocolate

If you spring for some really good chocolate for baking or an occasional treat, you may be tempted to keep it in the fridge. Don’t do that. The cocoa butter in chocolate misbehaves at cold temperatures, giving it a disappointingly crumbly texture and powdery surface over time. The latter issue is known as “bloom,” and it’s just the cocoa butter coming to the surface, so don’t throw away your chocolate if you see it. It’s perfectly fine to eat and will melt away if you bake with it.

13. Coffee

Like chocolate, its frequent partner, coffee tastes best when not frozen or refrigerated. The chill dampens the volatile oils that give coffee its robust flavor, and going in and out of the fridge can cause condensation on the beans or ground coffee (especially in humid climates like mine). Condensation can lead to spoilage, which is pretty ironic in this context.

14. Apples

I live in apple-growing country, and my grandkids and I eat a lot of apples. OK, they eat the first few bites of a lot of apples, but the point remains the same. Apples are a naturally long-keeping fruit, and refrigeration can mute their flavors. Don’t do it unless the apples are cut up or getting past their prime.

15. Nutella and Peanut Butter

These spreads are also beloved by my grandkids, and both are perfectly fine (better, even) when they aren’t refrigerated. Mainstream peanut butter brands are packed with preservatives and will last months without issue. Natural peanut butter only needs refrigeration if you don’t eat it often. Chocolate and hazelnut Nutella, and its competitors, develop a weird texture if they’re refrigerated.

16. Honey

It would never occur to me to refrigerate honey, so I was quite surprised to learn that some people do. Sugar is a preservative, and honey is mostly sugar. It will last for centuries when sealed to keep out moisture, so relax and leave it in the pantry. Refrigeration also makes honey crystallize faster, making it a pain to get out of the bottle.

17. Cucumbers

For a lot of people I know, cukes go right from the shopping bag to the crisper drawer. That’s a bad idea because the cold, dry air of the refrigerator will make the cucumbers deteriorate pretty quickly. I’ve regularly kept my homegrown cukes on the counter for a couple of weeks without problems

18. Citrus Fruits

Citrus fruits are exceptionally versatile, making them a staple in many kitchens. Oranges, lemons, limes, and grapefruit all keep really well at room temperature, and refrigeration tends to suck the moisture out of them pretty quickly. Leave the fruits out, perhaps in a hanging basket or concrete bowl, and only refrigerate them after they’re cut.

19. Fresh Peppers

We’ll finish with fresh peppers, another fruit masquerading as a vegetable. Like many others on this list, they will continue to ripen if you leave them on the counter, and that’s when their flavor and texture are best. This is true for both sweet and hot peppers. I refrigerate mine after I cut into them, or if I’m looking to preserve hot peppers’ “green” flavor and don’t want them to ripen and sweeten.

Citrus Cheesecake

original recipe

Ingredients

  • 1 egg yolk
  • 1 tablespoon fresh lemon juice
  • 1 teaspoon grated lemon zest
  • ¼ teaspoon vanilla extract
  • 1 ¼ cups all-purpose flour
  • ⅓ cup white sugar
  • ½ cup butter, room temperature
  • 1 egg white
  • 3 (8 ounce) packages cream cheese
  • 1 ⅔ cups white sugar
  • 2 tablespoons cornstarch
  • 1 tablespoon fresh lemon juice
  • 1 tablespoon grated orange zest
  • 2 teaspoons grated lime zest
  • 1 ½ teaspoons grated lemon zest
  • ½ teaspoon vanilla extract
  • 3 eggs
  • 1 cup sour cream
  • ⅔ cup orange marmalade
  • 2 teaspoons fresh lemon juice

Directions

  1. Preheat oven to 450 degrees F (230 degrees C). Butter a 9 inch springform pan. In a small bowl, whisk together egg yolk, 1 tablespoon lemon juice, 1 teaspoon lemon peel and 1/4 teaspoon vanilla. In the bowl of a food processor, combine flour and 1/3 cup sugar. Add butter and process until coarse crumbs form. With machine running, add yolk mixture and blend until moist clumps form. Press dough onto bottom and 1 1/2 inches up sides of prepared pan. Freeze crust 10 minutes.

  2. Brush crust lightly with egg white. Bake until crust is pale golden, about 15 minutes. Cool on rack while preparing filling. Reduce oven temperature to 350 degrees F (175 degrees C).

  3. In a large bowl, beat cream cheese and 1 2/3 cups sugar until smooth. Beat in cornstarch, 1 tablespoon lemon juice, orange zest, lime zest, 1 1/2 teaspoon lemon zest and 1/2 teaspoon vanilla. Beat in eggs one at a time, then stir in sour cream. Pour filling into crust.

  4. Bake in the preheated oven for 55 to 60 minutes, or until puffed and cracked around edges and center moves only slightly when pan is gently shaken. Allow to cool to room temperature, then refrigerate overnight.

  5. In a saucepan over medium heat, boil marmalade and 2 teaspoons lemon juice until slightly reduced, about 2 minutes. Spread warm glaze on top of cake. Chill cake 10 minutes. Remove pan sides and transfer cake to serving plate.

Life Hacks – 2023

Microwave – Things it can do

https://news.lobandsmash.com/en/knew-microwave-things-never-capable?ly=native_one

Things We Never Knew Our Microwave Is Capable Of Doing
Brenda Miller

This article was originally published on RightLivin

Many of us use pretty much the same appliances in our kitchens. If we’re all about keeping things quick and convenient, then a microwave is usually a common appliance for heating food and defrosting, but it usually stops there. Yet, it turns out that our microwaves have so many uses, and many of us don’t know half of them. So in this article, we bring you some of the best uses for that wonderful appliance! Take a look, and by the end of it you’ll no doubt be throwing out everything in your kitchen except for that beloved microwave! (Okay, maybe not that far, but trust us – you’re going to be shocked).

Easily Remove Stamps From Envelopes
Did you ever find yourself struggling to take out a stamp that you mistakenly put on an envelope? If yes, then no need to despair. You should be able to use your microwave to help remove that stamp in no time, with a few simple steps.

​Easily Remove Stamps From Envelopes
Simply place the entire envelope in your microwave and turn the heat on to medium for 20 seconds. That should be enough to loosen the glue, so you can peel it right after.

​Regularly Disinfect Your Kitchen Sponge
Let’s be honest, too many of us forget to clean or to change kitchen sponges. But once you realize the number of germs that are probably growing on the bacteria heaven that your moist sponge is, you might want to clean it or change it more often.

​Regularly Disinfect Your Kitchen Sponge
Soak the sponge in some water and leave it for a few minutes. Afterward, place it in your microwave on medium heat for about two minutes. That should be enough time to clean it and, if you’re feeling fancy, add some drops of lemon to freshen it up.

​Bring Some Life Back To Your Stale Bread
There is no reason to throw away your stale bread before you try this small trick. Take baguettes for example. They are definitely a favorite, but many people prefer to not buy them because they go stale pretty quickly.
​Bring Some Life Back To Your Stale Bread

Simply dampen a kitchen towel with some sprayed water, and place the bread into the towel. Then, put both in the microwave for ten seconds on high heat. This will add some needed moisture back to your loaf of bread.

Create Your Own Personal Kiln
In addition to cooking your food, your microwave could be much more helpful in other aspects of your life. For example, if clay pottery has always been something you’ve wanted to try, but you don’t really want to pay for the expensive classes, then just set up your own clay station at home.

To make your own kiln, try placing the clay items you’ve created in the microwave covered with some baking parchment. After a few minutes, the piece should be set and perfectly hardened.

Crisp Your Chips In The Microwave
Isn’t it just the worst when you excitingly grab your bag of chips and realize that someone left it open, so they’re all soggy? And since soggy chips really do take the whole fun out of it, how about trying to salvage those chips with your microwave?

Lay the chips on a paper towel and give them a good blast for a couple of seconds on really high heat. And just like that, your chips will be all crispy again.

Toast A Bunch Of Nuts
Let’s be honest, who doesn’t like a yummy bowl of toasted nuts? Though many of us end up not going for the snack due to how time-consuming they can be, just listen to this trick.

Pour half a teaspoon of vegetable or canola oil onto the microwave plate. Then, top it with one cup of nuts. Microwave it for a minute, stir, and then another minute until they are toasted. It should take you about three to eight minutes to be ready.

​Peel Tomatoes Or Peaches With Ease
This is for if you feel like eating some fresh veggies or fruit with their skin off. Or, perhaps you want to cook and you don’t feel like struggling to take their skin off.

For a quick and easy solution to take their skin off, you can place your tomatoes or peaches in the microwave for approximately 30 seconds on medium heat. Then, let the fruit stand for about two minutes before you begin peeling them.

Bring Your Dried Mascara Back To Life
While some people love applying makeup on a daily basis, other people may put it only once in a while. For those who only wear it occasionally, the mascara might get a little bit dry with time.

If you feel like it’s not time to toss it away yet and you’d like to bring it back to life, just put your mascara in the microwave for a couple of seconds, and voila!

Peel Garlic Easily
You may love or hate garlic, but there is no doubt that its wonderful flavor and uses are infinite. Still, sometimes it’s incredibly hard to peel them, which discourages anyone from using them.

If you’d like to make your life easier, then place a head of garlic in the microwave and heat it up for 15 seconds on medium heat. In no time, the skin will be loosened and you can easily peel it!

Prevent Those Tears The Next Time You Cut Onions
Cutting onions can be a huge mission, and while there are several hacks out there to prevent crying during the process, many of them can be pretty disappointing. So next time, try this one. Simply cut the onion’s root and take the tip off of it.

Then, microwave it for about 30 seconds on full heat. You can then begin cutting your onion, and your eyes should be safe.

Create Your Own Heating Pad
Heating pads are useful for a number of things – they heat us when it’s cold, and they really help out whenever a part of our body feels sore. Whatever the case is, there is no need to keep buying heating pads since you can simply and easily create your own.

Just grab a clean sock and fill it with a bunch of rice, sew up the top part, and make sure that nothing can escape. Then stick it in the microwave and ta-da! You’ve got a cheap and easy heating pad.

Bake An Entire Cake
For many of us baking a whole cake in the microwave is unheard of. But believe it or not, it’s possible, and it comes out absolutely yummy!

There are tons of recipes online for literally any kind of cake, but for most of them, all you need is some flour, oil, salt, and the milk of your preference. Some cocoa powder wouldn’t hurt either.

Cook Some Yummy S’mores
Who says that you need a bonfire or a barbeque to cook up some s’mores? It turns out that your microwave can easily do the job. Grab your sweet treat and put it in the microwave for as little as 15 seconds until you see the marshmallow puffing up.

Once it’s ready, you can take it out and top it off with your favorite crackers.

Get Your Solid Beauty Products Warmed Up
So many of us have full drawers or even cupboards with a ton of beauty products that we end up not using for years. And when you finally remember they’re there, they might no longer be as warm or as useful as they once were.

So if you’d like to warm up the products that have completely solidified because of the cold, just place them in the microwave for a couple of seconds and they’ll be all loosened up.

Shuck Your Corn In The Microwave
By using the microwave to shuck corn you could save a ton of time. It could sound a little bit too good to be true, but this trick is actually used by several chefs around the world. Start by cutting the stalk end of the corn but make sure to keep the husk intact.

Then, put it all into a microwave for about two to four minutes. Once it’s done, just grab your uncut end and shake it, in no time, you’ll see it all flying right out.

Speed Up The Soaking Time Of Your Beans And Lentils
Sometimes you may not be in the mood to soak up your lentils and beans for too long. Instead of waiting an entire night until they are properly soaked, put them in a microwave-safe bowl and cover them with water.

Add a little bit of baking soda to it and microwave it on high heat for about ten minutes. Afterward, leave the bowl for about 30 to 40 minutes, and then your dish will be ready to go.

Steam Your Veggies
Who says you need a fancy steamer or steamer basket to get your wonderful veggies steamed? The microwave works just as well and pretty quickly too. First, cut your vegetables the way you like them.

Then, put them in a microwavable bowl, cover them with a very thin layer of water and top it with some plastic wrap. Then, heat it up on high heat for a few minutes, and your veggies should be steamed!

Cooking Your Pasta Was Never So Easy
Though you may think that the microwave is not a place for your pasta, you might rethink that once you hear about this hack. All you need for it to work is your dry pasta, a bowl, and water.

Just put the amount of pasta you want in the pot, add the water until it’s all covered by a few inches, and then place the bowl in the microwave for two to three minutes more than what is suggested in the instructions.

Make Homemade Potato Chips
I mean, who doesn’t love some yummy homemade potato chips? And the best thing is that you can make your own if you have a microwave in hand. All you need is some potatoes cut as thin as possible. Then, toss them in the microwave with a little bit of olive oil and salt.

In order for it to work, just make sure that you place them in a single layer before you turn on the full heat for about four minutes. Once they’re cool, dig in!

Soften Old And Clumped Brown Sugar
Brown sugar doesn’t take that long to clump up, so if you ever experience this little glitch, use your microwave to find a solution.
​Soften Old And Clumped Brown Suga

Put your sugar in a bowl, cover the top part of your microwavable container with a damp kitchen towel, then, microwave it all for about 30 seconds at a time. In a few minutes, the clumps should be gone

​Cook Your Dish Of Corn On The Cob
Who would think that corn on the cob made in the microwave could taste so good? Apparently, it does, and you can easily make it at home.

If you’ve got some fresh corn on hand, simply remove all of the husks and silk, then add about two tablespoons of water into a place and put two full-sized cobs on it. Top it all with another plate and put them in the microwave for around five minutes.

Get Your Potting Soil Sterilized
Did you ever think that you could boost up your gardening situation with your microwave? It may be another hack that sounds weird to some, but it’s actually incredibly useful. To begin, get some soil in a resealable bag and add a bit of water.

Then, leave the bag open in the top part and put it in the center of your microwave. Heat it at about 180 to 200 degrees Fahrenheit for about three minutes and then seal the bag until it cools.

Cook Up Some Delicious Pieces Of Bacon
It’s undeniable that the smell of bacon is probably one of the best smells out there. They remind us of weekends and fun times, and they’re basically the perfect snack to go with anything.

If you want to cook it quickly, start by covering a dish with a paper towel, add the bacon in one layer, and then add some more sheets of paper on top of it. Microwave it for a few minutes and it should get perfectly crisp in no time.

Soften Up Your Ice Cream
The next time you crave some ice cream but feel discouraged after seeing that it’s frozen solid, think about this hack. Soften your ice cream by placing the entire pot in the microwave for a couple of seconds.

Or you could also put some water in a bowl, heat it up in the microwave, then put your spoon in it for a minute or so until you feel it warm. Then, you may eat your ice cream!

Dye Your Own Yarn At Home
While Kool-Aid is a refreshing drink, it can also serve as the perfect instrument for a DIY craft project. Save yourself some extra money by mixing some Kool-Aid powder with some water.

Choose the color you want to use for your yarn and add just enough yard to the mixture you created. Make sure that the entire thing is all covered up and then place it in the microwave for a couple of minutes.

Clean And Disinfect Your Cutting Boards
Cutting boards are great and incredibly useful, but they’re another item in our kitchen that we often forget to clean properly. If you’d like an easy way to keep them germ-free, there are a few hacks you could try.

One of them could start with cutting a lemon in half, and begin rubbing the halves on the board. Then, put them in the microwave on medium heat and leave them for a minute. That will leave it smelling fresh and germ-free.

Make A Homemade Proofing Oven For Baking Bread
Proofing ovens may cost hundreds of dollars, so if you’d like to make one of your own with the help of tools that you already have at home, then listen to this one: first, heat up a cup of water in your microwave for just a few minutes.

Let it become steamy and then place the dough inside and let it proof. And that’s it, your bread will be ready to be enjoyed.

Make Some Poached Eggs
Many of us have mastered the art of making scrambled and boiled eggs, but what about those yummy poached eggs? It can be really tricky to make them, but if you use your microwave you may be able to find a simple solution to the situation.

Put a third of a cup of water in a bowl, splash some vinegar, crack an egg into the water and then prick the egg yolk with a toothpick. Once you cover the top of the bowl with some plastic wrap, place it all in the microwave for a minute, and voila!

Bake A Batch Of Brownies
Seriously, everyone loves brownies – so how about learning a quicker way to make the fudgiest and most chocolatey goodies? Instead of spending hours baking, simply melt some butter in a bowl, add sugar, cocoa, some eggs, and flour.

Mix it all up and, after pre-greasing a microwavable dish, add it to the microwave. In five minutes your brownies will be ready!

Make Your Own Cloud
If you have kids and you often find yourself looking for new ways to entertain them, then make this your next homemade science project. Grab a bar of Ivory Soap, place it on a microwavable plate, and heat it on high heat for about two minutes.

You’ll see the soap bar expanding right in front of you and in a second an entire cloud will be created.

Put A Stop To Explosions In The Microwave
No one loves explosions in the microwave, especially when they result in a huge amount of time cleaning up afterward. There is a very simple way to prevent them from happening though.

When you heat up things such as potatoes, tomatoes, or squash, take a knife or a fork and pierce a few holes before heating them up. This will allow the steam to escape while it heats up

Enhance The Taste Of Lemons
Many people may not know that putting your lemons in the microwave for a little bit should make its taste much stronger than usual

Just put it in the microwave for a few seconds, but make sure to not leave it for long as the lemon could explode. While the lemon is still warm, roll it along the side and the juices should beautifully flow inside.

Make Some French Toast
For the best microwavable french toast put some butter in a mug and melt it in the microwave, then add some nutmeg, maple syrup, cinnamon, milk, and of course, an egg. Mix it all up and start adding pieces of bread to it.

Once it’s all combined, let it absorb a bit, put it in the microwave for about 70 seconds until it’s solid, and enjoy.

Clean Your Microwave
So many of us use our microwaves on a daily basis and barely give them the deep clean they deserve. Instead of spending hours scrubbing it, cut a lemon, and squeeze it into a bowl of water.

Then, place each lemon half in the bowl and put it in the microwave. Heat it all for five minutes and all the dirt and gunk will be loosened up for you to wipe off.

​Get The Juice Out Of Any Citrus Fruit
Make sure that you get all the juice out of your citrus fruit the next time you make some freshly squeezed juice. Put the oranges, limes, or lemons in the microwave for about 10 to 20 seconds to gently warm it up.

That will allow it to release much more juice once you begin squeezing it. Just make sure you don’t leave it in the microwave for too long.

Test Your Container Before Putting It In The Microwave
Grab a cup or pot that you know for sure to be safe for the microwave and fill it with water. Then, place the cup or pot in a new container without putting the water in it.

Afterward, microwave both pots at once for a couple of minutes until the water begins to boil. Touch the new container with care, and if it’s hot or warm, then you might not want to put it in the microwave again.

Get Your Coconut Oil To Liquify
Coconut oil is one of those immensely useful ingredients – though it can be a total pain when it solidifies. Once it’s solid, it can be really annoying and hard to use, be it for cooking or for adding it to your beauty routine.

To make it liquid again, just put it in the microwave on high heat for a few seconds and it should be ready to go!

Make Home-Made Pickles
If you’re a fan of pickles then try to use this hack to start making your own! Grab a microwavable bowl, add some celery seeds, sugar, vinegar, turmeric, onion, mustard seeds, and a pinch of salt. Combine it and add in the cucumber slices.

Put it all in the microwave for seven or eight minutes, while stirring it at least twice in between. And just like that, you’ve made pickles.

Make The Easiest Scrambled Eggs
Scrambled eggs are easy and great, but they often require way too much effort to clean up after. To change this, just use your microwave. Crack a few eggs into a mug, whisk them up with a fork, add some seasoning and a splash of milk, then place it in the microwave for 45 seconds.

Take it out, mix it, and add it for another 45 seconds and you’re done.

Soften Crystallized Honey
Honey can be the best way to sweeten up your food while adding some very important nutrients to your diet. But when it becomes crystalized with the cold or with time, then use your microwave to soften it up.

Just microwave it for a couple of seconds and in no time the crystals will all have melted leaving you with a flowing pot of honey.

Froth Your Milk
Milk frothers are great and all but you don’t actually need them if you have a microwave. Just pour some milk into a jar and screw the lid on it. Shake the jar for about 40 to 50 seconds until you see that the milk has doubled its size.

Then, remove the lid and microwave it for about 30 seconds and your milk will be perfectly frothed.

Make A DIY Medical Compress
Hot compresses can be really useful to treat ear infections, sore and tired muscles, and sinus congestions. So instead of heading to the store to buy one – make your own.

Grab a wet towel, fold it up, and put it in a ziplock bag. Place it in the microwave with the ziplock open, and microwave it for two minutes. Then, take it out, seal the bag, wrap it in another towel and you’ve got your compress.

Warm Up Your Dishes
Here’s a sneaky trick that restaurants do that we bet none of you even noticed.
​So to recreate that restaurant atmosphere, put your empty dishes in the microwave and heat them for a minute or two before you begin serving up your meal. That will allow your food to stay warm for longer when you have your homemade fine dining experience.

Pre-Cook Your Meals Before You Grill Them
Grilling veggies can take forever, and sometimes you just want them ready to eat in no time. So to speed things up, pierce your potato, bell pepper, or whatever vegetable you’d like to grill with a fork, and put it in the microwave for a couple of minutes.

Then, add them to the grill and the vegetables should take much less time to get ready.

Make Crispy French Fries
After a day or two, french fries become so soggy that the excitement of eating them simply goes away. But instead of throwing them away, what if we told you that you could “revive” them?

Just lay them out evenly on a piece of paper towel, then sprinkle some vegetable oil and place it in the microwave for about ten minutes. Then remove them and let them rest for a bit until they are crisped up.

Clean Up Candle Wax
Burning a candle can be incredibly calming, and it can fill your entire home with a wonderful scent to your home. But when the wax starts getting everywhere, it can be really annoying to remove it from your candle holders.

But again, do not despair, just place the holders in the microwave for a bit and that should make it easy to take it all off.

Cook Special Fish Dishes
Cooking fish may feel a little weird at first, especially if you don’t do it often. So if you’d like to try to take things slowly, simply wrap your fish in a plastic wrap that can be microwaved.

Leave it for a few minutes in the microwave until the fish is cooked to perfection. If you put a few herbs with some lemon slices, your fish will seriously be delicious.

​Speed Up Your Dinner
Instead of cooking those TV dinners in the microwave, literally any meal could be sped up by using the microwave. You can steam, poach, heat things up, but always remember to stir it and to check it regularly, especially if it’s liquid-like soups and sauces.

Also, you need to make sure to take the food out a couple of minutes before it’s completely cooked.

Make Some Parmesan Wafers
Parmesan wafers are perfect to spice things up when you don’t feel like the usual chips. To make them, just cover a plate with parchment paper and cover it all with the thinnest layer of Parmesan.

Then, turn it on on full power for about 30 seconds and you’ll see them becoming brown. Remove them and there it is, you’ve got some parmesan wafers.

​Dry Out Almost Any Herb
One of the best ways to impress anyone in the kitchen is by making your own aromatic herbs. And while you may think that it will take forever to get that to the right point, it doesn’t have to. Lay the herbs on a kitchen towel and microwave them for 30 seconds.

Then, flip them over and add them for another 30 seconds. Continue flipping and microwaving them for some five minutes until they are dry.

100 Great Tips

This guy is extremely obnoxious, but knows his stuff.  Here are 100 tips, and GUARANTEED you’ll take away at least ten.  My favorites are shown below the video image.

      • For plastic wrap, use what is called a Cater Wrap.  Put extra large plastic wrap on the counter, set the container on it, and bring the ends up to cover the container.
      • Rest your steak for a full ten minutes, rather than five minutes.  This will give the juices more opportunity to reabsorb.
      • When shelling hard boiled eggs, roll them to fracture the shell, then soak in ice water for ten minutes.
      • When zesting citrus, hold the zester firmly, then rotate the citrus to remove the zest.
      • Spread Saran Wrap or waxed paper on the counter when peeling something.  To clean up, just gather the corners and toss into the garbage.
      • For a better sear, salt your protein and refrigerate overnight.
      • When trimming the fat cap off meat, put it into a container and then freeze. When you get about a quart, render it down, strain, and store.  Beef fat is pure gold.
      • To halve a massive number of cherry tomatoes, put onto a lid (like  a yogurt container) and top with another lid.  Cut in between lids to halve the tomatoes.
      • To hold your chives together, wrap a wet paper towel around the roots.  This will gather the stalks together for an even trim.  After you cut them, store them in a plastic bag.  The moist towel will preserve the chives.  When you are ready for more chives, cut the ends, the rewet the paper towel.
      • Use a mandolin for equal thin slices.  You can get an inexpensive one on Amazon for under $20.
      • To get your Sloppy Joe hamburger nicely sized, use a potato masher to get standard sized pieces.
      • Salt your sliced tomatoes before putting on your hamburger.
      • When you have wet dough on your fingers, just use some dry flour to rub most of it off, then wash with a bit of soap and water.
      • Use a 1/4 inch wire rack to dice hard boiled eggs into small equal pieces.
      • To make fruits and vegetables last longer, rinse 3-5 minutes in a bath of 3 parts water, and 1 part vinegar (or 2 TBL citric acid.)
      • Create a cartoush – NEED MORE INFORMATION – Use parchment paper or coffee filter, fold, fold, fold, fold, cut the point off, then put in our pot.
      • Something about garlic – WATCH THE VIDEO AGAIN
      • To shred chicken, use an electric mixer
      • Cook thighs, rather than breasts, for a moister chicken.
      • If your cooking oil gets too hot, just put some room temperature oil into the hot pot.

THIS IS NOT MY WORK, WATCH THE VIDEO ABOVE FOR THE TIPS


Triple Citrus Tart

You can use the below recipe from Johanne Killeen & George Germon, owners of Al Forno, in Providence, Rhode Island, or you can use my recipe for Pastry Dough.  Here is another recipe.   If you want REALLY easy, just use Puff Pastry.

    • 1 tsp orange zest – minced
    • 1 TBL orange juice – cold
    • 1 TBL ice water
      • It is better to have your dough too moist, rather than too dry
        You can always add a bit more flour, but not liquid
    • Approx 1 C AP flour
    • 2 TBL confectioner sugar
    • 1/4 tsp salt
    • 1 sticks cold butter in pieces
      • Pulse in food processor about six times
    • With motor running, add liquid all at once
    • Stop only to scrape down sides
      • You want dough to just hold together
      • Pour onto aluminum foil
      • Press together into a disk
      • Refrigerate immediately for about 2 hours
    • Keeping your hands and your dough floured start rolling it out
    • Flatten it to just under 1/8 inch
    • Replenish floured surface as necessary
    • Transfer onto a baking sheet
      • Add first layer to the tart
    • If using lemons, blanch them about 10 seconds in boiling water, then rinse them and dry them to remove the waxy coat and any pesticides
    • Slice on mandolin as thinly as you can possibly slice them
    • Layer over entire tart surface, slightly overlapping
    • Sprinkle with super-fine sugar – You can also create your own with your food processory
    • Fold over the crust sides
    • Refrigerate for about 90 minutes
      • Preheat oven to 450 before putting into the oven
      • Bake 15 minutes

Prepare your lime curd

    • Two whole eggs plus two egg yolks
    • 1/2 C sugar
    • 3/4 C fresh lime juice
    • 1/2 C heavy cream
    • Heat over a double boiler until it thickens – Keep no hotter than 190º

Whip your egg whites

    • 4 egg whites
      • Start to whip to froth on high
    • 1/2 C super-fine sugar – 1 spoonful at a time
    • Scrape down sides, then continue to soft peaks

Combine

    • After your tart has cooled, add a layer of curd
    • Put on your meringue over top of curd
      • Use a fork to pull out the peaks
    • Put into preheated oven until meringue darkens
    • Let cool just a bit, and then plate
    • Sprinkle with confectioner sugar


Lox and Bagels

Homemade Lox

  • Sushi grade salmon
  • Mustard seeds, cumin seeds, corriander seeds
    • Toast briefly and grind together – set aside
  • Chop cilantro – set aside
  • Combine
    • 1 C kosher salt
    • 1 C brown sugar
    • Add 1/4 C tequila
  • Cover sheet tray with plastic sheet
  • Put salmon on the large sheet of plastic – skin side down
  • Brush salmon with chipotle puree
  • Sprinkle with dried spices
  • Put citrus zest on top
  • Put salt slurry on top
  • Wrap in plastic
  • Top with another pan and put a weight on top
  • Refrigerate 48-60 hours
  • Wipe seasoning off salmon
  • Slice as thinly as possible against the grain

Pickled Red Onions

  • Slice red onion in half, then slice thinly
  • Pickling Liquid
    • 1 C Red wine vinegar, lime juice or citric acid
    • 2 TBL sugar, whole mustard seeds, corriander
    • Black pepper corns and kosher salt
    • Bring to a boil, then turn off heat and let rest ( on burner 15 minutes )
  • Pour over onion and let rest 30 minutes
  • Transfer to mason jar and refrigerate
    • Pour liquid to cover onions

Goat Cheese Spread

    • Goat Cheese
    • Green Onion
    • Fresh dill
    • Salt and pepper
    • Splash of milk
    • Mix in food processor

Jalapeno Cream Cheese

    • Cream cheese
    • Fresh cilantro
    • Roasted jalapeno
    • Splash of milk
    • Mix with a fork


Natural Salt Alternatives

Herbs and spicesMastering herbs and spices is the secret to tasty meals, and much healthier than using salt for flavour. Registered dietitian Annemarie Aburrow shows us how.Are you envious of those who throw together tasty dishes with only a few ingredients and a rifle through the spice rack? Not any more. We’ve compiled a range of herbs and spices with instructions on how to use them with meat, fish and vegetables.Soon you’ll be mastering the flavours of the Mediterranean, North Africa, India and beyond. What’s more, using these in place of salt is better for your heart health. Our recipe search offers four ideas to get you started.

1. Mint

  • MintTaste: A bright and refreshing herb that works in sweet and savoury dishes.
  • Preparation: Use fresh leaves if you can. Mint is easy to grow on the windowsill or in the garden (keep in a pot as it will spread).
  • Uses: Great in salads, on pasta or in couscous. It’s tasty with carrots, peas or broad beans.

2. Rosemary

  • RosemaryTaste: An aromatic herb with a pine-like fragrance. Use sparingly; it can overpower other flavours.
  • Preparation: Roast whole sprigs with root vegetables (carrot, parsnip, sweet potato). If using dried rosemary, crush it first.
  • Uses: Add to roast or grilled meats, bread, homemade pizza, tomato sauce, beans, potatoes or egg dishes. Consider growing some rosemary; it’s a hardy plant and does well outside.

3. Nutmeg

  • NutmegTaste: Sweet and pungent flavour. Works well in baked foods with cinnamon and cloves.
  • Preparation: Freshly grated nutmeg has a much better flavour than ground.
  • Uses: Add nutmeg with black pepper to homemade white and cheese sauces. It also adds warmth and flavour to homemade potato, cabbage and cauliflower soups.

4. Basil

  • BasilTaste: Sweet and peppery.
  • Preparation: Fresh basil retains more flavour and aroma than dried. Basil plants usually grow well on windowsills. As you pick the leaves, more will grow.
  • Uses: Perfect for pesto, marinades, dressings, sauces, sandwiches, soups and salads. Basil is traditionally used in Mediterranean cooking, in tomato-based pasta sauces, pizzas and bolognese. Use lemon, Thai and holy basil in South Asian and Thai dishes.

5. Cardamon

  • CardamonTaste: A warm, aromatic spice.
  • Preparation: Add whole cardamom pods to your dishes or use the seeds inside, either whole or ground.
  • Uses: Commonly added to Asian spice mixes and curry pastes. Cardamom also works well in baked goods and sweet breads, with cloves and cinnamon, for a taste of Scandinavia.

6. Chilli/Cayenne

  • ChilliTaste: Chillis vary quite a lot in strength, so add a little at first and taste your dish. Cayenne is a specific type of chilli.
  • Preparation: Chilli can be bought whole (fresh or dried), as dried flakes, powder, or as hot sauce. Chilli sauce may be high in salt (or sugar in the case of sweet chilli sauce), so stick to powder, flakes or whole chillies.
  • Uses: It works well in most dishes, including vegetable or seafood stews or vegetable soup. Add a pinch of chilli with a little mustard to spice up a cheese sauce, helping you use less cheese. Combine with cumin, coriander seeds and turmeric to give foods an Indian twist.

7. Cinnamon

  • CinnamonTaste: Mostly used in sweet treats like cake and apple crumble, but works with savoury dishes too.
  • Preparation: Sold as cinnamon sticks (grate or add whole to dishes like curries or stews) or ground.
  • Uses: Cinnamon is an important spice in Turkish and Middle Eastern cooking, where it is used to flavour chicken and lamb dishes. Use it to deepen the flavour of cottage pie, curries, tagines, casseroles, roast vegetables, bolognese sauce or stewed fruit.

8. Chives

9. Coriander

  • CorianderTaste: Coriander leaves have a distinct earthy and lemony flavour, while coriander seeds have a warm, spicy, citrus flavour when crushed.
  • Preparation: Use coriander leaves raw or add to foods at the end of cooking. Coriander seeds are commonly used in Indian dishes. Fry them in a dry pan and add them whole or crushed.
  • Uses: Add coriander leaves to salads, soups (eg carrot and coriander soup), salsas, curries and fish and chicken dishes, or combine it with lime and chilli in stir fries.

10. Dill

  • DillTaste: Dill has a strong taste, often compared to fennel, star anise and celery.
  • Preparation: Use fresh rather than dried if possible – use the leaves only and discard the stem.
  • Uses: Popular in Russian, Eastern European, Greek and Scandinavian cooking, dill is a welcome addition to cottage cheese, low-fat cream cheese, omelettes, seafood, steak, potato salad and cucumber dishes. Try adding dill to broad beans and rice and serve with koftas (made from lean minced meat), as found in Iranian cooking.

11. Cumin

  • CuminTaste: Earthy and smoky.
  • Preparation: Fresh cumin seeds, dry roasted and then ground, provide a richer flavour than cumin powder.
  • Uses: After black pepper, cumin is the most-used spice worldwide. It is flavoursome without too much spiciness. Cumin goes with practically any dish but particularly with lamb, game, beans and rice. Combine with oregano and chilli for a Mexican twist, or with cardamom, coriander and turmeric for a taste of India.

12. Ginger

  • GingerTaste: Peppery, lemony and slightly sweet, with a sharp aroma.
  • Preparation: Buy ground or fresh (as a ginger root, which can then be chopped or grated).
  • Uses: Ginger enhances sweet and savoury dishes. Fresh ginger can be grated into stir fries and curries during cooking, or sprinkled over meat before baking or barbecuing. It can also be used in salad dressings or added to rice. Ground ginger works well with stewed fruits.

13. Oregano

  • OreganoTaste: Oregano has a warm, aromatic, slightly bitter taste and a potent aroma.
  • Preparation: Fresh oregano leaves can be chopped into foods or added whole.
  • Uses: Popular in Greek and Mediterranean cooking. Use it to marinate meats, poultry and seafood before grilling, in egg dishes, breads, casseroles and salads. It’s also great in spaghetti bolognese and tomato salsas. Marjoram is a good oregano substitute, but tastes milder.

14. Paprika

  • PaprikaTaste: Paprika is milder and sweeter than cayenne pepper.
  • Preparation: Available as a red powder made from ground sweet and hot dried peppers.
  • Uses: For a Hungarian twist, team paprika with caraway, coriander, cinnamon and dill. Combine with garlic for a Spanish flavour. Paprika goes well with lamb, chicken and fish dishes, on baked sweet potato wedges, or in beans or scrambled egg.

15. Parsley

16. Sage

  • SageTaste: From the Mediterranean coast, sage is like rosemary, with more lemon and eucalyptus.
  • Preparation: Best used fresh and in small amounts. Unlike some herbs, sage does not lose its flavour with prolonged cooking.
  • Uses: Sage is traditional in Italian and French cooking, added to meats, poultry and stuffing, and is often chopped and stirred into pasta and gnocchi.

17. Tarragon

  • TarragonTaste: Adds a distinctive, bittersweet liquorice-like flavour to foods, and has an aroma similar to star anise.
  • Preparation: Tarragon should be added near the end of cooking time, as heat reduces its flavour.
  • Uses: Native to Siberia and western Asia, tarragon is a key herb in French cooking. It goes well with poultry, fish, egg dishes, beef and vegetable soups. It can also be added to salad dressings.

18. Thyme

  • ThymeTaste: A strong earthy, slightly minty flavour with a subtle aroma. Lemon thyme is another variety and goes well in soups and vegetable dishes.
  • Preparation: Depending on the variety you’re using, thyme can be finely chopped or added as a whole sprig. Unlike most herbs, thyme needs a long cooking time to release its full flavour.
  • Uses: Add whole sprigs to slow-cooked meals and casseroles and remove at the end. Thyme works well with other herbs like rosemary, parsley, sage, savoury and oregano, and is used in bouquet garni. It can flavour most meats, including chicken and game (as a marinade or in a sauce) and is a tasty addition to roast vegetables. Tuck sprigs inside a chicken, along with fresh lemon, before roasting. Pair thyme with paprika, oregano and cayenne pepper for Cajun cuisine, and with cinnamon, nutmeg and cayenne pepper for Caribbean meals.

19. Turmeric

  • TurmericTaste: Has a distinctive yellow colour so is sometimes used as a cheaper alternative to saffron, although it tastes quite different.
  • Preparation: Turmeric is an ingredient of curry powder and is in many South Asian dishes.
  • Uses: For a hint of North Africa, use turmeric with ginger in meat and vegetable dishes, or flavour rice with it. A little turmeric goes a long way; as it cooks, its flavour intensifies.

Eating Right and Dieting

Diet Rules

  • At least one day every single week
    • One vegetarian day
    • No alcohol
    • Oatmeal for breakfast
    • One No-carb day
    • Four servings of vegetables

In general . . .

  • Slow down
  • Don’t have to get my money’s worth
  • Meet step goal
  • Exercise
  • Leave three bites of food on our plate
  • Stop when we are full
  • Put fork down between bites
  • Smaller servings

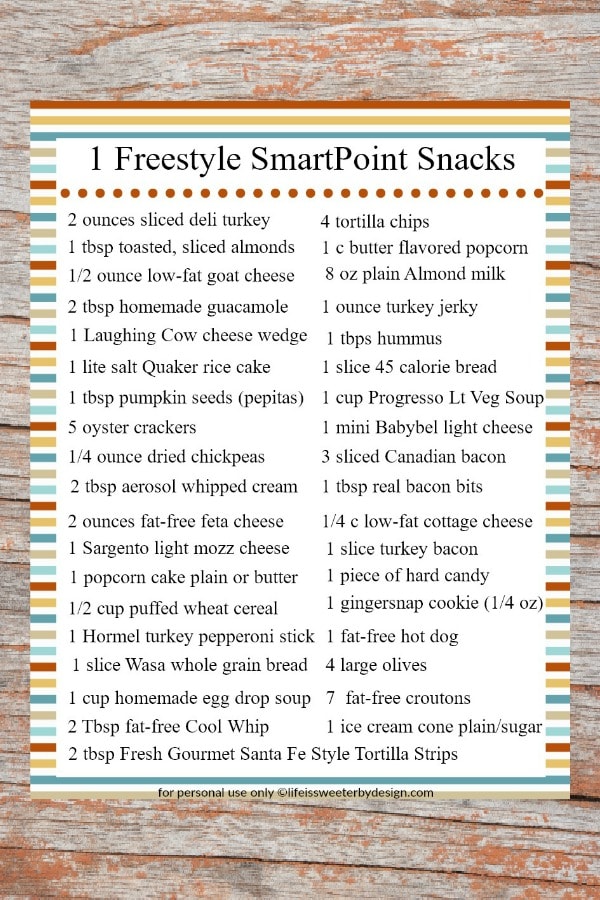
1 Point Snacks

ZERO Point Snacks

Food Additives to Avoid

While FDA generally recognizes most additives on this list as ‘safe,’ there are growing concerns about the safety of many common food additives, if consumed in large quantities.

  1. Aluminum: A preservative in some packaged foods that can cause cancer.
  2. Azodicarbonamide: Used in bagels and buns. Can cause asthma.
  3. BHA/BHT: A fat preservative, used in foods to extend shelf life. Linked to cancerous tumor growth.
  4. Brominated vegetable oil: Keeps flavor oils in soft drinks suspended. Bromate is a poison and can cause organ damage and birth defects. Not required to be listed on food labels.
  5. Butane: Butilated Anything is bad.  Put in chicken nuggets to keep them tasting fresh. A known carcinogen.
  6. Carrageenan: Stabilizer and thickening agent used in many prepared foods. Can cause ulcers and cancer.
  7. Camauba wax: Used in chewing gums and to glaze certain foods. Can cause cancer and tumors.
  8. Chlorine dioxide: Used in bleaching flour. Can cause tumors and hyperactivity in children.
  9. Disodium inosinate: In snack foods. Contains MSG.
  10. Disodium guanylate: Also used in snack foods, and contains MSG.
  11. Enriched flour: Used in many snack foods. A refined starch that is made from toxic ingredients.
  12. Magnesium sulphate: Used in tofu, and can cause cancer in laboratory animals.
  13. Monosodium glutamate (MSG): Flavor enhancer that can cause headaches. Linked in animal studies to nerve damage, heart problems and seizures.
  14. Olestra: Fat-like substance that is unabsorbed by the body. Used in place of natural fats in some snack foods. Can cause digestive problems, and also not healthy for the heart.
  15. Paraben: Used to stop mold and yeast forming in foods. Can disrupt hormones in the body, and could be linked to breast cancer.
  16. Polysorbate 60: A thickener that is used in baked goods. Can cause cancer in laboratory animals.
  17. Potassium bromate: Added to breads to increase volume. Linked to cancer in humans.
  18. Propyl gallate: Found in meats, popcorn, soup mixes and frozen dinners. Shown to cause cancer in rats. Banned in some countries. Deemed safe by FDA.
  19. Propylene glycol: Better known as antifreeze. Thickens dairy products and salad dressing. Deemed ‘generally’ safe by FDA.
  20. Propyl gallate: Added to fat-containing products. Linked to cancer in humans
  21. Recombinant Bovine Growth Hormone (rBGH): Geneticially-engineered version of natural growth hormone in cows. Boosts milk production in cows. Contains high levels of IGF-1, which is thought cause various types of cancer.
  22. Refined vegetable oil: Includes soybean oil, corn oil, safflower oil, canola oil, and peanut oil. High in omega-6 fats, which are thought to cause heart disease and cancer.
  23. Sodium nitrate: Added to processed meats to stop bacterial growth. Linked to cancer in humans. (Worst Offender)
  24. Sodium benzoate: Used as a preservative in salad dressing and carbonated beverages. A known carcinogen and may cause damage our DNA.
  25. Sulfites: Used to keep prepared foods fresh. Can cause breathing difficulties in those sensitive to the ingredient.
  26. Sodium carboxymethyl cellulose: Used as a thickener in salad dressings. Could cause cancer in high quantities.

Artificial Sweeteners to Avoid

Artificial sweeteners are regulated by FDA, just as food additives are, but this does not apply to products ‘generally recognized as safe.

  1. Aspartame S: An excitotoxin and thought to be a carcinogen. Can cause dizziness, headaches, blurred vision and stomach problems.
  2. Acesulfame potassium: Used with other artificial sweeteners in diet sodas and ice cream. Linked to lung and breast tumors in rats.
  3. Agave nectar: Sweetener derived from a cactus. Contains high levels of fructose, which causes insulin resistance, liver disease and inflammation of body tissues.
  4. Bleached starch: Can be used in many dairy products. Thought to be related to asthma and skin irritations.
  5. High fructose corn syrup: Sweetener made from corn starch. Made from genetically-modified corn. Causes obesity, diabetes, heart problems, arthritis and insulin resistance.
  6. Saccharin: Carcinogen found to cause bladder cancer in rats. (Worst Offender)
  7. Sucralose: Splenda. Can cause swelling of liver and kidneys and a shrinkage of the thymus gland.
  8. Tert butylhydroquinone: Used to preserve fish products. Could cause stomach tumors at high doses.

Artificial Food Colorings to Avoid

Food colorings are used to give foods a more attractive appearance, but some experts believe they cause serious health problems, including asthma and hyperactivity in children.

  1. Annatto: Food coloring that can cause hyperactivity in children and asthma.
  2. Bixin: Food coloring that can cause hyperactivity in children and asthma.
  3. Blue Dye #1: Used in bakery products, candy and soft drinks. Can damage chromosomes and lead to cancer.
  4. Blue Dye #2: Used in candy and pet food beverages. Can cause brain tumors
  5. Brown HT: Used in many packaged foods. Can cause hyperactivity in children, asthma and cancer.
  6. Caramel coloring: In soft drinks, sauces, pastries and breads. When made with ammonia, it can cause cancer in mice. Food companies not required to disclose if this ingredient is made with ammonia.
  7. Citrus Red Dye #1: Sprayed on oranges to make them look ripe. Can damage chromosomes and lead to cancer.
  8. Citrus Red Dye #2: Used to color oranges. Can cause cancer if you eat the peel.
  9. Green Dye #3: Used in candy and beverages. May cause bladder tumors.
  10. Norbixin:  Food coloring that can cause hyperactivity in children and asthma.
  11. Orange B: A food dye that is used in hot dog and sausage casings.  High doses are bad for the liver and bile duct.
  12. Red Dye #40: Found in many foods to alter color. All modern food dyes are derived from petroleum. A carcinogen that is linked to cancer in some studies. Also can cause hyperactivity in children. Banned in some European countries. (Worst Offender)
  13. Red Dye #2: A food coloring that may cause both asthma and cancer.
  14. Red Dye #3: A carcinogen. that is added to cherry pie filling, ice cream and baked goods. May cause nerve damage and thyroid cancer.
  15. Yellow Dye #5:  Used in desserts, candy and baked goods.Thought to cause kidney tumors, according to some studies.
  16. Yellow Dye #6: A carcinogen used in sausage, beverages and baked goods. Thought to cause kidney tumors, according to some studies.

Additives That are OK to Eat

  • Ascorbic Acid P
  • Ascrobyl Palmitate P
  • Cellulose – Shredded cheese T
  • Corn syrup (in moderation) S
  • Cyclamate S
  • Guar Gum M
  • Inulin T
  • Lecithin T
  • Natamycin P
  • Palmitic acid P
  • Phenylalanine F
  • Potassium sorbate
  • Riboflavin – digestion
  • Xantham Gum – T – small doses
  • Yeast Extract – F – small doses

B – Increases Bulk without affecting flavor
C – Coloring
F – Flavor enhancer
M – Keeps food moist
P – Preservative
S – Sweetener
T – Texture / thickener / keeps moist


Conclusion

  • Avoid fast foods
  • Avoid soda and sugary drinks & juice
  • Eat more fruits, vegetables and grains
  • Eat hormone free meat
  • Drink hormone free milk
  • Know what you’re eating!


Very Lemon Loaf

Ingredients

  • 4 large lemons or 8 key limes – clean
  • 1 stick unsalted butter – softened
  • 1 3/4 C AP flour
  • 1 2/3 tsp baking powder
  • 1/2 tsp kosher salt
  • 1 1/2 C sugar
  • 2 whole eggs plus 1 yolk
  • 1 C whole milk ricotta cheese

Step by Step

  1. Grate and juice citrus of choice
  2. Butter 9x5x3 loaf pan
  3. Preheat oven to 350º
  4. Sift together flour, baking powder and salt
  5. Drop butter into bowl of stand mixer and beat until fluffy
  6. Beat in ricotta, zest and juice
  7. Add flour 1/3 at a time and mix to incorporate
  8. Scrape batter into prepared pan
  9. Bake until golden brown and toothpick comes out nearly clean (50-60 minutes)
  10. While cake cools, make the glaze
  11. Pour 1/2 C sugar into sauce pan and ad 1/4 C juice
  12. Simmer until sugar dissolves and sauce thickens (3-5 minutes)
  13. Remove cake from pan and brush with glaze while loaf is still warm

Candied Lemon Peel

INGREDIENTS

  • 4 lemons
  • 2 cups cold filtered water PLUS lot of tap water
  • 2 cups white sugar

STEP BY STEP

  1. Cut lemons into quarters.
  2. Remove the fruit pulp, leaving the yellow peel and the white pith.
  3. Cut the quarters into 1/4 inch crescent strips.
  4. Put strips in a small pan, and cover with tap water.
  5. Bring water and lemon peel strips up to a boil in a small pan.
  6. Simmer 2 minutes.
  7. Drain as much of the water, as you can.
  8. Fill the pan with more water
  9. Bring water up to a boil and simmer 2 minutes
  10. Drain most of the water.
  11. Fill the pan up with cold water
  12. Rinse for a few minutes, and dump water.
  13. Fill up the pan again, rinse for a few minutes, then dump water.
  14. This time, use a colander so that you get as much of the water off the lemons as possible.
  15. Combine 2 cups of cold filtered water with 2 cups sugar.
  16. Bring to a boil, stirring to dissolve the sugar.
  17. Reduce heat to low simmer and stir in citrus peels
  18. Simmer for 20 minutes.
  19. Strain lemon strips, dumping water, but DO NOT RINSE THE PEELS.
  20. Set peels on clean printer paper to dry slightly.  About 15 minutes.
  21. Toss the candied peels in 1/2 C Turbinado sugar, granulated sugar, or powdered sugar (different textures) and let dry for another 6-8 hours.
  22. Store in an airtight container at room temperature for up to a month.

Homemade Butter Spread

INGREDIENTS

  • 1 stick Tillamook or Fleishman’s (high quality) butter
  • 2 TBL whole milk – DO NOT use skim or low-fat

STEP BY STEP

  1. Let butter come up to room temperature
  2. Put into mixing bowl (not a food processor – too fast)
  3. Add warm milk
  4. Whip with a mixer at low speed for 1-2 minutes
  5. Increase speed to high for 2-4 minutes until light and creamy
  6. Store in the refrigerator when not in use.

NOTES

  • The first mixing at low speed is to mix the ingredients well.  The higher speed will incorporate some air bubbles into the butter spread
  • Ten seconds in the microwave is an additional step the I take
  • Cover tightly in the fridge.  Tupperware works very well.
  • Butter will keep for a couple of weeks, but will tend to get harder (due to evaporation) the longer it sets.
  • If you are serving this with French bread, mix 1 TBL powdered garlic into the spread right at the very beginning.
  • If you are looking for a dessert spread, mix 1 TBL cinnamon and 2 TBL sugar in right at the beginning.
  • A citrus butter is good with muffins, waffles or pancakes.  Mix in the zest and juice from one orange – skip the milk


Seared Tuna

  1. Get extremely fresh Grade # 1 tuna
  2. Mix 3 TBL Grandpa's Thunder Powder or Arghhh Powder with 3 TBL brown sugar and 1 tsp salt
  3. Press top and bottom of tuna onto the mixed powder
  4. Get your cast iron skillet preheated to about 400º
  5. Sear the tuna for only 15-20 seconds each side
  6. Cut into planks or cubes to serve

Goes well served on top of a citrus salad.


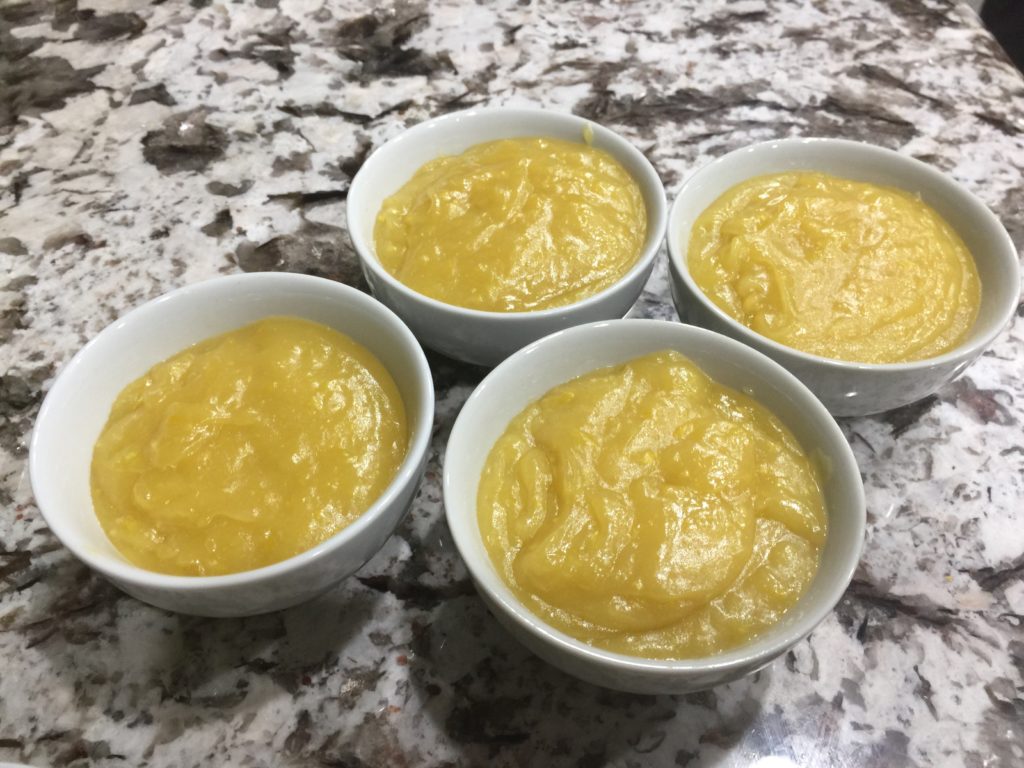
Basic Lemon Curd

Also called Zabaglione by the Italians, who claim to have invented it.

Basic Lemon Curd

This does not follow all of the rules, but it is about as easy as you can get.  I like easy, and this is the way I do it.

You will need a double boiler or a bowl which fits into a saucepan to make lemon curd. This restricts the temperature from never getting hotter than 212º – which is actually too hot for lemon curd, so you still need to be careful. 202º is the perfect water temperature. This also reduces the risk for scorching. You CAN do it in a sauce pan alone, but your chances of failure increase greatly.

The eggs will need to heat between 150º and 170º  – NEVER exceed 175º

Limes and Lemons both work really well in this recipe.

INGREDIENTS

  • lemon zest and juice of 4 lemons
    ( about 1/2 C )
  • 6 egg yolks
    Reserve the whites for an omelet
  • 1/2 cup Karo Syrup
  • 1 dash of salt
  • 1/4 C ( 1/2 stick – 8 TBL ) butter ( cut into tabs )
  • 2 TBL corn starch
  • Scant vanilla or Grand Marnier at the very end

STEP BY STEP

NOTE:  Just the yolk makes custard.  Yolk plus lemon makes lemon curd.

  1. Wash lemons.
    • Info: The lemons and the eggs should be at room temperature. Roll the lemons firmly on a table as a preparation for extracting the maximum quantity of juice from them.
  2. Grate rind, leaving white pith
    • Info: Using a citrus zester or a fine microplane grater, remove the yellow portion of the lemon rind, leaving behind the white pith (the white part under the rind which is bitter). Put the grated peel (also known as the zest) into a large mixing bowl.
  3. Squeeze juice from lemons into the mixing bowl.  Don’t worry about the seeds and the pulp, we will be straining in Step 14.  Plus, the seeds have a bit of pectin in them, which will help with your custard creation.
  4. Mix together eggs, sugar, salt, corn starch in a large mixing bowl.  Your mixing bowl should be a larger diameter than your stock pot.  We will be using the bowl as a double boiler.  Cream together the eggs and dry ingredients.  This will break apart the strings of white.
  5. Pour the egg into the large mixing bowl.
  6. Fill a large stock pot about 2 inches with water and bring to a rapid boil, then reduce the heat to a light simmer.  As I mentioned 202º – 205º is the perfect temperature
  7. Cut your butter into pieces and put into your mixing bowl.  This will become your “wok” bowl.
  8. Put your mixing bowl on top of the pot to create kind of a low-temperature wok.  This is called a double-boiler.
  9. Everything (except the vanilla) should now be in your double-boiler.  You need to stir VERY frequently.  About every 15 seconds, at least.
  10. When butter has completely melted, stir continually.
  11. Cook over double boiler until thickened ( 10-15 minutes ) then add your vanilla.  Mixtures continues to thicken upon standing.  If the temperature of the egg mixture rises above 175 the egg will cook and develop clumps.  Ideally, keep the egg mixture temperature between 150 and 170º.  The clumps can be removed in Step 14 if this happens.
  12. Put in about 1/2 tsp of vanilla or Grand Marnier. 
  13. Put bowl into an ice bath and stir until temperature drops.
  14. Strain the custard into a measuring cup, lined with a plastic bag.
  15. Cut the merest tip from the bag, and pipe into bowls or dump into tart crust (see recipes at top of this page)
  16. Cool at least an hour before serving

NOTES and ADDITIONAL INFORMATION

  • Lemon curd is a summer treat which isn’t difficult to prepare.
  • You can transfer the curd to a clean jar or store in the refrigerator, covered with wax paper.
  • Use the lemon curd to fill tarts, as a pie filling, or spread on crackers, toast or waffles.
  • You can also just serve this in a little bowl as a side dish.


Orange Citrus Salad

Chef Notes

  1. Avocado creama – Avocado, fresh mint, salt, EVOO, pepper, Sour cream, lemon juice – Muddle stick in blender – Refrigerate up to 24 hours
  2. pickled onion rings (Hot vinegar, sugar, 2 minutes)
  3. Grapefruit, oranges, SLICES
  4. Add Kalamati olives and garlic olives
  5. Roasted beets
  6. Drizzle with avocado creama
  7. Top with feta cheese and pickled onions
  8. Finally top with sprigs of mint, salt and pepper
  9. EVOO on top

Steam Juicer

Thanks to Living HomeGrown for some tips and feedback on using my steam juicer.

I’ve used my steam juicer for my soft fruits such as grapes, raspberries, etc. We last a huge branch of our lime tree last night, so today will be trying this on citrus (yet untested) and I am not sure how well it will work. I know the zest juice will be viable, but am not sure about the lime juice itself.

If all of the water evaporates, you can damage your juicer, so a trick that I use is to put two pennies in the bottom of the pan. They will start to rattle when the water gets low and steam forms underneath the pennies.

Candied Citrus

citrusINGREDIENTS

  • Citrus with little to no blemishes on the skin
  • 1 C Water
  • 1 C crushed ice with water
  • 1-1/2 C sugar

STEP BY STEP

  • Heat 1 C water plus all of the sugar
  • Stir until sugar is dissolved
  • Remove from heat and stir in ice mixture
  • Slice citrus as absolutely thin as possible – peels and all
  • Slip citrus slices into the sugar water
  • Cover with plastic wrap
  • Let soak overnight in the refrigerator
  • Finish with a fine layer of powdered sugar or Turbinado sugar
  • Let air dry on a rack overnight before storing.

If you would like another recipe, CLICK HERE for Candied Citrus from www.TasteOfHome.com – the photo is also from Taste of Home.

HTML Snippets Powered By : XYZScripts.com