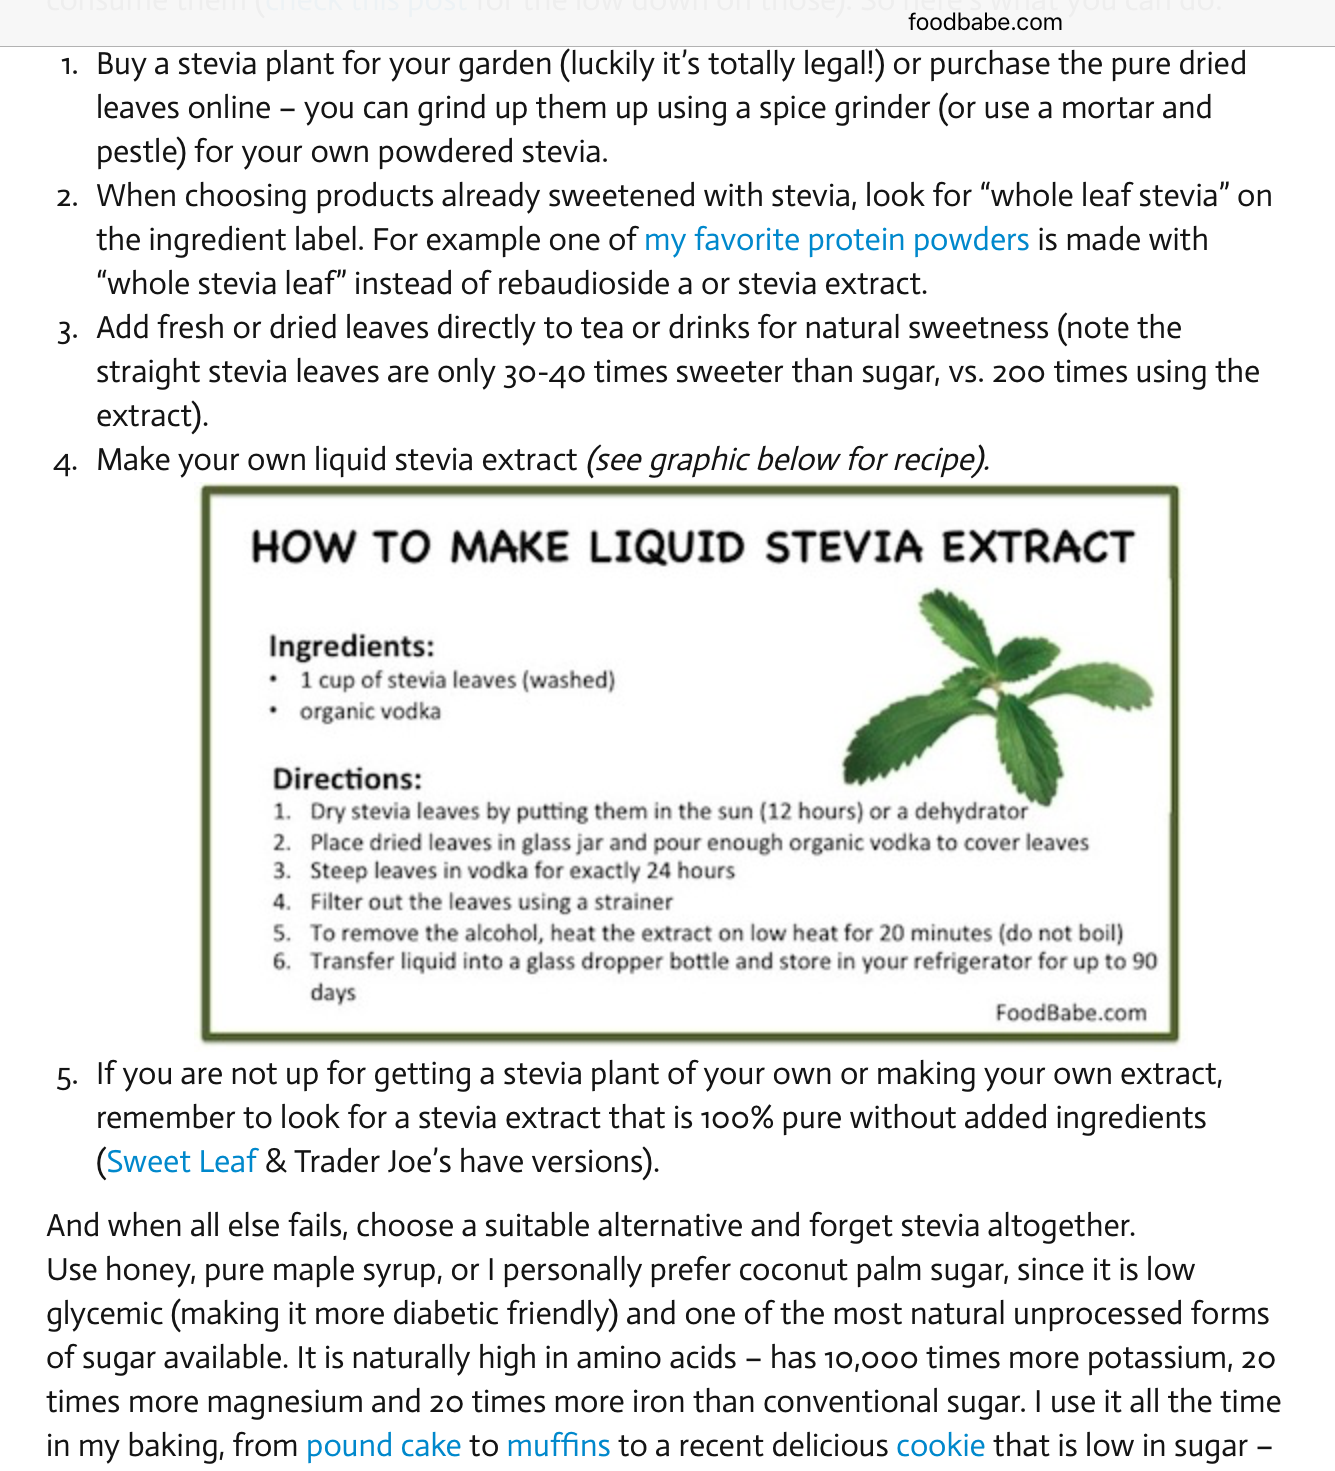
Make your own Stevia

From the FoodBabe.com –

Stevia is a sweetener made from a plant, so theoretically it should not be bad for you, but keep in mind that arsenic is made from apple seeds. Also, I would not want to eat poison ivy or hemlock, which are also plants, but alas I digress. The FDA has deemed stevia (after my lobbying) an acceptable artificial sweetener. That being said, I’ve decided to use it for myself. I eat much of my own food, and the result is I am starting to swell up like a tick. Yech! I need to lose weight. I bought some from Amazon.com to give it a try. After that is gone, perhaps I will try this method. Meanwhile, if you want to read more about stevia, you can read all about it on Wikipedia.

2015-11-20 08.41.01

Make your own Ricotta Cheese

Taste test on Am Test Kit shows BelGioioso Ricotta con Latte whole milk as the #1 winner, and Galbani Ricotta as the runner up.  Here are a few other recipes as well.

Ricotta should be velvety, luscious, and smooth and should NOT have curds in it like cottage cheese.  It should have a barely sweet taste.

Whole Milk Ricotta

INGREDIENTS

  • 1 1/2 quart whole milk . Organic is better . Homogenized and Pasteurized is OK . ULTRA Pasteurized is not OK
  • 1 pint heavy cream
  • 12± leaves of basil, thyme or cilantro – whole
    Separation Agents
  • 1/3 C lemon juice and 1/3 C vinegar  (or 1/2 C rennet)
  • After removed from heat:  1 tsp salt

STEP BY STEP

  1. Heat milk mixture on medium high until it simmers – about 150º
  2. Add 1 C heavy cream
  3. Lower heat and continue cooking until temperature hits 190º or higher.  Never ever more than 200º
  4. Add lemon and vinegar (or rennet) – preferably lemon
  5. Add whole basil leaves (not flakes) to the milk
  6. Stir to incorporate and simmer 3 more minutes
  7. Remove from heat
  8. Stir occasionally for the next 15 minutes.  This will precipitate out into milk solids
  9. Let rest for 5 – 10 minutes – Remove basil leaves
  10. Spoon into cheese cloth
  11. Use your best judgement: Let it drain until the whey has drained from the edge of the cheese, but the center is still very moist.  This will take AT LEAST 8 minutes.
  12. For a denser ricotta, let it drain until the center is also no longer wet (about 15 more minutes)
  13. (Alternate:  Refrigerate and drain 8-12 hours)
  14. Turn out into a bowl – a bit of residual whey is OK.
  15. Add salt and mix by hand – Add a touch of cream for a smoother consistency – Not too much though, you don’t want it to get runny.
  16. Let rest for at least 2 hours in the fridge before using
  17. Will keep for up to 7 days (covered) in the fridge
    • For a SWEET RICOTTA for desserts
  18. Mix in 1/2 C powdered sugar
  19. 1 tsp vanilla extract
  20. 2 tsp Cinna Sugar
    • To finish, and actually prepare your dessert . . .
  21. Heat up 1/4 C white sugar, 1/4 C brown sugar and 2-3 tsp lemon juice
  22. Bring up to a boil
  23. Add Strawberries and maple syrup
  24. Toss together and bring back to a simmer
  25. Remove from heat
  26. Put Sweet Ricotta onto brioche French toast
  27. and top with Strawberry mixture

The following two recipes are from CheeseMaking.com

Here are others:

Whey Ricotta

Ricotta is produced from a mixture of heat and acid. It can be made from whole or skim milk. Raw milk can be used when making Ricotta, since the heat treatment during curd formation more than meets heat requirements for pasteurization.

When made from a mixture of milk and whey it is called Ricotone.

Heat Whey & Add Salt

When making whey Ricotta, use leftover whey from a batch of cultured cheese. The fresher the whey the better.

Heat the whey, without agitating. Once it reaches 160°F, if desired, you can add 5-12% of fresh milk can be added to improve the richness and yield.

Continue heating to 170°F then add 1/2 tsp of salt for every gallon of whey, mix in quickly.

Continue heating without agitation to 185°F and hold at this temp until the ricotta rises.

Note: Some people heat to jsut below boiling (200F), this is not necessary, but it will not be a problem if the whey heats well into the 190’s.

Add Citric Adic

This step is optional

Mix 1/2 tsp. of citric acid per gallon of liquid. The citric acid should be dissolved in 1/2 cup water. Add quickly the pot and stir briskly for 5-10 seconds.

Watch the curd forming small flakes and gradually larger curd masses. Add a bit more more citric acid solution if necessary.

Note: If too much acid is added, the curds will sink to the bottom and the cheese will not be sweet. The correct amount of acid will produce a clear separation of white curds and bright green whey.

Gently Move Curd

As the curds rise, use a perforated ladle to gently move them from the sides to the center of the pot. These clumps of curd will begin to consolidate floating on top of the liquid.

Let the curds rest for 10-15 minutes. This is important because it is the point where the final Ricotta quality is assured.

Drain Ricotta

Ladle the curds gently into draining forms (No cheese cloth should be needed if you were patient in the previous step). Let the curds drain for 15 min up to several hours.

For a fresh light ricotta, drain it for a short while (until the free whey drainage slows) and chill to below 50F. For a rich, dense and buttery texture allow it to drain for an extended period of time (several hours). before chilling overnight

Move to a refrigerator or cold room. Consume within 10 days.

Another Whole Milk Ricotta


Prepare Citric Acid

Add 2 tsp of citric acid per gallon of milk used and dissolve this in 1 cup cool water.

Add 1/2 of the Citric Acid solution to one gallon of milk, save the rest of the citric acid.

Stir the milk briskly for 5-10 seconds.


Heat Milk

Add 1 tsp of salt to the milk then heat the milk slowly on low to med heat, stirring well to prevent scorching


Extra Citric Acid, if Needed

At 165-170F watch for small flakes forming in the milk and the separation into small flaky curds.

If after a few minutes you do not see the flakes forming, add more of the Citric acid until they form. Do this in 1 Tbsp increments, to avoid over acid milk.

At this point, when you see the curds, A slower stirring is essential to avoid breaking up the small bits of curd that have formed. Excess stirring will cause smaller and very granular curds to form. I tend to just roll the milk slowly with a bottom to top stirring motion.

Gently Move Curd

Continue heating to 190-195F then turn the heat off. The thermal mass of the whey will hold at this temp for quite some time. The higher temp is used here because of the additional proteins found in whole milk vs whey.

As the curds rise, use a perforated ladle to gently move them from the sides to the center of the pot. These clumps of curd will begin to consolidate floating on top of the liquid.

Let the curds rest for 10-15 minutes. This is important because it is the point where the final Ricotta quality is assured.

Drain Ricotta

Ladle the curds gently into draining forms. No cheese cloth should be needed if you were patient in the previous step. Let the curds drain for 15 min up to several hours.

For a fresh light ricotta, drain it for a short while, until the free whey drainage slows, and chill to below 50F. For a rich, dense and buttery texture allow it to drain for an extended period of time (several hours). before chilling overnight

Move to a refrigerator or cold room. Consume within 10 days

Christopher Collins Sweet Ricotta

  1. 2 C heavy whipping cream
  2. 2 C whole milk
  3. Heat until it reaches 200º
  4. 1/4 white vinegar
  5. 1/4 lemon juice
  6. 1 tsp salt
  7. Heat until they start to separate
  8. Ladle through a fine strainer – Keep the solids and discard the whey
  9. Put into a fridge overnight to continue to drain (12 hours)
  10. Mix 1 C powdered sugar, 1 TBL vanilla, and 1 tsp nutmeg
    • In a separate pot
  11. Heat 1/2 C white sugar
  12. 1/2 C Brown sugar
  13. 2 TBL Lemon juice
  14. Bring to a boil and dissolve
  15. Add in 4 C pieced strawberries
  16. Add 1/4 C maple syrup
  17. Heat at a low simmer for 45 minutes
    • Plate the brioche
  18. Toast slices of brioche bread
  19. Put a large dollop of ricotta on the bread
  20. Top with Strawberry preserves


Roberto’s Flour Tortillas – Use for Burritos

INGREDIENTS

  • 3 CU flour (optional – substitute 1/2 CU wheat flour)
  • 1/2 CU Crisco
  • 1 CU hot water
  • 1 tsp salt
  • 1 tsp garlic or onion powder (Optional)

STEP BY STEP

  1. Pulse all dry ingredients in a food processor
  2. Cut Crisco into flour mixture and pulse
  3. With processor running, add 1/2 C water all at once, then drizzle in more water until the dough comes together.
  4. Knead and mix adding additional water if necessary to make “play dough” consistency.  You “shouldn’t” need this step.
  5. Pinch off balls about the size of a tennis ball
  6. Cover with damp towel, and let stand 15 minutes to let moisture spread throughout ball
  7. Meanwhile, cut out squares of waxed paper to prevent sticking of flattened tortillas after stacked.
  8. Spread dough out into flat round circles on lightly floured surface
  9. Roll flat turning 90º each time
  10. Cook on non-greased cast iron griddle at 350 degrees, 30 seconds on each side
  11. Wrap in plastic, and store in the fridge for up to four days.

Special Steps
Variations Amounts for just two tortillas:

  • 3/4 CU flour
  • 2 TBL Crisco
  • scant salt
  • 1/4 warm water

Tips: Frying Food

Before we begin…

  1. Very little oil gets absorbed if done properly.
  2. Frying in cast iron increases potential to go rancid.
  3. Dutch oven is good fry vessel because it is heavy and holds the heat
  4. Unless you plan to do a LOT of frying, don’t invest in a dedicated fryer
  5. Have an ABC fire extinguisher on hand (and a lid)
  6. Spider strainer is good for removing fried foods
  7. You will also need a good pair of metal long-reach tongs – no plastic
  8. Try to get pieces to uniform size
  9. Since temperature is critical, a candy thermometer is important – about 315-365º depending on what you are frying.  DO NOT DEVIATE from fry recipe temperatures.  Do not go above 365 or your oil will go rancid.
  10. You need a wire rack so that things won’t get soggy after being removed from the fryer
  11. Canola oil and Peanut oil both have a high smoke point
  12. Fry in small batches because the temperature will change when you put things into it.
  13. Season when your fried food is still hot
  14. When you are done, let it cool before you do anything. Don’t save oil when you fry strong flavors such as fish. Then strain it into a glass jar. Use for up to three times, but then discard. Do not mix new oil with reused oil.
  15. Food to be fried should be patted dry with a towel, or spun in a salad spinner.  Any amount of water will create spatter risks.
  16. Fry in small batches to maintain temperature of oil
  17. Initial sizzle is steam being forced out.   When steam is going out, oil can’t go in.  When steam stops, oil is absorbed, so remove as soon as sizzle stops.

Ingredients to feed 4 people

BASIC FRY MARINATE (4-24 hours)

  • 1 Pieced chicken
  • 1 C Buttermilk
  • 1/4 C cayenne sauce
  • 3 eggs

BASIC FRY DREDGE

  • 1 tsp Salt
  • 1 tsp Garlic powder
  • 1/2 tsp Black pepper
  • 2 CU AP flour
  • 1 TBL baking powder
  • 1 tsp salt
  • 1/4 tsp cayenne pepper
BASIC FRY BATTER

  • 1 C Buttermilk
  • 1/4 C cayenne sauce
  • 3 eggs
  • 1 tsp Salt
  • 1 tsp Garlic powder
  • 1/2 tsp Black pepper
  • 2 CU AP flour
  • 1 TBL baking powder
  • 1 tsp salt
  • 1/4 tsp cayenne pepper
  • enough cold beer to thin your batter

Oh, one more thing…

  • Saturated Fats are BAD.  Althought they have a long shelf life, they are bad for your health.
    (eg) Butter, beef tallow, lard, palm oil. Saturated fats are solid at room temperature
  • Mono Unsaturated Fats are : BETTER for you.  They have a shorter shelf life
    (eg)  Olive oil, nut oils like almond, walnut and hazlenul – Low smoke point.
  • Poly Unsaturated Fats are actually GOOD for you.  They have a short shelf life, so keep refrigerated
    (eg) Canola, peanut, safflower and grapeseed oil. Mild flavor. High smoke point.
  • FRENCH FRY TIP FOR CHICKEN:   Fry twice…
    First for 2-3 minutes to cook, then drain on rack and cool then another 2-3 minutes for final fry to crispen
    Put on drain rack and season, then pop in oven at 200 degrees for 10 minutes

This is a recipe that has been created or modified by Robert (Grandpa) Andrews.
CLICK HERE for a free sample copies of Grandpa's Cookbooks. © 2016, 2017, 2018.

Graham Cracker Crust

Ingredients

  • 1.5 cups graham crackers (20 rolled fine)
  • 1/4 C almond meal (or corn meal)
  • 1 egg white
  • ¼ cup sugar
  • ¼ cup softened butter (do not melt)

Step by Step

  1. Preheat oven to 400 degrees
  2. Thoroughly blend dry ingredient
  3. Add softened butter or margarine.
  4. Combine wet and dry ingredients mixing quickly to moisten
  5. Press firmly into an even layer against bottom and sides of a 9 inch pie plate.
  6. Bake empty crust at 375° for 8-10 minutes.
  7. Cool before filling with your favorite pudding which you have prepared according to package directions.

Pastry Dough

You can use a pastry cutter, but it is easier to use your food processor.  Just make sure you do not overprocess your dough, or it will be tough.

INGREDIENTS

  • 4 CU flour
  • 1/4 CU granulated sugar
  • 1/4 CU dark brown sugar
  • Juice and zest from one lemon
  • 1 stick butter (cold) pieces
  • 1 tsp salt
  • 1 egg plus 1 yolk
  • Pulse above together, then add ice cold water
    Pulse only long enough to bring dough ball together

STEP BY STEP

  1. Cut all ingredients together or pulse in food processor
  2. Add water with food processor running only to incorporate – DO NOT OVERPROCESS
  3. Wrap dough in plastic, and refrigerate for 30-60 minutes
    Freezes well too.
  4. Roll dough flat, but not too thin, then transfer to pie pan or parchment paper.  Roll onto your rolling pin to transfer to keep it from breaking apart.
  5. Dock crust so that dough doesn’t puff up
  6. Sprinkle lightly with a bit more brown sugar
  7. Cover with foil, and bake at 375° for 20 minutes
  8. Remove foil and bake 5 more minutes

NOTES

  • Fill with savory or sweet filling.
  • If you are making a rustic free-form tart, put fruit in just after step four

How to Can Tomatoes

A NOTE ABOUT THESE INSTRUCTIONS

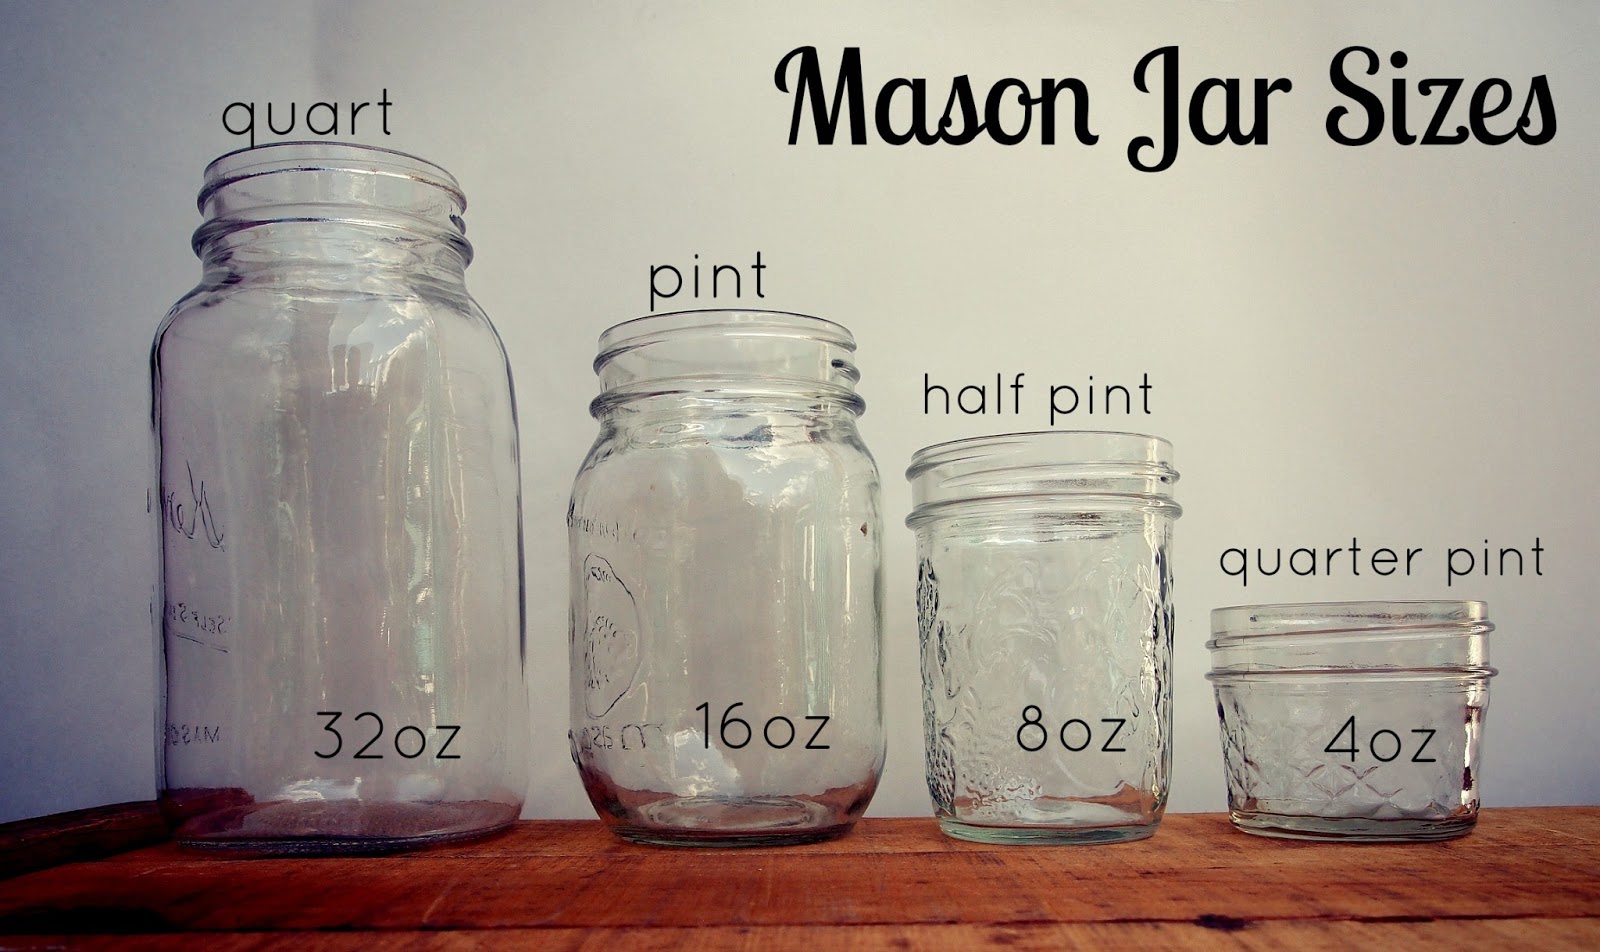
canning-jarsThese step by step instructions are USDA approved.  It is very important to read up on canning before getting started, so that you don’t accidentally miss a small but very critical step.

INGREDIENTS

  • Lots of firm, ripe tomatoes from your garden or from the farmers market.
  • 12 Canning jars, lids, and screw rings – 16 oz – 1 pint
  • A BIG pot of water – Fill with enough water to just barely cover the top of your canning jar.
  • A medium pot of boiling water

STEP BY STEP

  1. Time the entire wash cycle of your dishwasher WITH the dry cycle.
  2. Your tomatoes should be firm, red and ripe and have no soft spots.
  3. Wash your canning jars in the dishwasher making sure they finish the rinse and dry cycles.
    The rinse cycle will rinse off most bacteria, and the heat of the drying cycle will kill any remaining bacteria.
  4. Start your big pot to a boil on medium high heat
  5. Make a small X on the tip of the tomato
  6. Plunge them in boiling water in the medium pot for 60 seconds, then into cold water for another 60 seconds,
    The skin should easily peel off
  7. Discard the peels, and quarter your tomatoes and discard the hard stem end
  8. Using a slotted strainer or a spider strainer or a strainer basket, lower your tomatoes into the medium pot with boiling water
  9. Let them heat for 30-60 seconds
  10. Pack the fruit directly into the canning jar, leaving 1/2 inch clear space at the top.
  11. Add 1 TBL lemon juice to the tomatoes
  12. Add a bit of your boiling water to cover the tomatoes
  13. Wipe jar rim with a damp cloth, and secure tops with the metal rings.
  14. Add your jars to your BIG pot of water.
  15. When the last jar is in place, verify that your water level has risen to about two inches above the tops of the containers.
    Add more water if you need to raise the water level.
  16. Increase heat to bring your big pot to a boil
    Reduce heat to a simmer, cover and start timing
  17. Let your pint canning jars simmer for 35 minutes.
    If you are using the larger quart jars, let them simmer for 45 minutes
  18. If water level starts to drop substantially, heat water to boiling in the microwave, and add to the pot to raise the water level.
  19. Remove jars right on time and place on a cooling rack.  DO NOT TIP THE JAR.
  20. Let cook and store in a cool dark place until they are ready for use.
  21. Store opened cans in the refrigerator for up to a week.
  22. DISCARD a can if the lid seal seems to have broken, or if the lid is puffed up.


RobtCyn Tapenade

The IRC Gila Farms project gives us more greens than we can use in a week, so here is a way to extend the season.  This is also good when greens are in season at the grocery and very inexpensive.

INGREDIENTS

Mustard Greens, Kale, Spinach, Cilantro, Garlic, Lemon Juice, Onion, Olive Oil, Salt

  1. Re-wash all greens
  2. Chop greens into small pieces
  3. Mince in food processor
  4. Drizzle in 1/2 C olive oil to emulsify
  5. Pack into ice cube trays
  6. Top off with water
  7. Store in refrigerator for up to a month or freeze in cubes for a year.

Possible Applications

Mix with:
… Sour Cream for Dip
… Yougurt and Cuke
… EVOO for Salad dressing
… maranara for spagetti
… deviled egg filling / topping
… add as a pizza topping
… under chicken skin to bake
… hamburger for meatloaf
… scrambled egg
… mix with cream cheese for crackers


Very Thin Tortillas – Mu Shu

Authentic Mu Shu Pancakes

I don’t like the thicker tortillas that you find in the grocery store.  Here is a fairly simple way to make thin ones.  These also work well for Mu Shu pancakes.

INGREDIENTS

  • 1 cup sifted flour
  • 1/2 cup  very hot water
  • Scant salt

STEP BY STEP

  1. Mix flour and salt, then add extremely hot water
    What I do is put flour and salt in a food processor, and then drizzle in hot water until it starts to come together.
    The hot water breaks down the gluten so that they roll easier and flatter
  2. After adding the boiled water, drizzle in cold water until dough comes together.
  3. Mix adjusting water until dough is like playdough
  4. Wrap in plastic and let set for 30 minutes
  5. Prepare a medium-hot skillet – Cast iron is my preference – NO OIL
  6. Roll a log, and then cut in half, then in half again, then in thirds – You will have 12 pieces
  7. Roll into balls, and then flatten into thick disks – hockey pucks
  8. Brush sesame oil onto the top of HALF of them
  9. Stack two disks (oil in between) and roll out until about 7 or 8 inches in diameter
  10. Put a pair into a non-greased skillet on 350-400º for 30 seconds
  11. When the edges start to become translucent (about 30 seconds) flip the pancakes as a pair
  12. Cook the second side for about 30 more seconds
  13. Flip the two together and cook the first side again for only 10-20 seconds more
  14. Remove the pancakes to cool just a little bit, then separate
  15. See tips below on keeping them from drying out

To keep Mu Shu Pancakes from Drying Out

  1. Place finished pancakes in shallow covered bowl – like a glass pie pan
  2. Put microwave-heated wet cloth at the bottom of the bowl
  3. Put a plate on top of the cloth so the pancakes do not become soggy
  4. Cooked side always goes up.
  5. Put a pan lid on top of the bowl to keep the moisture in.


Mu Shu Pancakes – Video

Here is a video that shows how to roll the pancakes together. It is kind of hard to visualize above.  They fold the pancakes into quarters.  Although that is very common, I don’t like that because they tend to stick together that way.

Mu Shu Crepe Pancakes

INGREDIENTS

  • 3 TBL melted butter
  • 1 C whole milk
  • 1/2 C flour
  • 1/2 tsp salt
  • 2 eggs

STEP BY STEP

  1. Pulse together flour, salt, eggs and butter
  2. Add milk, and pulse just to mix
  3. Strain using a fairly coarse strainer
  4. Let batter rest for 30 minutes to let the glutens relax
  5. Cook in buttered crepe pan until cooked, but not browned
  6. Stack on plate to store and serve

Finish on a floured surface. If you have a scale, 120 – 130 mg ball of dough is perfect for pancakes. Roll balls, then cover and set them aside for 30 minutes

Picadillo

Picadillo is a mixture of ground pork or beef, onions, garlic and tomatoes. It is frequently used as stuffing for a Chile Relleno

INGREDIENTS

  • 1/4 lb. lean ground beef
  • 1/2 lb ground pork
  • 1/2 cup ready made sofrito – See Recipe
  • 1/4 cup diced bell pepper (green and yellow or red)
  • 1/4 cup chopped cilantro (1/8 bunch)
  • 1/4 cup sliced olives
  • salt and pepper to taste
  • 1 TBL tomato paste to thicken if necessary – Should be kind of like meat loaf

STEP BY STEP

  1. Brown the ground beef and pork
  2. Add Onions and cook until start to brown
  3. Add sofrito and peppers
  4. Add the olives, capers, salt and pepper, and tomato sauce.
  5. Add chopped cilantro
  6. Cook another 5-10 minutes IF NECESSARY to cook down any extra liquids.

MORE INFO

  • Picadillo needs to be moist but not runny, so not a lot of tomato sauce is used. But if you are serving it as a side dish use more tomato sauce. Usually a dish like this uses more sofrito, but I like to see the chopped spices so I reduce the amount of sofrito and add chopped ingredients – more like a pico de gallo.

Sofrito

Sofrito is a base for anything that uses tomatoes or tomato sauce. It just adds an extra dimension to your recipe.  It’s GREAT in any kind of marinara.

INGREDIENTS

  • Grandpa’s Thunder Powder – to taste
    MIRPOIX/TRINITY and FLAVOR VEGGIES
  • 1 onion (chopped fine)
  • 1 large Carrot
  • 1 stalk Celery
  • 3-4 garlic cloves (minced)
  • Optional red and green bell pepper
  • Cremini mushrooms – caramelized first – 15 minutes
  • Dry shitake – soak in boiling water, then strain – reserve liquid – destem
  • 1/2 C veggie or chicken stock
  • 1/2 C shitake strain (or 1/2 C more stock)
    ACID BASE
  • 1/2 C nice dark red wine
  • 1 TBL tomato paste
  • 2 TBL crushed tomatoes
    SACHET
  • Rosemary, sage, oregano

STEP BY STEP

  1. Saute onion, carrot, and celery in EVOO
  2. Simmer on low for about 8 minutes
  3. Optional at this point, add red and/or green bell pepper
  4. Add tomato paste and garlic and cook for another 3 minutes
  5. Add stock, wine and mushroom liquid
  6. Simmer until reduced and liquid begins to disappear
  7. Add San Marzano whole – mashed
  8. Use as you would Mirpoix or Trinity as part of another recipe

EXTRA INFO

  • Sofrito freezes very well
  • If you freeze it in an ice cube tray, you can break out the cubes and use them to flavor your spaghetti sauce bit by bit.
  • Optional to add above where you add the garlic
    • Red bell peppers
    • Green peppers
    • Cilantro
    • Ajicitodulces


Hot Fudge Topping

Takes about 10 minutes from start to finish.

Ingredients

    • 6 oz baking chocolate – dark or semi-sweet
    • 1/2 C granulated sugar
    • 1/3 C Karo syrup
    • 1/4 C cocoa powder
    • 3/4 C heavy cream
    • 1/2 tsp salt – only if using unsalted butter
    • 1/4 C butter (softened)
    • 2 tsp vanilla extract
    1. Mix all except vanilla and buter
    2. Heat over medium heat until consistent
    3. Bring to 220º  (3-5 minutes)
    4. Remove from heat and stir in butter and vanilla.
    5. Store in fridge for no more than a month.

More Homemade Toppings for Desserts & Ice Cream from Sally’s Baking Addiction

Sally McKenney has a great site with many wonderful recipes.  Here are some links to her ice cream toppings.

HTML Snippets Powered By : XYZScripts.com