Butter Rolls

butter_rollsIngredients
1-¾ cup Whole Milk
1 stick Unsalted Butter
¼ cups Sugar
5 cups All-purpose Flour
1 Tablespoon Active Dry Yeast
2 teaspoons Kosher Salt
3 Tablespoons Melted Unsalted Butter, For Brushing On Rolls

Preparation Instructions
1. Combine the milk, butter, and sugar in a medium saucepan over medium heat, just until the butter is melted.
2. Meanwhile, combine the flour, yeast, and salt in the bowl of an electric mixer fitted with the dough hook. With the mixer on low speed, slowly add the warm milk mixture and mix for about 30 seconds, until the dough begins to come together. Increase the mixer speed to medium and mix for another 5 minutes, until the dough forms a smooth ball.
3. Transfer the dough to a lightly floured work surface and shape into a ball. Place in a lightly oiled bowl and cover with a clean dish towel. Let rise in a warm, draft-free area for about 1 hour, until doubled in volume.
4. Punch the dough down and transfer to a lightly floured work surface. Divide the dough into 16 pieces and form each piece into a compact ball. Spray a 9-inch square baking dish with nonstick cooking spray. Arrange the rolls in the pan and cover with the dish towel. Let rise for another 45 minutes, until puffy.
5. Meanwhile, preheat the oven to 350°F. Bake the rolls for 12 to 15 minutes, until golden brown. Remove from the oven and brush the rolls with the melted butter. Serve warm.

Steak House Yeast Rolls

yeast_rollsCopied from:  https://www.facebook.com/NowYourCookin?ref=stream

Original recipe from Martha Stewart

1/4 cup water
1 1/2 cups milk
1/2 ounce active dry yeast
4 ounces melted butter
2 large eggs
2 Tablespoons granulated sugar
1 1/2 Tablespoons Kosher salt
6 to 6-1/2 cups of AP flour
Extra soft butter to butter the sides of the bowl and baking dish
1 egg for egg wash
Heat the milk and water to 110°F. Whisk the yeast into the heated milk and water. Let sit for 5 minutes, it should become frothy and bubble.

Add the butter, eggs, sugar and salt to a large bowl, whisk in the milk and yeast mixture.

Add the flour one cup at a time, creating a shaggy dough.

This can be done in a mixer with a dough hook but the final kneading will have to be done by hand so you don’t burn out your machine. unless, or course, you have a really heavy-duty mixer. I don’t stress my Kitchen-Aid stand mixer with the final kneading. Initial mixing yes, but not the final knead.
on a lightly floured surface, turn out the dough and knead until it is smooth and elastic. Form it into a nice round ball.

Butter the inside of a large bowl, Roll the dough ball to cover the surface with butter then place the ball in the bottom of the bowl. Cover with plastic wrap that has been also oiled to prevent the rising dough from sticking to the wrap as it rises.

Allow to rise in a warm place until the dough has doubled in size. This may take 1-1/2 to 2 hours.

Punch down the dough and divide the dough in half.

Roll each dough ball into an even rope
and cut even size rolls. Weigh each roll to weigh 1.70 ounces. Lightly roll them to shape into balls.

Butter a 9 x 12 baking pan. Place each roll in rows 4 x 6, allowing a small bit of space between each roll. This space will fill in as the rolls rise. Cover with oiled plastic wrap.

Allow to rise again, until doubled in size.
Once the roll pan is full, you will have some left over dough.

This dough is perfect for some amazing cinnamon rolls!

Roll the dough into a rectangle. Mix some soft butter with some brown sugar and cinnamon to make a paste. ( Make sure it tastes good.)

Spread the butter cinnamon mixture over the rolled out dough. Sprinkle the surface with pecans or walnuts.

Roll the dough into a tight cylinder. Pinch the seam closed.

Using a serrated blade, cut 2″ sliced from the roll. Place them cut side up (and down) in a well-buttered baking pan so the sides barely touch.
use a pan large enough to fill with the sliced cinnamon rolls.

Allow these to double in size.

Baking yeast rolls and cinnamon rolls:

Pre-heat the oven to 375°F

Mix 1 egg with water to make an egg wash. Brush the surface of the rolls with egg wash just before putting them in the oven.

Bake the rolls for 25-30 minutes, rotating the pan half way through for even baking.

The rolls are done when they are golden brown.

Remove from the oven and allow them to cool for at least 15 minutes before serving.

Any leftovers?

Make bread pudding!

Homemade Krispy Kremes

krispy_creme — Yes, this is the actual recipe! 🙂

Donut Recipe:

3 tbsp milk
3 tbsp boiling water
1 tsp dry active yeast
8 oz all-purpose flour (a little under 2 cups – I recommend you measure and weigh. See my note above)
1 1/2 oz sugar (about 3 tablespoons)
1 egg
1 oz butter, cold to room temperature (just don’t melt it, okay?)
dash of salt

Enough oil to cover the bottom few inches of a wok, or a deep fryer.

Directions:
In a large measuring jug, combine the milk and boiling water. Add a teaspoon of the sugar and the yeast. Stir it gently, then leave it in a warm place for the yeast to activate (aka foam).
In a large mixing bowl, combine the flour, the rest of the sugar, and the salt. Cut in the butter using your fingers or a pastry blender, until it resembles crumbs.
Add the egg (give it a quick beat) and yeast mixture to the flour mix, and mix into a smooth dough. This usually takes about 5 minutes of mixing.
Turn the dough out onto a lightly-floured counter and knead for about 5 to 10 minutes—it should feel springy and little bubbles should form under the surface. Place it back in the bowl, cover with a cloth or plastic wrap, and let rise for about an hour until double in size.
Once risen, place the dough onto the counter and cut it into 4 pieces. One piece at a time, stretch it into a long rope about an inch to an inch and a half wide. Cut strips about an inch long, ball em up with your hands, and place them on a baking tray or wire rack to wait.
Cover the doughnuts holes with a cloth to rise while you heat the oil to 375F.
Place the doughnuts into the oil and fry until golden brown on each side, about 2 minutes. Be sure to fry only a few at a time so they don’t overcrowd and stick together.
Drain on a paper towel or wire rack over a cloth, before glazing them. Be sure to glaze them warm, or else they won’t get that delicious coverage!

Glaze:

1/3 cup butter
2 cups confectioners’ sugar
1 1/2 teaspoons vanilla
4 tablespoons hot water or as needed

A brief note: I recommend a scale, as not all flours (and cup measurements) are made equal.
2 cups of my Canadian flour in my Canadian cups on my scale might be more or less than yours. 🙂
If you don’t have a scale, start at 1 1/2 cups and work your way up from there.

Amish Sugar Cream Pie

Amish_Sugar_PieThanks to Theresa Roebuck for sharing this recipe from Facebook’s Texas Recipes.

Chef assig’s Note:

My whole family loves this recipe, even my husbands family loves it! This came from an Amish family in Indiana.

Ingredients:

3/4 cup white sugar
1/8 teaspoon salt
2 cups half-and-half cream
1/2 cup whipping cream
1/4 cup brown sugar
1/4 cup cornstarch
1/2 cup margarine or 1/2 cup real butter
1 teaspoon vanilla

Directions:

In sauce pan combine, white sugar, salt, half-and-half and whipping cream.

Bring to a boil.

In another sauce pan, combine brown sugar & cornstarch.

Gradually whisk in hot mixture into brown sugar mixture.

Add margarine/or butter (to me this makes it even better.).

Cook over med. heat, whisk constantly, 5 min or until thick.

Simmer 1 minute and stir in vanilla.

Pour into uncooked pie shell and sprinkle w/cinnamon and nutmeg.

Bake at 375°F for 25 minutes.

Note:
Use commercial pie crust or MAKE YOUR OWN
I recommend “100 Year Old Pie Crust” for this pie.

Red, White and Blue Dessert

  1. Toss 2 C strawberries in 1/2 C sugar
  2. Create egg white nests
  3.  – Beat two egg whites to stiff peaks
  4.  – Near end add in 1/2 C sugar mixed with 1 tsp cornstarch
  5.  – Add 1/4 tsp orange flower water *
  6.  – Add 1 tsp white balsamic vinegar
  7. Makes nests on waxed paper
  8. Bake 275 degrees for 20 minutes
  9. Turn off oven, crack oven door, let remain in oven for another hour
  10. Meanwhile take 2 C strawberries and 1 TBL sugar and puree into “coolie”
  11. Put 1/4 C coolie onto the bottom of a white plate
  12. Place nests onto center of coolie
  13. Top with whipped cream (cream, sugar, vanilla)
  14. Top with strawberries
  15. Sprinkle with blueberries

Urban Farm Grape Juice

Here at UrbanFarm.info we have two grape arbors.  One producing white, the other red grapes.

In Arizona, grapes never get to the size that you can get in the grocery store, but we can produce some very good grape juice.

Here’s how.

  1. Pick your grapes (let’s say enough to carry in the front tail of your shirt or apron)
  2. Wash thoroughly
  3. Remove stem and other stem pieces
  4. Rinse again
  5. Measure out 1 gallon of grapes . Measure 4 quarts of water into a large bowl. That will be the line that will indicate 1 gallon of grapes.
  6. Pulse cleaned grapes in food processor to pulverize
  7. Cook covered on medium heat for 30 minutes, Stirring every 5 minutes
  8. Simmer covered on low heat 60 minutes minutes, stirring every 10-20 minutes
  9. Add 1 CU sugar near the end of the cooking process
  10. Strain and refrigerate . What works well is to find a metal bowl that conforms to the inside of your colander. You can press the juice through. Discard the pulp.
  11. Enjoy the following morning when chilled

Dried Sourdough Starter Request Form

Questions? Always start out at GRANDPA'S SOURDOUGH COLLECTION INDEX

If you would like to receive 1.5 ounces of Carl’s 1847 Oregon Trail Dried Starter FOR FREE  please complete the form below, following the instructions as they are given.

Mail this page (completed) to Robert Andrews – 1668 W Glendale Ave – Unit 304 – Phoenix, AZ 85201.  Include an envelope with two stamps on it or $1 to cover postage.  If you’ve included a SASE, do not incude $1 OR visit THIS PAGE to get your starter directly from Carl’s Friends by sending them an SASE with only one stamp, but you will get less starter.  If you send this form with an SASE with only one stamp on it, I will gladly send you 3/4 ounce of starter.

Please write your name and address VERY CLEARLY here:


–


–


–


Maintaining Your Starter Grandpa’s Way

Questions? Always start out at GRANDPA'S SOURDOUGH COLLECTION INDEX

When I first started baking with Sourdough Starter thirty years ago, the amount of the starter quickly overwhelmed me. Here is a way that you can maintain your starter, and create just enough for two people or a small family.

This assumes that you now have about 3/4  cup of active starter kept in a glass or plastic jar in the refrigerator with a plastic screw lid that IS NOT tightened too tightly.

Here is a label for your container:

Sour Dough Sponge
Before use: Transfer sponge into glass bowl.
Add 3/4 C each flour and water. Mix well.
Very occasionally add a sprinkle of dried milk or potato water
Rest covered on counter overnight. Clean container.
Next day, save 3/4 container and use remainder.
Return to refrigerator until next use. Feed weekly.
www.grandpacooks.com/recipes/sourdough
  1. Start with your jar of refrigerated starter.
  2. Again, this depends on how many you are cooking for. If you are preparing loaves for a potluck or for a larger family, look below for instructions on how you can increase the amounts. Be sure you decrease to your sustainable level after all the excitement has died out.
  3. Transfer your jarred starter to a large glass bowl. Add 3/4 C AP flour
  4. Add 3/4 C water
  5. Occasionally, add 1 tsp sugar OR 1 tsp dry milk.  ONLY ONE, NOT BOTH
    – Once every month (or if your starter starts to look sick,  add 1 TBL non-salted potato water, 1 tsp cider vinegar, 2 TBL AP flour
  6. Mix and let sit (covered) overnight to ferment (at least 10-16 hours)
    – Meanwhile, wash your storage jar. Contamination WILL ruin your starter.
  7. Next morning, fill your CLEAN glass jar with your amount of starter (same amount as in Step 1) and return the jar to the refrigerator.
  8. Use the remainder for your recipe.

NOTE: You must use/feed your starter at least once every week, or the starter will die. Even if you don’t bake, feed it and discard (or share) the part you would normally use.

You can make potato water by grating half a potato and microwaving 1/2 C water for a minute.  Put the potato into the water, and when it cools, your potato water is ready to use.

Never use salt, as it can kill your starter.  Add salt only at step number 8 above.

——-

Increasing your amount of starter for things such as a potluck.

So we will assume that you have taken your starter out of the refrigerator, added flour and water to it, and it has been setting on the table overnight.

Since you now have twice as much starter as the day before, you will need twice as much flour and twice as much milk as the day before.

Let it set on the counter again overnight, fill your starter jar and put it in the fridge, and then prepare the loaves for your potluck. If you have extra starter, take them in small containers to give to people who want to start their own sourdough starter. Please refer them to this website for maintenance instructions.

What puts the SOUR in Sour Dough?

Questions? Always start out at GRANDPA'S SOURDOUGH COLLECTION INDEX

A bit of speculation from Carl – the inspiration for Carl’s Friends.

There is a lot of speculation about creating a sourdough sponge that will make the best tasting sourdough bread.

  • One idea is every once in awhile use dark rye flour to feed the starter or some in the bread dough.
  • Another is to let it rise at a lower temperature (60?) so it rises longer and gives the bacteria a longer time to do their work.
  • I have been told that the special San Francisco flavor is created by the bacteria they have in the water there which comes from the Sierra Mountains under the ground.  (That’s possible, but it’s more likely that the natural floras in the area have contributed to the special taste.  Grandpa.)

History

All I know is that it started west in 1847 from Missouri. I would guess with the family of Dr. John Savage as one of his daughters (my great grandmother) was the cook.

    • It came on west and settled near Salem Oregon.
    • Doc. Savage’s daughter met and married my great grand father on the trail and they had 10 children.
    • It was passed on to me though my parents when they passed away.
    • I am 76 years old so that was some time ago.

I first learned to use the starter in a basque sheep camp when I was 10 years old as we were setting up a homestead on the Steens Mountains in southeastern Oregon. A campfire has no oven, so the bread was baked in a Dutch Oven in a hole in the ground in which we had built a fire, placed the oven, scraped in the coals from around the rim, and covered with dirt for several hours. I used it later making bread in a chuck wagon on several cattle drives – again in southeastern Oregon.

Considering that the people at that time had no commercial starter for their bread, I do not know when it was first caught from the wild or where, but it has been exposed to many wild yeasts since and personally I like it. I hope you enjoy it.

Making Your Own Dried Starter

Questions? Always start out at GRANDPA'S SOURDOUGH COLLECTION INDEX

There are two main reasons that you may want to create your own batch of dried starter.
1. You go on a long vacation or something, and your starter dies.
2. You want to pass the starter on to family or friends.

Regardless… as with a computer system… it is good to have a backup.

Here is my method first, followed by the method extracted from Carl’s Brochure.

GRANDPA’S METHOD

  1. Read Carl’s notes below about soft and hard water.  I prefer to use bottled water.
  2. Feed your starter as you normally would.  The next morning take out about 1/2 cup of your starter.
  3. Take a sheet pan and line it with plastic wrap
  4. Spread about 1/2 C of your starter fairly thin across the pan – about the thickness of 1-2 credit cards.
  5. Place in your oven without turning it on (just to prevent dust from accumulating)
  6. After about a week, it will mostly dry out.  It still has enough moisture in it that it will mold if you put it into a jar.
  7. At this time, break it into palm-sized chunks and wrap the chunks in a paper towel and let it continue to dry for another two weeks.  In a bowl on the counter is fine.
  8. Once all the moisture is gone, you can store the pieces in a glass jar without fear of mold.

CARL’S METHOD

Drying your own starter

Cover a dish or a pan with plastic wrap or waxed paper to prevent sticking. After you have fed your starter and let it get active, pour some onto the covered dish. The thicker the layer the longer it will take to dry. I use a broiler pan and pour it 1/4 inch deep as I use a lot of it. This takes nearly a week to harden.

Set aside at room temperature till it gets brittle – may be a few days. Break into small pieces and grind in a blender, coffee grinder or food processor. There you are! It will keep a long time. The yeast has sporulated and will stay that way for years. At one time it was used to “chink” the walls in log cabins and some of that stuff has been reactivated.

Hard water

If you have hard water in your area (hardness is graded from 1 to 14 with 7 being neutral and 14 the hardest), add 1/2 c of cider vinegar per 2 cups of water used in the sponge. This will cause it to rise better as it reacts with the soda. It is well to add 1 T of vinegar to your starter pot about once a month as it likes the acid environment.

Soft water

If the water is too soft (less than 6) it may be well to add 1/2 t baking soda as a reading of 6 to 7 is best.

Grandpa’s Sourdough – BEGINNERS INFO

Questions? Always start out at GRANDPA’S SOURDOUGH COLLECTION INDEX


Sour Dough bread making is a bit different than the yeast breads and quick breads you probably grew up with. A sour dough culture is ALIVE as much as a cat or dog or hamster is. Being alive, it requires regular feeding, or it will die. Not daily, but rather weekly.

First, you will need to REVIVE YOUR STARTER

Once a week, you will need to MAINTAIN YOUR STARTER by following an easy ten minute process.  If you do not, it will die.

There are many different ways and places to get the sour dough starter that you will grow into your live culture.

For the more adventurous, you can CREATE YOUR OWN FROM SCRATCH. Part of the mystique of sour dough starters though, is their history. I got mine from CARL’S FRIENDS. Because of an agreement with his grandfather, CARL T GRIFFITH provided a sour dough starter FOR FREE that had its origins along the 1847 Oregon Trail.  Carl has since passed away, but  HIS LOYAL FOLLOWERS help keep Carl’s legacy alive.

You may be on this page because of your CSA Share that you bought from the INTERNATIONAL RESCUE COMMITTEE‘s CSA program. The SUPPORTED AGRICULTURE movement of the IRC is designed to help refugees coming in from areas where they faced likely execution just for professing peace. Imagine that!

Anyway, I am planning to give some of my own Carl’s starter to the IRC/CSA for THEM to distribute to you for free. If you are interested in receiving a free dried starter (Carl’s Starter) FILL OUT THIS FORM and you will receive it in as little as a few weeks, but perhaps up to a month; depending on which part of the drying process your request was received. It takes about 30 days for me to completely dry the starter that will ultimately be shipped to you.

You can read Carl’s Brochure here.
– How to reactivate your dried starter, Sourdough Biscuits, Sourdough Hotcakes, Alaskan Sourdough Bread, The Doctor’s Sourdough Bread, San Francisco Sourdough Bread, Potato Bread, and Adaptations for Bread Machines

If you want to get your starter from the source, VISIT CARL’S PAGE and get the starter directly from him.

Here is a link if you want to get it from me.

Here is how you can make your own dried starter once you have successfully created a viable starter.

Here are some more links that you will need.

FOUR SOUR DOUGH RECIPES
– Basic Bread, Rustic Bread, Pizza Dough, Sweet Rolls

Here is another recipe I got from the TV

Royal Caribbean – This is the recipe for Sour Dough Rolls that I got from one of the chefs on the ship.

Banana Brekkers

TWO SMALL BAKING DISHES

1 TBL Butter and
2 TBL corn meal or mesquite meal, mainly to coat bowl.

FIRST MIXING BOWL (will be emptied early)
1/2 CU (LARGER) bread crumbs

SECOND MIXING BOWL
Left-over corn meal from Step 2
1/2 CU (FINE) bread crumbs
1+ TBL brown sugar
1+ TBL granulated sugar
2 TBL cold butter for the top

KEEP IN FRIDGE UNTIL READY FOR USE

FIRST MIXING BOWL (now empty)
2 ripe bananas, sliced and diced
1/4 cup orange juice
2 tsp Grandpa’s CinnaSugar®

1. Separate your bread crumbs into two equal portions across a FIRST and a SECOND medium sized mixing bowls.
2. Grease two small ramikans or baking dishes with butter, then put corn meal in bottom and toss until coated.
3. Dump remaining corn meal into the “SECOND” mixing bowl with the FINE bread crumbs
4. Add sugars and 1 tsp cinnamon into “SECOND” mixing bowl, then set aside.
5. Sprinkle course bread crumb mixture into bottom of baking dishes. This should empty out the “FIRST” mixing bowl
6. Slice the banans lengthwise, then cut into small pieces across and place into FIRST mixing bowl
7. Add orange juice and second tsp cinnamon and nutmeg in bowl with bananas.
8. Evenly spread fruit mixture over crumbs and rinse FIRST bowl
9. Remove butter from refrigerator and dice as small as you can.
10. Add into SECOND bowl and sprinkle fine crumb mixture evenly over fruit.
11. Bake at 375 F approx 30 minutes
12. Cool slightly, then serve warm.

Notes A colander with large holes works well to separate your bread crumbs.


Balloon Wine

24 OZ Frozen Grape Juice Concentrate
4 CU sugar
1/4 tsp Rapid Rise Yeast (about half a package)

1. Mix all ingredients in an empty gallon jug (an empty apple juice bottle works great.)
2. Fill with tap water to about two inches from top of jug. This is necessary for expansion
3. Place 12″ balloon over mouth of the jug
4. As the wine matures, the balloon will expand.
5. When the balloon fails to expand (falls over) the wine is ready to drink

Wine yeast is preferable to bread yeast, but either works equally as well. The taste is a bit better with wine yeast.


Baked Beans – COLLECTION

Regular ol’ Baked Beans

2 CU prepared beans – See recipe for Dry Bean Processing
¾ lb fat salt pork or 2 strips bacon
½ tsp salt
3 TBL brown sugar
½ tsp mustard
1/2 onion – chopped small
1 TBL ketchup
1 clove garlic – minced

1 a Put pork on glass plate and cover with paper towel.
1 b Cook in microwave 30 seconds and change towels.
1 c Cook another 30 seconds.
1 d Repeat one more time if necessary – ususally not necessary
2. Put cooked pork in bottom of glass casserold dish (that has a cover available)
3. Strain beans, reserving liquid
4. Add beans into pot, burying pork
5. Mix in all other listed ingredients
6. Add Reserved Liquid (from beans) pouring over top to barely, but completely, cover – use spoon to work liquid through beans
7. Cover with glass lid and bake 2 hours at 300 degrees
8. Uncover and cook 1 more hour

Reserved liquid means the liquid in which the beans did their final soak in, and were subsequently cooked in.

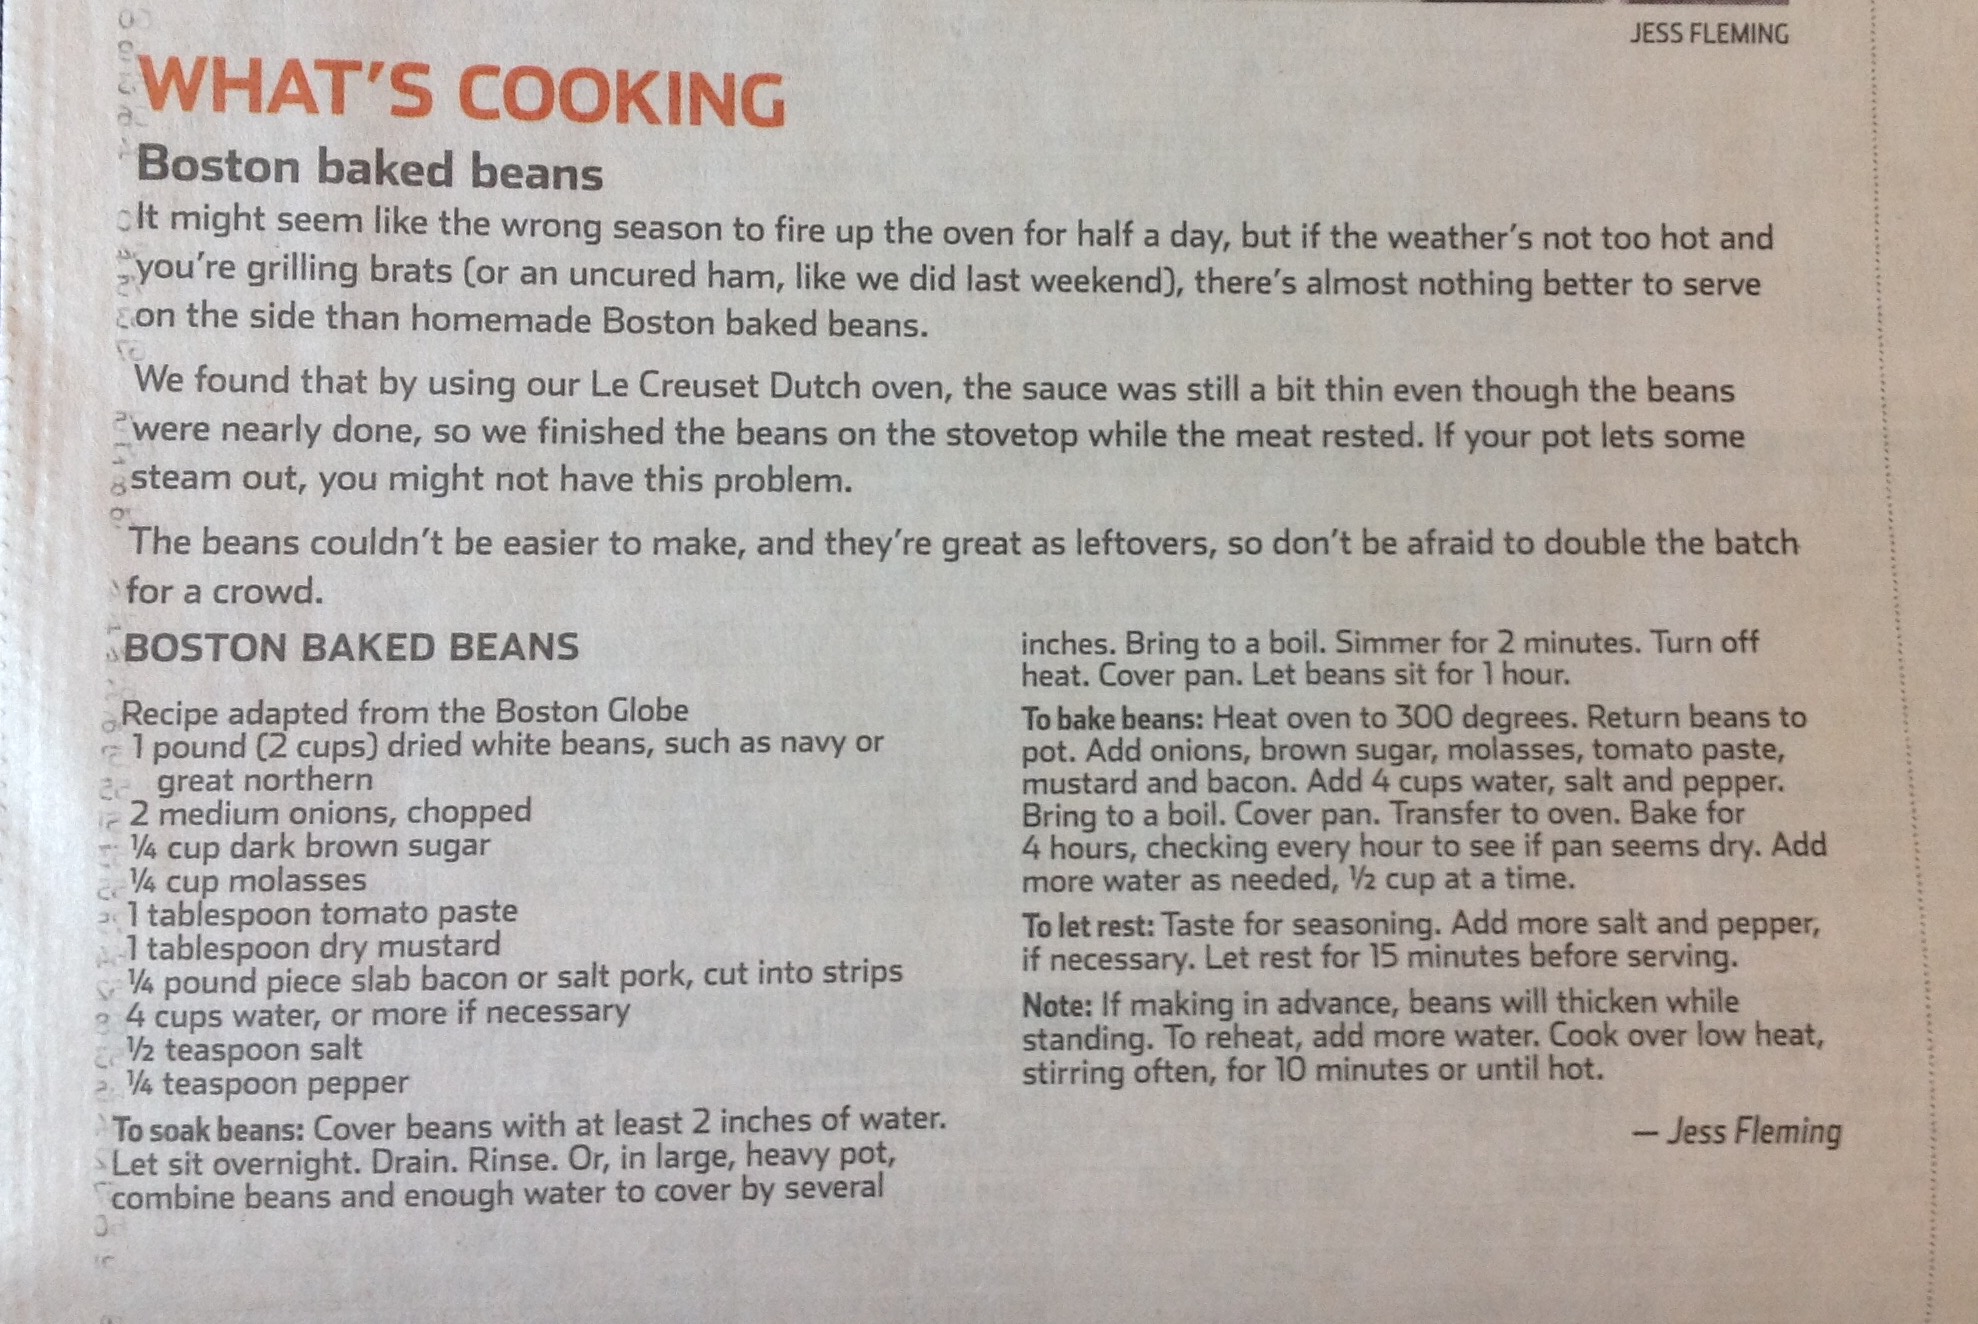
Boston Baked Beans


… From scratch.

Boston Baked Beanss (1)

https://www.grandpacooks.com/recipes/boston-baked-beans/

Boston Baked Beans (2)

https://www.grandpacooks.com/recipes/boston-baked-beans-2/

Backyard Baked Beans

https://www.grandpacooks.com/recipes/backyard-baked-beans/

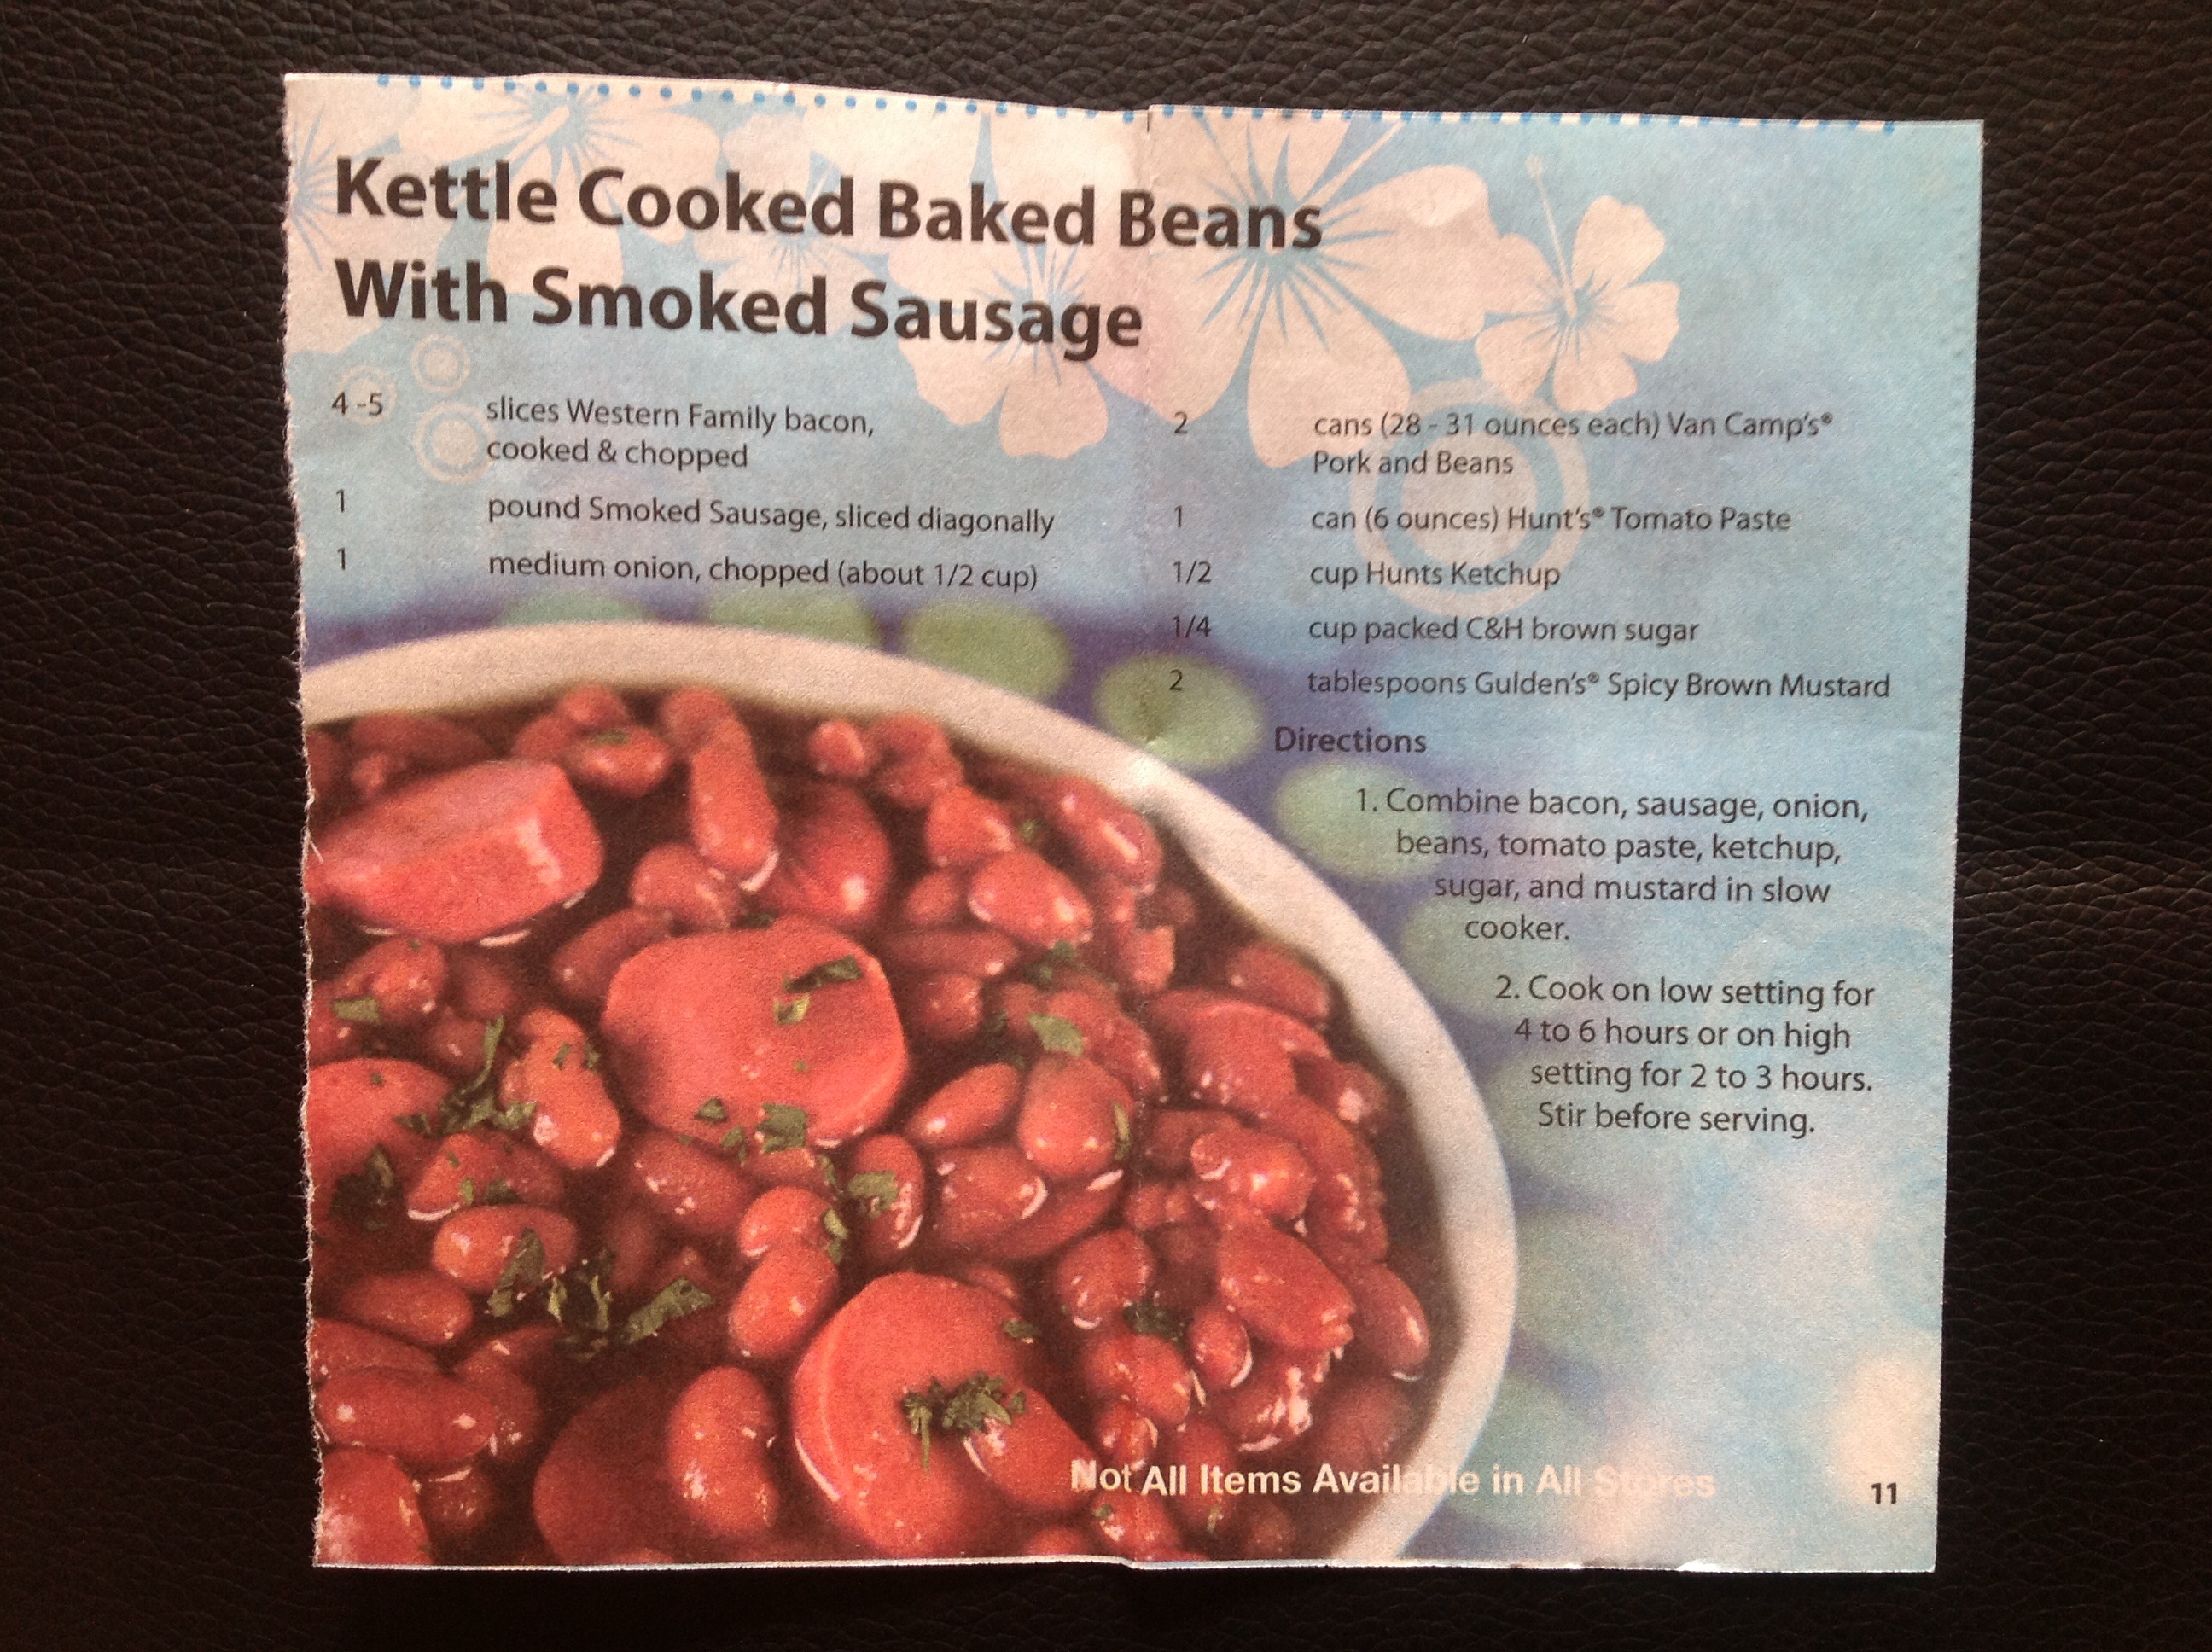
Kettle Cooked Baked Beans

image


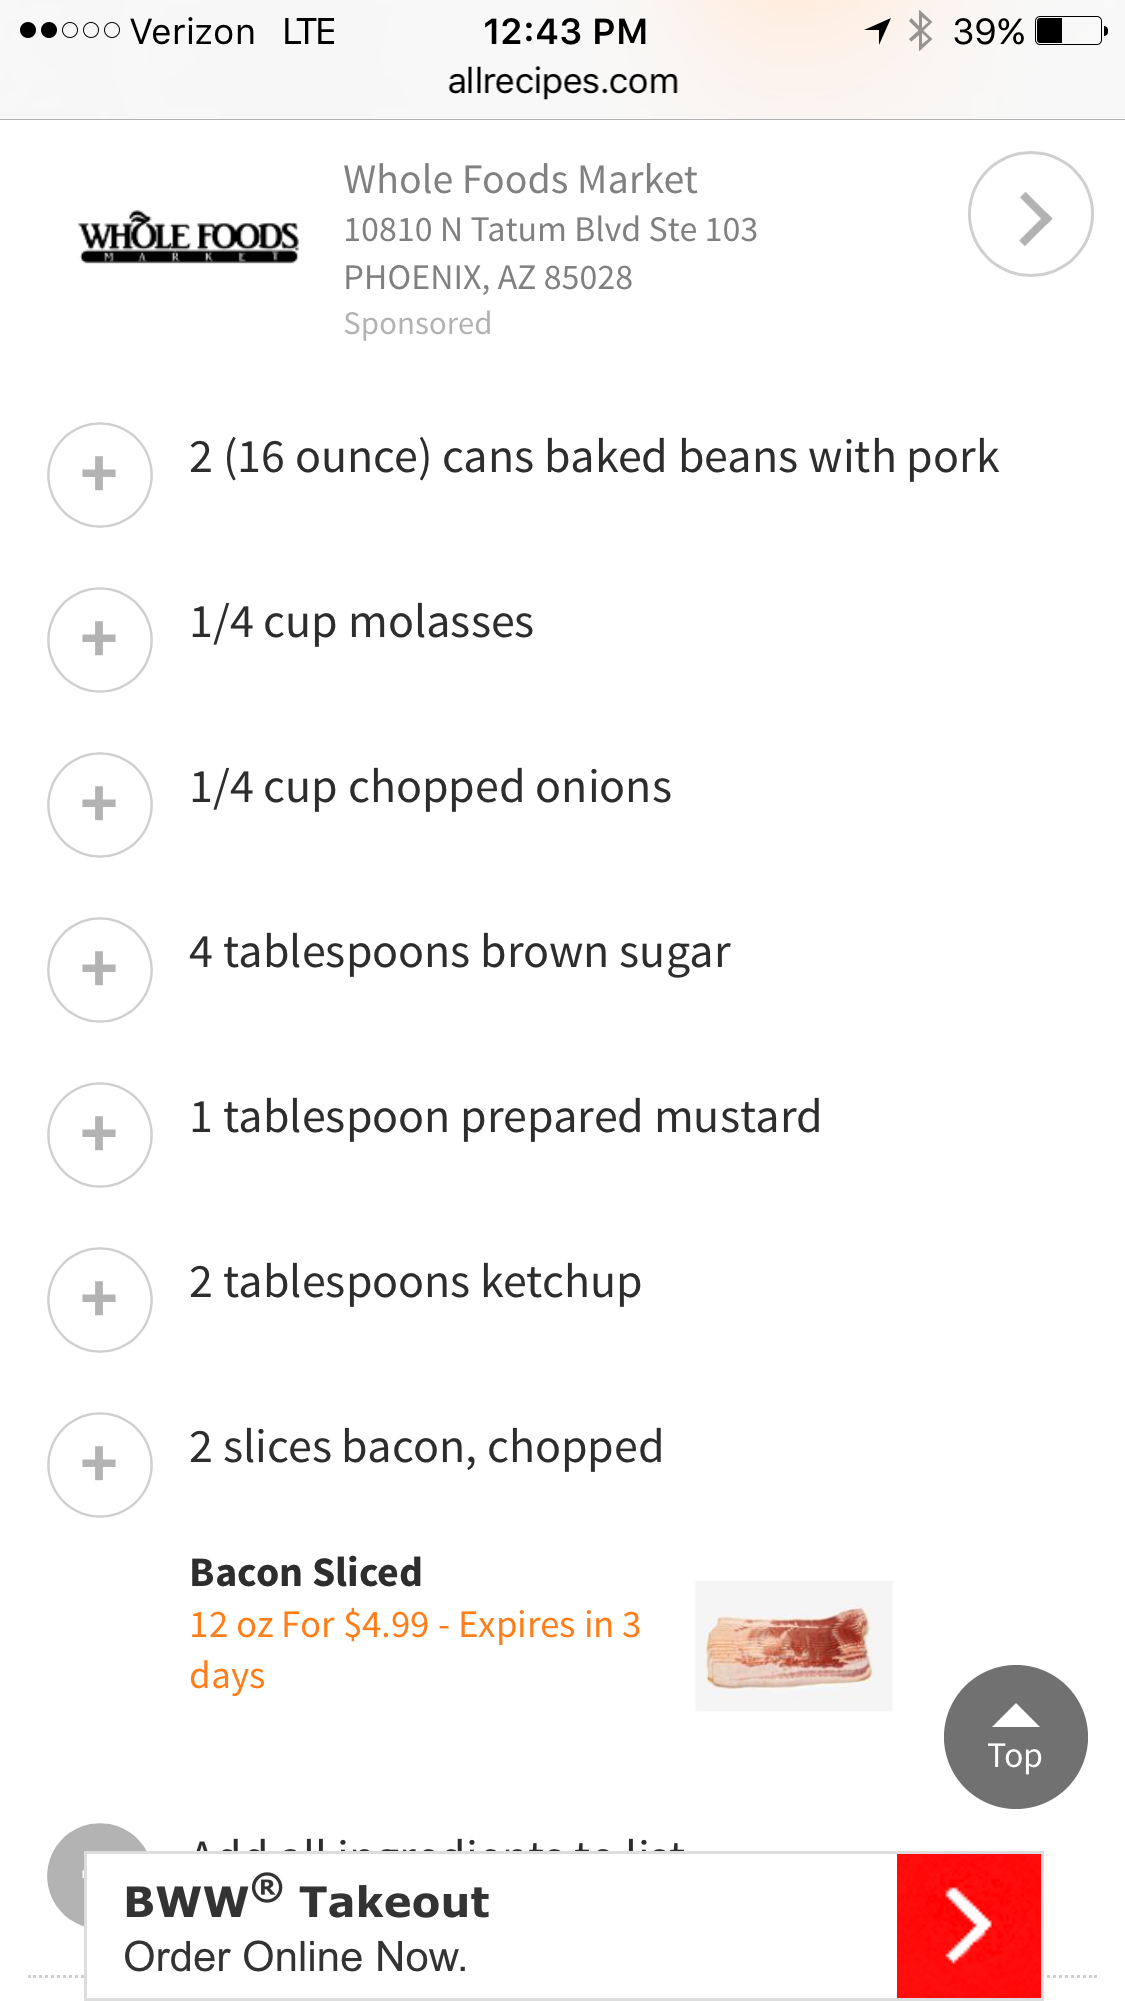
Simple Baked Beans

2015-12-19 12.43.14

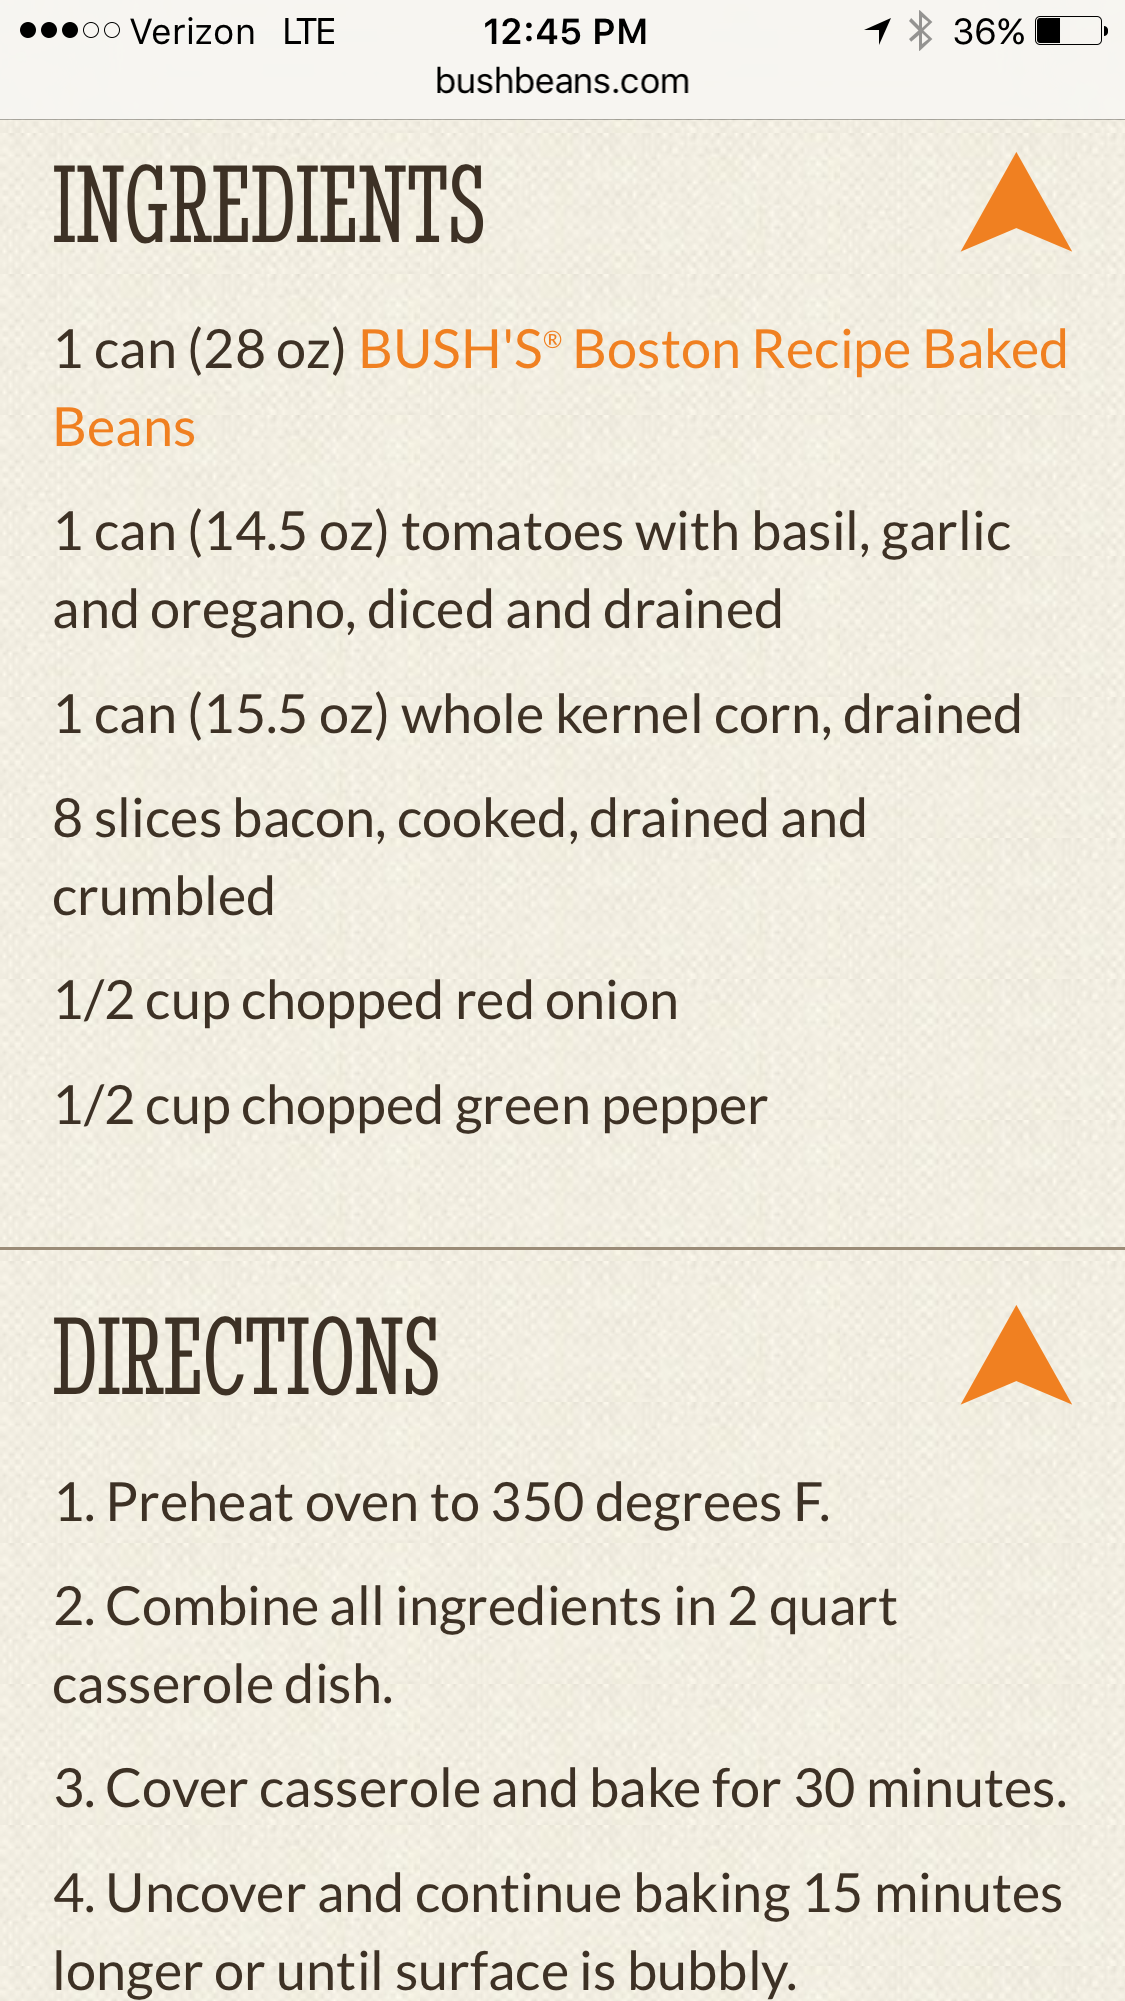
Bush’s Boston Baked Beans

2015-12-19 12.45.26


Bacon Corn Relish

1/4 CU Cobb smoked bacon (thickly sliced)
1/2 CU fresh corn
1 TBL parsley (chopped)
1 TBL green olives (chopped)
2 TBL olive oil
1/4 CU red onion (chopped)
2 TBL fresh lemon juice
1 TBL of ANY ONE of basil, thyme OR red peppers

1. Cook bacon in olive oil until crispy
2. Break apart bacon and add onion
3. When onion is translucent, add all other ingredients
4. Cook for another 5 minutes, then serve with Pork Tenderloin

HTML Snippets Powered By : XYZScripts.com