- Get more sleep
- Drink more water
- Eat slowly
- Put your fork/spoon down between bites
- Put food on a smaller plate
- Distribute smaller portions
- Exercise easy/repeatable 30 minutes per day
- Park away from the doors – walk more
- Drink a glass of milk before your meal
- Eat more fiber
- Eat more fruits and veggies
- Use hot sauce
Category: 222 Tips, Tricks and Tools
Tips, Tricks, Tools and other Info. Everything to help you succeed.
Tips: Fresh Fish
How to buy a whole fish
Sea bass is the best for whole-fish cooking. Also called a bronzini (bronch zino)
How to tell that it is fresh
- Fish should be whole and fresh.
- If you know your butcher, you can just ask for sushi-quality fish, but otherwise buy a whole fish.
- Eyes should be clear. Cloudy eyes indicate an older fish.
- Gills should be bright red.
- Fish should never smell fishy or like bleach.
- Flesh should be firm, not be mushy.
- If you are using meat from a large fish, you can tell it is fresh by the firmness and visual texture of the flesh.
- It should glisten.
- Go shopping with a cooler because it will degrade really quickly.
- Should have bulging, but clear eyes
- Scales should be close to the body – tight, not relaxed
- Fish body should have no bruises or soft spots
- Buy your fish at a market that does a big volume, otherwise you may get older fish
- Trust your fish vendor. Ask
– What is in season
– What do you have that is local
– Is this wild or farmed (Wild is better)
– What do you have that is line-caught - If you are buying squid, it should be shiny, have clear eyes, and the ink should not be dried
How to handle fish
- Cut off all fins (except the tail) early so you don’t stick yourself. A fish wound gets easily infected.
- Scale and clean fish immediately. Store fish on ice in a baggie, but allow it to drain. You DO NOT want your fish to set in water for any time at all. If it is properly handled, a fresh fish could last for six months
- Scale fish outside, or somewhere that the zillions of scales will not cause a problem. Just hold it by the tail and go back and forth with a knife held perpendicular to the body.
Fish that are high in oil
- Smelt, mackerel, herring and orange roughy
- Rinse, dredge, fry in film of peanut oil 3-4 minutes per side, then drain
- Serve with slices of lemon
- To dredge: dip in lemon then roll in crumbs with salt and pepper (or toss)
Fish that are good for the grill
- Whitefish or trout is the best choice for PLANK COOKING
- Soak wooden plank overnight, using brick to keep submerged.
- Grill with INDIRECT HEAT at 375-400 degrees and cook until wood begins to char (about 20 minutes)
- Internal temp will be about 125 degrees
- Serve right on the plank
Good summer fish
- Flounder and fluke are good fish to eat in the summer
Good round fish
- Snapper, porgy, tile fish, sardines, mackeral
What types of wood should I use
- DO NOT USE plain wood, as it may have chemicals.
- Make sure your wood is natural, untreated and kiln or air dried.
- Good woods are: Cedar, alder, maple, hickory, cherry, pecan, apple, white oak, mesquite
Fish Characteristics
- Slow moving fish (such as grouper) have a light meat and subtle mild flavor. They also overcook very easily.
- Fast fish (such as tuna) have an oily steak-like texture. Sharks and Tuna are examples of fast fish
- Striped bass is the most versatile, and is firm but stil flakey
- Shark and Tuna are long-lived fish, and will have a higher concentration of mercury in the meat.
Processing
- To scale, run your knife against the scales
- Gut the fish and run under cold water
- Pat the fish dry
- Remobe the gills
Tips: Equipment
Essentials
- Chef’s Knife – The best you can afford
- Paring Knife – make sure it feels good in your hand
- Ginsu Knife – really – I use mine all the time
- Santoku Knife – middle of the road will be OK
- Heavy duty meat cleaver
- Sturdy kitchen shears – Ideally they come apart to clean
- Honing/sharpening steel – Use at least every other time
- Flat sharpening stone – I just send mine out yearly
- Cutting Board – Small plastic and large plastic for raw meats and other things that cannot be eaten raw
- Cutting Board – Butcher Blok or Kiln Dried Maple or Ash for veggies and things that CAN be eaten raw
- Occasionally sand the board with a fine sandpaper, and then use a food grade mineral oil to treat the surface
- Sanitize occasionally with white vinegar
- Never into the dishwasher though
Incidentals, but Important
- Smooth Edge Can Opener – no nasty cuts
- Measuring Cups – good quality 1/4 C – 1 C
- Measuring Spoons – good quality
- Glass Measuring Cup – 4 C
- Bench Scraper
- Mixing Bowls – Stackable glass set
- Large stainless steel mixing bowl – 20 quart ±
- Salad Spinner / Colander
- Strainer – Regular and fine
- Vegetable peeler – even expensive ones will grow dull
- Potato masher – sturdy / heavy duty
- Whisks – one steel and one for non-stick pans
- Grater / zester / microplane
Cookware and Bakeware
- 12 inch stainless steel skillet with lid
- 10 inch sauteé pan
- 8 inch non-stick omelet pan
- Saute pan – with lid
- Small sauce pan – with lid – 2 quart
- Medium sauce pan – with lid – 3 quart
- Large pot – with lid – 5 qt Dutch oven is a nice choice
- Large stock pot – with lid
- Grill pan – nice to have, but optional
- Cast Iron Skillet – lid optional
- Heavy duty rimmed baking sheet
- Wire cooling rack
- Casserole dish – 9*9 and 9*12
- Pyrex round glass pie plate
- Bread loaf pan
- Broiler pan
Cooking Tools / Hand Utinsels
- Spatula – silicon and wooden
- Stirring spoon – metal, silicon and wooden
- Sturdy tongs
- Ladel
- Oven mitts or hot pads (3)
- A rolling pin
- Infrared thermometer – from ThermoWorks
- Instant-read probe thermometer – ThermoWorks
- Oven Thermometer – Alternately, test periodically with infrared
Appliances
- Immersion Blender – alternate to a hand-mixer
- Digital kitchen scale (with tare)
- Countertop blender
Other Kitchen Essentials
- Food storage containers – I use yogurt containers, etc
- Aluminum foil
- Parchment paper
- Sandwich wrap – waxed paper
- Saran Wrap (or similar)
- Cloth towels
- Paper towels – I use washable Dollar Store wash cloths
- Sponges
- Scrub sponges
- Dish drying rack
- Small and large trash bags – I use grocery bags in a mixing bowl
- x
Tips: USDA Safe Food Handling
This information has been copied directly from the USDA website. It is important enough that I am replicating it here.
Here is THEIR article…
Safe Food Handling Fact Sheets
Cooking for Groups
Cooking For Groups | En Español | En Español PDF
This information will help volunteers prepare and serve food safely for large groups such as family reunions, church dinners, and community gatherings. Get the booklet, artwork, and more.
- Related Publications
For General Audiences
Basics for Handling Food Safely | PDF | En Español | En Español PDF
Lists safe steps in food handling, cooking, and storage; includes a cold storage chart.
Be Smart. Keep Foods Apart. Don’t Cross-Contaminate
By following these simple steps, you can prevent cross-contamination and reduce the risk of foodborne illness.
The Big Thaw — Safe Defrosting Methods — for Consumers | PDF | En Español | En Español PDF
Learn about the three safe ways to defrost food: in the refrigerator, in cold water, and in the microwave.
“Check Your Steps” Children’s Color Quiz (PDF Only)
Fill-in-the-blank and matching activity for kids.
Cleanliness Helps Prevent Foodborne Illness | PDF
By keeping everything clean that comes in contact with food, consumers can be assured they are helping to do their part to Fight BAC!®
Color of Meat and Poultry | PDF | En Español | En Español PDF
What factors affect the color of meat and poultry? What do color changes mean in terms of food safety?
Cooking Safely in the Microwave Oven | PDF | En Español | En Español PDF
This fact sheet lists the basics for safe microwave cooking or reheating.
Cutting Boards and Food Safety | PDF
To avoid cross-contamination, choose and maintain your cutting boards with food safety in mind.
“Danger Zone” (40 °F – 140 °F) | PDF | En Español | En Español PDF
Leaving food too long in the temperature “danger zone” causes foodborne bacteria to grow to levels that can cause illness.
Deep Fat Frying and Food Safety | PDF
Important guidelines to prevent deep fat frying injuries at home, and to ensure that food is cooked to a safe temperature.
Doneness Versus Safety | PDF | En Español | En Español PDF
Is “done” the same thing as “safe”? What does it mean to cook to proper temperature?
Door-to-Door Meat Sales | PDF | En Español | En Español PDF
Consumers must know important information about the dealer and the company before making a decision they might later regret.
Fighting BAC!® by Chilling Out
Cold temperatures keep harmful bacteria from growing.
Food Product Dating | PDF | En Español | En Español PDF
Background information on what dates do and don’t tell you about the safety of your food.
Food Safety After School | PDF | En Español PDF
Learn why children are at risk for foodborne illness and know the kitchen practices that help keep them from becoming ill.
Food Safety Counts! (PDF) | Alternate Text
Always “Check Your Steps” to protect your family from food poisoning.
Food Safety Tips for College Students | PDF
The USDA Meat and Poultry Hotline answers questions from parents or students about the handling and storage of food for college kids.
Food Safety Tips for Home Delivered Meal Program Participants
Available from the National Resource Center on Nutrition and Aging.
Food Safety While Hiking, Camping & Boating | PDF | En Español | En Español PDF
Whether you are in your kitchen or enjoying the great outdoors, there are some food safety principles that remain constant.
Food Safety Quiz | En Español | En Español PDF
Four questions to check basic knowledge of the Be Food Safe principles.
Freezing and Food Safety | PDF | En Español | En Español PDF
How to freeze food safely and how long to keep it.
Grilling and Food Safety | PDF | En Español | En Español PDF
Use these simple guidelines for grilling food safely.
Handling Food Safely on the Road | PDF | En Español | En Español PDF
Plan ahead and pack safely for the camping trip, boat ride, day at the beach or trip in the RV.
High Altitude Cooking | PDF | En Español | En Español PDF
Food safety considerations for cooking meat, poultry, and egg products at altitudes above 3,000 feet.
Hotline Answers “Panic Button” Food Safety Questions | PDF | En Español | En Español PDF
During the holidays, people are busy and can sometimes forget that unsafe handling and cooking can lead to foodborne illness. Here are some questions callers have asked regarding the safety of their holiday foods.
How Temperatures Affect Food | PDF
Keep food out of the Danger Zone between 40° and 140 °F.
Keep Food Safe! Food Safety Basics | PDF
Safe steps in food handling, cooking, and storage are essential in preventing foodborne illness.
Keep Hands Clean! with Good Hygiene (PDF Only)
Colorful 8½ by 5½ card conveys the theme for National Food Safety Education Month 2005.
Keeping “Bag” Lunches Safe | PDF | En Español | En Español PDF
Food brought from home can be kept safe if it is first handled and cooked safely.
Kitchen Companion: Your Safe Food Handbook (PDF Only)
This food safety handbook contains all the basic information you need to know about food safety…some old, some new… and all in one place.
Leftovers and Food Safety | PDF
USDA recommendations for handling leftovers safely to prevent foodborne illness.
Let Me Tell You How Dad Got Sick! | PDF | En Español | En Español PDF
This story of a case of foodborne illness is told in comic book format.
Mail Order Food Safety | PDF | En Español | En Español PDF
These tips will help the purchaser and recipient determine if their perishable foods have been handled properly.
Meat and Poultry Packaging Materials | PDF
Explains various types and uses of packaging materials and how their safety is regulated by government agencies; includes a glossary of packaging terms.
Mechanically Tenderized Beef | PDF
USDA now requires meat processors to disclose mechanical tenderization and give safe cooking instructions to consumers.

Microwave Ovens and Food Safety | PDF
This comprehensive fact sheet answers all your microwave questions.
Molds On Food: Are They Dangerous? | PDF | En Español | En Español PDF
Includes a chart, Moldy Food: When to Use, When to Discard. This information is helpful after an extended power outage or a flood.
No-Show Guests Jeopardize Food Safety | PDF
When guests encounter emergencies and the meal must be delayed or cancelled, food must be handled “just right” to remain safe.
Refrigeration & Food Safety | PDF
Covers the importance of refrigeration, placement of foods, proper storage temperatures and times.
Safe Handling of Take-Out Foods | PDF | En Español
Keep take-out and delivered foods safe and store leftovers properly.
Safe Minimum Internal Temperature Chart | PDF
One-page fact sheet that lists USDA’s recommendations.
Shelf Stable Food Safety | PDF
Answer your questions about the safety and proper storage of shelf stable foods — those that do not require refrigeration, like (most) canned goods; learn about the science behind modern food packaging methods.
Slow Cookers and Food Safety | PDF | En Español | En Español PDF
Used correctly, this countertop appliance is safe and convenient.
Smoking Meat & Poultry | PDF | En Español | En Español PDF
Where there’s smoke, there’s well flavored meat and poultry. Using a smoker is one method of imparting natural smoke flavor to large cuts of meat, whole poultry, and turkey breasts.
Specialty Devices and Food Safety | PDF | En Español | En Español PDF
Facts about thawing trays, solar box cooking, disposable temperature indicators, thermoelectric cooler/warmers.
Tailgating Food Safety Q & A | PDF
A tailgate gathering requires the same safe food handling practices as picnicking outdoors because a refrigerator and running water are probably not available.
Top Ten Reasons to Handle Your Food Safely | PDF | En Español | En Español PDF
Published in honor of the Meat and Poultry Hotline’s 10th year; updated in honor of its 25th year of operation.
Washing Food: Does It Promote Food Safety? | PDF
How to prevent cross-contamination; safe cleaning methods.
Your Family is First, Keep them Safe (PDF Only)
English translation of Su Familia es Primero – Manténgala Sana y Protéjala de Intoxicaciones Alimentarias (PDF). See our En Español pages for more Todo Cuenta materials.
Tips: Edible Colors
Here is a list of things that you can use to color food items, rather than food coloring.
- Red – Beet juice
- Red – Tomato Paste
- Green – Pesto
- Green – Blanched Spinach
- Orange – Colorante (Amazon)
- Yellow – Colorante (scant)
- Black – Activated Charcoal
- Black – Squid Ink
… and you can always use food coloring
Here is an example:
Color pie dough whatever color you like and roll thinly
Spray with Pam
Use metal spoons to form edible spoons – or use binder clips
Bake wrapped in foil – 5 minutes @ 350º
Put appetizers in the spoons
- Shred radish
- Olive tapenade mix
- Tomato
- Proscuitto
- Black River caviar
- Kalamata olives
- Salmon with creme fresh
- Fois gras
- Cheese
Tips: Starch Thickeners
Most people use cornstarch as a thickener because that is what has always been used. It is also widely available; HOWEVER, after Passover (the Jewish holiday) Manischewitz (man-i-chev-its) potato starch is usually widely available and on sale.
Here is a quick comparison of different starches from the website YUMMY.
Cornstarch
Cornstarch of cornflour is a fine, powdery starch that’s made from corn. It is a pure starch thickener, so compared to flour, a smaller quantity is needed to thicken the same amount of liquid. It is fast-acting too, thickening a sauce almost immediately when added to nearly boiling liquid. Asian-style dishes often use cornstarch, as sauces thickened with this starch remain clear and shiny. It is also used as a coating for fried chicken, pork, and fish.
Rice Flour
Rice flour is a type of flour derived from finely milled white or brown rice. It is gluten-free, thus it is often used as a substitute for wheat flour. Aside from being the main ingredient in noodles and native sweets, rice flour is also used for coating meats before frying.
Tapioca Starch
Extracted from the cassava root, tapioca starch is one of the purest forms of starch. It is gluten-free and is a popular thickening agent for sauces and dessert fillings. Like other root starches, it gelatinizes at relatively lower temperatures and produces sauces that are clear, shiny, and silky. It also has a less forward flavor once cooked. In Thai cuisine, water chestnuts are dredged in tapioca starch to make the classic dessert of red rubies with coconut milk. It can also be used as a coating for fried meat.
Potato Starch
Potato starch is a very refined root starch extracted from potatoes. Since it contains minimal protein or fat, sauces thickened with this starch are more translucent and glossy, with a silkier mouthfeel and a neutral flavor. It is also a good thickener for custards, puddings, and pie fillings. It is an ideal thickening agent for dishes or sauces that will be refrigerated or frozen, since it prevents liquids from separating, unlike sauces made with cornstarch.
Sweet Potato Flour
Sweet potato flour is a gluten-free root starch produced from white sweet potatoes or kamote. It is dull white in color with a stiff and somewhat coarse texture. It is commonly used as a coating for fried meats and poultry and also as a starch for gluten-free baked goods such as breads, cookies, muffins, and pancakes. It may also be used to thicken sauces and gravies.
Tips: MISC Notes
These are misc notes that I made from various sources.
- Use jicama spears for snacks
- Use a pita with cheese sauce and misc toppings for a quick dinner
- Use a colander for an easy steamer basket
- Put a towel under the cutting board to help hold it in place
Casseroles: Tips and Tricks
The goal of a casserole is not to prepare a restaurant-quality showpiece, but is rather to feed the hungry and heartbroken.
- Allow for drainage, or you could get a soggy bottom. There are meatloaf pans that have holes in them to let the grease drop to the bottom of the pan.
- A casserole should have kind of a creamy mouth feel to it, have a crunchy top (traditionally Ritz Crackers) and you should be able to identify the individual components within the casserole.
- The advent of soup make it unnecessary to start with a bechemel sauce or veloute sauce.
- Spray with PAM for easy removal
- Many meatloaf recipes use stale bread crumbs. Try these options:
– Use a fresh and hearty loaf such as French bread
– Use dry oatmeal – not minute oats, but traditional rolled oats - The type of material with which your pan is made will affect the cooking time.
- Metal :: conducts heat easily and cooks quickly
- Ceramic :: conducts heat slowly and cooks slowly
- TerraCotta :: the same as Ceramic
- General Cooking Guidelines
- Top with cheese
- Bake 45 minutes at 300º
- Bake 10 minutes uncovered at 350º
- Let cool 30 minutes
- There are three TYPES of Casseroles
- BOUND: Broccoli or Tuna Casserole
- LAYERED: Lasagna or Mousaka
- SCOOPABLE: Bean or Pot Pie
- Casseroles will generally contain at least two of the following categories
- Starch, Aromatics, Seasoning, Binder
- Good fillers for casseroles are
- Broccoli (stem peeled and blanched)
- Mushrooms sliced and sauteed in butter
- Ramen Noodles
- Yogurt, May, Eggs
- Chedder and/or Blue Cheese
Tips: Equivalents – COLLECTION
See also: SUBSTITUTIONS
Milk conversions and substitutions
Use this link for different types of MILK CONVERSIONS.
Chemicals
- Citric Acid Powder – 1/4 tsp – You can substitute 1 TBL bottled lemon juice – Cannot substitute Ascorbic Acid
- Lemon Juice – 1 TBL – You can substitute 1/4 tsp citric acid powder – Cannot substitute Ascorbic Acid
- Ascorbic Acid – You can substitute lemon juice or citric acid powder, but not the other way around
Liquid Measurements / Volume
- 1 Gallon = 4 QT = 8 PT = 16 C =128 OZ = 3.8 L
- 1 QT = 2 PT = 4 C = 32 OZ = .95 L = 950 ml
- 1 PT = 2 C = 16 OZ = 480 ml
- 1 C = 8 OZ = 240 ml
- 1 OZ = 30 ml = 28.5 gm
- 100 ml = 3.4 OZ = 1/2 C minus 1 TBL
- 250 ml = 1 C plus 2 TBL
- 1 IMPERIAL Gallon = 1.2 US Gallons = 4.5 L
Dry Measurements
- 16 TBL = 1 C
- 1/3 C = 5 TBL + 1 tsp
- 4 TBL = 1/4 C = 12 tsp = 2 OZ = 60 ml
- 2 TBL = 1 FL OZ = 30 ml
- 1 TBL = 3 tsp = 1/2 FL OZ = 15 ml
- 1 tsp = 5 ml = 1 CC
Weight / Mass
- 1 OZ = 28.4 gm
- 1 KG = 2.2 LB =
- 1 LB = .45 KG
- 100 gm = 3.5 OZ
- 250 gm = 8.8 OZ
Temperature
- Degrees Celsius to Fahrenheit :: Multiply by 1.8 (or 9/5) and add 32º
- Fahrenheit to Celsius :: Subtract 32º and multiply by 0.55 (or 5/9)
– - Fry temperature = 350º – 370º F :: Lower than 350 your food will be greasy. Above 370º and it will burn.
- Burnt Sugar = 350º F = 177º C – Becomes bitter
- Brown Sugar – Liquid Caramel = 338º – 350º F
- Clear Liquid Sugar Concentrate (Karo) = 320º – 335º F
– High Fructose Corn Syrup – The chemical chain is not good for us, but tastes REALLY good. - Hard Crack Stage = 300º – 310º F (eg) Hard Tack, Lollipops
- Soft Crack Stage = 270º – 290º F (eg) Taffy
- Hard Ball Stage = 250º – 265º F (eg) Gummy Bears
- Firm Ball Stage = 245º – 250º F (eg) Caramels
- Soft Ball Stage = 235º – 240º F (eg) Fudge
- Thread Stage = 230º – 235º F
- Jams and Jellies = 220º – 225º F
- 212º F = 100º C – Steam – has more kinetic energy than the water – will cause severe and more painful burning. Will have the same effect as 230º liquid.
- 212º F = 100º C – Hot water – will cause burning
- 162º F – Skin will be destroyed on contact – scarring will occur
- 131º F – Second degree burning will occur
- 125º F = 52º C – Painful burning will occur
- 108º F = 42º C – Hottest bath that is marginally safe
- 98.6º F = 37º C
- 68º F = 20º C
- 32º F = 0º C
- -40º F = -40º C – Not useful, but interesting!
- -109º F = -78º C = Temperature of Dry Ice – Causes tissue damage in 5 seconds
- ABSOLUTE ZERO = –273.15° C = –459.67° F
For Speed and Length Conversions CLICK HERE.
Tips: Non-Stick Skillets
 This includes teflon, ceramic, and all surfaces that claim to be non-stick.
Please also review my post: Care of your Cast Iron Skillets
Teflon Tips
Teflon, Ceramic and other non-stick finishes need to be taken care of. Here are some tips that you may find useful.
- Wash and rub a little canola oil into it before first use.
- Don’t heat the pan empty. At least put a little oil into the pan.
- Don’t use cooking spray. There is a propellant that will build up and destroy your pan. If you must, get a spritzer bottle and put canola into it.
- Don’t let the temperature EVER exceed 450. Ideally, I never even exceed 400º This Thermapen is one of the best investments you could make. You will use it nearly every single day.
- Don’t let food dry on the surface of your pan. When the temperature has dropped to 250º (or below) wipe it off with a wash cloth and hot water. I usually don’t even like to use soap on mine.
- If you can’t clean it immediately, at least fill it with water to minimize the chemical effects of the remaining cooking oil residue.
- If you do use soap on your pan, occasionally wipe in a little canola oil (See Tip #1)
- Never ever EVER use abrasive cleansers or pads on your pan.
- Never put your teflon or ceramics into the dishwasher. The hot water is OK, but the drying cycle will kill your pan.
- For stubborn stains, use a mixture of baking soda and water. mix and apply the paste. Leave for an hour, then wipe off. Repeat if needed.
- If your pan has a wooden handle, season it VERY occasionally by wiping with canola oil
- Season a hot pan (250º) occasionally with a paper towel and olive oil (See Tip #1)
- Never use metal cookware (spatula, whisk, spoon, etc) when cooking with your non-stick pan
THE PENNY TRICK – If you are boiling water, put a penny in the bottom of your pan. If it boils dry (which will ruin your pan) the penny will start to rattle because of the boiling water beneath the penny. The rattling will tell you your pan is nearly empty (usually) before your pot is destroyed.
Tips: Peppers
- Before working with peppers, coat your hands with just a bit of olive oil. This will protect your skin, and then you can just wash your glove off afterwards
- The seeds and vein contain most of the heat in a pepper
- Most of the seeds will be near the stem
- Green jalapeños will turn red if left on the vine
- Green bell peppers are just unripe red bell peppers
- Hatch chilies have the best flavor out of many similar peppers
- A pepper gets “hotter” if it is stressed during growth
- A dried pepper should still be slightly pliable
- When cutting a bell pepper, use the outsides and keep the core intact. It will stay fresh for 3 days longer.
Tips: Frozen or Canned Food
Most food is flash frozen at the peak of ripeness.
Berries – These have a very short season, so frozen is the best way to get ripe strawberries, blueberries, raspberries 10 months out of the year. Thaw them overnight in the refrigerator.
Spinach – Greens freeze very well. You can thaw these in the fridge overnight, or place them in a bowl of water for 30 minutes. Leaf for leaf, frozen spinach costs quite a bit less than fresh as well.
Tomatoes – These don’t freeze well so should be canned, or bought canned or sun dried and placed in oil.
Vegetables – Frozen peas are much better frozen than canned. They are frozen at the peak of ripeness. The canning process can tend to make them mushy. Thaw them overnight in the fridge in a bowl of water.
Lemon juice – Don’t buy that plastic lemon shaped container, or even the green bottles of juice. Squeeze lemons yourself and then freeze in water bottles. Thaw in the refrigerator. There may be some separation of the juice and the pulp, so shake before using it.
Grapes – These don’t freeze or can well. Raisins can be rehydrated overnight in water.
Broccoli – This does not freeze well. It becomes mushy. It is marginally OK to use in a stir fry, but fresh is so much better.
Salmon – Of course it is better fresh, but it is also very expensive. Canned salmon is not THAT bad, and is about a fifth of the price of fresh. If budget is no matter, go fresh. For most of us canned salmon is good enough for most of what we do.
Steam Juicer
Thanks to Living HomeGrown for some tips and feedback on using my steam juicer.
I’ve used my steam juicer for my soft fruits such as grapes, raspberries, etc. We last a huge branch of our lime tree last night, so today will be trying this on citrus (yet untested) and I am not sure how well it will work. I know the zest juice will be viable, but am not sure about the lime juice itself.
If all of the water evaporates, you can damage your juicer, so a trick that I use is to put two pennies in the bottom of the pan. They will start to rattle when the water gets low and steam forms underneath the pennies.
Tips: Tuna
- A sashimi knife called a yanagi-bocho or yanagi knife is sharpened only on one side. This allows you to slice the sashimi with minimal bruising or mashing.
- Tosha Soy is generall used for sashimi dipping. You can make an acceptable substitute using soy + sake + mirin + bonito flakes. Boil the mixture, then cool, then strain.
- Create a carrot wave, but slicing a carrot very thin, then wrapping it around a chop stick. Immerse it in ice water for 5 seconds, and the form will stay in place.
- NOTE: White tuna – Kanpachi or Amberjack – is a heartier fish and will hold up better for many recipes, but it does not offer the presentation that RED tuna offers.
- A typical recipe for Amberjack is to carve very thin slices on the bias, and then skewer them with a thin lemon medallion.
- When cutting tuna, let the knife do the work and be patient. DO NOT push the knife through the meat, but rather let the moving knife gently slice through the meat.
- Put your finger on top of your carving knife to stabilize it and keep it from moving from side to side.
- Start your slicing movement before you even touch the surface of the fish.
Tips: Dietary Water
In these dog days of summer here in Phoenix, where the temperature frequently peeks over the high side of 120º it is important to stay hydrated. Dietary Water is more beneficial than just drinking tap water, as it gives your body nutrients that tap water does not offer. Here are some choices that you can eat, or put into a blender.
- Watermelon
- Cucumber
- Mint
- Cantaloupe
- each
- Pineapple
- Honeydew
- Plums
- Orange
- Lemon
- Lime
- Berries
- Mango
- Pineapple
- Mint leaves, by themselves, offer little water, but help flavor the above items when blended as a beverage
- Gatorade – While not exactly natural, Gatorade helps your body retain its electrolytes. Just don’t drink more than a couple, or it will put your whole body chemistry off balance.
It is also helpful to use EVOO rather than butter through these hot months.
You can also create a cooling device that will help lower your temperature for about thirty minutes.
- Take a sock and fill it with dry rice, lentils or dried beans.
- Sew up the open end and put it into the freezer.
- On the nights where it is too hot to fall asleep, put this cool sock under your neck or along side of your Adam’s apple to help your body cool down.
Tips: Gardening
- Store your seed packets in a photo album for easy review and retrieval.
- Bake crushed egg shells at 350º for 20 minute to kill bacteria, then spread across your soil to slice the underbelly of snails.
- For those that you like, put a canning jar lid full of beer. They will drink themselves to death.
- Use Acrylic or Oil paints to create informal arts plant ID rocks
- Not the artsy type, use plastic forks and a Sharpie to create plant markers
- Coffee grounds in your soil helps repel pests AND fertilizes your garden.
- Soak your seeds for 24 hours to give them a germination jump start
- Put colored bottles around your garden for a bit of whimsey
- Use a shipping palate to create a vertical garden
- A rain gutter makes a garden trough along the top of your fence. Use spaghetti tubing for irrigation
- A gauze strip will wick water into your house plants while you are on an extended vacation
- Use a toilet paper roll as a seedling pot
- Create a water bottle sprinkler using duct tape and your garden hose
- Use cinnamon as a rooting compound to repel fungus.
Tips: Substitutions
See also EQUIVALENTS
Why Substitute?
- Emergency: If you don’t have a needed ingredient, there are usually options.
- Health Related: Eliminating peanuts, for example :: Most allergies are with milk, egg, peanuts, shellfish, soy, wheat
- Creative: Tarragon rather than oregano, for example
Allspice
1 teaspoon = 1/2 teaspoon cinnamon + 1/2 teaspoon ground cloves
Apple Pie Spice
1 teaspoon = 1/2 teaspoon cinnamon + 1/4 teaspoon nutmeg + 1/8 teaspoon cardamom
Baking Powder
• Single Acting: 1 teaspoon = 1/4 teaspoon baking soda + 5/8 teaspoon cream of tartar – 1/2 tsp of cornstarch if you are not using it right away
Confectioner sugar ?!?
• Double Acting: Releases gas twice – Hard to do in the home
Baking Soda
There is NO substitute for baking soda
Basil
Substitute peas
Bread Wheat Flour
Xanthan Gum – Helps do the task that gluten does
Other gluten-free wheat flour substitutes are garbanzo beans, teff, sorghum and quinoa flours
Butter
• Replace half the amount of butter in your recipe with applesauce; if the recipe calls for one cup of butter, use half a cup of butter and half a cup of applesauce. If you don’t mind a denser, more moist bread, replace all the butter with applesauce to cut even more calories and fat.
• Use Greek yogurt cup for cup to replace all or part of your butter
• Canola oil can be used in place of melted butter.
Buttermilk
1 cup = 1 tablespoon lemon juice or vinegar plus enough regular milk to make 1 cup (allow to stand 5 minutes in the fridge)
Chili Sauce
1 cup = 1 cup tomato sauce, 1/4 cup brown sugar, 2 tablespoons vinegar, 1/4 teaspoon cinnamon, dash of ground cloves and dash of allspice
Chocolate, Unsweetened
1 ounce = 3 tablespoons cocoa plus 1 tablespoon butter or regular margarine or vegetable oil
Cornstarch (for thickening)
1 tablespoon = 2 tablespoons flour
You must cook longer than you would with cornstarch.
Cream
• 1 C = 1/3 cup melted unsalted butter + 3/4 cup milk.
• 1 C = 1/3 cup melted unsalted butter + 3/4 cup low-fat milk + 1 TBL flour or cornstarch.
• 1 C = 1 cup skim milk + 2 TBL cornstarch.
• 1 C = 1/6 cup melted butter + 7/8 cup half-and-half.
Egg: 1 whole egg
• 1 egg = 1/4 cup egg substitute
• 3 TBL powdered flax
Mayonnaise
1/2 C = One egg yolk to 1/2 cup of oil. Plus 1 tsp Dijon and salt
Miso
Soybean allergy:
Parmesan – from Italy
Substitute American Parmesan if mixed
Peanut Butter
Substitute cashew butter,
Pine Nuts
Substitute walnuts
Sugar, Confectioners’ or Powdered
1 cup = 1 cup granulated sugar plus 1 tablespoon cornstarch; process in a food processor using the metal blade attachment until it’s well blended and powdery.
Tahini
Ground up sesame seeds
Tomato Juice
1 cup = 1/2 cup tomato sauce plus 1/2 cup water
Wine, Red
Any amount = The same amount of grape juice or cranberry juice
Wine, White
Any amount = The same amount of apple juice or white grape juice
Tips: Terminology
- Temperature
- Low heat: 225°F to 249° F – (107°C to 120°C)
– Boiling, simmering, poaching
– Unrefined canola oil - Medium low heat: 250°F to 324°F – (121°C to 162°C)
– Slow cooking, stews, stocks, reductions
– Unrefined corn oil - Medium heat: 325°F to 374° – (162°C to 190°C)
– Gentle cooking temperature, also for finishing food started at high heat
– Extra virgin olive oil and butter – Low temperature frying - Medium high heat: 375° to 449°F – (190°C to 232°C)
– Pan fry and quicker general cooking of foods
– Refined canola oil – High temperature frying - High heat: 450°to 650°F – (232°C to 343°C)
– Saute, sear, Wok stir fry
– Refined sunflower and peanut oil – Very high temperature quick frying
- Low heat: 225°F to 249° F – (107°C to 120°C)
- Braise
- Sauteé
- Sear
Good Housekeeping has quite a comprehensive dictionary of cooking terminology.
TERMINOLOGY
- TEMPER – If you combing your egss and hot liquid all at once, you will cook some of your eggs, resulting in lumps. To temper your eggs and liquid together means that you take just a little tiny bit of your hot liquid and whisk it into your eggs, then a bit more, then a bit more. Once they are combined, about 50/50 you can mix the entire thing together.
- CLARIFIED BUTTER – Melt butter slowly, and the milk solids will settle on the bottom. Pour off the clear oil, leaving (and discarding) the milk solids.
- ZEST – Use a microplane and shave off the colored part of an orange, lime or lemon. Try not to get the pith.
- MICROPLANE – Essentially the same as a file, but this is for food. You SHAVE off tiny pieces of citrus, nutmeg, etc and use it as part of your flavoring.
- PITH – The white part of citrus that is just under the colored skin. Usually very bitter.
Tips: Steaks (Beef)
See also Tips: Burgers and Tips: Steaks and Cow Parts
Buying your Meat
- Don’t skimp on buying a steak. You would spend $40 on a really good steak at a restaurant, consider spending nearly that much on a quality piece of meat with good marbling. See the chart below from Food Beast for price ranges of different cuts of meat.
- Buy an aged steak. More developed flavor. Better yet, buy a nice cut and dry age it yourself. Put on a rack and salt both sides. Put in the refrigerator for 48 hours uncovered.
- The ONLY time you should press down on your steak is when it is first put on the grill. Put the “serving side” onto the heat first, then press it down to get maximum contact. Don’t press down again after you flip it.
- Consider buying and cooking one thick steak (2 inches is a nice thickness) to serve multiple people. The overall quality will be better.
- Bone in cuts of meat will generally have a more complex flavor.
Prepping your Meat for Cooking
- Searing your Meat:
- Get a good sear on your meat. Sear means flavor and appearance will be enhanced.
- Tie your meat up with a string around the perimeter to hold and shape your meat.
- Steaks must come up to room temperature before you start to cook it (30-60 minutes)
- Salt your meat liberally.
- Salt it the night before, and refrigerate it overnight
- Dry Age Your Meat: Place on a wire cooling rack in the refrigerator for 24-36 hours before cooking. This will allow the moisture to be removed from the surface of the meat. If you are marinating your meat, just be sure to press it VERY dry before searing.
- Before searing, add pepper
- Sear at medium-high (about 400º) for about two minutes per side on a cast iron skillet. Sear the presentation side first. Sear even the sides of a thick steak.
Cooking your Meat
- GENERALLY SPEAKING thin cuts of meat will cook quickly over high heat, while thicker cuts will cook slowly over low or medium heat.
- When grilling a steak, consider a 2-3 inch thick Rib-eye on the bone steak. This will feed 4-6 people. Take bone off before serving. Cut against the grain in thick slices – about 3/4 inch.
- Cook all FOUR sides on the hot side of the grill, then move to the indirect side of the grill and cook until internal temperature is 125º
- Start over high heat.
- Try to get steak to medium rare throughout the entire steak. About 250º for six hours or until internal temp is about 120º
- Rest for ten minutes before cutting
- I consider two thermometers critical for any serious chef, even if they will remain an amateur chef for their entire life. I purchased both of mine at ThermoWorks.
- The first is an internal temperature Instant Read ThermaPen. It is about $80 but I have had mine for about ten years. It needs a new battery about every three years.
- This one is less expensive, but I find that I use it more than the internal probe. I usually use it for seeing if my skillet is up to heat, but it is also good to see if the blacktop will burn the paws of my dog. It’s also a lot of fun to play with at night. It is an Industrial Infrared Thermometer and is about $50.
- If you can only buy one, buy the Infrared Thermometer.
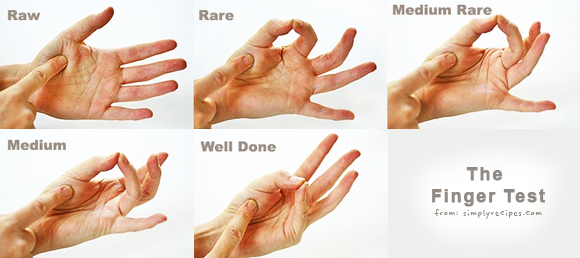
- If you ABSOLUTELY can’t afford to buy one, here is a way that you can test your meat reasonably well. Use the finger test. This wonderful photo is from WattaLyf.
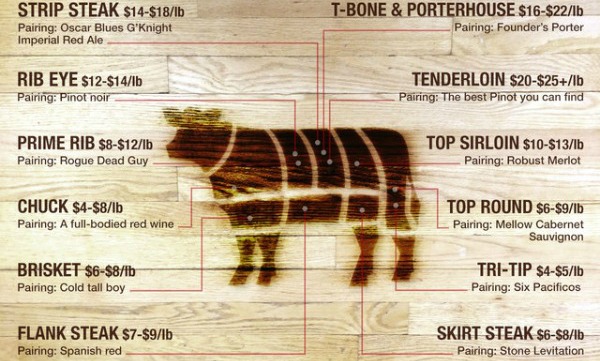
This graphic is from Food Beast
Click for an enlargement.
Notes about cuts of meat
- Boneless Rib Eye-more fat, more flavor
- Ribeye – more marbling and more flavor
- Filet Mignon – very tender, but not as much flavor
- Porterhouse-filet
- Del Moneo – no filet
- Tenderloin-most tender
- Sirloin-good for grill
- London Broil-top round
- Flank Steak-marinate 24 hrs & grill – Fairly lean and needs fat
- Brisket-first cut-slow cooker
- Brisket-second cut-fat-hamburger
- Top Round-good for oven roast @ 350
- Bottom Round-pot roast-slow cooker
- Skirt steak – outside chest toward ground – thougher
- Hanger steak – behind skirt steak – much more tender
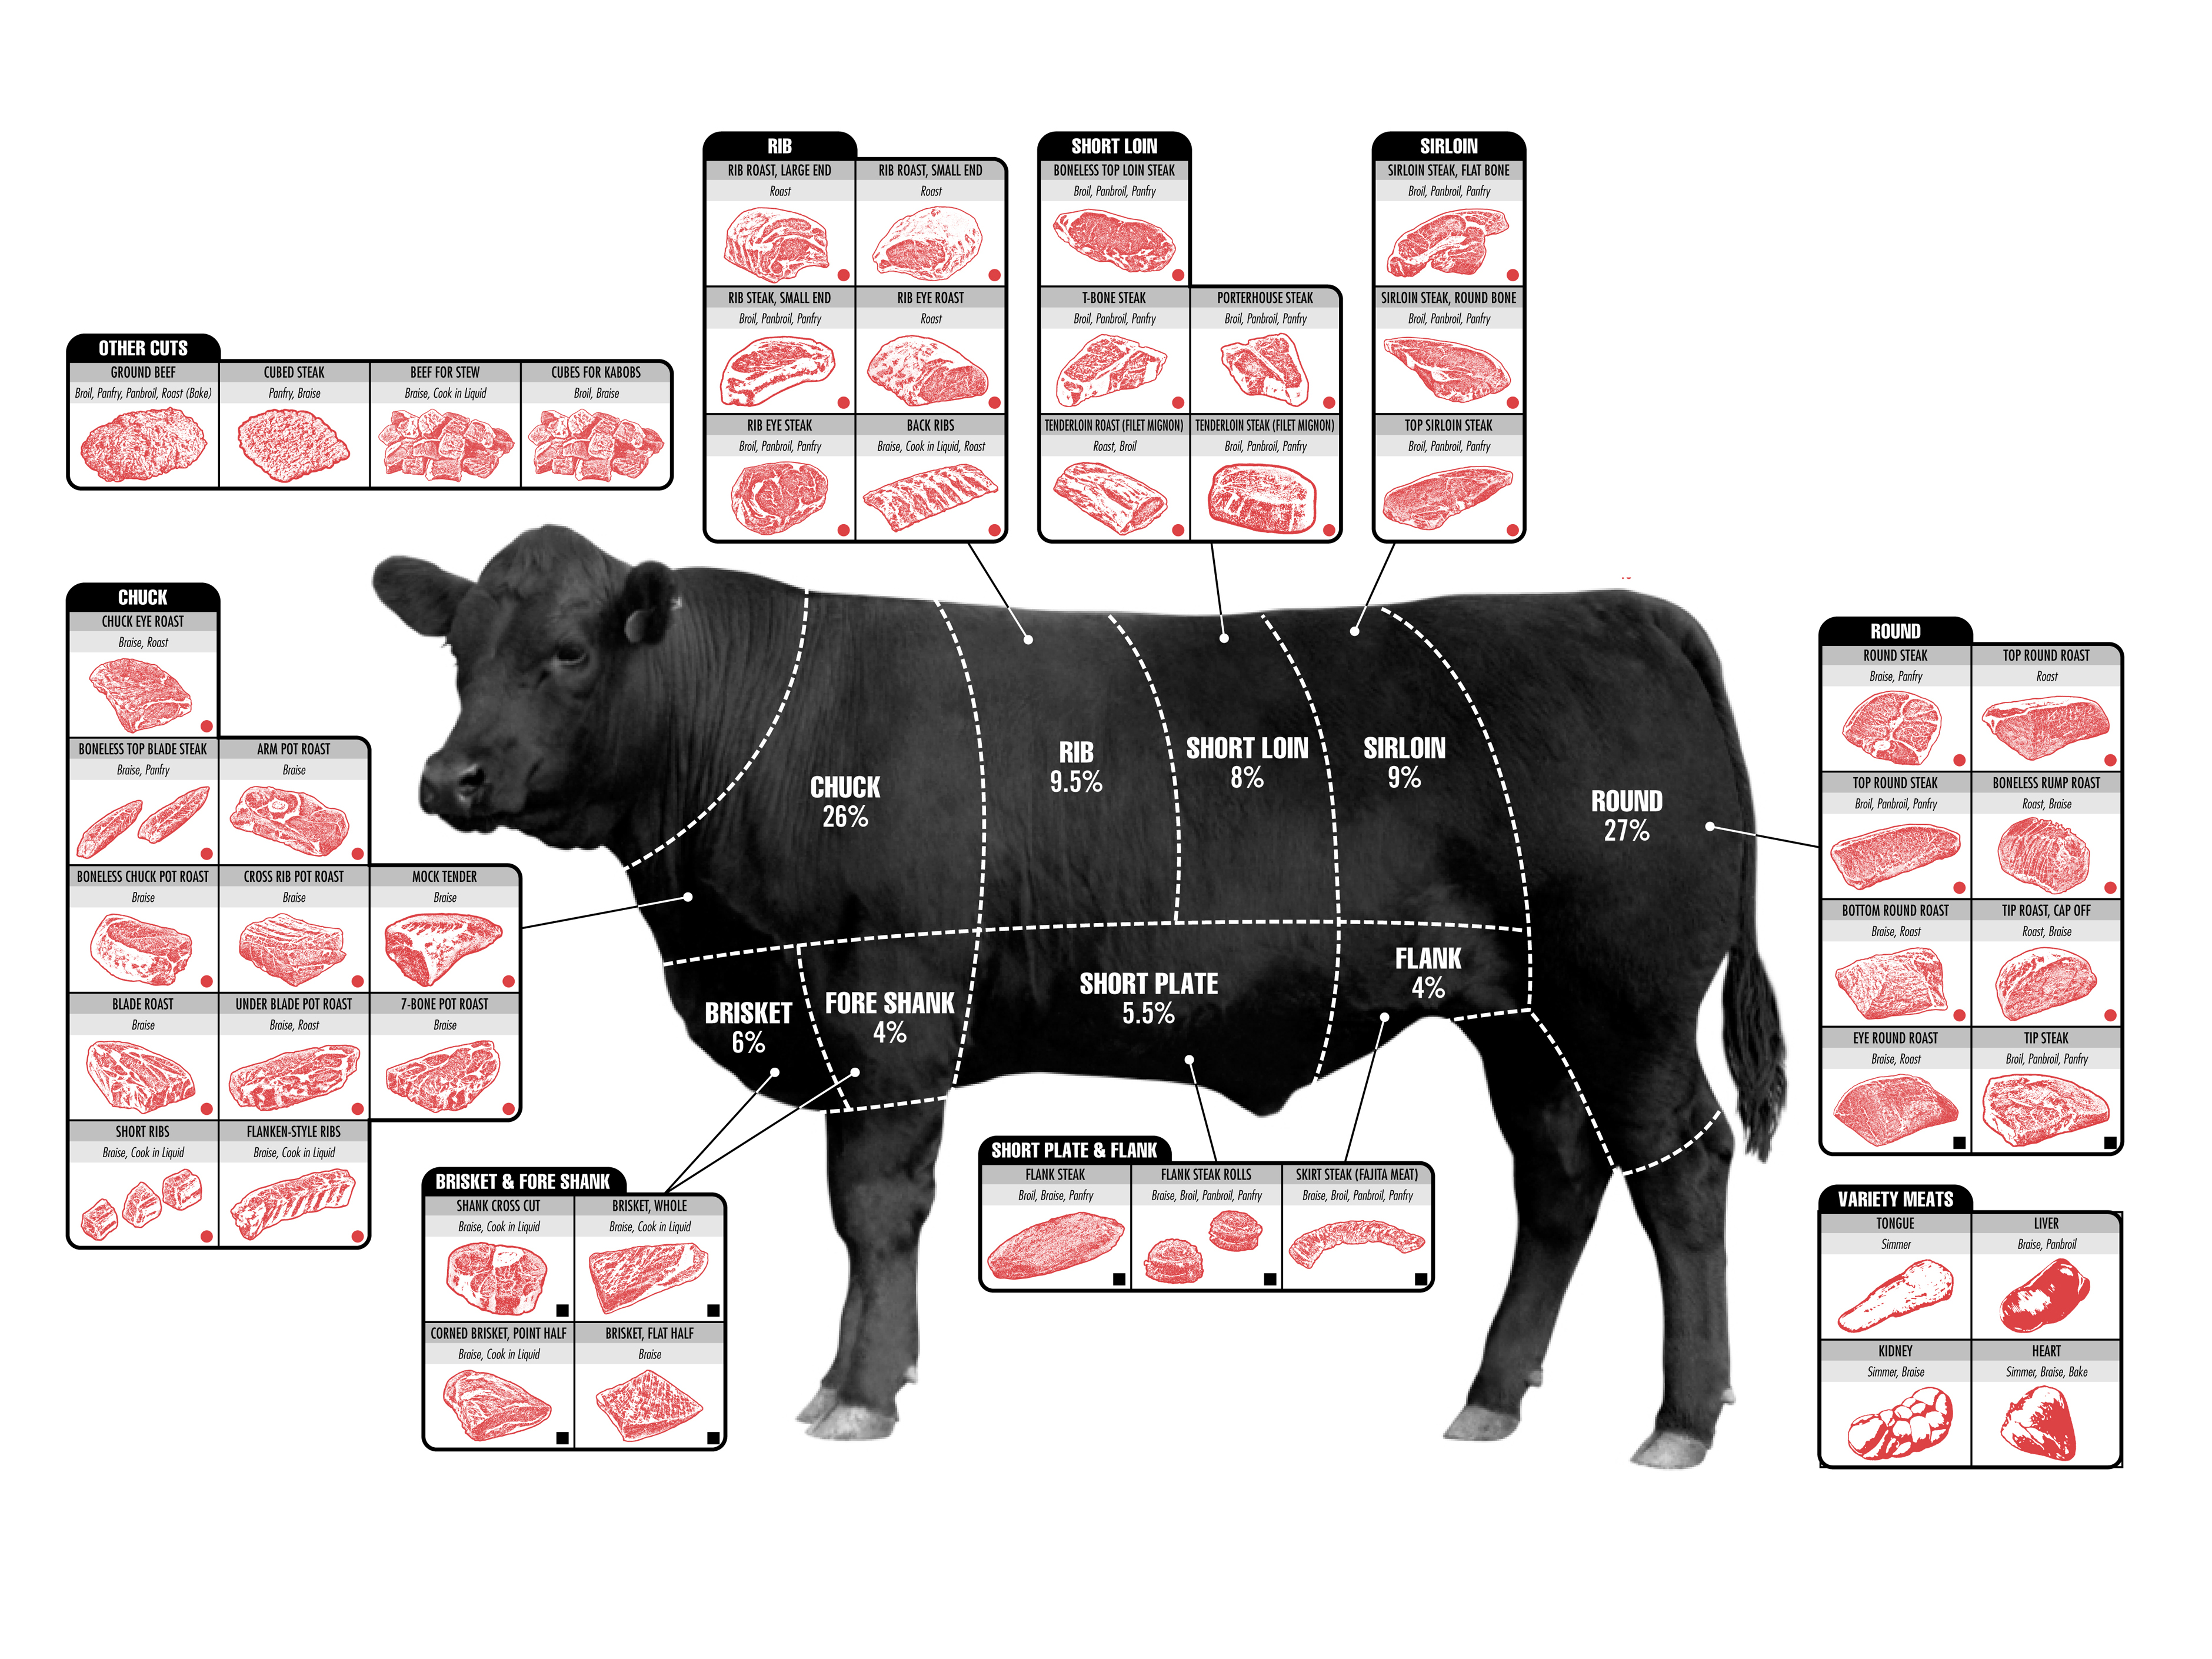
Here is another good chart. Click to read the details.
Tips: Avocado
Purchasing Your Avocado
- When selecting an avocado, if you are planning on eating it right away, get one from which the stem falls off easily, but is still somewhat green underneath. If the underneath has turned brown they are overripe. If the stem does not come off, it is good to sit on your counter for a few days until it ripens.
- If you can only find an unripe avocado you can have it ripe by tomorrow if you place it in a bag with a banana and let is rest for 24 hours. The gas produced by bananas ripen produce. Because of this, don’t store bananas with your fruit if you don’t want them ripened.
Peeling, Slicing and Dicing Your Avocado
- Halve the avocado. You may have seen people hack the seed with their knife. Be very careful if you do this, because it is very easy to get your finger too.
- I prefer to slightly squeeze the avocado, and the seed will nearly pop out.
- You can score the avocado right in the skin, then just scoop it out with a spoon. Here is a video by Expert Village.
 If you are making a lot of guacamole, after you halve the avocado, press it through a bread drying rack that has metal struts going both directions creating a grid. Just press the avocado through this into a bowl.
- You can also scrape an avocado against the side of a glass. Here is a video by Crazy Russian Hacker.
Misc Avocado Information
- I am from Ohio. Back east avocados are called mangoes. Bell peppers are also called mangoes. Here in Arizona mangoes are called mangoes, avocados and called avocados and bell peppers are called bell peppers.